#genshin guide
Text
hey Genshin artists! i've got a tip for you!
TL;DR: In the current Fayz event in Genshin, on PC you can use the walking stance during time-freeze to "tick forward" time in tiny steps without cancelling the current animation. This can be really helpful for getting good reference photos with unique angles in each snapshot!
I'll be reblogging this post with a more detailed explanation and extra photos, but for this post I'm keeping it short and showing one set of images with instructions.

One note, though: you have to re-toggle walking after each time you "move". So the sequence is like this: Freeze time, take a photo, toggle walking, tap a movement key to unfreeze time, and repeat. You have to toggle walking each time you do this, because after each freeze/unfreeze, you're put back in the default running state.
#genshin impact#genshin fanart#genshin guide#genshin#I'm not sure what else to tag this with x-x#but please reblog this (and maybe the extra explanation & images too!) if you do find it helpful!!#This can be a great way to get lots of nice reference photos for gesturing drawing in a very short amount of time#and since you can adjust the camera it gives you more control than if you do something like pause and go frame-by-frame through a video#I hope this reaches enough people before the event ends cause we only have 6 more days or so#but this is such a good opportunity for artists that want the benefit of cool references from Genshin that fit exactly what they want
20 notes
·
View notes
Text
new to genshin and confused? here's what EVERY character does! || p7 - hydro

Here, we are, the final part of this series! For those of you who are new, welcome to the series where I explain what every character does in simpler terms than those essays hoyo keeps writing
The final part is Hydro and honestly the only reason I did it last was because I was trying to figure out how to rewrite some of the abilities in only 2 sentences (for anybody curious, that's my process for making these since if i let myself go any longer it will end up waaaay too long)
Too see my previous posts in this series, i'll link them at the end of this one
let's begin!
╰┈➤ 4 stars
Xingqiu (Support/Off-field damage)
❥ Skill: Deals Hydro damage and creates rainswords that orbit your character. When your character takes damage, a rainsword will break, heal them (from passive), and reduce the damage that was taken
❥ Burst: Deals Hydro damage and creates an effect. Under the effect, your characters' normal attacks will trigger sword rain attacks that deal Hydro damage and the number of rainswords you have will always be at maximum
❥ Roles: Off-field Hydro application, Off-field damage
❥ Damage scales off of: Attack
❥ Healing scales off of: HP (not recommended to build him with HP)
Barbara (Support)
❥ Skill: Deals Hydro damage and creates a loop around your character that periodically heals them and applies them with Hydro. The loop will apply Hydro to enemies it touches and during its duration, Barbara's normal attacks will heal all of your characters
❥ Burst: Heals all of your party members
❥ Roles: Healer, Budget Hydro character in bloom teams, Charged attack DPS (mainly a meme build but can actually be decent)
❥ Damage scales off of: Attack
❥ Healing scales off of: HP
Candace (Support)
❥ Skill: Tap deals Hydro damage and if used at the moment she is attacked, deals Hydro damage equal to that of a fully-charged hold skill (from passive). Hold creates a barrier that, when destroyed or released, causes her to deal increased Hydro damage
❥ Burst: Deals Hydro damage and grants your characters a Hydro infusion and an increase to the elemental damage dealt by their normal attacks + an additional increase to this based on her HP (from passive). When you switch characters, a wave will be unleashed dealing Hydro damage (max 3 triggers)
❥ Roles: Hydro infusion, Off-field Hydro application (at C6), Hydro DPS
❥ Damage scales off of: HP
❥ Buff (from passive) scales off of: HP
╰┈➤ 5 stars
Mona (Support)
❥ Skill: Creates a taunt that continuously deals Hydro damage in a small AoE and additional Hydro damage when it expires. Holding the skill will allow Mona to dash back quickly before creating the taunt.
❥ Burst: Deals Hydro damage and applies a bubble to enemies that can immobilize weaker enemies. When an enemy with the bubble takes damage, it will be destroyed to deal Hydro damage and cause the enemies to take increased damage for a short duration
❥ Alternate sprint: Mona becomes water and can move around quickly, applying Hydro to enemies she hits when reappearing. If she is in this state for at least 2 seconds before reappearing, she will create a taunt with less duration and lower damage than that of her skill (from passive)
❥ Roles: Damage buffing, Off-field Hydro application, DPS
❥ Damage scales off of: Attack
❥ Buff (from passive) scales off of: HP
Childe (DPS)
❥ Skill: Enters a melee state where his normal and charged attacks are executed with dual blades and deal Hydro damage. Hitting a marked opponent in this state will cause a small shockwave of Hydro damage to be released.
❥ Burst: In his ranged state, he will deal Hydro damage, refund some energy, and mark opponents that were hit. In his melee state, he will deal Hydro damage, trigger a Hydro explosion on marked enemies, and clear any marks
❥ Charged attack: A fully-charged aimed shot in ranged mode will apply a mark to any non-marked enemies it hits and deal 3 hits of Hydro damage to any marked enemies it hits. Defeating a marked enemy with any attack unleashes a Hydro explosion that marks any enemies it hits
❥ Roles: Hydro DPS, On-field Hydro application
❥ Damage scales off of: Attack
Kokomi (Support/DPS)
❥ Skill: Deals Hydro damage and summons a jellyfish. The jellyfish will periodically deal AoE Hydro damage and heal your active character
❥ Burst: Deals Hydro damage and enters a state that increases her normal/charged attack damage and allows them to heal all of your character when they hit. It will also allow her to walk on water and will refresh the duration of her Jellyfish if it is present when the burst is cast (from passive)
❥ Passives: Kokomi's crit rate is permanently decreased by 100 but her healing bonus is increased by 25%. In her burst's state, normal/charged attack damage will additionally be increased by her healing bonus%
❥ Roles: Healer, Off-field Hydro application, DPS
❥ Damage scales off of: Attack (Skill), HP (Burst)
❥ Self-damage buffs scale off of: HP, Healing bonus
❥ Healing scales off of: HP
Ayato (DPS)
❥ Skill: Deals Hydro damage and enters a state that causes his normal attacks to become quick slashes of Hydro damage which can be automatically preformed by holding attack. When these slashes hit, Ayato will gain a stack that increases their damage
❥ Burst: Deals Hydro damage and creates a field. The field will continuously rain down Hydro damage and increases the normal attack damage of characters within it
❥ Roles: DPS, On-field Hydro application, Off-field Hydro application
❥ Damage scales off of: Attack
❥ Damage increase from stacks scale off of: HP
Yelan (Support/Off-field damage)
❥ Skill: Moves swiftly and marks enemies with a lifeline that explodes when the movement ends, dealing Hydro damage. By holding, Yelan moves swiftly for a short duration and is able to control the direction of her movement
❥ Burst: Deals Hydro damage creates an effect that unleashes coordinated Hydro attacks when your characters use normal attacks or when her skill deals damage. During its duration, the effect will continually increase the damage dealt by your active character every second, up to 50%
❥ Charged attack: After spending 5s off-field, Yelan enters a state that allows her next aimed shot to fire a quickly-charging arrow that deals AoE Hydro damage. After using her skill, each enemy hit grants her an additional chance to enter this state
❥ Roles: Off-field damage, Off-field hydro application, Damage buffer, DPS (mainly at C6)
❥ Damage scales off of: HP (including special charged attack)
Nilou (Support)
❥ Skill: Enters a state that allows her to unleash 3 dance steps that unleash waves of Hydro damage either by pressing her elemental skill or normal attack. If the third dance step is a normal attack the state will be extended and if it is an elemental skill, create an aura around your character that allows them to apply Hydro to enemies that come into contact with it.
❥ Burst: Deals Hydro damage and marks enemies hit with an effect that will explode after a short duration, dealing another hit of Hydro damage
❥ Passives: If you only have Hydro and Dendro characters, the third dance step of her skill will cause your characters to enter a state that turns any bloom cores created into "bountiful cores" that explode more quickly with a larger AoE. The damage of these cores is increased by Nilou's max HP (9% for every 1k HP she has over 30,000, max 400%)
❥ Roles: Bloom team enabler
❥ Damage scales off of: HP
❥ Bountiful core DMG increase scales off of: HP
Neuvillette (DPS)
❥ Skill: Deals Hydro damage and creates 3 droplets that will heal him when absorbed by the charging of his CA
❥ Burst: Unleashes 3 waves of Hydro damage and creates 6 droplets that will heal him when absorbed by the charging of his CA
❥ Charged atttack: Unleashes torrents that continuously deal Hydro damage to opponents in an area in front of him and drain his HP. This attack must be charged up first for a short duration that can be sped up by absorbing droplets (He can move around/rotate both while charging and unleashing this attack)
❥ Passive: Triggering a Hydro elemental reaction grants him 1 stack that increases his charged attack damage. He can have up to 3 stacks but each specific reaction can only grant 1 stack
❥ Roles: DPS, On-field application
❥ Damage scales off of: HP (Skill, Burst, Charged Attack)
❥ Self-healing scales off of: HP
Furina (Support/Off-field damage)
❥ Skill: If she is in her Ousia state, deal Hydro damage and summon 3 salon members that, for a set duration, will automatically attack enemies to deal Hydro damage and drain the HP of your characters. If she is in her Pneuma state, summons a singer that, for a set duration, periodically heals your active character
❥ Burst: Deals Hydro damage and grants all of your characters an effect that gains stacks when your characters' HP change. Under the effect, your characters' damage and healing bonus are increased based on the number of stacks you have.
❥ Charged atttack: Deals AoE physical damage and switches her Arkhe alignment, immediately changing the effect of her skill (if it is currently active, her summons will immoderately change). Furina's default alignment is Ousia.
❥ Roles: Damage buffer, Off-field damage, Off-field Hydro application, Enables 4pc Marechausse Hunter on many characters
❥ Damage scales off of: HP
❥ Healing scales off of: HP
OMG WE'RE DONE?? I'm honestly so proud of myself for actually sticking with this lol. I hope you found this guide helpful!!
Since this is the final part of the series, I guess i'll touch a bit on my process.
Each of these posts takes maybe, 30 minutes? It got a lot faster with each new one since I got a bit more used to it. Now, I unfortunately don't touch grass so I already know what every ability does but as I wrote I would always cross-reference with the game. This was mainly to make sure I wasn't misremembering anything or leaving parts out but sometimes I also used it to figure out how to word things.
As I stated at the beginning, my main goal with each ability is to sum it up in 2 sentences or less. This was pretty easy for some but I honestly think this limited me a bit in others and maaay have caused me to overuse commas (i love using commas lol). For some more tricky kits I worked around this by including separate sections for some passives although this was mainly used as a way to highlight significant parts of a character's kit that weren't from their skills.
For anybody curious, here's what I think were the hardest kits to do from each element (i'm also using this opportunity to link each previous post)
Cryo - Freminet, but Eula's burst is pretty close
Pyro - Honestly none of them were that difficult but if I had to choose one it might be Lyney because his kit has a lot of different parts to it. Dehya was also a bit tricky but mainly when it came to wording things
Electro - Definitely Raiden. Her burst just does so many things that it was hard to squeeze them all in. The main issue with it was the part about her stacks since they are decently important but I feel like they kinda got squished in awkwardly at the end. As I was writing it I honestly felt like they seemed more like a passive than a feature of her burst
Dendro - Nahida. Looking back on it I think I was able to break down each component of her kit pretty well but writing hers felt overwhelming. There is just a lot going on in her kit especially with the different interactions her burst has
Geo - Probably Itto. I went into it feeling pretty confident but explaining his stacks got quite tricky. I knew beforehand that Ushi getting hit would give him stacks but I didn't know the exact other skills that would give him them. So as I read his kit to double check, I had to figure out a way to squeeze in mentions of the other ways to get stacks. While writing it and honestly while writing this, I feel like I almost could have left out the details as to what gives him stacks? Like imo it isn't necessary to understanding his kit and general playstyle but not having them in felt like I was leaving a major part of his abilities unexplained. I think he would have benefited the most from having a stacks
Anemo - OK FIRST OFF REREADING THE POST TO CHECK WHAT I WROTE FOR EACH CHARACTER I REALIZED I FORGOT TO CHANGE KAZUHA'S NAME TO WANDERER WHEN I COPY PASTED THE TEXT AS A TEMPLATE LMAO. I just fixed it now so i hope nobody noticed lol. Speaking of him, he was probably the most difficult. Squeezing in every part of his special state was quite tricky which is why I didn't mention points and instead referred to it as duration
Hydro - Despite what you may think, Nilou actually wasn't that hard. I think I struggled the most with Childe because riptide just does a lot of things in a lot of different ways. Other than that, wording Neuvilette's charges attack was a bit hard
Thank you for supporting me throughout this series!! Seeing every like, reblog, and comment genuinely makes my day because I get to see how people actually care about what I do and I love knowing that i've helped ya'll out!!
For anybody finding me through this post/series and wanting to know what i'll be making next, my next two posts will probably be talking about each traveler variant and then talking about all the characters that can be obtained for free
I also want to make content that isn't strictly aimed at begginers so I plan on making some account-improvement advice (my account used to be a disaster so hopefully i can use that experience to help) and maybe talking about every artifact set?
that's all for today! Remember to drink water, go outside, and take a break from the screen every once in a while!!
#genshin impact#genshin ask blog#genshin guide#genshin help#genshin impact advice#genshin#genshin advice#new to genshin#genshin hydro#kamisato ayato#genshin ayato#neuvillette#neuvilette genshin#genshin furina#furina de fontaine#furina#fontaine#focalors#yelan#genshin yelan#yelan genshin impact#childe#tartaglia#childe tartaglia ajax#childe tartagalia#genshin tartagalia#mona megistus#genshin mona#sangonomiya kokomi#kokomi
25 notes
·
View notes
Text
Newbies who've arrived on Genshin since it blew up/started trending complaining abt the cut scenes: Is there a way to tell a player is new here without them saying they're new here?
Seasoned veteran player here since the start, you just gotta babe. Not everyone wants to know about the lore or the characters, but that doesn't make it a Bad game.
I've recently seen people complaining about being bored, yet all they focus on these days is repeating the same domains, and commissions every single day then exhaust themselves and log out after focusing only on primos and using up resin without doing all of the many other things to do in the game.
If you play it for just primo farming, or the marketed method of playing (because yes, it is designed to also convince you to spend money), it's going to become boring.
I've been playing for about 2 and a half years, most days and I get a lot out of doing ALL KINDS of things, and I certainly don't spend all that much time forcing myself to burn out doing only domains and suchlike, I like cooking actually quite a lot!
There's Genius Invokation TCG, a card game, to play either against characters or friends in The Cats Tail.
There's world exploration.
Farming ingredients, low-key relaxing activities, and beautiful scenery as well as music to enjoy in different places you visit. You can collect CDs for your Serenitea Pot.
There's your teapot world designing, where you can build your own home and customise it with so many different items, furniture, plants, and you can even raise your own garden to make farming plants quicker.
There's mini games pretty much every event, and you can access most events now with Quick Start, which is only pretty recent. You think now is annoying. Back when we were at it for ages, you simply had to finish ur damn quests. 😭
Food shopping, quick pick ups around all the cities or secret vendors around Teyvat.
Random chatting to the NPC civilians is often missed out, but you can just have pleasant conversations with them and some random ones give you presents for interacting with them.
There's flying challenges.
Check out the blacksmith and make your own weapons instead of only the crystals constantly. It can be quite nice to know you collected stuff to forge your own weapon set even if they're not the strongest weapons.
There are SOOOO many different puzzle games in every corner of the world to tackle if you want something to really stimulate your brain, plenty of which are pretty hard if you find some too easy. This unlocks their own set of rewards after, but if you enjoy a good puzzle, check out the locations of some. There are plenty in Inazuma, that's for sure.
Feeling irate but too stressed to domain? Idk, go whack some trees in the forests and farm lots of wood for building furniture in your teapot! You can convert things in there as well if you have loads of a certain item hanging around you don’t use.
There's hidden achievements. You can take the time running around, or just Google their locations. Some are fun. But it takes a break from the usual daily grind. And that’s the point, it should just be a grind unless you want to grind out a lot of reruns etc.
They also introduced fishing. Fish is hard to come by or isn't, depending on how much you swim or where you spend a lot of your time in Teyvat. Fishing added the ability to rest and catch all kinds of variety of fish. You can collect certain types, certain bait, and build up your fishing kit. It's a fun pastime for some, and feeds you if not anything else!
There's secret locations, caves, islands, gorgeous discoveries to be had in difficult to reach places but it pays off, and if you truly into Adventuring, this could be a fun kick to try getting to these special areas.
Co-op mode can be used to socialise, role-play, and hang out or help your friends, but it doesn't have to ONLY mean grinding domains together just for stuff, over and over again and again. I think the monotony and boredom have come from everyone desperately farming ALL the time against their will so they can have the best weapons or get favourite characters, and they feel there's no time to do anything else, or they actually don't have time to do anything else after all that if they work etc.
Hell, sometimes I just Zone out swimming around in the gorgeous waters in random areas and look around. I think I've enjoyed the game for so long without it losing its spark, as I've just done whatever felt good, and it's a really wonderful game playing it without stress like that. If it’s boring, or a currently uninteresting task? I give it a miss this time.
I don't have the best kit by any means, but I have lots of cool characters I love anyway. But I play it for peace and an escape, pushing to do the stuff we are tbh sometimes rushed to do.
If anyone has any more interesting alternative things to do in Genshin Impact, please add!
#genshin impact#genshin#genshin gameplay#genshin tips#genshin landscape#genshin impact community#genshin help#genshin world quest#genshin farming#genshin guide#genshin graphics#genshin impact forum#genshin impact posting#genshin posting#gi#gaming
20 notes
·
View notes
Text

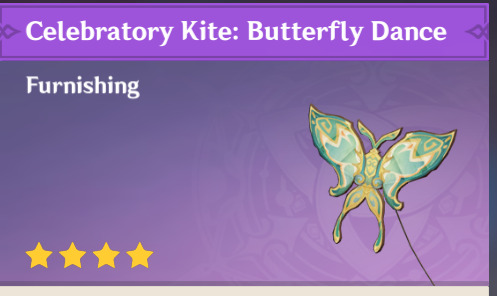
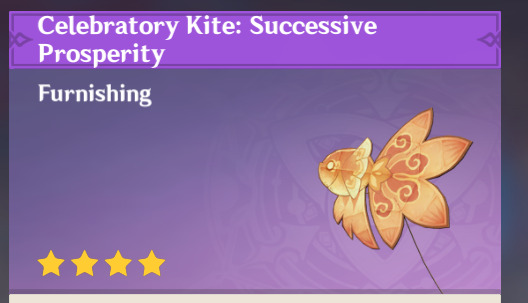

Buy these beautiful kites here for mora from Zhenyuan

Play the web event Dancing Beasts and Soaring kites on Hoyolab to get this tea house
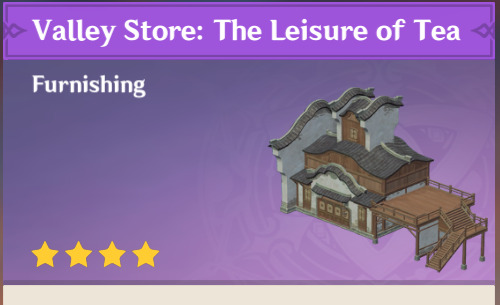
Then all the other rewards are obtained through the main Lantern Rite quests like the bumping tigers game for these


These are huge!
Don't forget to also pick up Xingqui's free outfit and a free 4 star from Liyue of choice but this is all the main quests but some of these furnishing are pretty hidden
5 notes
·
View notes
Text

MY THOUGHTS ON THE FONTAINE ARCHON QUEST
I just finished the Fontaine Archon Quest, and I have some thoughts. More under the cut!
Warning: contains spoilers for the story.
QUEST BREAKDOWN
Chapter 4 Act 1 - Prelude of Blancher and Noirceur
The first act is quite short, and flows very smoothly, in my opinion. We are first introduced to some of Fontaine's characters, the most import ones being the twins, Lyney and Lynette. The storyline is good, but we're also introduced to the basic way things work in Fontaine.
I like the end of this act the most, I think. Lyney's big performance is really, really good - and it has the perfect shock factor once the rope snapped. I love guessing plot twists, but I genuienly couldn't figure this one out!!
Honestly, I didn't expect death from Genshin. I know we've had characters dying multiple times before, but never like this! Although he wasn't that important to the story, it still quite shocked me. (My mouth was agape for like 5 minutes after, lol)
Chapter 4 Act 2 - As Light Rain Falls Without Reason
The second act is pretty short too. It didn't feel dragged out and with lots of unnecessary dialogue (yeah, I'm looking at you, Sumeru). The most important character is definitely Navia here.
The story is good and well thought-out. I liked how they solved the missing women case. That part where the Oceanids/women came for Vacher was so scary tho?? Like they just casually dropped that he lost his soul. What.
Chapter 4 Act 3 - To The Stars Shining
The begining of act 3 was a little fast-paced, considering that we found out Childe was missing and everything.
Neuvillette looked so good tho😻
I like how they designed Fortress of Meropide, yet I don't understand certain important things. For example, how is the fortress' entrance at the Opera Epiclese, yet it's actually in the sees under the Liffey Region? Strange if you ask me. I love the steampunk vibes, tho!
For me, this part of the archon quest was the most boring and most dragged-out one. For the majority of the quest you are either working, investigating or sleeping. And literally nothing else. It really annoyed me that we manually had to return to our bunk to sleep!
Chapter 4 Act 4 - Cataclysm's Quickening
The first half of this quest - up to the point we talk to Wriothesley - is also very boring to me. Nothing significant happens. I feel like they could've done without this part.
Much is explained in this act, including the reasoning behind Fountaine's prophecy and it's eventual downfall. The storyline with the boat wasn't bad, and I liked how some characters liked Wriothesley while the others didn't - he also seemed like such a villain when Lyney thought he kidnapped Lynette.
We meet with Arlecchino, which was a much less significant character in the storyline than I thought she was going to be. The gnosis is mentioned only like, 5 times in the entire quest, and The Knave is about the same amount, too. I'm not saying that's bad, we are just used to the Fatui being the main problems in these Archon quests.
Chapter 4 Act 5 - Masquerade of the Guilty
This act was... Wow. What an end to this chapter of the quest. I mean, so many things happened! It was a rollercoaster of emotions. First of all, I was so sad when Navia's friends died. So much death in this quest!
The trial against Furina was painful to read. Her attitude is just so infuriating, yet the whole thing is really really interesting and the story is, as always, so great! It was such a shock when the Hydro Archon was sentanced to death!
However, Focaloros' plan was brilliant and I have to say, I underestimated her as an Archon. At first, I was a little sceptical on how she was one of The Seven, but I get it now. Also, I'm very sad that she's dead. Her sentance was so unfair to her, yet she did what was right for her people and I respect that.
Neuvillette was amazing in this part of the story, as well. I'm glad that he has the Hydro Archon's power now.
QUEST SUMMARY
new characters we met:
5 ☆ Lyney (bow, pyro): good character, a very concerned brother. he lied to us but for a good reason - turned out he's in the Fatui.
4 ☆ Lynette (sword, anemo): quiet, reserved, an assistant to Lyney.
4 ☆ Freminet (claymore, cryo): same as Lynette, but more shy
5 ☆ Navia (claymore, geo): passionate, brave and adventuristic. she runs a major organisation called Spina di Rosula. during the quests she turns into a real friend of us (plus she looks like Taylor Swift in the fearless era!!)
5 ☆ Neuvillette (catalyst, hydro): 😻😻😻. I'm in love. Literally. I'm so thankful the Genshin team desided to give us more very handsome men in Fontain. he's also a great character, and wields great power. (currently saving up primogems for him)
5 ☆ Furina (sword, hydro): might be an unpopular opinion, but I HATED her character. she's obnoxious, she's self-centered, and while I know it's only to put on a show for her citizens, I still don't like her.
5 ☆ Wriothesley (catalyst, cryo): I'm actually lucky enough to have Wriothesley in my team currently, and honestly, I really recommend him as cryo!!! I love his play style, and he's just been fitting into my team so well! aside that, i really like his personality as well. he's a bit playful and sure, just a tiny bit cocky, yet still sweet.
4 ☆ Charlotte (catalyst, cryo): a very annoying character to me as well. she's too pushy for my taste.
new info we gathered:
Lyney and Lynette are working under the House of Hearts, a Fatui organization based in Fontaine.
the "father" of their house is Arlecchino, the 4th of the 11 Fatui Harbingers, who's been sent to Fontaine to take the Hydro gnosis
Even though used as a punishment, the Fortress of Meropide is a separate institution from Fontaine's justice system and oparates separately. The "leader" of the fortress is Wriothesley, an ex-criminal.
Neuvillette is the hydro dragon sovereign.
Furina isn't the actual archon - she's the cursed human version of Focalors, placed on Teyvat for the last five hundred years to display the image of an archon. After Focalors' death, she turned into a normal human, and will continue on to lead a normal life.
Focalors, the true archon, served a death sentance to be able to save her people from the terrible prophecy. She left all of her power to Neuvillette.
Neuvillette gave the gnosis to Arlecchino as a gift, showing once again no resistance to the Fatui harvesting these materials.
Our next destionation is Natlan, the pyro nation. We learn from Neuvillette that Natlan is a country of war and dragons.
As for our sibling, we have learned nothing new. (Shocking, I know)
All in all, Fontaine is a beautiful new region which I cannot wait to explore fully. I think that the genshin team really outdid themselves (yet again). The story could have been changed just a tiny bit (were 5 acts really necessary?), but nevermind. We've got amazing new characters which I'm glad to play with, and a new little piece to the giant puzzle we call Genshin Impact.
Thanks for reading! Hope my guide helped. Follow for more!!
#genshin impact#genshin impact quests#fontaine#genshin impact fontaine#genshin fontaine#archon quest#hydro archon#hydro nation#fontaine archon quest#genshin lyney#genshin lynette#genshin wriothesley#genshin neuvillette#genshin navia#genshin furina#genshin charlotte#my opinion#genshin guide
4 notes
·
View notes
Text
Nilou Build Guide

It’s been a while since I’ve made a guide like this. I took a hiatus from the game but I’m back and very excited to see that Nilou has grown quite a bit in popularity! Since her banner just reran and Nilou has a very unique kit I thought I’d take some time to write up a guide for her!
When I stopped playing in 3.2, Nilou and Nahida had just dropped, and people were still getting used to Dendro as an element. Now in 3.6 Nilou Bloom is one of, if not the single most popular abyss teams in the game - and for good reason! If you’re thinking of pulling for Nilou or already have her and looking for ways to build her I hope this guide can help!
Role
Nilou is an extremely unique and complex unit due to her very intricate elemental skill and Ascension 1 passive talent “Court of Dancing Petals.” There’s a lot to break down in the mechanics of Nilou, but the short version is she enables the absolute crap out of the Bloom reaction. Also, for her kit to work as intended, she can only be paired with Hydro and Dendro units. This was a big reason that Nilou wasn’t as popular on her initial release, since we only had 3 playable Dendro units at the time, none of which were healers or optimized for bloom.
Now we have Nahida, AlHaitham, YaoYao, Baizhu, and Kaveh. All of these characters slot extremely well into a Nilou core and allow more flexibility within the team comp.
Nilou is niche, but for good reason. She makes bloom so EZ mode that it wouldn’t be balanced in burgeon/hyperbloom comps and there’s more than enough reaction damage from bloom that you don’t need other elements to clear high level abyss floors. I also think that while Nilou is complex, she’s very forgiving in her damage output. So even if you’re a new player and can’t farm good artifacts/have no idea what you’re doing she’s still consistent with her personal hydro damage.
———————————————————————
Kit Breakdown
The in game description for Nilou’s kit is probably the most wordy in the game. I’ll try to make it as simple as possible:
Auto Attacks
Nothing fancy here. Standard sword user but you’ll only ever be using her auto attacks during her dance which is explained under her Elemental Skill.
Elemental Skill
Nilou’s elemental skill (E) is a “dance” in which she uses auto attacks (A) or the skill button (E) to preform different “steps.” Nilou can preform 3 “steps” in her “dance.” The last step of her dance will have a different effect depending if you end it with (A) or (E). If the dance is ended with an auto attack (A): Nilou’s attacks will be converted to hydro for a duration and every third hit will deal AoE hydro damage. If the dance is ended with the elemental skill button (E): Nilou will create a Ring of Tranquility, which remains around the active character and rapidly applies the wet status in its AoE.
In simple terms you have two options when ending her Dance. You can remain on field and deal Hydro DMG with her attacks or set up the Ring of Tranquility and swap to different characters. 9/10 times you’ll pretty much always do the latter and set up Ring of Tranquility, as it allows her to enable quick swap playstyle and apply hydro while off field. But it’s nice to have flexibility as both on and off field unit!
Regardless what step you end the dance with Nilou’s Ascension 1 Passive, “Court of Dancing Petals” will activate. I will explain this passive in more detail below.
All of the damage associated with Nilou’s Elemental Skill scales off of her Max HP.
Elemental Burst
Her burst is much more simple, she deals AoE hydro damage around herself and marks enemies hit with a flower that then deals additional hydro damage after a duration.
All damage in this manner also scales with Nilou’s Max HP.
Passive Talents
Ascension 1 - Court of Dancing Petals
Upon use of the third step in Nilou’s dance: When the party consists of only the elements Hydro and Dendro, all Dendro Cores created from the Bloom reaction (Dendro + Hydro) instead become Bountiful Cores. Bountiful Cores rupture immediately and deal greater damage over a larger AoE. It’s basically Bloom on steroids.
Ascension 4 - Dreamy Dance of Aeons
Math time. For every 1000 HP points Nilou posses above 30k, Nilou increases the damage of all bountiful cores, including cores she did not make, by 9%. The maximum increase from this effect is 400%, meaning it caps at 77.5k max HP.
This passive along with the fact that of all her personal hydro Dmg scales off of HP% means you want to stack HP% as much as you possibly can.
————————————————————-
Build Overview
In General, you want as much HP as physically possible on Nilou as well as some EM to help boost her bloom Dmg. You’ll also want some ER depending how frequently you need to use her burst. In Bloom you do not need Crit stats since Bloom can’t crit. Shoot for the following stats depending on your level of investment:
F2P Stat Goals
50-60k HP (with Hydro Resonance)
200-300 EM (with Dendro Resonance)
110-120% ER.
Invested Stat Goals
70-77k HP (with Hydro Resonance)
300 EM (with Dendro Resonance)
120-130% ER
I’d say if you’re f2p you wanna shoot for at least 50k Max HP with hydro resonance and a stretch goal of 60k. It’s really hard to get more than 50k without her weapon, though. If you have her signature weapon then shoot for 70-75k Max HP. 77.5k HP is where Nilou’s A4 party buff caps but you do not necessarily need to max the buff due to diminishing returns.
Either way, ~200-300 EM is plenty of EM since her passive provides her such a large DMG bonus in place of EM. It’s totally fine to have more than 300 EM, but don’t sacrifice HP for it.
ER totally depends on how frequently you want to use her burst. 110-130% is plenty in most comps.
Level & Talents —————————
You definitely want to take Nilou to Lv90. The extra HP significantly increases the party’s bloom damage due to her A4 passive.
On the plus side, theoretically, you don’t have to touch Nilou’s talents at all since bloom damage isn’t affected by Talent Level. I do personally recommend at least taking her Skill and Burst to Level 6 though, since her raw Hydro damage is definitely nothing to sneeze at. If you plan to use her outside of bloom comps I’d take Skill and Burst to at least Lv9. There’s quite literally no reason to touch her auto attack talent at all.
Weapons ————————————
⭐️⭐️⭐️⭐️⭐️ - Key of Khaj-Nisut; Primordial Jade Cutter
⭐️⭐️⭐️⭐️ - Xiphos Moonlight; Toukabou Shigure; Iron Sting
No surprise, her signature weapon is absolutely busted on Nilou and if you have it you should definitely use it. It’s a massive HP stat stick and allows her to buff party EM based on her Max HP. Jade Cutter is good too since it also gives HP, but the crit is wasted in a bloom comp.
If you are f2p or just don’t have the Key, then Xiphos Moonlight, Toukabou Shigure, and Iron Sting are all great 4⭐️ options. Dark Iron Sword works too but the other options are just better.
Artifacts ———————————
Overall, Nilou is very easy to build bc HP is a common stat on artifacts. HP and EM are the most important stats with Nilou, with HP taking very high priority. You always want to run HP as the main stat on Sands, Goblet, and Circlet. 200-300 raw EM from sub stats is plenty, especially if you have the Key.
All this said, go with any of the following sets that achieve the goals I explained above:
2pc Tenacity / 2pc Vourukasha / 2pc Wanderer / 2pc Gilded / 2pc Flower of Paradise Lost
4pc Flower of Paradise Lost
4pc Vourukasha’s Glow
None of these sets are necessarily better or worse than the others. The 4pc passives from Flower and Vourukasha sets are both very useful but overall it’s better to have as much HP and EM as you can. Just go with whatever combination gives you the most HP and EM!
Constellations —————————
Nilou has very powerful constellations in c2 and c6, and her c1 gives her more uptime on her Ring of Tranquility. Despite the power level and QoL these constellations bring though, they are absolutely not necessary for her to function in her niche. She is a perfectly cracked unit at c0.
If you’re looking to roll on Nilou I personally recommend going for her weapon before going for any of her cons. The extra HP alone is reason enough and the party EM buff from the weapons passive is extremely clutch. Overall it just makes building her leagues easier. Beyond her weapon C2 is a hard stopping point imo. Only go for more cons after C2 if you just absolutely love her and want to maximize her fully.
———————————————————————
Team Comps
This section is pretty obvious when you understand how Nilou’s kit works, but Nilou is more flexible than people give her credit for!
Bloom
99.99% of time you will be running Nilou in a dedicated Bloom comp. This means she can only be paired with Dendro and other Hydro units in order for her A1 Talent to take effect. Her bloom comp options continue to expand as more Dendro units become playable. In general, you want consider the following in a Nilou Bloom Comp:
• Bloom rupture damages the active character. Nilou drastically increases the damage from rupture so a healer is absolutely necessary for survival, especially in abyss and if you’re driving with a squishy unit like Nahida. Kokomi and Baizhu are the premium options for this role but YaoYao and Barbara certainly work too. You can probably get around needing a dedicated healer with Kaveh and Xingqiu in the comp as long as Kaveh is the on field driver and you’re good with rotations. Ultimately, it comes down to personal preference and how comfy you want the team to preform.
• Hydro Resonance increases Nilou’s max HP by 20% which in turn increases the entire party’s bloom damage. Kokomi, Yelan, and Xingqiu are the preferred hydro units for this role. Kamisato Ayato is also very effective at applying Hydro in AoE but you’ll need good enough off field dendro app to maintain dendro core generation.
• Dendro Resonance is almost as necessary as Hydro Resonance imo. It provides extra EM party wide as well as more Dendro application. Nahida is the premium Dendro unit in the game and she is no exception here. Nahida is certainly not a requirement though! Literally any Dendro character outside of Tighnari works here (and even Tighnari is good enough to get the job done). Collei is really good here if you have constellations!
• Bloom ownership can be a bit complicated due to elemental gauge mechanics which is another post in itself entirely lol. To make it simple, in most bloom comps it’s safe to assume the hydro units will be the ones triggering *most* of the blooms, so you’ll want high amount EM on your hydro characters (Nilou being the exception especially if you have her weapon.) But, it’s likely that depending on rotations etc that everyone in the comp will trigger blooms to some degree. Nilou’s A4 helps with this as it increases bountiful core damage regardless who triggers the core, but it’s still something to consider. Whoever is triggering in the team comp needs to have a lot EM and be Lv90!
Non-Bloom Nilou?
It’s not her preferred comp for obvious reasons, but Nilou’s insane amount of HP scaling and hydro application definitely allows her flexibility in other teams outside of Bloom. You can slot her into really any comp where Hydro app is needed: Freeze, Electro-Charge, Vape and even Fridge/Hyperbloom/Burgeon. Just be aware she won’t reach her full potential outside of Bloom.
———————————————————————
Conclusion
Nilou is a very unique character and single handedly made Bloom one of the most, if not the single most busted reaction in the game. Despite her complex kit Nilou is surprisingly very forgiving in her playstyle and can preform well even if you don’t know what you’re doing. But if you do know what you’re doing she’s just straight up busted. Overall, she’s a very strong unit within her niche and I think she’ll only get better as more Dendro and Hydro units are added to the game.
As always I hope this guide was somewhat helpful! 🪷
8 notes
·
View notes
Text
I’m lazy and dumb, so I’m asking for Genshin team comps✨
Hello guys! I do love Genshin Impact and all of its characters! Ofc I really like the game, but I’m very bad at making team comps and very picky about the characters I want to play. So, there’s a little challenge and a big thank you ✨if someone does want to help me.
I have:
Albedo, Ayato, Bennett, Chongyun, Collei, Itto, Kaveh, Lisa, Mika, Nahida, Shenhe, Thoma, Venti, Xiao, and Wanderer.
Which comps can I do with only these characters? I don’t mind repeating anybody 😊 Just want to have some fun with characters I really care about.
#genshin impact#genshin headcanons#genshin#genshin aesthetic#genshin things#genshin thoughts#genshin talk#genshin characters#genshin spoilers#genshin tips#genshin help#genshin gameplay#team comps#genshin impact community#genshin guide#genshin impact forum#genshin impact posting#gi#gaming
10 notes
·
View notes
Text
youtube
Shield Strength in Genshin Impact is often misunderstood! I don't think the game does a good enough job of explaining all the mechanics that go behind shields. As a result, many players often misunderstand how the artifact set Retracing Bolide works.
In this video, I show and explain how exactly Shield Strength works, why the Retracing Bolide set is often misunderstood, and further hidden mechanics that affect shields in Genshin Impact!
#genshin impact#genshin guide#sevyplays#layla#send this to anyone asking about retracing bolide on layla#shield strength is weird in genshin impact#Youtube
14 notes
·
View notes
Text
About genshin impact: don't go over Worl level 5! ...if you're new. (Thats AR ~50)
You should try to lvl up as much as possible before going above 5. Specifically, pick 2 characters of each element to lvl up. Ideally, you pick one dmg dealer and one shield haver. The exception are healers, of course.
You can use the traveler if you're missing characters, but generally, even the 4-star characters are better than the traveler, because you need different builds for the traveler, depending on their element. It's easier to use and farm for the other characters.
They should all get to character level 70, that means you'll have 14 characters that are level 70 all with their abilities as high as possible (i think level 5 or 6 at lvl 70) and the best artifacts in purple.
For the AR ascension quest, pick the characters with the necessary elements and lvl those completely, 80 should be the max at AR 50. At AR 51-60, lvl up the other 10 characters to the max lvl (which should be 90) and max out their abilities if possible. (You need crowns for lvl 10, as well as weekly boss materials starting lvl 7).
If you get to world level 6 before you're ready... it's getting complicated. Sure, starting world level 5 let's you turn down the world level by 1. Only by one. When you reach world level 6, you can lower it... to level 5. It's really important to level up your characters enough.
#i'm eating gilbird#genshin impact#genshin gameplay#genshin guide#genshin impact gameplay#//guess who has only one character 100% done#//it's me and the character is venti.#//VENTI. seriously.
3 notes
·
View notes
Text
Genshin Impact - Abyss suggestion Electro/Taser team

So just to say I'm not the biggest Genshin expert but I hope this can maybe help some people and give team suggestions. I can clear Spiral abyss 36 stars easily
The Electro or Taser team is based on the element reaction Electro-Charged (hydro + electro) and elemental mastery
Team members:
Yae Miko: Mostly use for skill and busrt damage. Mostly the DPS of the team. Ideal crit rate/crit damage ratio (70/200)
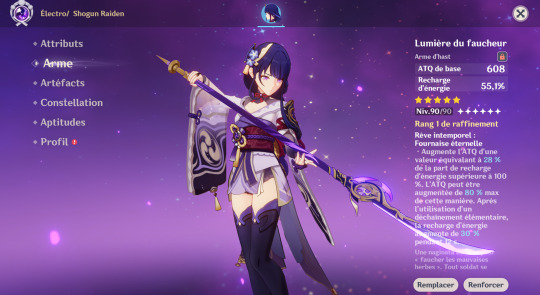
Raiden: Mostly use for the energy recharge and burst boost, the burst also can deal massive damage. Focus on raising her Energy Recharge, crit rate/crit damage
Kazuha: Use to boost electro damage and element mastery of the team, use the skill and burst most possible. Focus on raising his Elemental Mastery
Kokomi: Mostly use to apply hydro and heal party member. With the Thrilling Tales of Dragon Slayers she also provide a attack boost when switching. Focus on HP and healing bonus with the Ocean-Hued Clam x4 set. No crit rate or crit damage (useless on her)
*You can replace Kokomi with Mona for more DPS but I like having some healing in my team. Venti can also replace Kazuha if you have his proper 5* weapons or even Sucrose can do the job.
How to use the team:
Place Yae totems, use Kazuha skills to boost Electro and switch to keep the elemental mastery. Switch on Kokomi for attack boost and healing and use Raiden skill + Burst if ready (reach around 100k for the first hit). If Yae burst ready also use it after settup Raiden skill (I can ready 40k by totem destroyed).
You can switch in different order for this team, keep in mind you want Kazuha to use his skill on Electro element and not the Hydro element by accident. Kazuha passive boost damage of a element if he absorb this element with his skill
This is my second abyss team and I will probably share all my other team, thank you for reading and hope this help!
#genshin impact#genshin#genshin impact guide#genshin guide#shogun raiden#sangonomiya kokomi#yae miko#kaedahara kazuha#genshin team#genshin impact team
12 notes
·
View notes
Text
Daily To Do's - Activities & Reset Time | Genshin Impact - GameWith
This is also a very detailed & helpful guide for New / returning players. This one talks about Daily Comissions & also about original resin & how to use it & why its so important & I highly recommend doing your dailies, especially all 4 comissions everyday ( as much as possible ) because you earn alot of Adventure Rank EXP & lots of Primogems each day up to 60 total a day + you can claim the extra reward from Kathrynne from the Adventurer's Guild afterwards too ( she gives you an extra 20 gems + hero's wit, etc. ) Also recommend using Resin, you get 160 each day total original resin, you can use it to do ley lines for experience books & Mora as well as to do Bosses & artifact, weapon & talent book domains each day too to level up & ascend your characters to help you progress faster.
#genshin players#genshin impact game#genshin impact#genshinimpact#genshin#genshin guide for beginners#genshin guide#genshin guide for new players#genshin new player guide#genshin guides#genshin impact daily comissions#genshin impact mihoyo#genshin tips#genshin help#genshin tips and tricks#genshin impact hoyoverse#mihoyo#hoyoverse#genshin impact guides#genshin impact beginner guide#genshin beginner#genshin resin
11 notes
·
View notes
Text
𝕋𝕚𝕡𝕤 𝕗𝕠𝕣 𝕓𝕖𝕘𝕚𝕟𝕟𝕖𝕣𝕤 ℙ𝕒𝕣𝕥 𝟙 ★
No. 1 - 𝘞����𝘦𝘯 𝘺𝘰𝘶𝘳 𝘴𝘵𝘢𝘳𝘵𝘪𝘯𝘨 𝘰𝘶𝘵 𝘺𝘰𝘶 𝘴𝘩𝘰𝘶𝘭𝘥 𝘶𝘯𝘭𝘰𝘤𝘬 𝘢𝘭𝘭 𝘵𝘦𝘭𝘦𝘱𝘰𝘳𝘵𝘦𝘳𝘴 𝘢𝘯𝘥 𝘴𝘵𝘢𝘵𝘶𝘦 𝘰𝘧 𝘵𝘩𝘦 𝘴𝘦𝘷𝘦𝘯. 𝘋𝘰𝘪𝘯𝘨 𝘵𝘩𝘪𝘴 𝘸𝘪𝘭𝘭 𝘮𝘢𝘬𝘦 𝘪𝘵 𝘴𝘰 𝘮𝘶𝘤𝘩 𝘦𝘢𝘴𝘪𝘦𝘳 𝘵𝘰 𝘮𝘰𝘷𝘦 𝘢𝘳𝘰𝘶𝘯𝘥 𝘵𝘩𝘦 𝘮𝘢𝘱 𝘲𝘶𝘪𝘤𝘬𝘭𝘺 𝘦𝘴𝘱𝘦𝘤𝘪𝘢𝘭𝘭𝘺 𝘸𝘩𝘦𝘯 𝘥𝘰𝘪𝘯𝘨 𝘲𝘶𝘦𝘴𝘵𝘴.
★・・・・・・・・・・・・・・・・・・・・・・・・・・・・★
No. 2 - 𝘚𝘢𝘷𝘦 𝘺𝘰𝘶𝘳 𝘧𝘳𝘢𝘨𝘪𝘭𝘦 𝘳𝘦𝘴𝘪𝘯. 𝘠𝘰𝘶 𝘥𝘰𝘯’𝘵 𝘯𝘦𝘦𝘥 𝘵𝘰 𝘴𝘢𝘷𝘦 𝘺𝘰𝘶𝘳 𝘧𝘳𝘢𝘨𝘪𝘭𝘦 𝘳𝘦𝘴𝘪𝘯 𝘶𝘯𝘵𝘪𝘭 𝘺𝘰𝘶𝘳 𝘈𝘙 60 𝘣𝘶𝘵 𝘵𝘳𝘺 𝘵𝘰 𝘴𝘢𝘷𝘦 𝘪𝘵 𝘶𝘯𝘵𝘪𝘭 𝘈𝘙 45. 𝘛𝘩𝘦 𝘳𝘦𝘢𝘴𝘰𝘯 𝘧𝘰𝘳 𝘵𝘩𝘪𝘴 𝘪𝘴 𝘣𝘦𝘤𝘢𝘶𝘴𝘦 𝘴𝘵𝘢𝘳𝘵𝘪𝘯𝘨 𝘰𝘶𝘵, 𝘵𝘩𝘦𝘳𝘦 𝘢𝘳𝘦 𝘯𝘰 𝘨𝘰𝘰𝘥 𝘢𝘳𝘵𝘪𝘧𝘢𝘤𝘵𝘴 𝘰𝘳 𝘮𝘢𝘵𝘦𝘳𝘪𝘢𝘭𝘴 𝘵𝘩𝘢𝘵 𝘺𝘰𝘶 𝘤𝘢𝘯 𝘨𝘦𝘵. 𝘠𝘰𝘶 𝘴𝘩𝘰𝘶𝘭𝘥 𝘶𝘴𝘦 𝘺𝘰𝘶𝘳 𝘧𝘳𝘢𝘨𝘪𝘭𝘦 𝘳𝘦𝘴𝘪𝘯 𝘸𝘩𝘦𝘯 𝘺𝘰𝘶 𝘨𝘦𝘵 𝘢𝘵 𝘢 𝘩𝘪𝘨𝘩𝘦𝘳 𝘈𝘙 𝘴𝘰 𝘺𝘰𝘶 𝘤𝘢𝘯 𝘨𝘦𝘵 𝘣𝘦𝘵𝘵𝘦𝘳 𝘪𝘵𝘦𝘮𝘴.
★・・・・・・・・・・・・・・・・・・・・・・・・・・・・★
No. 3 - 𝘛𝘳𝘺 𝘵𝘰 𝘨𝘦𝘵 𝘢 𝘨𝘰𝘰𝘥 𝘸𝘦𝘢𝘱𝘰𝘯 𝘵𝘩𝘢𝘵 𝘪𝘴 𝘨𝘰𝘰𝘥 𝘧𝘰𝘳 𝘺𝘰𝘶𝘳 𝘮𝘢𝘪𝘯. 𝘍𝘰𝘳 𝘦𝘹𝘢𝘮𝘱𝘭𝘦 𝘛𝘪𝘨𝘩𝘯𝘢𝘳𝘪 𝘴𝘩𝘰𝘶𝘭𝘥 𝘯𝘰𝘵 𝘣𝘦 𝘶𝘴𝘪𝘯𝘨 𝘈𝘮𝘰𝘴 𝘣𝘰𝘸.
★・・・・・・・・・・・・・・・・・・・・・・・・・・・・★
No. 4 - 𝘛𝘰 𝘮𝘦, 𝘦𝘷𝘦𝘳𝘺 𝘤𝘩𝘢𝘳𝘢𝘤𝘵𝘦𝘳 𝘪𝘴 𝘢𝘵 𝘭𝘦𝘢𝘴𝘵 𝘴𝘰𝘮𝘦 𝘸𝘩𝘢𝘵 𝘨𝘰𝘰𝘥. 𝘐𝘧 𝘺𝘰𝘶 𝘸𝘢𝘯𝘯𝘢 𝘣𝘦 𝘢 𝘺𝘢𝘯𝘧𝘦𝘪 𝘮𝘢𝘪𝘯, 𝘣𝘦 𝘢 𝘺𝘢𝘯𝘧𝘦𝘪 𝘮𝘢𝘪𝘯. 𝘐𝘧 𝘺𝘰𝘶 𝘸𝘢𝘯𝘯𝘢 𝘣𝘦 𝘢𝘯 𝘈𝘮𝘣𝘦𝘳 𝘮𝘢𝘪𝘯, 𝘣𝘦 𝘢𝘯 𝘢𝘮𝘣𝘦𝘳 𝘮𝘢𝘪𝘯. 𝘞𝘪𝘵𝘩 𝘨𝘰𝘰𝘥 𝘦𝘯𝘰𝘶𝘨𝘩 𝘢𝘳𝘵𝘪𝘧𝘢𝘤𝘵𝘴 𝘢𝘯𝘥 𝘢 𝘨𝘰𝘰𝘥 𝘸𝘦𝘢𝘱𝘰𝘯 𝘢𝘭𝘰𝘯𝘨 𝘸𝘪𝘵𝘩 𝘴𝘰𝘮𝘦 𝘩𝘪𝘨𝘩 𝘭𝘦𝘷𝘦𝘭 𝘵𝘢𝘭𝘦𝘯𝘵𝘴 𝘵𝘩𝘦𝘯 𝘺𝘰𝘶 𝘤𝘢𝘯 𝘮𝘢𝘬𝘦 𝘢𝘯𝘺 𝘤𝘩𝘢𝘳𝘢𝘤𝘵𝘦𝘳 𝘨𝘳𝘦𝘢𝘵.
★・・・・・・・・・・・・・・・・・・・・・・・・・・・・★
No. 5 - 𝘋𝘰 𝘯𝘰𝘵 𝘨𝘦𝘵 𝘢𝘥𝘥𝘪𝘤𝘵𝘦𝘥 𝘵𝘰 𝘳𝘰𝘭𝘭𝘪𝘯𝘨. 𝘛𝘩𝘦 𝘨𝘢𝘮𝘦 𝘪𝘴 𝘱𝘳𝘦𝘵𝘵𝘺 𝘨𝘦𝘯𝘦𝘳𝘰𝘶𝘴 𝘸𝘩𝘦𝘯 𝘨𝘪𝘷𝘪𝘯𝘨 𝘰𝘶𝘵 𝘧𝘳𝘦𝘦 𝘸𝘪𝘴𝘩𝘦𝘴 𝘣𝘶𝘵 𝘥𝘰𝘯’𝘵 𝘭𝘦𝘵 𝘵𝘩𝘢𝘵 𝘧𝘰𝘰𝘭 𝘺𝘰𝘶. 𝘚𝘰𝘰𝘯 𝘦𝘯𝘰𝘶𝘨𝘩 𝘺𝘰𝘶 𝘸𝘪𝘭𝘭 𝘸𝘢𝘯𝘵 𝘵𝘰 𝘨𝘦𝘵 𝘢𝘭𝘭 𝘵𝘩𝘦 𝘤𝘩𝘢𝘳𝘢𝘤𝘵𝘦𝘳𝘴 𝘢𝘯𝘥 𝘢𝘭𝘭 𝘵𝘩𝘦𝘪𝘳 𝘸𝘦𝘢𝘱𝘰𝘯𝘴 𝘴𝘰 𝘺𝘰𝘶 𝘸𝘪𝘭𝘭 𝘴𝘱𝘦𝘯𝘥 𝘤𝘰𝘶𝘯𝘵𝘭𝘦𝘴𝘴 𝘢𝘮𝘰𝘶𝘯𝘵𝘴 𝘰𝘧 𝘮𝘰𝘯𝘦𝘺 𝘰𝘯 𝘨𝘦𝘯𝘴𝘩𝘪𝘯. 𝘐𝘵’𝘴 𝘭𝘪𝘬𝘦 𝘔𝘪𝘏𝘰𝘺𝘰 𝘰𝘳 𝘏𝘰𝘺𝘰𝘝𝘦𝘳𝘴𝘦 𝘩𝘢𝘴 𝘺𝘰𝘶 𝘶𝘯𝘥𝘦𝘳 𝘵𝘩𝘦𝘪𝘳 𝘴𝘱𝘦𝘭𝘭.
★・・・・・・・・・・・・・・・・・・・・・・・・・・・・★
No. 6 - 𝘋𝘰 𝘺𝘰𝘶𝘳 𝘢𝘥𝘷𝘦𝘯𝘵𝘶𝘳𝘦 𝘫𝘰𝘶𝘳𝘯𝘢𝘭. 𝘞𝘩𝘦𝘵𝘩𝘦𝘳 𝘺𝘰𝘶 𝘢𝘳𝘦 𝘫𝘶𝘴𝘵 𝘣𝘰𝘳𝘦𝘥 𝘰𝘳 𝘸𝘢𝘯𝘵 𝘵𝘰 𝘬𝘯𝘰𝘸 𝘸𝘩𝘢𝘵 𝘥𝘰𝘮𝘢𝘪𝘯𝘴 𝘢𝘳𝘦 𝘰𝘱𝘦𝘯 𝘺𝘰𝘶𝘳 𝘢𝘥𝘷𝘦𝘯𝘵𝘶𝘳𝘦 𝘫𝘰𝘶𝘳𝘯𝘢𝘭 𝘩𝘢𝘴 𝘺𝘰𝘶 𝘤𝘰𝘷𝘦𝘳𝘦𝘥. 𝘐𝘵 𝘨𝘪𝘷𝘦𝘴 𝘺𝘰𝘶 𝘧𝘳𝘦𝘦 𝘱𝘳𝘪𝘮𝘰𝘴 𝘦𝘷𝘦𝘳𝘺 𝘯𝘦𝘸 𝘤𝘩𝘢𝘱𝘵𝘦𝘳 𝘢𝘯𝘥 𝘪𝘵 𝘴𝘩𝘰𝘸𝘴 𝘵𝘩𝘦 𝘭𝘰𝘤𝘢𝘵𝘪𝘰𝘯𝘴 𝘰𝘧 𝘴𝘱𝘦𝘤𝘪𝘧𝘪𝘤 𝘦𝘯𝘦𝘮𝘪𝘦𝘴. 𝘐𝘯 𝘵𝘩𝘦 𝘦𝘯𝘥 𝘺𝘰𝘶𝘳 𝘢𝘥𝘷𝘦𝘯𝘵𝘶𝘳𝘦 𝘫𝘰𝘶𝘳𝘯𝘢𝘭 𝘸𝘪𝘭𝘭 𝘴𝘰𝘰𝘯 𝘣𝘦𝘤𝘰𝘮𝘦 𝘺𝘰𝘶𝘳 𝘣𝘦𝘴𝘵 𝘧𝘳𝘪𝘦𝘯𝘥 𝘸𝘩𝘦𝘵𝘩𝘦𝘳 𝘺𝘰𝘶 𝘭𝘪𝘬𝘦 𝘪𝘵 𝘰𝘳 𝘯𝘰𝘵.
𝘗𝘢𝘳𝘵 2 𝘤𝘰𝘮𝘪𝘯𝘨 𝘴𝘰𝘰𝘯 ♡
4 notes
·
View notes
Text
new to genshin and confused? here's what EVERY character does! || p1 - cryo

intro is kinda long srry, if you don't want to read it all tldr this is part 1 of 7, will link previous installments in every new post.
hello! This is part 1 of a new series (idk what else to call it) i'm doing where I summarize every character's kit. It seems like a lot of people on here are new or casual/story focused players who might not be interested in reading every character's abilities.
So if you aren't too into combat and want to see what every character does to decide who you want, this post is for you!
Today i'll be looking at Cryo characters. If you want to see my posts for other elements if they are out yet, i'll be adding links to all other elements in each new installment. I'll also make a post w links to all other elements once i'm done w all 7
note: i will not be talking in depth about how strong a character is unless it is very important. mainly because the best way to have fun (for most) is by playing characters you like and also bc tier lists are often controversial and pretty much all characters if built well are viable
ALSO when i list their roles they aren't ranked in order or implying that if you need x role you should play that character. I'm just putting what I most commonly see them played in
ok enough talking, let's get into it!
╰┈➤ 4 stars
Chongyun (Support/DPS)
❥ Skill: Creates a field that gives your sword/polearm/claymore characters a Cryo infusion
❥ Burst: Deals 3 hits of Cryo damage
❥ Roles: Cryo infuser, DPS, Burst DPS
❥ Damage scales off of: Attack
Kaeya (DPS/Off-field DMG)
❥ Skill: Deals Cryo damage
❥ Burst: Creates a spinning circle of icicles that deal Cryo damage when they hit enemies
❥ Roles: Off-field damage, Physical DPS
❥ Damage scales off of: Attack
Diona (Support)
❥ Skil: Deals Cryo damage and create a Cryo shield
❥ Burst: Creates a field that deals Cryo damage and heals your active character
❥ Roles: Cryo Shielder, Elemental Mastery buffer (at C6), Cryo application for large melt damage showcases (mainly at C6)
❥ Damage scales off of: Attack
❥ Shielding/Healing scales off of: HP
Rosaria (Support/DPS/Off-field DMG)
❥ Skill: Flashes/jumps to an enemy and deals Cryo damage
❥ Burst: Creates a field that deals periodic Cryo damage. During its duration, she gives your characters a crit rate buff (from her passive)
❥ Roles: Support for Physical damage teams (at C6), Off-field Cryo damage, Crit rate buffer, Physical DPS
❥ Damage scales off of: Attack
❥ Buff scale off of: Crit rate
Layla (Support)
❥ Skill: Deals Cryo damage and creates a Cryo shield that periodically deals Cryo damage
❥ Burst: Summons a sphere that periodically deals Cryo damage to enemies
❥ Roles: Cryo shielder
❥ Damage scales off of: Attack (skill) and HP (burst)
❥ Shield scales off of: HP
Mika (Support)
❥ Skill: Deals Cryo damage and grants your party members an attack speed buff and a Physical damage buff (DMG buff is from passive)
❥ Burst: Heals all of your party members, then grant them an effect that heals them when they use normal attacks
❥ Roles: Attack speed buffer, Support for Physical damage teams, Healer for Furina teams
❥ Damage scales off of: Attack
❥ Healing scales off of: HP
Freminet (DPS)
❥ Skill: Enters a state that enhances his normal attacks and causes them to change the effect of his skill. His skill's effect can be changed to deal Cryo damage, Cryo+ Physical damage, or Physical damage
❥ Burst: Resets the cooldown of his skill and enters a state that buffs his normal attacks and reduces the skill's cooldown
❥ Roles: Shatter DPS, Physical DPS, Cryo DPS
❥ Damage scales off of: Attack
Charlotte (Support)
❥ Skill: Deals Cryo damage and marks up to 5 enemies. When marked, enemies will take periodic Cryo damage
❥ Burst: Deals Cryo damage, heals all party members, and creates a field that heals your active character and deals Cryo damage.
❥ Roles: Healer, Healer for Furina teams, Off-field Cryo damage/application
❥ Damage scales off of: Attack
❥ Healing scales off of: Attack
╰┈➤ 5 stars
Qiqi (Support)
❥ Skill: Deals Cryo damage and creates a summon that periodically heals your active character and deals Cryo damage. Qiqi's normal attacks heal your characters during its duration
❥ Burst: Deals Cryo damage and marks enemies with a talisman that heals your characters when they cause the marked enemy to take damage
❥ Roles: Healer
❥ Damage scales off of: Attack
❥ Healing scales off of: Attack
Ganyu (DPS)
❥ Skill: Deals Cryo damage and summons a flower that will taunt enemies. Once it is destroyed or its duration expires, it will deal Cryo DMG
❥ Burst: Summons a field that deals continuous Cryo damage. Characters within its AoE will gain a Cryo damage buff (from her passive)
❥ Charged Attack: At charge level 2, her charged attack will become a frostflake arrow that deals a larger amount of Cryo damage. Once it hits an opponent, the arrow will bloom and deal additional Cryo damage
❥ Roles: DPS, Off-field Cryo application
❥ Damage scales off of: Attack
Eula (DPS)
❥ Skill: Deals Cryo damage and grants her a Grimheart stack that increases her DEF and resistance to interruption. Holding her skill consumes all stacks and decreases Cryo+Physical resistance of the enemy it hits.
❥ Burst: Deals Cryo damage and summons a sword that gains stacks with her normal attacks/skills/burst. The sword will explode after its duration and deal Physical damage based on the number of stacks it has
❥ Roles: Physical DPS
❥ Damage scales off of: Attack
Ayaka (DPS)
❥ Skill: Deals Cryo damage
❥ Burst: Summons a snowstorm that deals continuous Cryo damage during its duration and a larger hit of Cryo damage at the end
❥ Alternate Sprint: Turns her into frozen fog. She can move over water in this state. When she reappears, she will apply Cryo to any opponents hit and will gain a Cryo infusion on her normal/charged/plunging attacks
❥ Roles: Freeze DPS, Cryo DPS
❥ Damage scales off of: Attack
Shenhe (Support)
❥ Skill: Deals Cryo damage and grants your characters a flat damage bonus to their Cryo attacks. Tapping/Holding it will also grant your characters a Skill+Burst/Normal+Charged+Plunging Attack bonus
❥ Burst: Creates a field that deals periodic Cryo damage and decreases the Cryo+Physical resistance of enemies inside of it. Characters inside of it gain a Cryo damage bonus (from her passive)
❥ Roles: Cryo buffer, Physical support
❥ Damage scales off of: Attack
❥ Buff scales off of: Attack
Wriothesley (DPS)
❥ Skill: Enters a state that buffs his normal attacks and causes them to consume his HP when they hit opponents. Both of these effects only take place if he is above 50% HP.
❥ Burst: Deals multiple hits of Cryo damage
❥ Passive: When under 60% HP, Wriothesley's charged attack is enhanced. The enhanced charged attack deals increased damage and heals him
❥ Roles: Cryo DPS
❥ Damage scales off of: Attack
And, that's all! I hope this post is useful!! It took like 1hr 30min so hopefully it helps somebody lol.
For tips and advice, check out my other posts! For clarifications or more detailed explanations, comment on this post or send in an ask!
#genshin impact#genshin ask blog#genshin help#genshin guide#genshin impact advice#genshin#genshin advice#genshin newbie#new to genshin#genshin cryo#ayaka#ganyu#wriothesley#shenhe#eula lawrence#kaeya alberich#˚₊· ͟͟͞͞➳❥ new players
16 notes
·
View notes
Video
youtube
Knockout & Take That You Overblown Mist Flower All Cryo Regisvine Hidden Achievement Genshin Impact
#genshin#genshin impact#genshin 3.4#genshin 3.5#mondstadt#cryo#achievement#guides#genshin guide#hoyolab#hoyoverse#mihoyo
2 notes
·
View notes
Text


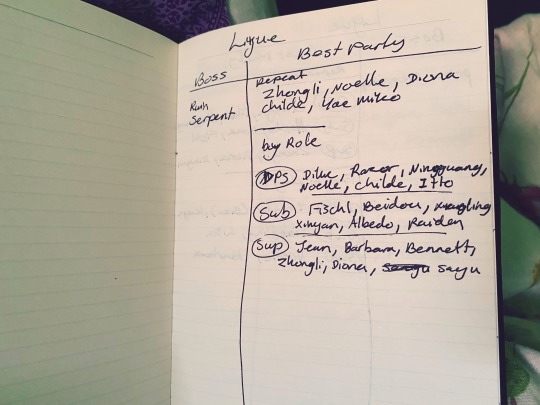
Some guides I’ve been filling in into my Genshin Impact journal. I had some motivation to perfect the boss fights a little more and it’s been so much easier to win. It’s easier to reference this than going in and out of the game all of the time. I like looking back at my progress writing it all out! I have a whole bunch of much better teams again, updated now I have more characters, artefacts, and weapons.
(yeah I know there’s guides online, people have already told me this way is “stupid” because there’s “already resources online” but I work better with this and they clearly haven’t done irl tabletop before or gaming journaling before if this is apparently stupid, likewise not everyone has a phone and a tablet and a PlayStation and a computer and another phone to hand, in order to reference the guides when they’re also in game on one platform to avoid the horrendous refresh after 30 seconds, this is also much better for my ADHD so why should I make it harder in ways that don’t work 😂 adding this to basically say, no more negative feedback on my own personal method I am using that not many people use because they don’t want to write it down, but works well for me personally and is a way to make my teams really fkin good)
(This isn’t finished, I only started this the other day, I’m writing a guide for all the bosses)
#genshin impact#genshin boss#genshin impact guide#gi#genshin#genshin guide#genshin impact forum#genshin impact gameplay#genshin impact bosses#field bosses#weekly boss#liyue harbor#mondstadt#teyvat#genshin tips#genshin team
4 notes
·
View notes
Text
How to Get: Hamayumi Bow!
Repeat the instructions for 7 days to obtain the bow blueprint!
Does not have to be consecutive.
#genshin childe#genshin impact#how to#game guide#free to play#childe tartagalia#tartaglia#Hamayumi Bow#genshin EN#genshin players#genshin guide
4 notes
·
View notes
Last Seen Blogs