#from youtube to mp4
Audio
without the helmet filter you can hear how out of breath he is in a few lines
#i hope you guys know i rip this audio in the most difficult way possible#instead of taking it from the actual game files i SCREEN RECORD a YOUTUBE VIDEO that contains these lines#and then reorganize them in windows movie maker#and then use an mp4 to mp3#and then edit the picture of danse on my phone and save it as a draft on tumblr so i can save it on my laptop#since i cant edit drafts i made on my laptop on my phone#this is equivalent to giving your cat a puzzle feeder#except the food is danse audio and the cat is me#fallout 4#paladin danse#audio#brotherhood of steel
188 notes
·
View notes
Text
sometimes you hear a song you haven't heard in years and find that you still know every word to it just as well as you did when you were 13 and suddenly you feel the connection between the person you were and the person you are
and sometimes that song is "draco and harry" by the whomping willows
#i got lost in spotify and i landed there#i had no idea it was on there?#i remember listening to them on myspace#MYSPACE#we didnt even use myspace in poland but i got it just to listen to w-rock#wizard rock#i am typing this in 2022 with a full chest#the whomping willows and the ministry of magic were the SHIT#tmom collabed with tessa violet#tessa violet had a song about a forbidden wizard love between a gryffindor and a slytherin#i checked she hid it from her youtube#but miss meekakitty i know your secret#i have the mp4 on my extrernal drive#this is a very bizarre moment#shut up matt
24 notes
·
View notes
Video
youtube
Bro what’s with this crowd i’d kill to be at this show
#i love when youtube is like hey do you wanna watch old brobecks shows from 10+ years ago#and i'm like yes absolutely right away#the brobecks#live#.mp4
11 notes
·
View notes
Text

Is it sad that that's exactly what happened :/
#all i wanted to do was add one (1) song to Spotify because it's not available to stream on Spotify#but instead a ton of my youtube from my ND channel now exists in audio form on Spotify#i mean only i can access it but still thats not at all what i wanted to do lol#on the bright side i can put the ND music i have on my computer in my writing mix#still its a lot to dig through#it's weird tho that Spotify grabbed audio from mp4 files#like id understand if it grabbed all the mp3 and wav files#but video files???#very weird#i only just figured out how to do this#so im still learning how it works#nancy drew#clue crew#nancy drew pc games
3 notes
·
View notes
Text
once again i am asking for an official playlist of pokemon music on spotify cause they're all BOPS
#when i was a kod i used to rip the soundtracks from youtube into my mp4 and later my phone#and it was great#tiktok
2 notes
·
View notes
Text
#how to download youtube video#from youtube to mp3#youtube mp4#yt to mp3#youtube mp3#yt convert#youtube to mp4 converter download#converter#youtube mp3 converter#youtube mp4 converter#youtube to mp3 320
1 note
·
View note
Note
Question: Can i enjoy something that has a problematic creator? (WITHOUT supporting the creator's actions) I say this cause i like a lot of stuff but its creators are bad so i just don't know if it is okay to separate the art from the artist. I'm pissed that everything that i like turns out to have a shitty creator. These things make me happy and i simply can't stop liking them :(
Answer: Yes you can
A lot of this is my belief of separating the work from the creator, but I do say you can appreciate and enjoy the content for what it is without acknowledging the person behind it
Especially if you're not supporting them
Just be aware I think, and understand what they did was wrong, and that should be good
#it gets tricky with places like youtube where creators benefit from views#if theres no reuploaded videos of things either...#yknow... ytmp3 lets you download videos and such... mp3 and mp4 files....#cough cough#gludgen answers!#anonymous#I'd recommend getting the ytmp3 apk download beforehand... but you didnt hear it from me
0 notes
Text
☆ UPSCALING LOW QUALITY FOOTAGE
what i used:
• 2021 macbook pro with m1 chip (390/500gb storage used she's hanging in there)
• photoshop 2020
• mpv (for screencaps but this isn't needed!)
• handbrake (available for linux, mac and windows here)
• video source to gif
what is handbrake?
basically its a software that helps you change the format of videos, such as for certain devices or screens, or in the case that we're going to utilise, quality and frame rate!
disclaimer:
handbrake is super easy to use and very beginner friendly for this procedure and it can make a video go from 30fps to 60fps however it does not replace the quality of true 4k/blue/master-pro res files. in the gif below, this is the level of detail in a master pro-res file.

getting started
it's easiest first to note the timestamps of the video you want to encode, and keep in mind that unless your computer is incredibly powerful, i wouldn't try to encode an hour worth of footage in one run! my laptop could handle about 30 seconds in one go before she started toasting.
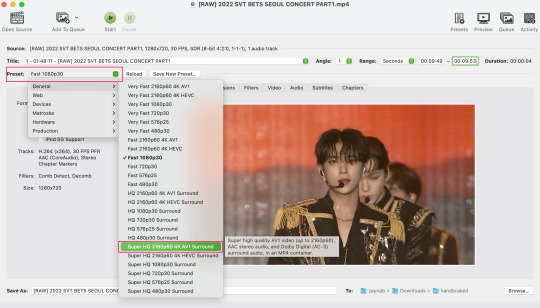
using handbrake:
once you've downloaded the software, open the software and it will come up with a pop up window asking you to open the video source (that is presumably saved within your folders) and go ahead and do so!
in the range section, use the drop down button to navigate to seconds and enter your timestamp. the duration on the side will show how long of the footage you're gonna encode is!

then go down to the save as, and give your footage 'to be snipped' a name. this isn't necessary but useful because if you're planning to say, encode 3 or 4 small parts of footage in one sitting, each encoding instance will overwrite the previous one. so i just call mine 'cut 1', 'cut 2' and so on.

next go to preset, and there you'll see such a wide variety of options that you can play around with, with differing qualities, frame rates, sound options, and so on. for the sake of this tutorial, i'm using 'superhq 2160p60 4k av1 surround' and i've used the drop down menu to select it! then go ahead and press start! the time taken to complete depends on the duration of footage that you sent to encode! you'll find your encoded video as an .mp4 file in your designated folder (which you can change via browse at the bottom)
what next?
• if you prefer to open footage directly into photoshop (my ps can't handle it), then go for it!
• if you screencap as i do, then just use mpv or whatever screencapping program you prefer to make the screencaps and open in ps in your usual manner.
• you can use the timestamps to further process the video through vapoursynth to denoise, but i've yet to try that!
the results
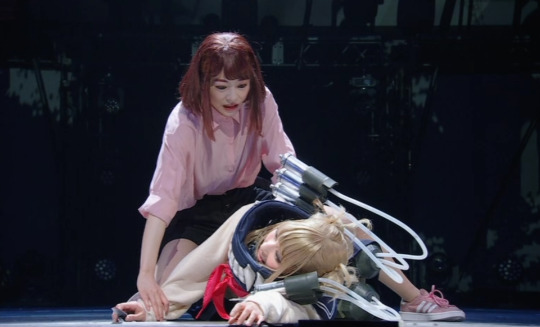
for this first set of example footage, i used footage from the be the sun concert file, which is almost 2 hours in length and 4gb in file size.


you can see the difference in the smooth frame rate of the footage, as well as the quality of the sharpening!
and to utilise the bane of gifmaking, a gose episode, notorious for dodgy pixelated frames and less hd quality in 1080p on youtube, i ran it through the same settings!

these are the exact same files, downloaded using 4k video downloader and with the same sharpening, but see how on the original file, the sharpening looks a bit more harsh and 'outlined' while it seems to sit softer on the encoded 4k version!
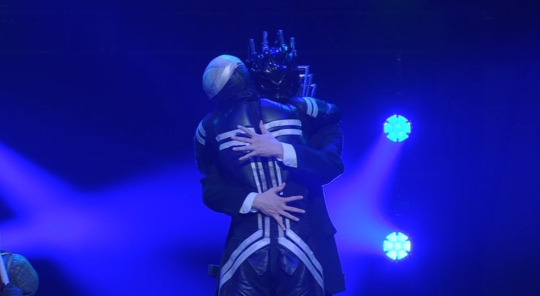
so i mainly use handbrake for dvd files, or not-so-hd 1080p youtube videos or videos that seem a bit clunkier but i had never tried them on a tv/film file so take a look below! i used a 1gb (so not very good quality) of a show (as compared to its 4gb files).
as i said at the start in the disclaimer, handbrake can't replicate true file quality, as you'd expect to see in a proper hd bluray/t*rrent file of a show but there's an interesting difference in the frame rate. personally it's not something i would utilise much there but its all up to individual preference on how someone prefers to have their gifs <3
this is a very basic run-through of how i used handbrake, as i haven't really explored all its features and i use this as a quick process when i'm running through seventeen dvd/dl files but i feel like it would work well on general youtube videos (such as interviews, episodes, behind the scenes) and feel free to send an ask/message for any help/clarification! <33
#ps help#usergif#gif tutorial#kpop gif tutorial#seventeen#completeresources#2605#userace#niniblr#emification#usershreyu#heymax#arieslofi#tusermlee#userbloomingwarrior#uservivaldi#userzil#userfanni#userrozza#usermoonchild#userraffa#tuserjen#usernik
281 notes
·
View notes
Text
- tumblr has removed the ability to directly upload a video to a reblog (puzzling as to what this accomplished for them)
- must embed external video via html post
- html5 <video>: no
- <embed>: no
- fine what does youtube give you?
- fucking <iframe> wtf, but it works
- replace source with url to self-hosted video: no
- what the fuck maybe it only takes exactly the same container/codec as youtube
- ffmpeg (ffmpreg lol) matched codec: NO
- fine i’ll just fake the fucking headers: nope it’s tls-only
- FINE ILL JUST KILL MYSELF UPLOAD IT TO FUCKING YOUTUBE
- result is a “youtube short”, gay, how to change
- “vertical videos under 60 seconds are always youtube shorts”
- equip dynamite vest
- try one more thing that works for a direct embed from my domain
- works
- wtf
- try above with<script> javascript instead of <video> mp4
- also works
- use tumblr.com js url that you can still upload for extremely outdated theme editor
- alert(session_token)
- yep that’s my session key alright
- alt account following blog loads dashboard and my post
- YEP THATS ITS SESSION KEY ALRIGHT
some of you guys are alright. don’t allow any other javascript than what’s loaded for a safe text post at school tomorrow.
76 notes
·
View notes
Note
How do you make your gifs?
Hello hello! I love talking about gifmaking, so thank you for giving me the chance to ramble.
Instead of a detailed step-by-step walkthrough, I will link tutorials and resources written by the wonderful Tumblr creators on here along the way. Everyone has their method and preferences, and there’s no right or wrong way to make gifs. I’m going to share techniques and resources I picked up along the way that work best for me—they may or may not be suited to your preferences, but I hope you’ll find some helpful things here.
(Warning: screenshot/image heavy)
USEFUL TUTORIALS AND RESOURCES
Here are some tutorials and resources that I found very useful when I got back into gifmaking:
Gifmaking tutorial using video timeline by @hope-mikaelson is identical to my own process
Gifmaking and coloring tutorial by @kitty-forman, whose process is very similar to my own
Giffing 101 by @cillianmurphy, an incredibly detailed tutorial that covers everything you need, including a step-by-step guide to using HandBrake
Gifmaking and coloring tutorial with 4K HDR footage by @sith-maul, another incredibly detailed tutorial with many useful tips
Gifmaking tutorial by @jeonwonwoo, incredibly comprehensive and covers so many aspects of gifmaking from basics, sharpening, captioning, and text effects
Gifmaking/PS tips and tricks by @payidaresque
Action pack by @anyataylorjoy, the Save action is especially a true life-saver
@usergif and @clubgif are amazing source blogs with many tutorials on gifmaking, color grading, and gif effects, can’t be thankful enough for the members for their work curating and creating for these blog!
TOOLS
Adobe Photoshop CS6 or higher, any version that supports video timeline. @completeresources has many links to download Photoshop, have a look!
Photopea is a free alternative to Photoshop, but it has a slightly different UI, check out these tutorials for gifmaking with Photopea
HandBrake or any other video encoder, especially if you’re working with .MKV formats
4Kvideodownloader for downloading from YouTube, Vimeo, Instagram, etc.
OBS Studio or any other similar screen capturing software. To prevent duplicate frames in gifs that prevents your gifs from looking smooth, try to match the recording frame rate (FPS) with the source.
IMPORTING FOOTAGE AND WORKING IN VIDEO TIMELINE
I work exclusively in video timeline instead of importing video frames to layers or loading files into stack. For videos that don’t require converting/encoding using HandBrake, especially ones that are already in .MP4 format, I tend to open the video directly on Photoshop, and trim the videos around directly.
As mentioned above, this gifmaking tutorial using video timeline is exactly how I make gifs. I find it more efficient, especially if you’re making multiple gifs from the same video/the same scene with little to no change in lighting conditions You can simply slide around sections of gifs you want to save, and they will all be the same length.
Another thing also covered in the tutorial linked is the ability to change video speed in video timeline mode. Right click on the video and set the speed before proceeding with cropping/resizing. This is also very useful when you’re making blended gifs where you need the footage to have the same length.
Slowing footage down.
As mentioned in this post, changing the FPS before slowing down the gif results in smoother gifs. Doubling the frame rate before slowing down your gifs usually yields the best result.
Speeding footage up.
I love using this to speed up slow motion B-rolls to make the speed slightly more natural. It will result in nice, smooth gifs:

(B-roll footage, normal broadcast speed)
(200% speed)
Subject won’t stay in frame?
Another feature of the video timeline mode. Keyframes are your best friend. This tutorial by @kangyeosaang covers everything you need to know about panning gifs. I use this technique regularly, it’s a life-saver.
COLORING
Here are some coloring tutorials I found very useful:
Coloring tutorial by @brawn-gp beloved, their coloring style is second to none
Mega coloring tutorial by @yenvengerberg, for stylized /vibrant coloring
Understanding Channel Mixer by @zoyanazyalensky
Coloring rainbow gifs by @steveroger, which delves deep into Channel Mixer
I tend to go for neutral-saturated coloring in general, especially for minimalist gifsets with no effects (blending/isolated coloring/overlays etc.), but the possibility is endless for stylized coloring. Here’s what my adjustment layers look like for the example gifs above.
The base footage for this Charles gifset is incredibly desaturated. I started with a Curves layer to bring contrast to the gif, as well as do some color-correcting to bring the base footage to a more neutral tone. To bump contrast, I also like to add a black and white Gradient Map layer with a Soft Light blending mode at 10%-30% opacity:
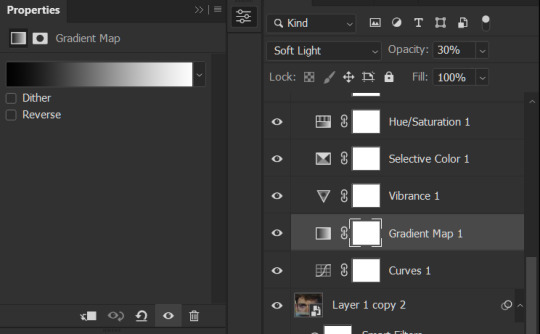
The Vibrance layer is then used to lift the saturation of the base footage, with the Selective Color, Hue/Saturation, and Channel Mixer layers to help remove the green/yellow tint to his skintone.
An underrated adjustment layer/preset in my opinion is the Color Lookup. You can layer in pre-loaded .LUT color grading presets to help speed up your process. For this gif, it’s simply a base preset Soft Warming Look to achieve a warm, pink-tinted tone.
In hindsight I feel like this gifset is too saturated, his skintone is skewing very red/pink, I could’ve bumped down the lightness of the reds with a Selective Color layer or a Hue/Saturation layer. Try to err on the side of neutral for skintones. Experiment with layer orders—there’s no right or wrong! Remember that each layer build up on the one before it.
The base footage of the Jalen gif is already quite nicely color-graded, but it’s still muddy and underexposed. As with the Charles gif, I started with a Curves layer to bring the gif to a better baseline contrast. Then I focus on brightening the gif with the Brightness/Contrast and Exposure layers.
The Hue/Saturation and Selective Color layers are to color-correct Jalen’s skin tone—it’s something I spend most of my time coloring gifs and focus a lot on, especially when color grading BIPOC skintones. Putting a Vibrance layer, upping the Vibrance and Saturation, and calling it a day would make his skintone skew very, very yellow/orange.
Focus on the reds and yellow for skintone, play around with the Saturation and Lightness sliders, use the Hue slider with caution.
It can be tricky to achieve the right skin tone when working with sports footage vs the higher quality, higher dynamic range footage of films or TV shows, but I try to keep it as close to the subject’s natural skintone as possible.
Here are some of tutorials with tips and tricks on coloring BIPOC:
How to fix orange-washed characters by @zoyanazyalensky
How to prevent pink-washing and yellow-washing by @jeonwonwoo
Coloring tutorial by @captain-hen
Changing lighting conditions?
Fret not—this is why I love working in video timeline. I’ll take this gifset as an example: it’s a deceptively difficult one to color. The footage is 720p and the sunlight shifts throughout the video, so matching across gifs was tricky.
My solution was to split the clips in sections with consistent lighting, and apply adjustment layers to the individual sections before applying general color grading layers on top of everything.
We can make use of the Fade Transition effect for sections where the lighting changes within the gif section we want to color.

(without vs with Fade on the Brightness/Contrast layer)
The difference is subtle in this example, but the brightness in the right gif is noticeably more consistent throughout. You can also add the Fade Transition effect to the beginning for a fade in, of course.
SHARPENING AND OPTIMIZING GIF QUALITY
This tutorial by @anya-chalotra covers everything you need to know about optimizing gifs for Tumblr.
Sharpening.
Sharpening is essential to making crisp gif images. Here’s another ask I answered re: my own sharpening settings and maximizing gif quality.
(base footage, unsharpened)

(color graded, unsharpened)
(color graded, sharpened)
The final gif is sharpened with Smart Sharpen, 500% at 0.3px and 10% at 10px (my standard sharpening settings).
Here are some tutorials and resources on sharpening:
Sharpening process by @anya-chalotra
Sharpening tutorial with added gaussian blur by @haleths
Sharpening action by @daenerys-stormborn
Size your gifs for Tumblr correctly.
This is essential: full width gifs are 540px wide.Two side-by-side gifs should be 268px wide. Here’s a handy post on gif size guide for Tumblr.
Incorrectly sizing your gifs will take away the quality of your gifs: undersizing your gifs will especially make them grainy, blurry, and /or pixelated, and won’t display correctly on many people’s desktop theme. Oversizing usually isn't as dramatic as undersizing, but it will make the gifset glitch when displayed, and the file size will be unnecessarily bloated.
Work with HD footage if possible.
Media fandoms (films/TV shows) are luckier than us in the sports trenches—we have to work with what we have. Broadcast footage is usually subpar: lacks contrast, pixelated, very desaturated, the list goes on. But it’s possible to still make high quality gifs from subpar footage. Here are a couple of tutorials to mask low source footage quality:
low quality video ➜ “HD” gifs tutorial by @nickoffermen
Sharpening low quality footage by @everglow-ing
(This gifset I made is from a 480p footage with horrendous lighting conditions and colors, and the end result is decent I’d say)
Save for Web (File > Export > Save for Web (Legacy) or Ctrl + Alt + Shift + S) settings.
I default to Adaptive + Diffusion but also use Adaptive + Pattern from time to time. Any combination of Adaptive or Selective + Diffusion or Pattern will give you a good result. In my experience some gifs will need the Selective color table for the colors to display correctly.
Here are my default settings:
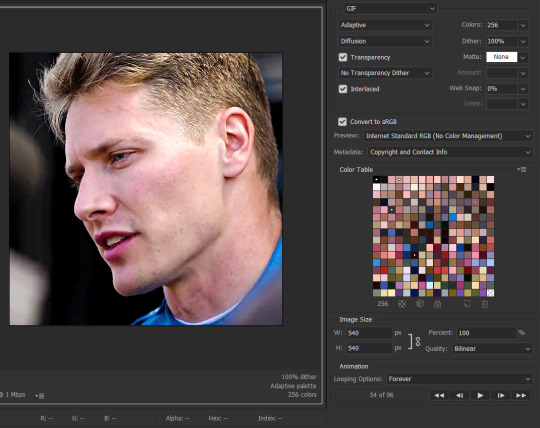
SAVING AND EXPORTING FOR TUMBLR
Converting to frames and adjusting the gif speed.
If possible, avoid exporting your gif and reopening it to adjust the frame speed. I used to do this sometimes when I’m lazy, I have to admit, but this is where this Action as mentioned at the beginning comes in very handy. It converts all visible layer into smart object, then converts it back to frame animation.
Step-by-step:
1. Select all layers
2. Right click > Convert to Smart Object
3. Go to the Timeline menu (≡) > Convert Frames > Flatten Frames into Clips
4. Go to the Timeline menu again (≡) > Convert Frames > Convert to Frame Animation
5. In the same menu (≡), select Make Frames from Layers
6. Delete the first frame (it’s a duplicate) then set your frame speed

Now you can adjust the frame speed before exporting it (Save for Web).
Pay attention to the source framerate.
The frame delay of 0.05 s is usually the default to make gifs for TV shows and films, and it is preferred by most gifmakers. This stems from the fact that most movies and TV shows are 24 or 25 FPS. This may not be the case for all source videos: you might get 30 FPS footage, and sports or gaming footage can be 50 or 60 FPS. Gif speed also depends on the FPS of your original file. Play around with gif speed and see what feels most natural to you.
My rule of thumb is the frame delay Photoshop gives you + 0.01 s. For example, 50 FPS footage will give you 0.02 s frame delay (25 FPS gives you 0.04, 30 FPS gives you 0.03, etc.), so set it to 0.03 s. I usually err on the side of a faster frame delay for smoothness in in-game sports footage, anything else (interviews, press conferences, B-rolls) can get away with being slowed down. Again, experiment and see what you think looks best!
Keep gifs under the Tumblr file size limit (10 MB).
Cut down the number of frames. My gifs are usually around 60-70 frames for 540px full-width gifs, but depending on the coloring, sometimes you can get away with more. 268px gifs can go up to 200+ frames.
Crop your gifs. Remember to keep full-width gifs at 540px wide, but if necessary, you can crop the height. My go-to sizes are 540x540, 540x500, 540x450, and 540x400.
Amp up the contrast of your gifs. Flat colors like black cut down gif size.
The Grain filter or Noise filter, though beautiful for aesthetics or simply necessary sometimes to mask low source footage quality/pixelating, may bloat your gif size.
Play your gifs back before exporting.
Pay attention to duplicate frames or glitches, you might need to get rid of them!
Hope this is helpful! Don’t hesitate to send an Ask or DM if you need any help, I will happily answer all your questions and send over PSDs. (I’m also on Discord—just shoot me a message if you need my tag!) Happy creating :]
#tutorial#PS asks#gif tutorial#Photoshop tutorial#I guess this is more of a resource link dump than tutorial but. Hey. Why reinvent the wheel...#Sorry for the late answer I hope you see this Anon :]#completeresources#allresources#userxoames#userbarbi#usernrzr
1K notes
·
View notes
Text
30 minutes of editing and we got this babes!
The only reason it took as long as it did is that i had to remove the old audio from the mp4 i used. the video quality was good but the audio sucked so i swapped it with an mp3 version of the official song that was uploaded to youtube. also my first mp4 file got corrupted and i didnt realize for a solid 30 minutes
anyway... heres Stayed Gone from Hazbin Hotel in the best quality i could find! could be better but i tried
https://youtu.be/2J1zuxRqwto?si=DaBoeyvWwfw1D9ci
if anyone wants the file i gotchu <3
#hazbin hotel#hazbin hotel alastor#hazbin hotel vox#alastor#vox#piracy#but only because they wouldnt offically upload it#and i need to replay it a bunch#its so good#go watch the actual show pls#stayed gone
93 notes
·
View notes
Text
getting that good wood - info post!
hullo! so this info is all from goodwood's site, but i thought i'd consolidate a couple relevant events/times for seb fans to watch out for—y'know, the whole where and when shtick!
<< WHERE >>
if you do not have tickets to attend in person: the 2023 goodwood festival of speed will be streamed live on their youtube channel! you can find their channel HERE.
the livestream schedule is as follows:
Thursday - 09:20 BST
Friday - 08:30 BST
Saturday - 08:30 BST
Sunday -08:30 BST
with the exception of thursday (which is just an hour later), 8:30 BST translates to...
eastern time - 3:30
central time (US) - 9:30
central european time - 2:30
pacific time - 12:30
philippines - 15:30 (3:30 PM)
australian eastern standard - 17:30 (5:30 PM)
if you have access to ITV1: the festival will be shown on saturday at 11:15 BST and sunday at 13:30 BST, with highlights available on itv4 the week after.
<< WHEN >>
goodwood is next weekend, from thursday (july 13) to sunday (july 16). seb has been confirmed for appearances on both saturday and sunday, but he might be there thursday and friday as well to check out the festivities!
you can find the full timetable HERE.* more details under the cut!
*please note that this information is NOT final and may be subject to last-minute changes, but for the most part (a week out from the event, when this post is being written) should be accurate
saturday, july 15
seb has an interview scheduled for 14:45 (2:45 PM) BST!
eastern time - 9:45
central time (US) - 8:45
central european time - 15:45 (3:45 PM)
pacific time - 6:45
philippines - 21:45 (9:45 PM)
australian eastern standard - 23:45 (11:45 PM)
goodwood only says he's slated to drive from his collection, including nigel mansell’s williams fw14b and ayrton senna’s 1993 mclaren mp4/8. so a POTENTIAL event he might drive in is goodwood 75 at 14:05 (2:05 PM) BST
description: experience the rich history and unparalleled excitement of motorsport at goodwood, re-living the most exciting and iconic moments from the past 75 years.
eastern time - 9:05
central time (US) - 8:05
central european time - 15:05 (3:05 PM)
pacific time - 6:05
philippines - 21:05 (9:05 PM)
australian eastern standard - 23:05 (11:05 PM)
sunday, july 16
again, these are only potential events he might drive in!
there's another showing of goodwood 75 at 8:30 BST.
eastern time - 3:30
central time (US) - 2:30
central european time - 9:30
pacific time - 12:30
philippines - 15:30 (3:30 PM)
australian eastern standard - 17:30 (5:30 PM)
and the famous goodwood shootout at 14:00 (2:00 PM) BST
description: the weekend reaches its thrilling climax as motorsport greats fight for the top spot in the timed shootout.
eastern time - 9:00
central time (US) - 8:00
central european time - 15:00 (3:00 PM)
pacific time - 6:00
philippines - 21:00 (9:00 PM)
australian eastern standard - 23:00 (11:00 PM)
and finally, yet another goodwood 75 at 16:30 (4:30 PM) BST.
eastern time - 11:30
central time (US) - 10:30
central european time - 17:30 (5:30 PM)
pacific time - 8:30
philippines - 23:30 (11:30 PM)
australian eastern standard - 1:30 (MONDAY JUL. 17)
no idea what exactly he's going to participate in (save for the interview), so if you have the time to watch all weekend, u might catch him elsewhere in the official stream! but these are the most likely events i could think of, for those who might be busy or only want to pay attention to what he might be doing.
that all said, i encourage people to watch other events at goodwood if possible! it's a fun event and there's lots of cool people scheduled to make an appearance :)
if i missed anything, do feel free to let me know!
#sebastian vettel#goodwood festival of speed#goodwood 2023#edit like 20 min later fixed a typo about the thurs stream it should say an hour later than the other days srry!
184 notes
·
View notes
Text
The Ultra Stage 3 English subtitles for DVD
(musical 2 subtitles are here)
Here are the English subtitles for the DVD of the third stage musical of My Hero Academia: "The “Ultra” Stage Symbol of Peace" and it covers the forest training arc and Kamino (chapter 70 to 95). The Japanese title is: 「僕のヒーローアカデミア」The “Ultra" Stage 平和の象徴.
download link (mediafire rar. file) - last updated 2 Jan 2024
download link (mega) - last updated 2 Jan 2024

The subtitles are in .ass formats and were synced using Aegisub.
Musical3_MP4 is for the main show in disc 1. Instead, Musical3_PanoramicMP4 is for the panoramic camera view of disc 2. (I am still syncing this version!)
These subtitles are synced with the officially released dvd but can be used only after transforming the dvd (which has multiple vobs files) into a video file. This is the main dvd (non panoramic) version, panoramic version will be added soon!
In order, this is what you need to do to fully enjoy the musical with subtitles:
1) Buy the dvds: where to buy the dvds
2) Transform the dvd into mp4 format + add subtitles: how to transform your dvd into a video file and how to add the subtitles to the dvd - guide
3) For a comprehensive summary of musical information (titles, where to buy, etc) you can check the weebly page here or the summary post on this blog (which has tags for pics and videos too).
4) If you see any mistakes, or you would like to translate them in a different language, please contact me here, on twitter or via email ([email protected]) and let us know so we can fix it!
IF YOU HAVE PURCHASED THE DVDS and you need any help making these subtitles work do not hesitate to contact me. I WILL FIGHT AND FIND A SOLUTION UNTIL YOU CAN WATCH THIS SHOW SUBTITLED.
CREDITS
Subtitles and translations have been created by:
bakuhatsufallinlove (tumblr): songs, dialogue, sync, editing, proofreading, organizational work
arthurianmaiden(me, also on tumblr here): dialogue, sync, editing, organizational work, sync for panoramic version.
juarhala (tumblr): dialogue, sync
nyankomata3 (twitter): songs
Special thanks to pikahlua (tumblr) who helped us with some of the translations!
We also used some missing song lines from orchidsubs/orchid4hire youtube translations with their permission (youtube channel here).
Remaining bits of songs and dialogues were translated by fiverr user kentranslations with funds donated by Elle Cross, Nanabamboo and Maria.
Keep in mind that a lot of things (songs, help, support) also comes from all the people who partecipated in the creation of the subtitles of musical 2! So please check this post too!
#my hero academia#togachako#kamino#bnha#bnha musical#the ultra stage#ultra stage#bnha musical subtitles#mine#well that is the tag i use#but this is a work of many people!
74 notes
·
View notes
Text

some quick info:
↳ this is specifically for the screencapping method. i use mplayer osx extended to get my caps, but there are a few other programs you can use as well. i’ll specifically be going over mplayer here.
↳ i’m using ps 24.4.1 on a 2020 m1 macbook air
[tysm to @kyubinz for looking this over and adding some things ily]
☆ feel free to send me an ask/message with any questions you have! ☆
「 setup 」
1. finding videos
one big thing to remember is that the overall file size of your video will impact the quality of your gif. the larger, the better. i almost never use anything below 1080p, and try to use 2160p whenever i can. 4k video downloader is the program i use for downloading videos from youtube, it’s free to install and works great! because of how large some files can be, i always store any media on my hard drive. i highly recommend using one if you plan to keep lots of files on hand.
.mkv files are best, but .mp4 works fine as well (.mkv files are usually bigger aka better quality).
2. getting your screencaps
after downloading mplayer, go to the top bar and click file > open. open the video you’ll be screencapping.
you can either drag the little time indicator or using the arrow keys on your keyboard to move to the spot you want to capture. the > key can also be used to move forward frame by frame. to start capping, pause the video and press shift + cmnd (ctrl if you’re on windows) + s to take a screencap. i usually just hold it down until i’ve gotten all the screencaps i need.
by default, screencaps go right to desktop. you can set up a folder for them to go to automatically by going to settings > general and then selecting a spot in the menu under “interface”, but i just let them go to desktop and then sort them into individual folders so they’re easier for me to find while i’m giffing. in general, i try to stay under 80 frames so my gifs fit into tumblr’s 10mb image size limit.
3. importing screencaps into photoshop
to import your caps into ps, go to file > scripts > load files into stack. this window should open:

click browse, and navigate to the folder with your caps in it. select all of the caps you want to import, and then click open.
click ok to create a file with your caps, and then wait until it’s finished loading your caps into the layers tab. once they’re loaded in, this is what your screen should look like:

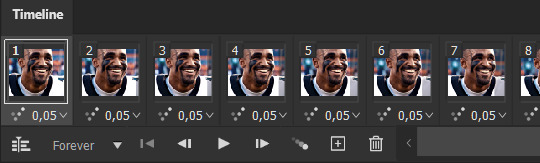
(if you aren’t seeing the timeline at the bottom of your screen, go up to the top bar and go to window > timeline)
click create frame animation, then go to the hamburger menu at the top right of the timeline and select make frames from layers. once your frames have loaded in, select the same menu again and click reverse frames. play through your gif to make sure everything looks good.
if you were to save your gif at the speed it’s set at now, it would be way too fast. to fix this, you have to set the frame delay. do this by selecting all your frames in the timeline using shift click, and then clicking (on any frame) where it says “0 sec”. select other from the menu that comes up, and you should get this popup:
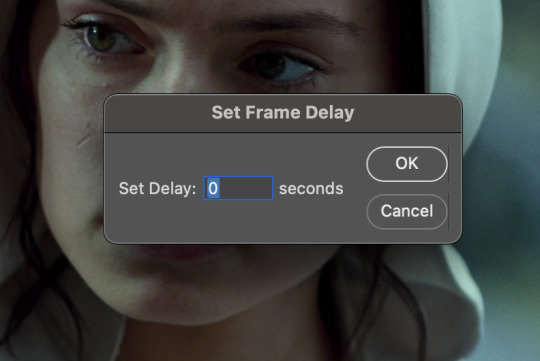
the general rule of thumb for gif frame delay is 0.05 seconds. there are some cases — certain animated movies or video games, for example — where other delays are best, but for the most part, 0.05 is what you want to use (0.05 can slightly slow gifs, and sometimes using 0.04 better matches the clip's original timing. this is really a "train your eyes" thing, and picking the best delay gets easier as you gif for longer). you can set this by typing the number into the text box and then hitting the ok button or enter on your keyboard.
at this point, i’d go ahead and save your file. you can go to file > save in the top bar, or just hit cmd/ctrl + s on your keyboard.
「 making your gif 」
1. sizing
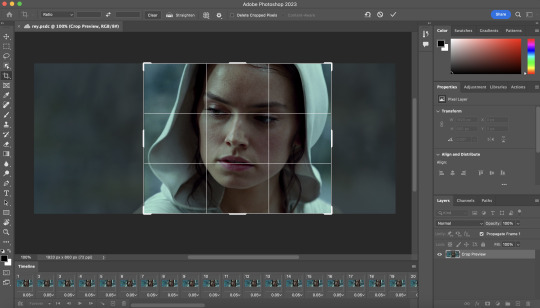
after your frames are ready, the next thing is to size your gif. to crop your gif, press c on your keyboard to open the cropping tool. white borders will show up around your gif.
before doing anything, i would suggest making sure “delete cropped pixels” is unchecked. this will allow you to drag your gif around later if you want to reposition. you can find this option at the top of your screen. drag the borders on either side until you have the area you want selected. mine looks like this:
once you’re happy with your selection, hit enter on your keyboard to finalize it.
the tumblr image guidelines require gifs to be 540px across (here’s a post detailing this). to change your gif’s image size, go to image > image size in the top bar. you’ll get this popup:

instead of setting the width right to 540, i’ll be setting it to 544, and then trimming down the edges using canvas size. this makes the quality just a little better, and also prevents any weird borders being made around your gif on the off chance photoshop decides to add them. this isn’t necessary at all, you can absolutely size right to 540, but i just like doing this. if you choose to do this, open canvas size right after you set image size (image > canvas size in the top bar), and trim your width down to 540 and your height down a few pixels as well.
2. sharpening & other filters
sharpening is essential for good-quality gifs. the first step to this is converting our timeline from frame animation to a video timeline. select this little icon in the bottom left of your screen:
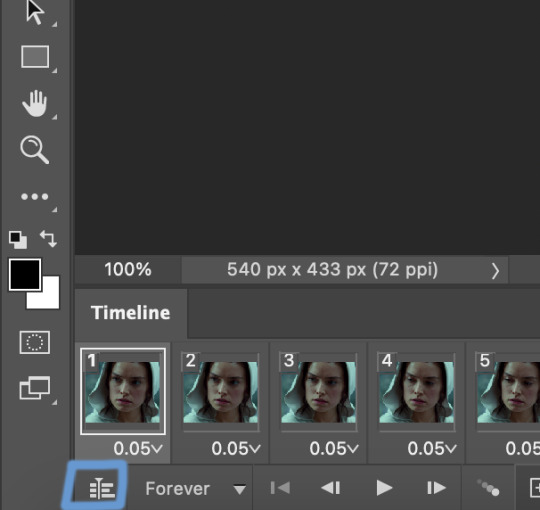
this is what your timeline will look like now:

you can use the little slider with mountains on either side to change the width of your frames in the timeline for easier access when editing. now that we’ve got all this set up, we can sharpen! i use this action pack to sharpen my gifs in addition to a few of my own settings (here is a video on how to install actions into photoshop). go to window > action in the top bar if you aren’t seeing the action tab.
i’ll be using the sharper action from the pack. to use an action, select it from the list and press the little play button at the bottom of the panel to apply it.
in addition to this, i usually also add unsharp mask at 50% amount with a 0.5px radius:


there are a few other filters than can be helpful when giffing:
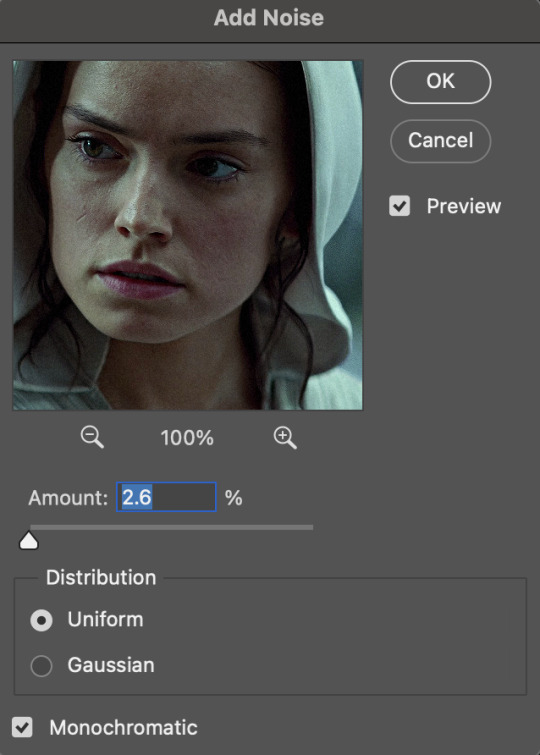
a. add/reduce noise
noise (aka grain) can be added with “add noise”. go to filter > noise > add noise.
these are the settings i usually use, but the amount depends on the gif (i don't ever go over 3.5 for the most part):
(if you want a grain effect but moving noise doesn't work for the gif, you can also add a grain overlay and then mess with blending mode and layer opacity until it looks how you want)
reduce noise can be used to remove some of the pre-existing grain on a clip. go to filter > noise > reduce noise. here are my settings:

leaving reduce noise on its own at 100% is a bit too much, so double click this icon and change the opacity (i usually do around 45):

b. gaussian blur
if your clip is a bit pixelated, gaussian blur can help with smoothing it out a bit. go to filter > blur > gaussian blur. my settings are 1 pixel radius w ~20% opacity (this changes based on the gif).
3. coloring
time to color! i want you to keep in mind during this section that everyone likes different colorings, and this is just my process! please don’t feel pressured to follow exactly what i’m doing, the best way to find what you like is to just mess around and experiment!
i like to start off with lighting adjustments: brightness/contrast, levels, exposure, and curves.
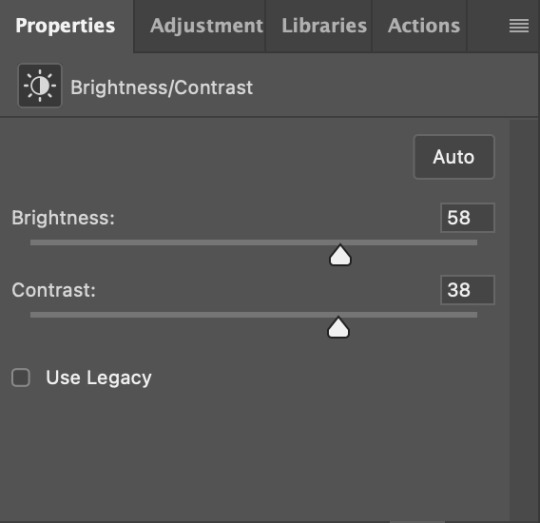
a. brightness/contrast
i usually start out with this first, just because brightening the gif right away helps me start thinking about how i want to color! here are my settings:
b. levels/curves
levels and curves can either be used interchangeably or together. i usually use levels to adjust lighting and curves to adjust color values, but i’ll go over using both for lighting as well as using curves for adjusting color values.
for both of these adjustments, i use the eyedropper tools to pick out white and black points. for levels, the top eyedropper tool to the left of the graph is used to pick out a black point. i do this first. use the tool to pick a spot on your gif that you want to be the base for black values. for me, that’s the shadow inside rey’s hood. the bottom eyedropper tool picks white point. use the tool to pick a spot on your gif that you want to be the base for white values. i chose the outside of rey’s hood. make sure you’re doing this on a new levels adjustment layer.
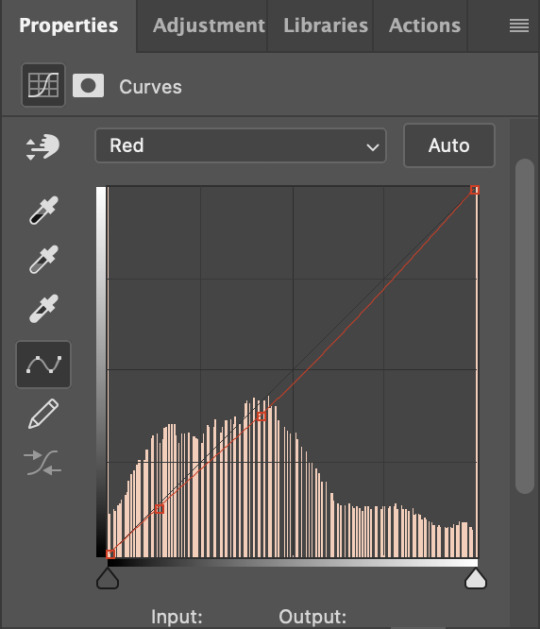
now, on to curves. you can either use the same eyedropper method or manipulate the graph directly. using the eyedropper is the same as levels, so i’ll just go over graph manipulation.
shade lightens as you move to the right along the x-axis of the graph — black is the far left, white is the far right, middle is the midtones. generally, i don’t work with midtones.
i’m going to use levels for this gif’s lighting, and curves to adjust color values. here’s how to do that:
curves can be used to adjust the amount of a certain color in different lighting areas of a gif. for example, i can specifically decrease the amount of green in the gif’s whites. to edit these values, select the rgb drop-down menu and adjust them one at a time. here are my final graphs:


c. exposure
this one’s pretty straightforward. the exposure slider adjust general exposure. the offset slider adjusts how dark your dark points are, and gamma correction can be used to lighten/darken scenes as a whole. here’s my settings:

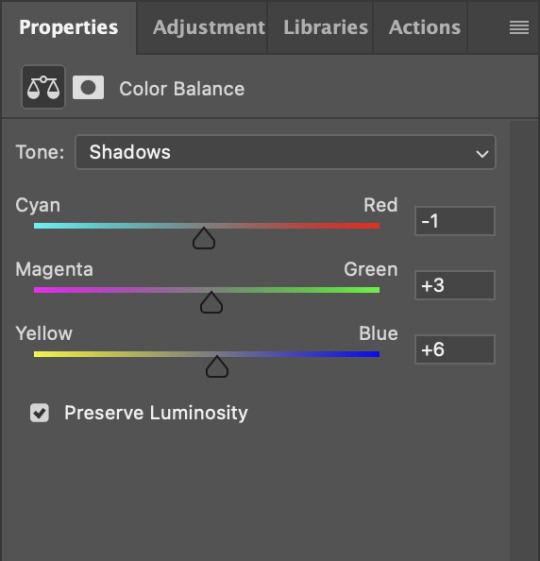
d. color balance
color balance is used to adjust overall tint of a clip. this is in general pretty simple, but i do want to point out that using the shadow and highlights tabs in addition to just the midtones can really help. here’s my settings:

e. channel mixer
channel mixer is one of my favorite tools in ps, especially for coloring scenes that are a pain in the ass without it. to avoid taking up too much space, here’s a great tutorial covering channel mixer. here’s my settings:


[at this point, i’m noticing my gif is still a bit darker than i’d like it, so i’m adding just a bit of brightness/contrast to fix it. there’s also a patch of blue over one of rey’s eyes, so i’ve used a hue/saturation layer to get rid of that bit and masked it to her eye. i’m not going to go over masking here, but there are lots of great tutorials out there!]
f. selective color
selective color can be used to adjust the amount of specific colors within a color. for example, if i were to go into the red tab and take out cyans, the reds would become more red. if i were to add yellows, the reds would become more orange, etc etc. this can be especially good for color manipulation. for this gif, i’d like to make the background more blue, so i’m going to use selective color to do this. here’s my settings:

g. color lookup
color lookup uses 3dlut files to remap gif colors (it’s a preset — think instagram filter or something similar). i don’t always use these, but when i do, i almost never leave them at 100% opacity. color lookup is great for giving gifs a film-type look if you want to do that, it’s got loads of different options. here’s my settings (adjustment layer is set to 20% opacity):

atp i’m pretty much done with coloring! i usually end up doing a few extra little lighting adjustments at the end. for this gif, i added some brightness/contrast at +8. i’ve also noticed that my gif’s looking a bit grainy, so i’ve added some noise to lean into it. this is usually the way i fix it, but you can definitely do reduce noise/gaussian blur as well if you don’t want a grainy look.
here’s my fully colored gif + a process gif (fast images warning):

「 saving gifs 」
1. frame rate
one thing you may have noticed is that my gif is looking a bit choppy. photoshop has a tendency to mess with frame delay after gifs are converted to video timeline. here’s how to fix that.
select all of your layers and convert them to a smart object (right click > convert to smart object). next, click on the hamburger menu in the top right of the timeline and go to convert frames > flatten frames into clips. now we need to change the timeline from video timeline to frame animation. click the little 3 boxes symbol in the bottom left corner of the timeline:

go to the hamburger menu again and select make frames (this is the same one you used earlier), then go through your frames and delete any duplicates. the first frame usually needs to be deleted specifically. once you’ve done that, set the frame delay back to 0.05 the way you did earlier.
2. exporting
once you’re happy with how your gif looks, go to file > export > save for web (legacy).
these are my export settings, but feel free to experiment with the menus where i have selective and diffusion selected, different settings work best for each gif. in general, most gifmakers only use selective/adaptive and diffusion/pattern because they generally work the best for tumblr. before saving, make sure your looping option is set to forever:

gif size for tumblr has a 10mb limit. my gif is under this, so i don’t need to make any changes, but if yours is over, you can either delete some frames from the beginning/end of your gif and/or adjust the height of the gif (width needs to stay 540px so your gif doesn’t get stretched/compressed on tumblr, but height is fair game).
here's my final gif!

happy giffing, and please don’t hesitate to send me any questions you have! ♡
#*mine#gif tutorial#tutorials#allresources#usertheos#userzesty#userzaynab#usershreyu#rogerhealey#userabs#userhekaates#usermaria#userraffa#usermorgan#uservivaldi#tuserheidi
278 notes
·
View notes
Note
What got you to start editing out the intros on snapcube 2? I suppose it helps get to the games faster, but as a hardcore Vodhead, I kind of liked those.
I've gone back and forth about keeping pre-streams in the VODs for a couple years now. Whenever I decide to take them out I always have a couple people being like "aw I liked those", but then when I leave them in I can tell the majority of viewers will just skip to gameplay anyway and of course there's the age-old "skip to [timestamp here] for the game" comments. Not that I really mind people having the option per-se, but essentially over the years I've gotten the impression that there's always gonna be someone who feels like the experience of the VODs could be improved by either including them or cutting them and it's just gonna come down to individual preference, so I should go with my gut and how I like to produce things.
SO to actually answer your question as it stands technically, what got me to start removing the opening sections of streams RECENTLY is that I actually just completely upended the way I produce these VODs. I used to have an entire, seamless recording running from the moment I started streaming to the very last second, when I hit my "go live" button the recording would turn on automatically and I never touched it. Then when it came time to post I would put the recording in my editing software, cut out the starting soon screen and all the breaks, and then render and upload manually. At some point during or right before the Tears of the Kingdom series I changed this completely. Having to render out new versions of cut down VODs overnight became way more trouble than it was worth, literally hours of downtime where I couldn't do much on my PC while it was working on exporting them.
So I created a new method that goes something like this:
start the stream, play music
after a few songs, hop on mic and settle in with chat. talk about stuff, chill.
once i am ready to Do The Actual Content, i hit the button to start recording stream locally so the recording only ever begins when i'm ready to go.
i address vodheads and introduce them to the stream separately, then the show starts for real
if there are any stream breaks, i pause the recording as i leave and start it up again once i come back so there is literally nothing i have to edit out of the final recorded file
once the stream is over, take the recording and quickly convert it to mp4 so i can upload it to youtube as-is. every cut is already made, it's in full quality, and i don't have to render it.
now, i totally could just start recording once i hit my "bootup jingle" sound and hop on mic earlier in that process! the practical difference would not be really much to sneeze at on my end. i actually have already done this a couple times! however, what also ended up happening is that the Tears of the Kingdom series like.... REALLLY cut down on how much time i was even spending in the pre-stream to begin with. i was so pumped about that playthrough and i wanted to really maximize my time playing the game while i was live, so often there just really wasn't anything interesting in the pre-stream chat to begin with. this wasn't always the case, but it was reliable enough that i got used to just starting the recording when i started the game. then once i got used to it i kinda started to like it and like how the final VODs turned out when you could just click on it and jump right in, and i've kinda kept up a similar pacing and cadence to my streams post-TOTK.
ultimately, the TL;DR answer is that it's just how i prefer to produce the VODs right now and it makes my workflow a lot easier and makes me feel good about the final product! not saying this will never change, again it's something i go back and forth on. but it's how it is rn!
169 notes
·
View notes
Last Seen Blogs

xorydel
BEAUTY

vegas11app
Vegas 11 app se paise kaisa kamaye

doofuscon-blog
guh?!

jlmrz
electroacupuncture
potatogal
potatogal