#fresh tips tutorial
Text
There is in game sound from the radio, so don't turn your speakers up too much lol.
@merge-conflict since you asked for the behind the scenes of these shots!
So far, the only workaround I've discovered to get around the NPC collision physics in vanilla photomode is to get some height and clip through the top of the character. Which is why there's a lot of me jumping on the light fixtures and furniture and then wiggling every single pose slider. The setup for objects in this apartment isn't great, most stuff is either too tall or too short of ideal and placed too far away, which made it a lot trickier to get these photos setup. And the reason I did this in the Glen apartment is because it has enough ceiling clearance to do all this, most of the other apartments don't. The Corpo Plaza might have high enough ceilings, but I'd have to scout it out.
I unfortunately didn't get footage of the exact moment where I managed to get the setup correct. Which was me going up to the second floor with the bed, jumping onto the railing while crouched, sliding down to the spotlights just below, and then somehow pulling out photomode at just the right time mid-fall.
I'm explaining all this in case anyone else is also on console and is interested in taking their own shippy pics. It's pretty goofy and requires a lot of persistence, but it's not impossible. And this technique does work for all NPC models, so you can get in with any of the other LIs too.
#cyberpunk 2077#virtual photography#tutorial#tips and tricks#console shots#vanilla photomode tutorial#let me show you the way of the cheese#oc: valerie hye jin li#my grandpa v#stinky not fresh#river ward
36 notes
·
View notes
Video
youtube
Quick Tips Apply Transfers for tabletop wargaming miniatures #paintingwa...
#youtube#way of the brush#tutorial#painting#mini painting#painting warhammer#bretonnia#decals#quick tips#just the tip#fresh tips#tabletop gaming#miniature wargaming
4 notes
·
View notes
Note
how do you start doing low poly models like that? id like to start myself but im not sure
I have a bit of a leg up by virtue of having done a game art course so I already have all of the technical skills and such to do full proper character models, so the low poly stuff is easy by comparison.
That said! I tend to start with the hips, head and feet and work from there- I work in Maya, and use the extrude and multicut tools primarily, with symmetry on, model em in a t-pose for rigging reasons. The big thing is to keep your edges forming nice "loops" rather than spirals or whatever - that way, you can easily remove polys later- when it comes to 3d work, it's often easier to start high and work your way down than the other direction.
At some point I need to make another lowpoly character model - when I do so, I'll take a bunch of screenshots n add them on to this post to show the process!
#I am freeish this weekend so perhaps then.#Sorry I don't have any proper tips or tutorials anon I am not self taught I literally just took 2 years of classes#Wish I could help you more!#Feel free to ask more specific questions n such but if you're like. Totally fresh to 3d modelling#Uhh. Ccan't really help you bc i just. Took classes.
10 notes
·
View notes
Text
doll hand-book⋆.ೃ࿔*:・🎀

how to feel prettier, some visual interest tips, a beauty handbook and how to glow up without doing something big/extra, little habits and things that u can incorporate into ur life to make u glow up without even thinking about it ✨ (constantly being updated)

double cleansing every morning and night for clean and sparkling skin
BODY GLITTER
exfoliate ur skin weekly (2-3x)
incorporate pretty words into ur vocabulary
drinking enough water everyday to be healthy and beautiful
sweet smelling body butters and body oils to moisturize
posture is important so sit straight and stand straight
wear sunscreen on your face and body everyday bcuz spf is important
jewelry to decorate ur body
carrying lipglosses and hand lotions and perfumes in ur bag for touch ups throughout the day
meditate, say ur affirmations and journal for a pretty mind
for journaling, buy a cute journal and journal with scented glitter pens and stickers
for visual interest
glitter is very feminine, in makeup, clothing, nails, and on collarbones. when i wear glitter on my skin i feel like a fairy ✨
jewelry makes u glitter (nose studs, stacked necklaces and stacked earrings, rings, belly piercings, and nail gems)


know what ur undertone is, since i have a warm undertone (gold>silver)
LONG is the way to go (long nails, lashes, hair, flowy dresses and tops and skirts)
for the sleek and shiny look (shiny and silky hair, glossy skin and lips)
glowing up subconsciously
prioritize sleep (sleep 8-10 hours a night)
drink at least 1L of water a day
eat a fruit or veggie with every meal to glow from the inside out
use coconut oil/castor oil on ur lashes and brows every night
facial massage everyday and practice mewing
move your body in a way that feels natural (for example, i go to a school where we have to walk a lot bcuz the campus is big so subconsciously i do LOTS of walking without even thinking of it)
if ur wearing ur hair up/in a protective style, use a hair mask
to look polished and put together
chapped lips are unacceptable, use an overnight lip mask and a hydrating chapstick throughout the day. if u notice ur lips just peeling in general, use an exfoliating scrub/brush ur lips with a toothbrush.
neat hair = a polished look
keep ur nails trimmed, filed, and polished and if u wanna do a little extra get them manicured
address skin concerns so that then you can get glossy skin
make sure all ur metals match and color coordinate
keep it simple
details make a difference
shape ur brows
whiten ur teeth + maintain good oral health
color coordinate
fixing posture
HELPFUL RESOURCES
how to smell dreamy - @flirtygirl-coterie
feminine archetypes - @prissygrlsorority
beauty binder - @prissygrlsorority
maintaining a clean and fresh appearance - by yours truly
makeup tutorial in pics - by yours truly
"your glowing" - by yours truly
general hygiene secrets and tricks - by yours truly
#it girl#advice#becoming that girl#self care#self love#that girl#it girl energy#honeytonedhottie⭐️#resources💬🎀#glow up#pink pilates princess#dream girl tips#dream girl#diva#divalicious#princess#dolly#girlhood#girly#girl blogging#girl blogger#glowing effect#beauty tips#beauty
2K notes
·
View notes
Video
youtube
#lip gloss#why should you wear lip gloss#why should you wear lip gloss instead of your favourite matte lipstick#why should you wear lip gloss instead of lipstick#lipstick#matte lipstick#makeup#my makeup tutorial#beauty#beauty secrets#beauty tips#makeup revolution#bratz#bratz lip gloss#glow#look#fresh look
0 notes
Note
hiya! any tips on creating an immersive save that will attract not only you as the player but others as the viewers? your aesthetic is stunning and im so obsessed with everything you do!! <3
oh wow, this is a super sweet ask, @plumday.
let's see. I interpreted this as an ask about how I setup my sim save in a way that engages me. Hopefully this is helpful!
Setting Up TS4 Gameplay

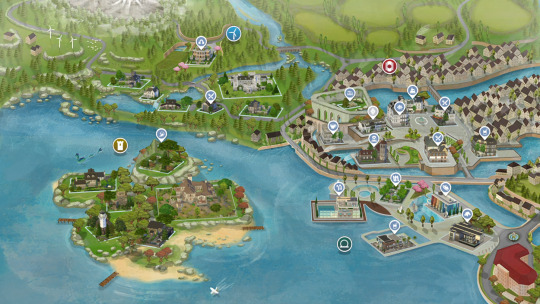
Revamp Sim Worlds
BRAVE THOSE LOADING SCREENS and leave your residential lot! (I promise it's worth it)
NEW LOTS - Each of my worlds have been renovated with lots I handpicked from the gallery - too much work? I recommend using a savefile! Here are some of my personal faves @ratboysims 1, @down-in-simsland 2, @folkling 3 & @sweetbeagaming 4.
RESIDENTIAL RENTAL - these lots help make the world feel more dense and lived in, plus condensing the local households to 1-2 lots leaves room for more non-residential lots to explore with your sims.
WORK AND SCHOOL - I recommend placing offices, schools, and daycare lots. These combined with a few mods (semi-active custom careers and Zerbu's go to school mod 2) and clubs are something I really enjoy.
Set Up Clubs
I really like @sojutrait's tutorial on how to use clubs to enhance your gameplay and is a MUST HAVE in my humble opinion. I usually have a family chore club, work clubs, neighborhood clubs, extended family clubs, etc... and it's so nice to click a button suddenly there are sims there making my game more lively.
To have more than 3 clubs per sim, I use this mod maintained by @kingzaceofsims.
I also use custom club activities so sims (MOSTLY) behave how I want them to. @srslysims has tutorial on how to make your own.
To be able to have club gatherings in vacation worlds I use this mod. It was helpful with sending my pixel kids to camp.
Set Up the Calendar
@aliennooboo made this AMAZING tutorial on setting up your sims calendar that I just adore. I find this helps me remember to do things with my sims and helps change up their day to day life.
Playing
ROTATIONAL GAMEPLAY - I find this keeps me engaged and prevents boredom. It keeps things fresh and allows me to explore different stories. Here is a great resource to get started!
GAMEPLAY MODS - I find adding various mods keeps my gameplay fresh and interesting. I recommend these creators (1, 2, 3, 4 & 5) in particular.
Screenies
POSES - As a gameplay person, I try to use poses sparingly. It disrupts the game for me but I find sometimes I can't convey what I want to without them, so I try to only use a few. This is what works for me, please do what works for you. Shout out to all the storytellers blogs, though, that keep me fed.
RESHADE or PSD files can add some fun color and effects to screenies. ONLY edit as much as you want to. I felt a lot of pressure to get better at this and I am finally finding the balance of how much and what kind of editing I actually like to do. I have collected reshades/gshades and resources here.
House Keeping
Keep back ups of your trayfiles, screenshots, households, lots, etc 'cause it's sims, things break and go wrong.
Keep your CC and mods organized otherwise fixing your game is a hug pain.
Reblogs and additional tips and recommendations welcomed!
HAPPY SIMMING!
342 notes
·
View notes
Note
Do you have a recommendation when designing a black character? Or tips, or maybe pages you visit for references?
Suck at explaining stuff but I’ll try

‼️ Ethnic Features ‼️
So, the art world is in a very weird place when it comes to ethnic features. The conversation was about how using POC ethnic features as an insult in media was damaging and needed to stop, and that somehow morphed into people being scared about drawing people with those features.
Black people have big ears, big noses, and big lips. That's not the problem. The problem was that media was using it to make us look like giant ape, monkey, monster creatures. It's okay to give them these defining features.
Also, remember that brown people have lighter pigment under their feet, hands, and bottom lips. 🌸 (didn’t really know where to put this but drawing mix people is basically a spin the wheel we come in all different shapes and sizes and features. There’s really no wrong way to draw a mixed POC.)
‼️ It's Just My Style ‼️
I'm so goddamn tired of hearing this goddamn excuse. A style does not mean you can't properly represent POC. I would even go on to say that if your style is stunting you so grossly that you can't draw a proper black person, you have a bad art style. Sorry—not really.
Media has shown us that style does not stop representation. The only thing stopping that is your ignorance and refusal to improve. Great examples of ranging styles still being able to represent different POC are "Adventure Time," "Disney's Soul," "Proud Family," "Afro Samurai," etc. I'm just saying this because I've seen this excuse be more prevalent in the art world, and it's just better to nip that in the bud.
‼️ Whitewashing + I Don't Know How to Use the Color Brown ‼️
I've seen people make the excuse that the skin color is lighter because they use a pastel style, but they never bring up the fact that the only color in the art that's lighter is the skin tone. 💀
Also, the whole thing about people saying they don't know how to shade and color brown palettes is just completely bullshit. I would even say that trying to shade pale colors is harder than shading darker colors. Additionally, there are multiple artists and tutorials showing you exactly how it's done. You have no excuses other than you just don't want to.
YouTuber Sinix has a great video on painting skin tones!
‼️ Black Hairstyles ‼️
I love dreads. Dreads are a very pretty hairstyle. However, we have more hairstyles other than dreads. If you're going to draw black characters, I would encourage you to branch out and explore beyond dread heads. There are so many unique black hairstyles out there. We need to move on from just focusing on dreads.
YouTuber Ari has two wonderful videos on black hairstyles in video games. I would recommend checking them out.
‼️ References ‼️
I love referencing old black media such as "The Fresh Prince of Bel-Air," "The Proud Family," and "Little Bill" (before all the Bill Cosby stuff came out). I also appreciate how "House of the Dragon" implemented black people into the lore. Other references include "BOTW/TOTK Rottmnt," etc.
Some artists I reference all the time are Mohammed Agbadi, who doesn't do many art tutorials anymore but often discusses black characters in media, and his art is still amazing. Ethan Becker has a very interesting video on the racist triangle that I recommend checking out.
On Instagram, I love the art of Jojo.Dreamie, Chibichanga12 (holy shit, love their art), Bruniosktch, and Caw.Chan. I also just reference my family a lot. 💀
This is a lot of rambling, but what I’m gonna say is don’t stunt yourself by tricking yourself into believing that your art can’t include POC 🌸🌸‼️💌💖💌💌🎀💕💘‼️🧁
#rottmnt#rottmnt fanart#rottmnt mikey#pastriesart💌#pastrieschat💌#this was long but hope I got my points across#as a Afro head I challenge dread heads to a duel
735 notes
·
View notes
Text
Tipps for little ones that are prone to accidents!!
(Obvious cw! for diaper mention)
mainly regarding No. 2 since that's what I deal with pretty much every day.
Which padding might be best?
Finding the right diaper for regular, or even everyday use can be difficult.
Since I regularly go potty normally, I often have to open and close my diapers. I find hook & loop tapes are the most durable option for this.
Pull ups are also easy for that, but they tend to get saggy and they fray really easily, so I'm not a big fan of them.
Cloth back diapers aren't crinkly, so they are more subtle than others.
The thickness of a diaper is not important when you only go number 2 in them, since they don't have to "absorb" liquid, just hold the other stuff, so you can go as thin - and therefore subtle - as you'd like.
Medical diapers are much more affordable than cute ones, but they are also boring.. Drawing on your diapers or putting stickers on them can be a great solution, aswell as a fun crafting project.
How to possibly prevent accidents?
Prevention is not always possible, but those tricks help me sometimes.
Be careful what you eat/ drink. Knowing what dietary constrictions you have and upholding them can be vital. Try avoiding possible triggers for IBS, food intolerances, etc. Especially when you'll be out and about, where having an accident could feel especially upsetting.
Try and figure out the "schedule" of your bowel movements, most people have to go at certain times and in certain intervals after eating. Figuring out your schedule if possible can help you prevent accidents by going to the toilet at the right time precautionary. Finding out your schedule can be done by writing down every time you use the restroom, especially after eating/ drinking, so also note the times of that! Do so for at least one moth to try and figure out a clear pattern.
What do when you had an accident in public?
Having an accident in public can feel upsetting and humiliating, I often get really self-conscious and sad if it happens.. But I have some Tipps that help me deal.
Firstly, here is a tiny tutorial for the cleanest way to "fold" a dirty diaper, to prevent any leaking.
I always carry little diaper bags with me, that I previously filled with a "smell killing powder". → these powders can be bought online or in stores, they are advertised as scent killers, odour eliminating Powder or garbage / diaper bin deodorizing powder. (I use "Geruchs Vernichter" by Dr. Becher) !! don't put the powder in a diaper while/ before wearing it, it's really harmful to the skin !!
The diaper bags are just little plastic bags, there are options to get ones that aren't see through, if you're super self-conscious. Another option is to wrap the bag (or diaper in it) in toilet paper to disguise it. The bags themselves are also available scented!
Carrying air freshener or deodorant may also help you, when you're in a public bathroom and feel self-conscious about the smell.
A fresh diaper, aswell as wet wipes and disposable gloves are also always in my travel bag.
Make a list of positive affirmations & take it with you everywhere.
It's not your fault, you're not broken, you're not icky, you are so valid & these accidents don't change anything about that!! <3
What to wear?
If your shy about wearing diapers, the right clothes may give you comfort.
Baggy clothes to hide them are a great option.
I found hoodies that are long enough to cover up the back areas especially comforting.
Baggy pants in general are great to hide your padding, just make sure to wear a belt so they don't slip of!
I always wear a tugged in shirt or a onesie, so there is no peeking of the diaper when I lean forward.
Wearing a short leggings/ underwear over your diaper might give you a feeling of safety aswell.
That's all I can think of right now, I might update this later though. Everyone is free to add their own tips, tricks or remarks aswell!!
I want you to know that there is nothing sameful or icky about having to wear diapers or simply choosing to wear them for comfort. There is nothing weird about it and you are not broken or less worthy of love for wearing/ needing padding.
You are strong, you got this and I'm so very proud of you for taking care of yourself!
Stay safe, kiddo!
#nates babbling#baba space#nates tips#nates recommendations#padded agere#padded regressor#paddedagere#sfw interaction only#sfw#sfw agere#agere#age regression#agere community#age regression community#age regressor#cw: diaper mention#tw: diaper mention#tw: diapers#cw: diapers#tw diapers#cw diapers#cw diaper mention#tw diaper mention
180 notes
·
View notes
Text

blender lighting tutorial + tips.
requested by @thecrimsonsimmer + recommended viewing: youtube video one, two, three, and four. this post will be dealing with newer versions of blender (2.8+) and cycles since that's what i'm more familiar with + commonly used for rendering. this is coming from me as an artist with some dabbling in photography and things i've learned in college!
references and setting the mood
are you basing your render on an existing photo? study the light source and what direction it's coming from: that's what's going to tell you your set up for a similar effect.
if you're not basing it on an existing piece, a good start is knowing How you want to set your subject (your sim) up - do you want them to be in the spotlight? are they in a specific environment that has neon lights? are you going for moody or something fresh, bright? definitely look up colors and their meaning (color theory, movie screencaps, etc.) to create a stronger image!
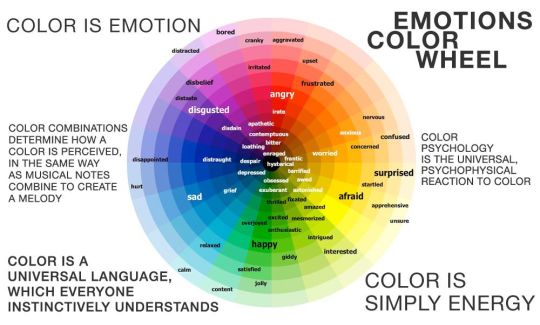
using resources to start the set up
it's always a good thing to mix your tools with different communities, such as the art community! many have lighting tools to figure out how to color their subject, such as this free-to-use head figure that depicts where the lighting source should be placed.

there's also the photography community and teaching people how to set up their lights for certain setups. video three and four linked in the beginning are from photography viewpoints.
spot? area? point? sun?
let's think of the lighting types as objects - a spot is like a plain lightbulb, area is a reflective sheet, spot is a flashlight, and the sun... well is the sun!
a spot is similar to an area light, but triangular/a cone. think of a helicopter search light, it's focused on a small area with the most light concentration. these can be used for lamps with lampshades, car headlights, or a lighthouse.
an area light is great for lighting up technology. a phone screen, tv screen, tablet, anything that's an LED screen emitting from a surface. the light is not as concentrated as a spot and is meant to cover more flatly (hence the rectangular source)
a point is best used for small pops of colors such as candlelight, lamppost, lightning bug tail, etc. a small source that has nothing covering it.
a sun covers the entire area and can be used as the overall mood setter. it can create filter over the entire render by just shifting the color like you would see in a movie. you'll be given a line with a sun light that gives the direction of where the sun is coming from. basically a spot light just on a much larger scale LOL.
power + coloring

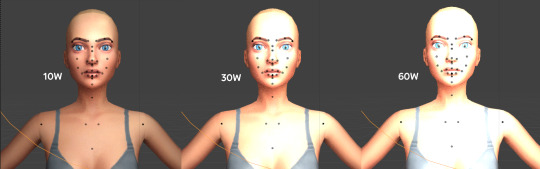
this screenshot is mostly what you'll only use to start off with. watts is the unit of measurement and the higher you go, the brighter the light will be.
examples with a white colored point light
10W-20W: general portrait lighting
30W-50W: bright source, close flashlight for example
60W+: blinding
coloring is just like the system for in game lights for ts4. shift it to whatever you want it to be (click the white bar, that's the color preview) and mess around with the vibrancy. the darker, more intense color, the less it's going to appear on the sim.

closeness and intensity
similar to what's shown in the head lighting tool shown earlier, the closer the light is, the more that specific area is lit up. go too close and your sim could be completely washed out. it helps to change the size of the light (change with the radius slider) to better imitate what you're wanting. the larger the radius, the more diffused and softer the light source will be.
close + small = very clear of the light source shape, can obviously tell where it is in relation to the subject
far away + large = soft lighting, more of a hazy lighting of the color you choose.


to quickly adjust the light, press "G" and hold down your middle mouse button to adjust which axis you'd like to edit along. green is the x-axis, blue is the y-axis, and red is the z-axis. you can also press "G" and type the letter of the axis you want to use. drag the mouse to change the placement on that specific axis to however you want. if you want to freely edit the placement, just press "G" to move it out of the axis bounds.
world lighting
take this step as setting your canvas color before you start painting. in order for the values to look their best, change the world color to the same hue of the color you are mostly using. for example, this is set in a red-toned environment:


this is essentially changing the cast shadow onto the sim. the default is gray and will muddy up your undertones if not changed properly. for this instance, if you were to still use the same red point light in a gray world color it'd look like this:

of course, this will be based on if you have an environment image or not that can affect your lighting overall. this post is based on the fact there is no environment image and what not! if you need a visual demonstration on how to mess with the world lighting, check out this short video.

i hope that helped anyone beginning to render or wanting to light up your own scenes! i'm no rendering expert, but here's some of the helpful tricks i've learned and collected over the years<3 if you have any other questions feel free to send an ask!
#ts4 blender tutorial#sims 4 blender tutorial#ts4 render tutorial#sims 4 render tutorial#lighting tutorial#lyko posts#tutorial#long post
172 notes
·
View notes
Note
As a black girlie all I’ve been thinking about is how dedicated Sejanus would be when it come to taking care of his girlfriends hair. He sits and watches tutorials and tips and tricks on how to do her hair and what’s best for it. He also uses this knowledge when he has daughters too.
oh and ur so right
I think ma plinth has coily hair? maybe? so sejanus grew up watching his mother put care into his hair and it's a familiar sight when he sees you do the same. he likes to sit with you no matter what you're doing, so when it's wash day he's there by your side watching you apply curl creams and gently detangle your hair.
whenever you complain about something, maybe being a little upset that your wash and go didn't work out or maybe you feel like your hair just didn't come out how you wanted it to, he's secretly looking things up and proposing solutions for the next time.
and one of his favorite things to do is help take your braids out!! it's such a mindless task in a way, and he has gentle hands already so he's just extra careful. it's a guaranteed stretch of time where he can sit with you and talk about whatever is on your mind. plus, he loves when you have fresh braids and you need your scalp oiled. he massages any sore spots while he does it, too.
and seeing sejanus take care of your daughters hair is one of your favorite things. if even possible, he's even more gentle with her. she adores having little pigtails, so sejanus gets really good at slicking the buns back to stick out at the sides of her head. when she starts to really like twists or braids with beads at the end, sejanus is practicing how to secure the beads until he can do it in his sleep. (he loves to joke about them being little warning bells for her too)
63 notes
·
View notes
Video
youtube
Quick Tips Heavy Chipping for Armour miniature wargaming #tutorial
#youtube#warhammer#painting#mini painting#miniature painting#tabletop painting#quick tips#just the tip#fresh tips#tutorial#heavy chipping#weathering#way of the brush
2 notes
·
View notes
Text
HOW TO BRUSH YOUR FURBY - AN IN-DEPTH GUIDE ! ! !

Hey Furby friends! Today, I’m making an in-depth guide on how to brush your Furby, AND how to pick out a good brush for your Furby.
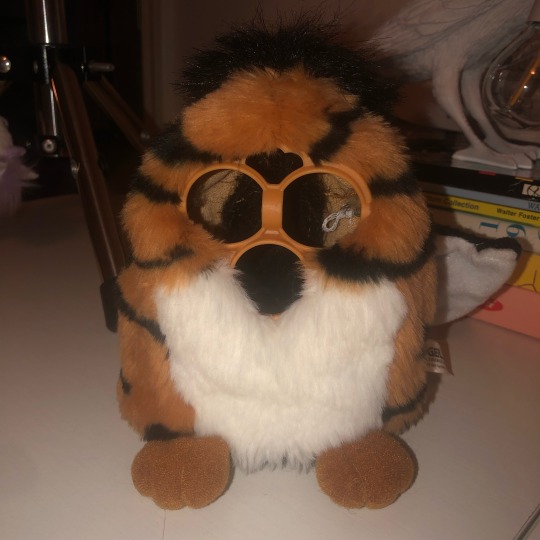
Chances are, if you own a used Furby, the fur might look like the Tiger Furby skin as shown here on the right. In comparison to the Church Mouse Furby skin on the left, the fur has a “fluffed out” appearance, feels matted to the touch, and goes in different directions all over the place!
While this fluffy look is still pretty cute, if you want your Furby to look as if it came fresh out of the box, this small guide is perfect for you.
(I highly recommend washing your Furby skin before brushing it out. It will look a lot cleaner in the end.)
CHOOSING A BRUSH
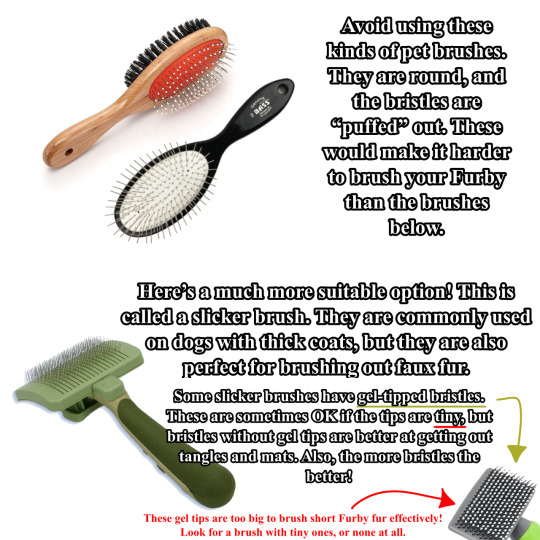
If you don’t already have one, now is a good time to pick out a brush for your Furby. Avoid using brushes like the ones on the top - they tend to not have many bristles, and are spaced out in a way that giving a consistent brushing is difficult.
Instead, choose a brush like the one on the bottom. This particular brush is called a slicker brush, often used for brushing animals with thick coats. It is rectangular and has many metal bristles that are relatively sharp, which are perfect for getting out little tangles and mats in faux fur. Some slicker brushes have gel tips on the bristles to make brushing less painful for the animal being brushed, but in this case, it’s best to skip out on the gel tips.
BRUSHING
Now that we know which brushes are best, it’s time to actually do the brushing! As I mentioned above, I highly recommend washing your Furby skin before brushing it out, so that the end result will be extra clean and soft.
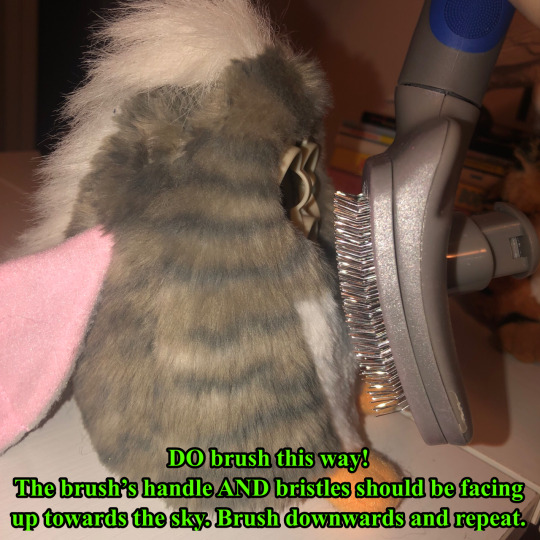
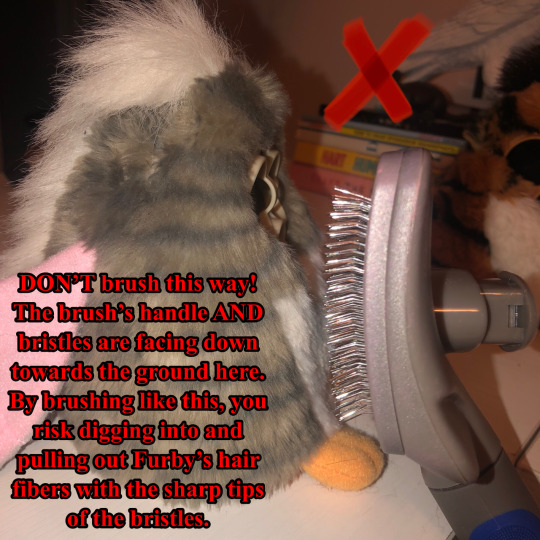
When brushing your Furby, it is important to use your slicker brush correctly. DO hold the brush upside down, as shown in the first image. The brush’s handle and bristles SHOULD both be facing up towards the sky, NOT down. Now, simply brush in the direction that the fur is flowing (brush downward). Brushing like this minimizes the chances of pulling out too much fur. After all, the bristles are sharp, and it’s easy for them to get caught in the fabric by accident.
DON’T hold the brush right side up, as shown in the second image. The brush’s handle and bristles should NOT both be facing down towards the ground. Please refer to the last paragraph on how to properly use your slicker brush.
RESULTS
Remember that Tiger skin from the beginning? Well, here he is all brushed out. It might be a little hard to see any difference, but in real life, he feels so much softer and looks almost like he was never even played with.
I hope that this tutorial helped you or anyone who needed it! I plan on posting more tutorials very soon! Thank you for reading.
#furby#furby tutorial#furby guide#tutorial#1998#1998 furby#1999 furby#adult furby#guide#furby community#furby fandom#furbys#furbies
412 notes
·
View notes
Text
masterlist (2024)⋆.ೃ࿔*:・🪷

law of assumption and manifesting
how i write my scripts
a look into my own manifestation
some manifesting exercises
random success story
beginners guide to manifesting
robotic affirming
law of assumption ins and outs
reprogramming subconscious mind
rampaging with manifesting
valentines day prep challenge (day one)
valentines day prep challenge (day two)
valentines day prep challenge (day three)
valentines day prep challenge (day four)
valentines day prep challenge (day five)
valentines day prep challenge (day six)
valentines day prep challenge (day seven)
honeys tea on self concept (improved)
how i make affirmations tapes + affirmation tape
you know how to manifest
ways to apply the law
for when u think u "failed" at manifesting
reprogramming ur mind activity
building a new life and identity (remake)
what to do when the 3d hasn't aligned
how to deal with self doubt when manifesting
i pledge allegiance
how to manifest faster
dealing with the unfavorable
self care and beauty
for healthier hair
shampoo and conditioner recommendations
long list of self care practices
at home spa day
doll hand-book
maintaining a clean and fresh appearance
"your glowing"
general hygiene secrets and tips
hot girl summer prep
glazed doughnut skin secrets
things that are on my list to buy (beauty binder)
mental well being and healing
the feel better formula
the tea on self love
disconnect and heal
ways to feel better about ur appearance
sustained satisfaction
how to keep going
embracing being alone
for rest and relaxation
the happy pill
self care assessment
how to unwind
shadow work prompts
how to stop being toxic
how to feel enough
honeys girlblogging and that girl-ism
starting a video diary
how to deal with mean girls
ur guide to effortless glamor
little habits to adopt
embodying the wellness girlie aesthetic
the wizard liz mindset analysis
hyper girliness
dear diary
starting ur fitness girlie era
dopamine detox challenge
starting a collection
honeys guide to throwing a slumber party
HONEYS IT GIRL MAGAZINE - FEBRUARY EDITION
giving urself princess treatment
video dairy entry ideas
cultivating creativity and a deeper sense of self
starting and managing ur blog
how to be rich and luxurious
HONEYS BUSINESS INQUIRIES
a glamorous well being
incorporating luxury
HONEYS IT GIRL MAGAZINE - MARCH EDITION
productivity and self development
focusing on urself
getting seriously organized
honey's resource bundle
getting it together
a fresh start
trusting and betting on urself
becoming ur own project and self upgrading
reset routine
goal ideas
practicing self discipline
things to do while on a dopamine detox
making an effective planner
the art of conversation (from a professional yapper)
restocking and replenishing
school and studying
school notion tutorial
becoming an academic weapon challenge
studying methods + tips
how to get good grades without excessive studying
academic resources
ways im romanticizing school
pretty and well educated
notes from honey🎀🍰
places to go vision board
notes from honey - note one
notes from honey - note two
things that make my mornings a million times better
367 notes
·
View notes
Note
Dropping by to say omg AUGHH I love your writing! Always gets me hooked and gets me to scroll till the end, especially the Whitney stuff-
Idk if this has been asked/answered before, but Whitney piercing headcanons? What spots they might have chosen? I've always imagined they had a fuck ton of metal rings and studs-
That where the spam liking is coming from? I’ve been getting lots of spam likers lately, not that I mind but it’s nerve inducing whenever someone randomly likes a recent post only to pull up with one from months ago out of nowhere. Just where the fuck are you guys finding these things? Usually sift through someone’s blog by their top posts or recent posts in order, maybe per a specific tag then too. Appreciate it though, thanks.
Whitney piercings.. have been on my mind lately too. I’ve got a tongue piercing scheduled soon so this is wildly timed well.
content warning! accidental self-harm? whitney tries to pierce some things themselves, fucking fails. blood. do not attempt to do these at home, you stupid fucks.
Know one would likely think that’s Whitney’s first piercings would be the regular earrings shit but to me, it was the tongue they did first. Y’know, it’s easily hidden behind the tight line of their lips firmly pressed together, not that the bitch doesn’t openly show off the muscle whenever they get the chance to whenever they speak, but can get away it. Maybe their parents would disapprove though the bully doubts so themselves, don’t got the money to get such a procedure so they settle on a handcraft piercing for their tongue. Where’d they find the gleaming pearl to do that? Who knows really.
Pulls up with some random tutorial on their phone, cheap and blurry camera with the instructions unclear but by god, Whitney does some dumbass decisions at times and this is one of them. Would be lying if they didn’t hesitate for a bit, shit, they’re going to get that damn piercing whether their dad or mom, both likes it or not. Sharp needle fisted in their hand, tongue peeking out and does it go well? Fuck no. Yells out a curse as stray droplets of blood drip across the tiled floor of their narrow bathroom space, leaving fresh, bloodied marks in their wake. Wasn’t all that serious of an injury, least not to the delinquent where it caused serious, permanent damage. Begrudgingly gets it done by a professional the next time, slight flush on their face from the sheer embarrassment of having failed pathetically so.
Next were earrings, the typical way that it’s done with an ice cube and of course, a needle again. Got an infection for a week, the blonde heals fast. Doesn’t affect them all that much other than the annoying routine of having to apply the same disinfectant over the surface of their swollen skin for a week straight. I’m talking a couple of rings wrapped over their ear shells and lobe, typically sharp since it suits them. Probably has snake bites too, seen too many arts to not say so otherwise and they like the look of it.
Genitals.. Yeah, the genitals for sure. Whitney wants to enhance their sex experience and fuck, do they love to hear a bitch squealing from the friction of the glinting metal fresh against their skin, lightly kicking back.
Whitney with a dick? Jacob ladder piercing, the bars set upon the length of their dick, ranging from their base to the flushed tip oozing pre-cum. Likes to specially tease you with it, making you count the number of bars as they slowly sink into your stretched out hole, struggling to form coherent words from being stuffed so full by a fat cock. You fail? They’re doing it all over again till you get it right.
Whitney with a pussy? Labia piercing. (Seen them before but I had to search that shit up for the name.) Rings snugly tucked around their clit, sensation all the more heavy as they comfortably grind themselves down on your lap at the pub, shameless in their erotic display. If you’re eating them out whenever or wherever, a light flick of your tongue across their drooling clit is enough to have them dizzyingly stupid and moaning, head thrown back.
Nipples, the fucking nipples. Visible against the shirt they wear beneath their scruff, leathered jacket, proudly standing erect. I’d say this is actually one of the main bodily weaknesses of the bully. Sure, their genitals is definitely an erogenous zone, but play with the pink buds a bit and you have yourself a whimpering Whitney struggling not to cum from your playful touches alone.
Know this isn’t about piercings but thanks to @princesstokyomoon, I’m convinced this motherfucker has a womb tatt regardless of gender and you get a slight glimpse of it whenever they’re out and about with only their old, grey sweats on. Hipbones right above the elastic waistband, trailing below the inked art. Fucking.. Fucking stupid bitch whining at the press of your palm flat against that exact area.
#I made this longer than I should#happens whenever we’re talking about whitney headcanons#I’ve got specific shit for the bully in my mind#they were one of those kids with bunch of bandages slapped on from the amount of bruises they’d get#no. they didn’t grow out of it — just doesn’t bandage themselves anymore#dol#degrees of lewdity#whitney the bully#whitney dol#dol whitney#curious anon#asher gets asks#asher writes
37 notes
·
View notes
Note
do u have any wiz101 beginner tips!! i just started recently cause it's a very charming mmorpg but after the unicorn way quest it threw so much tutorial and gameplay mechanic at me and my little pea brain cannot keep up, any advice?
OK HIII for starters thank u for helping me realize i had asks turned off on da wiz blog... i've since fixed that so. that should be good now <3 ^_^
AS FOR BEGINNER TIPS... i played the very first arc YEARS ago like a year or two after wiz's first release. i played back in 2011 so everything is like a blur to me- and i do have like. TWO wizards that i made to start fresh with just to see like. how things changed and. YEAH. i see what u mean with how they just kind of throw u at the wolves once ur done with that section
unfortunately i dont have many tips in that regard just because the starting point of the game has changed SO much fundamentally from the time that i played, to now. but i could give u some small things that might make ur life a little easier???
edit: PLEASE ALSO CHECK ALL THE REBLOGS AND THE REPLIES FROM ALL THE LOVELY PEOPLE!!! THEY HAVE ADDED MORE THAN I COULD EVEN THINK TO REMEMBER THEY R THE REAL MVPS!!!!
find a friend who can trade u monstrous TC (treasure cards)!! they're additional spell cards you can add onto your deck that upon use get used up, but monstrous comes super in handy because they boost your damaging spells DMG by a big amount. it'll make the slough of early game much quicker.
WHILE UR DOING UR main scenario quests, look around at the side quest in the area!! i never did this growing up but it dawned on my now how crazy smart this is LOL a lot of side quests will be like "hey wizard go beat up these things for me pleaseeeee" and you can sync up ur quests along with ur sidequest and they'll both count. literally a win-win
the further u go on in the game, u should keep ur deck smaller- less spells means more likely to pull what u need in that moment means less prolonged battles that go on for longer than they need to. ALSO LEARN RESHUFFLE its a balance spell and you learn it in krokotopia. CORRECTION YOU LEARN IT IN COLOSSUS BLVD FROM MILDRED FARSEER (THANK YOU @/divine-deer!!!!) literally worlds most op spell in the game love it
there's some side content that the game throws at u randomly. iirc, theres
grizzleheim starts at level 20 and then you keep getting called back there until u reach 45 (that's for wintertusk, highly recommend for that level!!)
wysteria, lvl 25 i believe
there's the underwater section in wizcity
sewers in olde town
aquilla (HIGHLY rec doing this for the sky iron hasta, that bad boy will carry you to lvl 100 LOL)
and much much more. i know there's more but I'm literally forgetting because there's so many side worlds
when in doubt. just look up whatever you're dealing with and add reddit on the end. i don't like reddit but damnit those mfs have ALL the answers for literally anything
this is ALL i can rlly think of off the top of my head rn BUT if u ever have anymore questions my dms are always open as well as my ask box ^_^ i love wizzzzzz
#bailey-boompants#ask#wizard101#w101#i'm gonna reblog this to the wiz blog since its SUPPOSED to be there but. ya u get it#THANK u for asking this i hope some of those tips helped... i know it doesn't answer everything but. yea. wiz has a lot of. Things in it#it can be hard to like. comprehend#not to mention half the spells that have like. fucking hieroglyphics in them like. Ok what you mean 675 death fist 40% broken heart 3 devil#like WHAT.
60 notes
·
View notes
Note
hiii joseph. If this is annoying or a bother, please tell me to stfu, but I was wondering if you have any tips for drawing blood? I know you've done it on a couple of your edits and it always looks so good, and I'm in a position now where I need to for an edit, and I have no idea where to start. Thanks!! 💖
hii im so sorry iw as like waiting for an opportunity to make this a whole tutorial but then i forgot about it RIP i'll just talk at u if thats ok. i might add actual process pictures later
so firstly when drawing blood u have to consider three things:
how much blood is there/where did the blood come from
how long has the blood been there/has it been smudged or altered in some way
what material is the blood currently on
the answer to these questions informs how the blood is going to look. a fresh arterial spray on skin and clothes is going to look a LOT different than a pool of it thats been on a hardwood floor for a few hours/days. i would recommend looking up references if u have the stomach for it but if not u can still watch like shows/movies so its not actually for real. if thats still too much then idk u dont have any business trying to make a bloody edit at all sorry SFDGHJK. google images will do u a world of good but uhhhh im gonna be real i have a login to a website that stockpiles real crime scene photos for forensic and crime (??) students which i usually head to but im not comfortable sharing that LMAO. i swear google images is still fine though
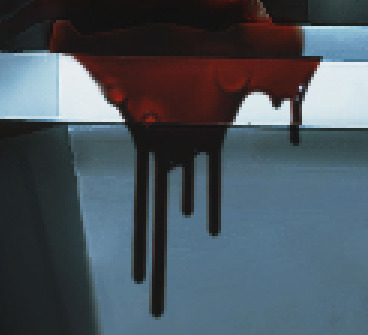
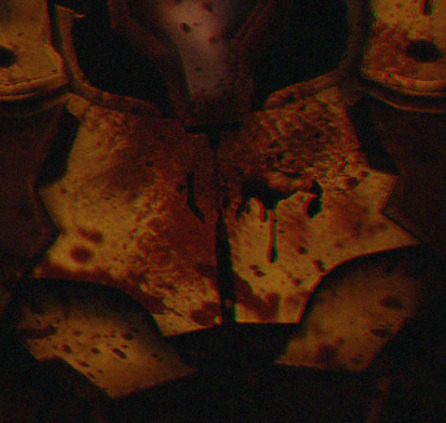
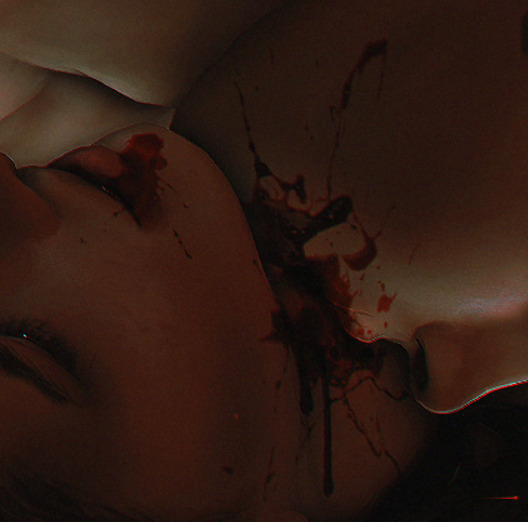
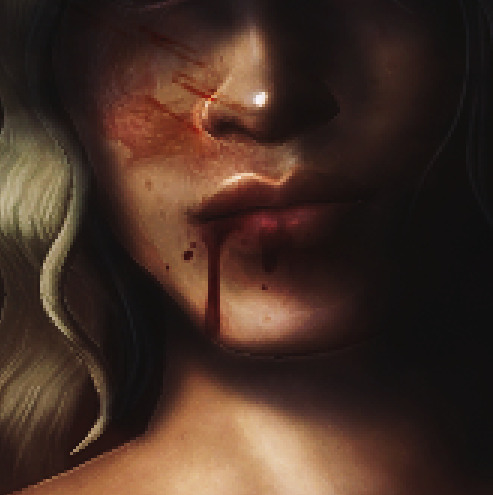
i usually just copy almost exactly what im seeing on the screen so the method varies a lot but its mostly various shades of dull red drawn on several multiply layers. erasing using a low opacity brush helps for like ?? layering?? blood doesn't dry uniformly, some parts will be darker than others etc. in a lot of lightings blood will just look straight up black. if thats the case i usually manually add a bit of solid red to act like a highlight. also u dont have to get too precise with it a bit of a suggested smudge can go a long way
i have a few examples of some of my drawings of blood here im going to just explain in the alt text what caused the blood/affected the blood so it looks the way it does
blood drawn on fabric:

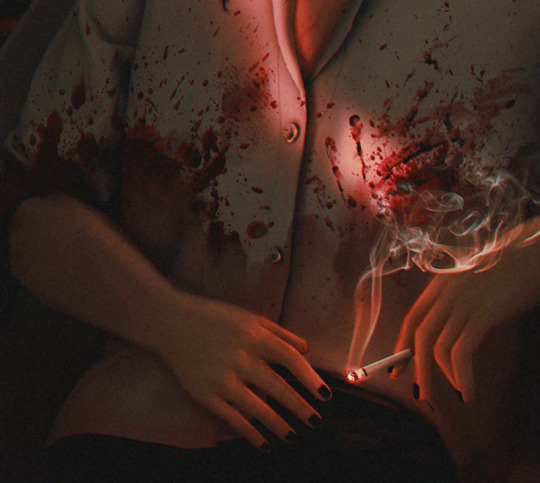

blood drawn on solid surfaces:


blood drawn on skin:
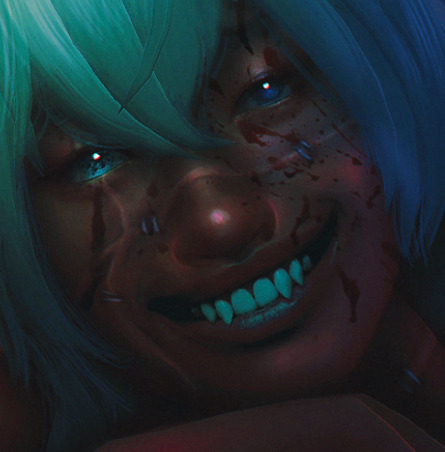
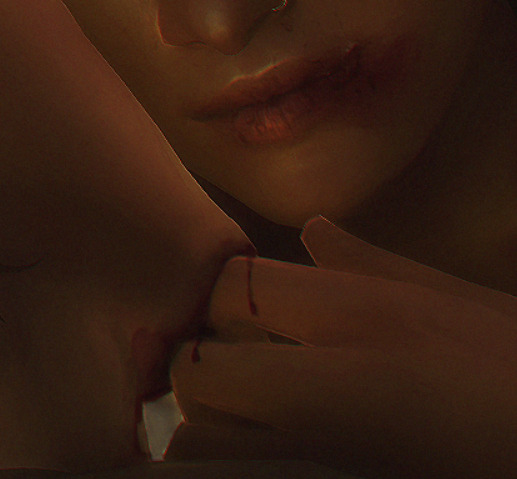

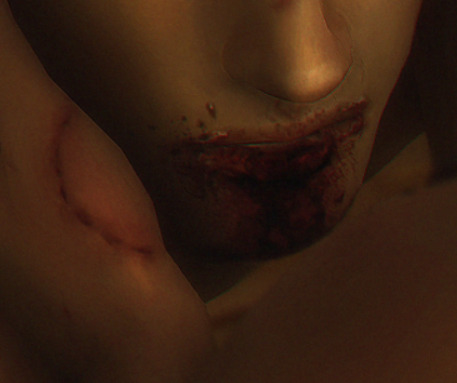
i also use these blood overlays (only some of them will show over clothes rip): 1 2 3
#bloodtw#while getting example pics i realised i use blood like. a LOT. sue me if its not the sexiest bodily fluid like-#ask#reply#morrigan-sims#tutorial
15 notes
·
View notes
Last Seen Blogs

shanjannatithub
Untitled

estvlla
dark star .*+

starmethod
I Don't Know.
dreamair
ninth apostle (ap)

fivecl
𝓶𝓪𝓭𝓮 𝓸𝓯 𝓲𝓻𝓸𝓷 — ;;