#fiddling around with the new medibang brushes
Text

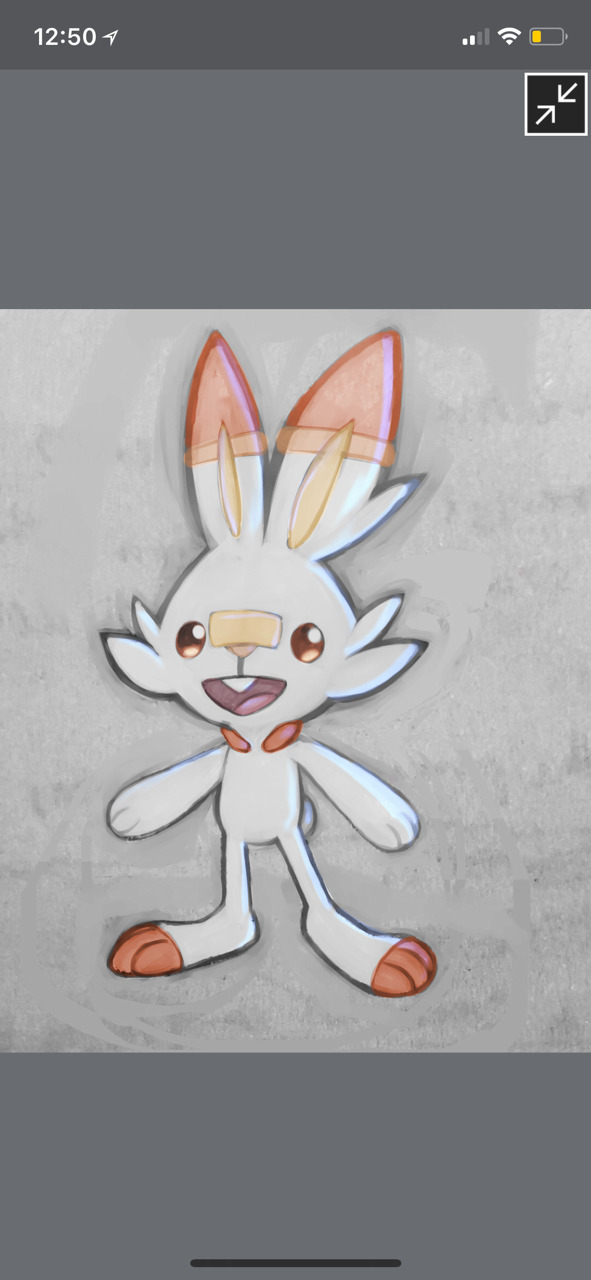
remakes of designs of watership down characters c: bigwig, hazel and fiver. i may do more of these in the future, feel free to drop some characters you'd like to see! the original version (aug 2022) below the cut!

overall i'm definitely more happy with the new designs. i mostly fiddled around with hues/saturation, moved and added some markings to make them more distinct, and of course my anatomy and artstyle have developed a lot more these past months.
also it's fun to look at how i use my brush now compared to before. the lines are thinner, characters more detailed, and i'm pretty sure i even fiddled around with the settings so that the flow direction changed. it's ironic since i was originally using this brush as a "loose sketch" liner but now render everything completely - definitely time consuming with this particular tool but i wanted to keep things consistent enough so that i could compare these two pictures.
tune in next week for another epi rambles about medibang paint brushes! well, hopefully the next time i post won't be next week.
#bigwig is my favourite in every aspect#watership down#my designs#bigwig#thlayli#hazel#hazel-rah#fiver#hrairoo#i started my art journey through drawing rabbits lol#though cats have muddled my skills a bit#but i think im relearning nicely#see now i just want to draw rabbits all day long
46 notes
·
View notes
Text
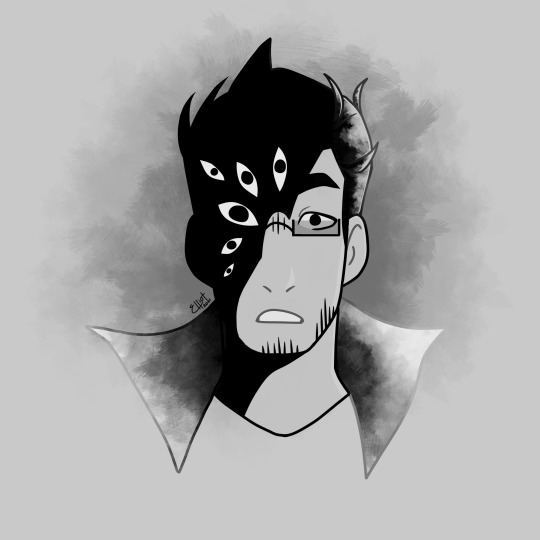
#fiddling around with the new medibang brushes#so i did one of my favorite sketches with it#his head is a lil long but thats ok#specs oc#monochrome art#monochromatic#black and white#black and white aesthetic#scopophobia tw#scopophobia cw#scopophobia#scopo cw#scopo tw#digital art#pedigrees art#just yall wait for what i did with this-
35 notes
·
View notes
Note
Hey Moderator- I was wondering, what advice do you hav for protogen faces? Yknow, the dotted/pixelated LED ones. I’ve been trying to draw one for 20 mins, and tried to use your picrew as a reference (for more info I’m using Ibis Paint X.), and I haven’t been able to get it right and it is REALLY bothering me. i tried looking it up, but it yielded no results. Do you have any advice? Were you drawing on like… Medibang or smth?- Many thanks in advance if you do decide to respond to this! ^^
Hi thanks for asking! and i got your other clarification btw I understand :)
Heres a quick tutorial on how I made the pixelated face for Protogens below:
Here's the method i used but ill also give an easier alternative!
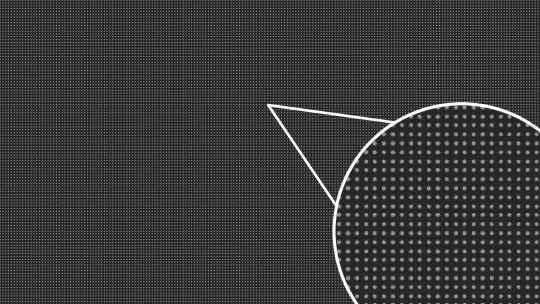
I started off by pasting a dotted pattern on a new layer, Medibang came with this pattern built in but you can look up transparent dotted textures and copy and paste them instead. Close-up to show the pattern better-
I then drew the face i wanted with a smooth pen tool on another new layer, and selected outside of the face. Going back the dotted layer i deleted the outside, leaving the dotted pattern in the face shape. you can delete the layer you used to draw the face with the pen afterwards.
You can probably leave it at that if you want, but if you want the face to glow i suggest following this tutorial: https://www.deviantart.com/chicinlicin/art/Glow-Tutorial-201366137
Heres a simpler method as well:
if you have acess to a dotted brush like the ones below you can simply draw the face using those

if you wanna add more effects to it to appear like a screen i suggest adding an LED filter over top via copy and paste and putting the layer to overlay or screen. you can look up "TV effect" to find the ones i use.
be sure to fiddle around with it, try different dotted textures and colors to find what looks good to you!
Hope this helps :)
9 notes
·
View notes
Note
hi! im trying to get into digital art, but I have no idea where to start. for a beginner, what programs/tablets/pens do you use or what tips do you have? thank you so much for any help!
Hiya!!! And that's awesome!
For programs, I use Medibang most because it's a.) Free b.) Has lots of brushes and c.) Has no limit to layers. I haven't used many other programs because that's the one I started out with, but I've heard IbisPaint is a good program too.
Tablets and pens generally come together, and I'd suggest looking at Huion or Wacom tablets. I started with a Huion tablet and only got the Wacom because I needed a new one after awhile, but both are generally pretty good imo. They're kinda expensive tho, so I'd be sure to look at reviews and maybe see if there's a cheaper version/cheaper but good tablet around
Basically just browse online stores or something for awhile 😅
And some tips!
Experiment with brushes! Some programs (like Medibang-) have a cloud with like. A hundred or more brushes for you to use and that's a little daunting but it's fun playing around and you can see what works best for you
Experimenting with the brushes/testing them out could also give you inspiration or at least an expectation as to how things will turn out
If you're way more comfortable with traditional art, do a sketch traditionally and take a picture of it! If you have Google Drive or Onedrive or any other apps similar, you can scan the drawing and it'll come out really clear. This makes lineart a bit easier
Save, save, save, and save. It's absolutely terrifying when like. An app crashes or a computer shuts down and stuff and you haven't saved your work
I recommend saving at these points: Sketch, Lineart, Base color/mostly colored, Shading or partial shading, then Background
And save if you're gonna be away from the work for a bit but don't wanna close out. Just in case
Play around with the different layer options! I don't know how many times I fiddled with random layer options and then liked the end product of a piece,,,,
Layers are your friend. Do not be afraid to make many layers unless you're like. Doing a challenge
Color picker/eye drop tool is amazing and very useful. Highly recommend using it if you're using a ref from like. A show or something
Heard this from someone else, but: If you're drawing characters from a show on like. Netflix or something. Take a screenshot for a ref directly from the show yourself. Especially if the character isn't white. "Screenshots" from the internet love to whitewash (like pics of Katara from ATLA)
I'm so sorry this is not a lot and all over the place 😅 I'm not great with tips but! I hope this helped you a bit, even if it was just a little.
TL;DR: Experiment, browse prices and read ratings, save often
Most importantly though, just have fun with it! <3
6 notes
·
View notes
Note
what's your art process in making digital paintings?
Oh dang that’s hard to explain. I got nothing else to do rn tho so I’ll try haha
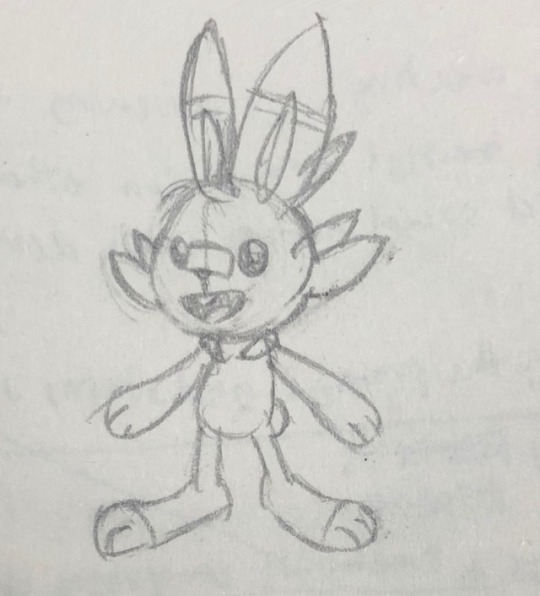
First I just sketch something. Doesn’t matter if it's neat or not. I usually do it digitally but I was in class when I got the ask so here it is on my notes

Then I’ll use the distort/liquify tool in whatever art program I’m using to fix the pose and proportions. In this case I just used Facetune’s reshape tool. (gotta make use of all them free apps lol) Don’t forget to flip the image to see if it looks alright from both sides
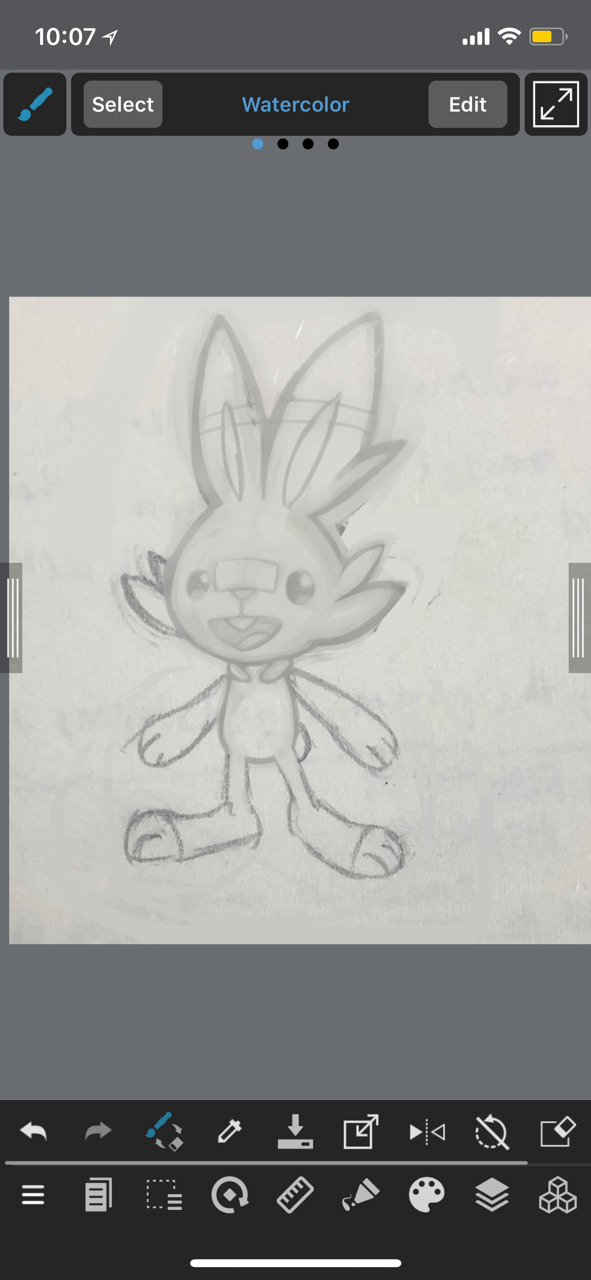
In hindsight I really should have taken more screenshots here whoops. But uhh I import the image to Medibang Paint Mobile and use the lasso tool to just fix more stuff, like tilting the mouth and bandage, fixing the ears and neck, etc. Then I use the watercolor brush to refine the drawing. I don’t use a new layer for this
I forgot to mention that I did convert the image to black and white after I started rendering the drawing, just so the colors would be consistent later. (don’t mind the time lmao this didn’t take me two hours I promise)
Basically I just focus on making the lines look neat. I personally like the sketchy look so I don’t really mind the inconsistent shades of gray in some areas
Here’s how it looks after.
I import the image to Adobe Lightroom CC and fiddle around with the contrast settings. My intention is to make the lineart stand out more
I open the image in Medibang Paint again and color it using Overlay and Multiply layers. I add highlights using a Divide layer.
I’ll fix more things and post the finished art later.
I do have another walkthrough of my art process but it’s pretty old lol DM me if you want me to post it or whatever
6 notes
·
View notes
Photo

Here’s my best-of-2017 art review!! Let’s play a game, it’s called “spot when tou gained a new special interest,” everyone wins ‘cause it’s really fucking easy
(Here’s 2016′s, for comparison!)
Links and comments beneath the readmore!
[ Jan ] - I was learning Medibang at this point o 3o Still pleased with this picture though.
[ Feb ] - Slim pickings in terms of finished pics this month, looks like I spent most of the month designing Baccano! gems. Here’s Rosetta.
[ Mar (a) ] - this picture is still extremely horrifying and extremely good. I’m very proud of the lighting and the color scheme.
[ Mar (b) ] - I’m moderately pleased with this picture although it definitely made me realize that it was Time to learn to draw a tilted-up head.
[ Apr ] - I was working on Improvement Hell for most of this month so there’s nothing super finished, but I really appreciated the way the experience taught me that if I sit my ass down and take the time to draw backgrounds, I can do it actually.
[ May (a) ] - I sat my ass down and drew a background. Everyone remembers that Daniel Danger’s art is incredible right? Good. This is just me imitating it.
[ May (b) ] - Good lighting, cool space effects. ...Which I mostly covered with the month label here, oops.
[ Jun ] - Ellis! I’ll tell y’all about Ellis eventually... I promise
[ Jul ] - One thing that happened because of a new special interest is I decided to fiddle around with art styles a bit, in part because Jen Zee’s art is so pretty that I want to c r y. So I was trying a few new things in this one.
[ Aug ] - obviously the reason I’ve been trying lineless art recently is, also, Zee’s incredible style. I’m also really proud of the expression on this one.
[ Sep ] - I think I started working on this one in August and continued into September, iirc? Also I really enjoy the easy gold leaf effect of lighter and darker shades of yellow in the “fluffy watercolor” or “fluffy pastel” brush.
[ Oct ] - not only am I getting better at facial structure but also at consistent face shapes? I think??
[ Nov ] - I finished this one in December but I sketched and started coloring it in November before I left for Japan. Fun fact: the cells were an extremely last-minute addition.
[ Dec ] - kisses are hard and backgrounds are not what I usually do myself and I am really pleased with how this picture came out.
#tou's art tag#2017 art summary#2017 art review#tou and a stupid commotion#tou and the sword boyfriend#art summary#art review
6 notes
·
View notes
Last Seen Blogs
sentientcouchpotato
Tumblr Clutter
elsahedia
addicted fangirl
upsurgecomic
Upsurge

familyfirstcare-blog
Family First Care
xteaaddictx-blog
🌸🌸🌸