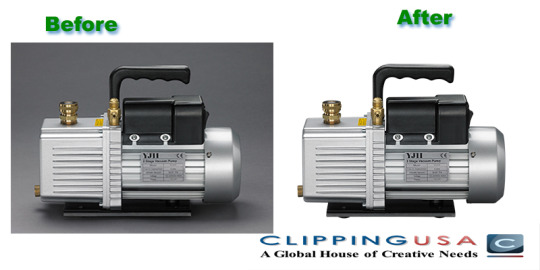
#ecommerce photo retouching USA
Text
The Implication of High-End Retouching Services in UK
High photo retouching is crucial when your best photograph requires extra attraction. This high retouching service is required for wedding images, advertisements in magazines, photographs for style or luxurious publications, real estate shots, and a diffusion of different photographs.
Regular retouching takes away lots of pixels from pictures, but, high-end retouching from photo editing services…
View On WordPress
#clipping path service uk#clipping path uk#commerce photo editing services#ecommerce image editing service#ecommerce image editing services india#ecommerce image editing services UK#ecommerce image editing services USA#ecommerce photo editing#ecommerce photo editing services UK#ecommerce photo editing services usa#ecommerce product photo editing services#ecommerce product photo editing services india#ecommerce product photo editing services UK#ecommerce product photo editing services usa#eCommerce product photo retouching services#image editing services uk#photo editing company uk#photo editing services uk#photo editing UK#photo retouching#photo retouching services uk#photo retouching uk
0 notes
Text
#professional photoshop services#photo editing services#Headshot retouching#remove background from image photoshop#color correction service#clipping path usa#clipping path service usa#ecommerce image editing agency in usa#image editing service#Portrait Retouching
0 notes
Text
Affordable product photo editing service in USA
Product retouching fulfil eCommerce photo editing services. ✔ Color correction ✔ Removal of dirt, scratches,unwanted backgrounds & reflections ✔ Adding/removing shine ✔ Straighten
0 notes
Text
Clipping Path Services - Image _ Photo Editing Services in USA
Clipping Path Service is a specialized photo editing provider provided to ecommerce corporations, innovative experts, and photographers. It entails reducing out the heritage of an image and leaving handiest the favored element visible.
The ensuing pix may be used for advertising and advertising functions, as well as in print substances. It also helps boost brand cost and promote a fantastic image.

Background Removal
Background elimination is a carrier that honestly eliminates or cuts a heritage from a photograph. It is one of the maximum popular picture modifying offerings that permits you to create a continuing and beautiful picture.
It also can be used to modify a historical past coloration or dispose of an entire photograph from a picture. The system of removing a historical past allows you to enhance the overall look of your pics and reduce go back costs from customers who do not like your product pics due to distracting backgrounds.
The fee of this service is gaining rapidly for top needs of e-commerce web sites, modeling organizations and photographers. It enables them to accentuate the features of products and boom their income on online shops.
Clipping course is the maximum common heritage elimination technique for e-commerce groups. It makes it clean for customers to view a product without body distortion, which is vital for a powerful buying experience.
Image Masking
Images with many curves, smooth edges, and turns like hair, wool, or transparency require image masking. Unlike clipping path services, which are like reducing out an image from a magazine, image protection is an exertions-in depth system that calls for superior Photoshop strategies to account for each closing strand of hair or fur.
When evaluating photo overlaying services, search for an enterprise that currently handles a high extent of photographs. You need a carrier which could scale to your needs, with systems in the region to streamline the publish-manufacturing method and prepare your orders as you prefer.
A right carrier must also offer a number of techniques for verbal exchange, from email to chat to telephone calls. This will make it clean to be able to touch them with questions or problems and music the development of your order.
Image Enhancement
Images are a crucial part of any on-line keep or website. These images should now not only be attractive, but in addition they need to be optimized nicely for all e-commerce platforms.
Using the proper heritage color for your pix can improve click-via costs. Moreover, having a white historical past can help your customers see the item actually and increase conversion.
Clipping path carrier is a versatile tool that may be used to extract products from backgrounds, location items in life-style photos, or put off undesirable factors from photos.
Image Enhancement by Clipping Path is a less expensive, effective and fast manner to make your photographs stick out from the group. It is also outstanding for video content material and GIFs, because it permits you to feature a fast-converting, vivid heritage while not having to manually edit everybody.
Clipping path provider is one of the maximum lower priced and easy-to-use picture editing offerings. It may be used for any type of picture editing paintings, such as retouching, shade correction, resizing, and replacing.
Image Retouching
Whether you're an eCommerce store or a photographer, getting rid of and slicing a history from an image is a vital part of the process. Removing backgrounds from snapshots offers them a smooth, crisp, and professional look, and it additionally makes them simpler to edit for coloration modifications or other consequences.
Clipping course is a picture modifying carrier that surely gets rid of or cuts a background from an image. It's a tremendous way to make a product stand out and improve its conversion fee.
However, it could be a tedious and time-consuming task to finish in-house, especially in terms of e-trade merchandise. That's why it is a terrific idea to lease an outside image clipping carrier.
To make sure that the Clipping Path Service you pick out is achieved efficiently, there are numerous signs to look out for. First, test that the edges of the cutout are clean and free of jagged strains. Additionally, if the concern or object being isolated has particular information and descriptions, that is another sign of a terrific job.
Clipping Way
Free Trial | Edit 2 Images Without Any Charge | Clipping Way
Contact Us For Any Image Editing Queries | 24/7 Available
Get Quote | Receive Estimated Price For Image Editing
Clipping Way | Laurel MD | Facebook
Clipping Way (@clippingway) / Twitter
Clipping Way - YouTube
https://www.linkedin.com/company/clipping-way
Clipping Way (clippingway) - Profile | Pinterest
Clipping Way
15640 Millbrook lane,
Laurel, MD 20707
+1(409) 231 0231
Via Portunno no- 97,
Inter no- 3, 00054 Fiumicino RM
Skype: clippingway
92 Eastern Avenue,
Sheffield S2 2GJ
+44 744 144 6777
0 notes
Photo

I will do quickly any ecommerce photo editing background removal photo retouching
If you any need this service please contact us me.
Please Order Now: https://www.fiverr.com/share/Ka6EG2
We would be happy to help you
Email: [email protected]
WhatsApp: +8801613853332
Website:- fiverr.com/belalmiya
Why do you like me
✅Free Trial facility
✅Unlimited Revisions100%
✅Client Satisfaction
✅Superfast Very Quickly Delivery ( 3 Hours)
✅Quick Response
#editoratikur #ClippingPath #backgroundremoval #ImageEditing #PhotoColorCorrection
#PhotoManipulation #PhotoEditing #PhotoRestoration #ImageEnhancemen #ImageProcessing
#ImageResizing #AdobePhotoshop #GraphicDesign #Retouching #shadow #Amazon #eby #alibaba #onlinestore #webstore
#backgroundremove #photoediting #whitebackground #removebackground
#retouching #photoretouching #usa #canada #newyourk #germany
#ClippingPath#backgroundremoval#ImageEditing#PhotoColorCorrection#PhotoManipulation#ImageResizing#removebackground
0 notes
Text
The implication of Photo Editing for Images improvement

You'll be able to grow the range of customers and stand proud of different photographers who will improve your profession. You could additionally examine a photo editing company in USA, even in case you do images as an ardor; it's going to rework the holiday or own family snapshots and make special reminiscences.
1. Converting the heritage
From time to time, after taking extremely good photographs, you'll realize the history isn't always attractive as you desired. It can be a needless item or the background coloration that makes the photo less appealing. The simplest manner to please your consumer is to edit the image with the aid of changing the heritage and the usage of an extra appealing one.
2. Modifying Will help you construct your fashion
The fine manner to depart your stamp on the photo is through editing by image editing services in USA. You could develop an editing style that makes the pictures feel specific and make people understand your work. It's a great way to emblem yourself, especially if you are beginning as a photographer. People might be able to sample out your work through your modifying; it's amusing to test on some snapshots until you discover your editing style. After you get it, you could keep on with it throughout your images enterprise and make it your style.
3. Correcting image coloration
When you cross for a photograph shoot, whether or not a marriage or a prenup shoot, you could now not get the time to get each photograph's lights correct, lighting will affect the colors on the image; you might realize later even as going via the pics that some of the colors aren't accurate.
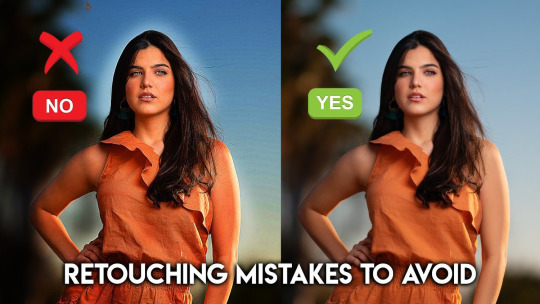
4. Retouching
Photo retouching may be very important, in particular, while you are running with a model. Ever seen the perfect version of photographs on billboards and wondered how that is feasible? It's editing. Now that you understand, you should be able to supply ideal pictures with enhancing as properly. With retouching, you can dispose of wrinkles, zits, or any blemishes that might degrade the image. You'll be able to rework the overall appearance of the character or item in the image completely.
5. Cropping
With cropping, you may dispose of undesirable content material from the picture. In case you find matters in the picture that had been no longer supposed to be there or maybe want to cast off a person in a set photo, cropping is the exceptional answer. It's additionally the high-quality way to emphasize the man or woman or object in the picture with the aid of cropping unnecessary distractions. It's going to save you from deleting the image completely, and it's clear to do; there are not any superior competencies wanted.
6. Editing is used to modify comparison and brightness
Assessment and brightness modifications are necessary for any photograph. This is because photographers are anticipated to supply perfection; if you provide a customer with a picture that appears too dark or too vivid, you may not get some other hazard. Manipulating evaluation in pics is very critical; you can need a touch understanding of tone and matching exceptional coloring. You can check the ecommerce image editing service for the work.
#photo editing services in usa#photo editing services#photo editing USA#photo editing company in usa#photo editing company#image editing company in usa#image editing company#image editing#best image editing company in usa#image editing services in usa#best image editing services in usa#photo retouching services in usa#photo retouching services#photo retouching#clipping path company in usa#clipping path company#clipping path#clipping path in USA#clipping path services in usa#clipping path services#ecommerce image editing service#ecommerce product photo editing services#ecommerce product photo#ecommerce photo editing services#product photo editing services#ecommerce image editing services in USA#ecommerce image editing in USA
0 notes
Link
best photo editing services
professional photo editing services near me
photo editing services uk
real estate photo editing services
outsourcing photo editing
cheap retouching services
lightroom photo editing services
photo editing service for photographers
photo editing services near me
photo editing service online
photo editing services company
photo editing services canada
photo editing services for wedding photographers
photo editing services australia
#photoshop services#photoshop service#amazon photo editing service#digital photo editing service#ecommerce photo editing service#image editing services in usa#photo editing services uk#fix the photo reviews#photo retouching services price#image editing service provider#image editing service uk#ecommerce image editing service
1 note
·
View note
Link
#ecommerce photo editing services in uk#ecommerce photo editing services in usa#ecommerce photo editing services in india#photo retouching services#background removal services#photo editing services in india#photo retouching service in india#photo retouching services in usa
0 notes
Text
SKIN RETOUCHING PHOTOSHOP TUTORIAL: ENHANCING E COMMERCE PHOTOS
One of Photoshop's most popular uses is to improve a model's face or skin in a photo. But, retouching skin without making a face to look fake or "plasticity" is no easy achievement.
In the following Photoshop CC 2019 skin retouching tutorial, we'll go over some steps you can apply to any face to even lines and pores, remove spots, redness, and stray hairs, and contour a face to appear slimmer. Learn to create complex changes so you can retouch skin in Photoshop while retaining the model's individual components.
In this skin retouching Photoshop tutorial:
How to fix blemishes in Photoshop
How to smooth skin and edges in Photoshop
How to refine lines in Photoshop
How to make looks thinner (or full) in Photoshop
Your final Image
How to fix blemishes in Photoshop
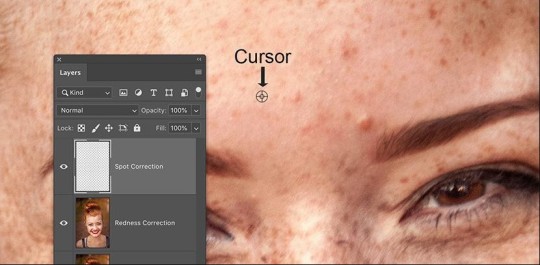
You can exclude redness around the nose/eyes and erratic ruddy cheeks quickly and easily from a model's face without touching other red states in your photo, like lipstick or clothing. Because this step affects areas during your Picture, you'll want to do this step before you retouch any other areas of your Picture.
Step 1: Set up your layers
In your Layers panel, increase your Experience layer and rename it to "redness change."
To duplicate a layer, right-click (CTRL+Click on a Mac) on your layer and select Duplicate Layer, or click on the Layer panel menu and select Duplicate Layer.
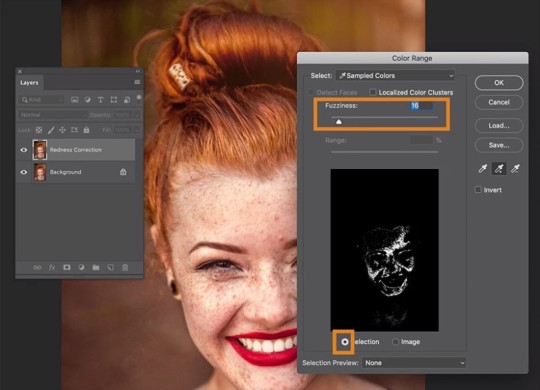
Step 2: Select color range
In the drop down list at the top of the application window, choose Select > Color Range.
In the dialog box that appears, make sure the radio button next to Selection is chosen at the bottom of the box, and select the eyedropper tool on the right-hand side of the dialog box. Click on an area of redness on the face within the Image itself (you may need to move the dialog box out of the way to get to the Image). Usually, the tip of the nose is a great place to start.
Choose the eyedropper tool with the + symbol to add to the Selection, clicking on parts of the face that also need attention — this might be the areas around the eyes or tip of the chin. Move the fuzziness slider toward the left if the selection area looks too large.
Click OK.
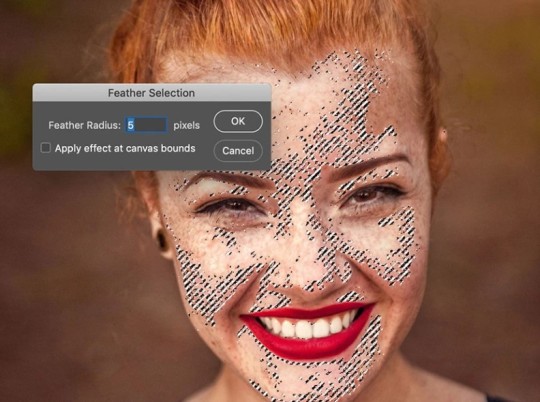
Step 3: Feather the Selection
Choose Select > Change > Feather from the dropdown menu and set your feather space to a low number, so being 5 pixels.
Step 4: Adjust the hue of Selection
Choose Picture> Adjust > Hue/Saturation (or click CTRL+U on a PC, COMMAND+U on a Windows Or Mac) from the dropdown menu and move the Hue slider to the right to the redness is decreased, but the change remains subtle. Here, we moved the slider just to +5; your number will most likely be between +2 and +8.
Leave the Saturation and Lightness sliders at 0.
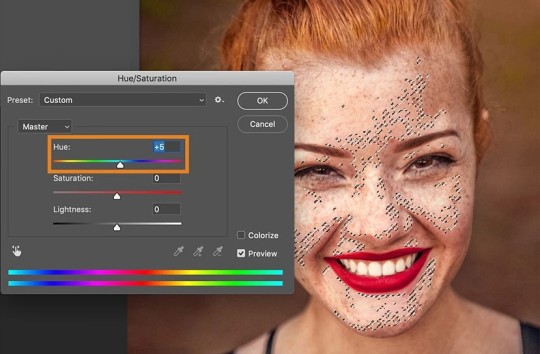
Click OK.
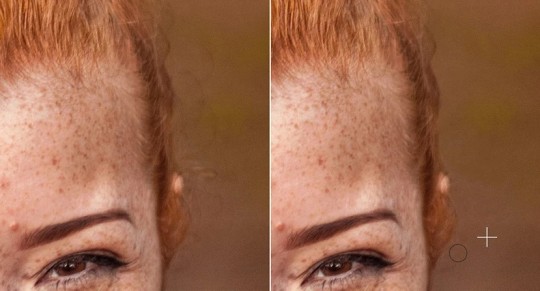
How to smooth skin and edges in Photoshop
The next step in the skin improving Photoshop tutorial is to remove impurities, smooth out stray hairs, and soften wrinkles.
Learn, when doing Photoshop face retouching, the final goal is to keep the model looking practical, so we don't want to reduce ALL lines. We also want to keep all of the face's features in place; freckles and dimples, for instance, need to stay where they are.
This stage in the process is by far the most time-consuming and will require your artistic eye. It's also the most natural step to mess up, so we'll keep all of our adjustments in a separate layer that you can erase or paint over without affecting your Redness Correction layer.
For this step, we'll be using a combination of the Clone Stamp tool and the Healing Brush tool. Both of these tools work by choosing an area of the Image that you want to create a variety from, and then "painting" over the blemish, wrinkle, or stray hair with the selected portion of the Picture.
Step 1: Create a new layer
Create a blank layer above your Redness Repair layer and name it "spot correction."
Step 2: Fix the big stuff
Start big and work your way in.
First, select the Clone Stamp Tool from the Toolbar and set your hardness to 30% or below. Set the darkness to between 40% and 50%, and get sure the sample is set to Current & Below
To use the Clone Stamp tool (and the Healing Brush tool), find a range of the Image you want to correct, and then move your cursor to a nearby area that's the same color but smooth in touch.
Hold down the ALT key (Option on a Windows Or Mac). The cursor will change form. With the ALT (OPTION) key still finished, click on the image. Clear the ALT (OPTION) key and "paint" with the tool on the area you need to change.
As you use the Clone Stamp tool (and the Healing Brush tool), remember to choose selections that are very close to the area you're trying to fix, ensuring smoothness (and believability) with your colors and textures. Work on smoothing out stray hairs and flyaways around the head first. As you work, get to keep the hair looking real; the last thing you want is for the head of hair to start looking like a mask. Next, move to the front, and correctly use the Clone Stamp tool to remove any blemishes and stray hairs, and fix makeup if needed. As you work, you can change the size of your brush as needed, depending on the area you are working on.
Step 3: Smooth out fine lines and details
Finally, choose the Restorative Brush tool and work on any lines. Begin at the far edges of lines and go your way in, using a very soft Healing Brush and trying not to remove lines perfectly. When you zoom out and see your Image as a whole, you may not mark all the different changes you went to once. In the result, they'll join up to improve the overall shape.
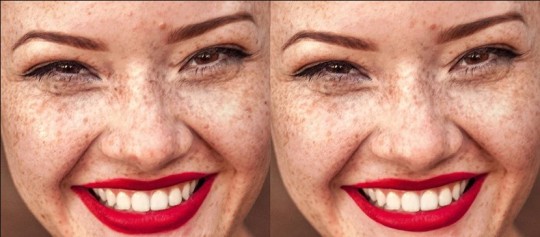
How to refine lines in Photoshop
The next step of the surface retouching method is the simplest and quickest and involves some fancy layer lines.
Step 1: Prepare your layers
You'll need to mark the redness change layer and the place change layer into a new layer while maintaining our unique background layer.
Select the two correction layers and stamp them by typing CTRL+A+E (COMMAND+OPTION+E on a Mac).
Duplicate the new stamped layer two times. Name the lower duplicated layer Blur and the upper duplicated layer Texture.
Click the eye icon next to the Texture layer to make that layer invisible. Select the Blur layer.
Step 2: Apply Blur
Choose Filter > Blur > Gaussian Blur from the dropdown menu.
In the dialog box, adjust the Blur until you can no longer see any of the model's pores. This will usually be between 1.0 and 3.5, depending on the clarity and resolution of your Image.

Click OK.
Step 3: Apply texture
Click on the eye icon near to the Surface layer to make the layer evident again. Select the Surface layer.
Choose Image> Apply Image from the dropdown menu.
In the dialog box, set your Layer to Blur, Channel to RGB, Blending to Add, Opacity to 100%, and Scale to 2. Additionally, check the box next to Change. You should, however, be in the Surface layer when you do all of this. The Strategy layer will become old with evidence of items.
Click OK.
Finally, change the combination mode of your Texture layer to Linear Light.
Step 4: Mask out details
You should still be in the Surface layer at this time. While holding the ALT key (OPT on windows Or Mac), click on the mask icon at the bottom of the Layers panel. This will produce a party with the entire picture hidden out.
Make sure your carnival is selected (you should see a partial white frame around the mask icon inside the layer, as in the image above).
In your Toolbar, set your font color to white and your background color to black.
Choose your Brake Tool from the Toolbar and change its settings so that it is very soft (30% hardness or lower), and its darkness is around 40%.
"Paint" in the areas of your image where you want to take back in parts, such as around the eyes, eyebrows, lips, teeth, edges of the nose, and everything around the face, including hair, clothes, and background.
Step 5: Make any adjustments to the Blur layer
At this stage, you'll be able to see if there are any areas of the model's skin that still need adjustments after spot correction and blurring. You can use the same tools and techniques you used in the Spot Correction layer to fine-tune the Blur layer.
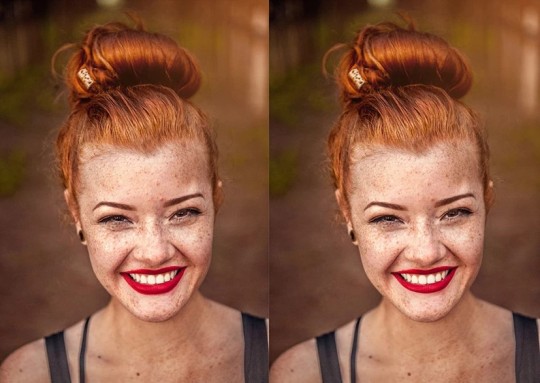
How to make faces thinner (or wider) in Photoshop
The next and last step in this surface retouching Photoshop tutorial will allow you to join or eliminate shadows and highlights. Strategically combining shadows allows you to make a face, or specific features, appear more transparent. Adding highlights package help define certain parts of the face, such as cheekbones and the area just under the eyebrow.
You can also raise living shadows and highlights to soften the skin further and fix small light issues. Both are adding, and removing shading are done the same way, at the same time.
Step 1: Set up your new layer
Create a new, empty layer up your Texture layer. Name the layer "contouring."
Fill the contouring course with 50% gray by choosing Edit > Fill from the dropdown list, or by typing SHIFT+F5 (FN+SHIFT+F5 on a Mac) and choosing 50% Gray next to Contents.
Click OK.
Change the Contouring layer's combination mode to Soft Light.
Step 2: Darken specific areas
Select your Burn tool from the Toolbar. Set the tool's settings to 40% opacity, and make sure the Range is set to Midtones. Adjust the size of the brush to something rather large.

Using the Burn tool within the contouring layer, "paint" the sides of the face and the edge of the chin to slim the face. If you want to contour the nose as well, paint the sides of the nose, starting in the middle of the bridge and working down to the lower edges.
Set the Scorch tool to a more moderate opacity to "paint" over areas of the face that are too bright, such as highlights that need to be taken down in brightness.
Step 3: Lighten specific areas
Select the Dodge tool from the Toolbar. As with the Burn tool, you'll want to set the Dodge tool to about 40% opacity and make sure the Range is set to Mid tones.
Use this tool to paint the tops of cheekbones and the middle of the nose. You can also improve the areas just below the eyebrows, and the middle of the forehead if it is not too bright now.
As with the Burn tool, you can also use the Dodge tool to brighten areas of the features that are in deep shadow to soften the overall impact.
Your final image
Place all the layers you created into a new layer group so you can keep them together, separated from the original Background layer. You can now compare your changes to the original image by toggling the visibility of the new layer group.
Professionally edited images are essential to making a great impression to online users and looking to learn more? We've built an entire library of Photoshop retouching tutorials and more examples to help you learn how to DIY your photo editing.
See Related Articles :>>>><<<>>>><<<<<>>>>>
Best Quality Clipping Path Services
Clipping Path Services Applied for Background Removing from Photos
HOW TO CREATE A TRANSPARENT BACKGROUND IN PHOTOSHOP
Watch Vedio
#clipping paths#clipping path services#How to smooth skin and edges in Photoshop#How to fix blemishes in Photoshop#How to refine lines in Photoshop#How to make looks thinner (or full) in Photoshop#ENHANCING ECOMMERCE PHOTOS#clipping path service#photo retouching services#clipping path#clipping path usa#best clipping path service provider#skin retouching Photoshop tutorial
0 notes
Link
Get More Info // ORDER
I can do all retouching/editing jobs professionally including smoothing skin tone, adding or removing objects, background removing/blur, teeth whitening, adjusting posture, body shaping, image enhancing, retouching lips, hair, eyes
Do you know? Good product photos can boost your brand.
here's my work sample...
#Product_editing #Picture_editing #cut_Out #cutout #background_remove #tranasparent_PNG #photoshope_editing #Amazon #cliping_path #Amazon #Amazon_Product #Retouch #Retouch_product #product_photos #amazon #ebayseller #ebayseller #amazonfinds #amazonfashion #photography #photographer #background #imageskincare #photoshopedit #photoshop #usa #ecommerce #shopify #shopifystore #shopifyseller
#editing #graphicdesign #marketing #logo #color #creativity #design #branding #jobs #logodesign #digitalmarketing #brand #print
1 note
·
View note
Text
What's the importance of Photo Editing in Marketing
What’s the importance of Photo Editing in Marketing
Pictures are quickly turning into an international advertising and marketing language, way to the development of picture-centric social networks like Instagram and Pinterest. Humans normally reply higher to visual alerts, and whether or not you’re in the culinary, fashion, retail, or tourism industries, well-edited photographs in a photo editing company in USA should be at the high of your…
View On WordPress
#clipping path company in usa#clipping path company usa#clipping path services in usa#clipping path services usa#ecommerce image editing service#ecommerce image editing services USA#ecommerce photo editing#ecommerce photo editing services#ecommerce photo editing services usa#ecommerce product photo editing services#ecommerce product photo editing services usa#eCommerce product photo retouching services#image editing services in usa#photo editing company#photo editing company in usa#photo editing services#photo editing services in USA#photo retouching services#photo retouching services in usa
0 notes
Text
#clipping path service#best clipping path service#photo editing services#remove background from image photoshop#color correction service#professional photoshop services#clipping path usa#ecommerce image editing agency in usa#clipping path services new york#image editing service#Headshot retouching#Portrait Retouching#Ghost Mannequin effect
0 notes
Text
Product Image Editing Services For Ecommerce IN USA
Ecommerce Photo Editing Services
USA based product image editing service provider CLIPPINGUSA. There are countless ecommerce product photo editing services online that promise to fix all your image editing needs. Yet, many of these companies offer image editing services that are mediocre at best. It is best to avoid ecommerce photo editing services that charge hundreds of dollars for image manipulation.
Do you know that average consumers cannot tell the difference between images manipulated by amateur and professional photographers? Professional photographers are able to manipulate images so they look like they were taken by professionals. The same cannot be said of ecommerce product photo editing services. Even if you use their software to retouch your images, you will not be able to tell the difference.
How to differentiate between the ecommerce photo editing service and an amateur photographer's services? The main difference is that the ecommerce photo editing services are able to manipulate images so they look like they were taken by professionals, and the amateur photographer's services are unable to do so. The quality of the product image depends on the photographer's skills.
Ecommerce photo editing services usually offer free trial offers. Some of them even offer free trials for two weeks! You should ignore any company that offers you images for free until they have provided you with high quality images to test. Many amateur photographers use stock photos for ecommerce photo editing services, but the quality of these images are below standard and will not help you enhance your sales.
Before you sign up for an ecommerce photo editing services, check their client portfolio. Find out if they have helped design and develop a successful online store. Find out if they offer retouching service. You may be able to save money if you hire an ecommerce photo editing services for retouching images to your online store. They can even retouch images that have been sold on eBay.
If you have used an ecommerce photo editing services before, they will have templates available for your product images. So you do not need to worry about learning HTML code to create product images from scratch. You just need to hire an ecommerce photo retouching service and provide them with the product images. They will convert them to as many PDFs as possible. They will then create a folder for each product image and name it according to the product name.
Product photo editing tutorial : https://www.abetterlemonadestand.com/photoshop-tutorials-product-photos/ check this out.
Some ecommerce services also offer image cropping, portrait photo correction, background elimination and enhancement services. Image cropping is when a small portion of an image is removed so the overall image size is reduced. Portrait photo correction is when the face of a person is modified. It is done by professional photo editors so that the end result is a realistic photo of that person. Background elimination is also done to remove all backgrounds from an image. Background enhancement service adds special effects and colors to background areas of an image.
When hiring an ecommerce photo editing service, you can e-mail your image requirements along with the description of the image and its purpose. The service will e-mail you back with the specifications that you require for the service. The ecommerce service should provide high quality retouching service. They should have experienced artists for the task.
Image cropping and portrait photo correction are the basic tasks included in the ecommerce photo editing services. Image cropping is when a part of an image is removed to make the final product photo. It can be used when a person is looking for specific product photos such as office products, personal products, etc. Portrait photo correction is also needed when people are taking group photos. For example, if there are ten people in a group photo, only those five people should have their hairstyles changed. This service is necessary because otherwise the whole group looks similar.
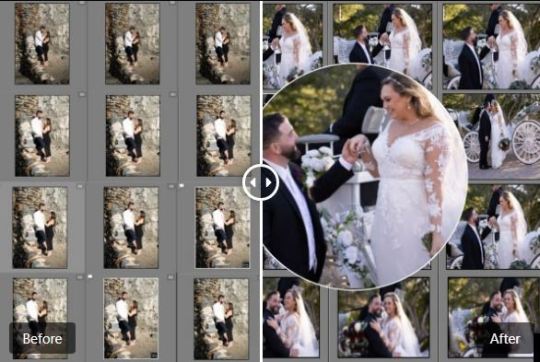
Ecommerce photo editing services include retouching, editing, colorizing and beautifying images. Some of the services also offer services for wedding photography, portraits and pet photography. You can also e-mail them to request for images of certain products.
The ecommerce service offering photo editing services also offers background service. With this service, they will redo your background. This is perfect for those who are doing product photography. In ecommerce photo editing, the background is the second screen you see after you clicked on a product image, which usually means you have to click another product to get to the background.
#ecommerce photo editing service#product photo editing#ecommerce product photo editing service#Ecommerce Photo Editing Services#Product Image Editing Services#E-commerce Image Editing Services#Product Image Editing Service for E-Commerce
1 note
·
View note
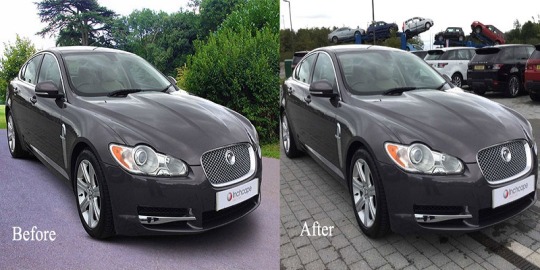
Photo

Is it true that you are searching for top notch cutting and modifying administrations at reasonable costs? We trust this is the correct spot for you. We are an expert photoshop cutting way specialist co-op situated in the USA and your confided in picture altering accomplice. You can depend on us as your colleague for a wide range of picture altering administrations. I will ask you to visit this website. www.clippingpathview.com. #ecommerce_photo_editing_service #ecommerce_photo_editing_company #ecommerce_image_editing_service #e_commerce_image_retouching For ecommerce image editing service, visit here : https://www.clippingpathview.com/best-image-editing-companies/ https://www.clippingpathview.com/ecommerce-photo-editing-services-and-retouching-services/ https://www.clippingpathview.com/professional-photo-editing-services-in-australia/
1 note
·
View note
Photo

To present blemish-free photos regularly, you might intend to choose retouching service.
Know more:https://bit.ly/2Oj0yAK
#Photoretouch #Graphicdesign #Imageediting #Backgroundremoval #editing #Photographer #Photography #USA #UK #Magazine #Italy #France #Australia #Canada #Miami #Washington #Ecommerce #Onlinebusiness #Model #Fashion #photooftheday #like #Follow #illustration #Toronto
4 notes
·
View notes
Link
The Basics of Clipping Path Services
Improve your bottom line with the top, most experienced clipping path service available in the industry today. The top clipping path services can save you time and expense by enabling you to focus on more creatively, high revenue producing work. The worst clipping path services will cost you more than money; they will blow deadlines, cause endless headaches and end up costing you more than ever before. If you want to improve your business, you need to invest in the best clipping path service that can get you the results you need at a price you can afford.
How do you know if a clipping path company is doing their job to your expectations? You simply need to ask for a proof of completion. A quality assurance form can be requested from any clipping path service provider and should be signed by both parties in agreement. This document certifies that the service provider has fulfilled all the tasks requested, as well as explaining all elements of the project to make sure no misunderstanding or fault could occur.
Clipping paths used to be done only with paintbrush and pen. Today's online interface clipping path services use state of the art technologies and software applications to enhance every stage of the project. Many of the available services offer services like: pre-designed logos and clipart, pre-designed websites, integrated design tools, ecommerce solutions and integration with social media platforms, like Facebook and Twitter. All these services and more are already working together with web designers. You may already be working with an online interface designer, who is rendering you these services and optimizing your online interface to maximize its potential.
Professional photo studios have been utilized for years. Photo lovers utilize professional studios for photo retouching to improve their photographs, enhancing colors, eliminating red eye and other problems. Photo studios have been the most convenient way to fix bad shots or fix images that cannot be fixed using already existing photos. Professional clipping path service providers bring the real professional touch to your photos and make them flawless.
If you need your photos to look perfect, using the best clipping path service provider is an absolute must. The leading clipping path services usa offer an extensive array of options to enhance your pictures, including: crop, flip, distort, and repair. These tools can be customized according to your needs, so you get the results you want.
If you want to do some photo editing, but don't want to spend time learning how to use Photoshop, a digital photo editing service is your answer. Using a service like this will allow you to get high-quality retouching without learning how to use advanced software. This also gives you a great deal of flexibility, as you only pay for what you need. A quality service will help you to turn your images around so they look great.
Clipping path services are used by professionals, so they will know exactly what you need. Most services have packages that include everything you need in order to fix your photos, including: cropping, restoring, and white balancing. Your chosen clipping path service provider should have several specialists, each of whom specializes in certain aspects of the service. For example, one specialist might specialize in optimizing photos using keywords, while another may work with lossless clipping path optimizing. You might also be able to request services in different sizes.
After you have selected the best service for you, the first step will be to create a retouching plan. The plan should include a strategy for optimizing your image across all of the different layers. It should also include a strategy for optimizing your background, including a plan for using clipping path service on the Background layer, using different layers, and optimizing your text. All of these strategies should be written out and outlined specifically on your clipping path service provider's website. You will then need to work closely with your service provider in order to create a comprehensive plan. Our Root Resource: “Background removal service“
1 note
·
View note
Last Seen Blogs