#don't worry that is my favourite meme template
Note
Hello!
First of all, happy new year and congrats on 1000 followers!
I just want to say I love your blog, and it's one of my favourite blogs on tumblr. You're a very important part of the GO fandom, so keep being you :). Your work is amazing; and I really love your video edits (I confess I haven't found the time to read your fanfics yet but it's definitely on my list, I promise).
I've been kind of wanting to try gifmaking for a while, and I read your posts about video editing/gifmaking. If it's not too much trouble, would you be willing to share a few more tips? (Doesn't have to be that detailed, just a few simple tricks for beginners).
Thank you and have a nice day/night!
Oh Anon, you're a sweetie. Thank you!! I'm so pleased that this blog can bring joy to others. All of you are so lovely, it makes everything so much more fun!
I'll share whatever wisdom I can but I'm still a bit of a newbie really; I've only used Davinci Resolve for about 6 months~ or so, so if anyone else has any other tips, please add!!
1) I would recommend Davinci Resolve to anyone who wants to get into video editing as it's free & quite similar to Vegas Pro (which I do have, but personally I prefer Davinci).
2) If you want to make GIFs, I'd recommend creating a project using the settings I use here, then saving it as your 'template' so every time you want to make a new GIF, you don't have to re-do your settings because it'll be saved on that project.
3) You can create multiple tracks - I use this for overlaying audio (and turning off video on that track), or for adding text or effects generators. This is what my War of Hearts edit looks like in DaVinci:

I used track 3 & 4 for text
Track 2 for just audio (you can see I turned off video)
Track 1 was my 'main' video & audio track
Track A5 was my music
This is what The Book of Love looks like, you can see it was only 3 tracks (music, video, text)

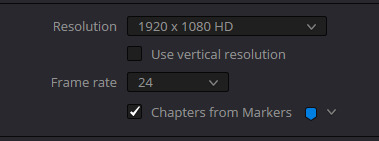
4) The marker function. This is handy for leaving notes for yourself or sectioning things off while you work, but you can also render those markers to create 'chapters' automatically when you upload it to YouTube. Add a marker with the little blue button, then double click your market & name it. You can use different colours too.


When you render it, tick 'Chapters from Markers' and make sure the colour matches the markers you want to make into chapters, then export.
5) Get yourself some new fonts!! I downloaded free fonts from Google [link], installed them, restarted Davinci, and they were ready to use!
6) The 3rd tab. When you click on a clip, you'll get lots of options. PLAY WITH THEM. Just start changing settings & observe what it does. I cannot emphasis enough - just play with Davinci and see what happens. Don't aim to make it something, just aim to learn. Whack a clip down & start putting effects, zoom, cropping, etc on it.
You can colour the image on the 5th tab via colour wheels. Don't worry if it's silly! Again, just click around and see what happens! Here, I'll show you me playing with colours & effects:

honestly it looks like a meme with the text
7) Speaking of the 5th tab, I ONLY LEARNT THIS LAST WEEK WHICH IS EMBARRASING, but you can copy the colouring you've done to 1 clip onto other clips. Select the clips you want to colour, then scrollwheel click on the clip WITH the colourings you want.
8) Use your arrow keys on the keyboard (⬅️➡️⬇️⬆️) to move along your timeline. It's a lot easier to find the right frame, instead of using your mouse. Here's some basic keyboard shortcuts:
Cut: [Ctrl + X]
Copy: [Ctrl + C]
Undo: [Ctrl + Z]
Redo: [Ctrl + Shift + Z]
Paste: [Ctrl + V]
Select All: [Ctrl + A]
Play/pause [Space]
9) This seems obvious but I have lost hours of editing because I didn't do this. When you start a new project, SAVE IT (File>Save Project) as then it'll start autosaving the project.
10) I would heavily recommend watching some YouTube tutorials if you've never video edited before. I also started out with a pre-installed Windows 'Video Editor' (I think it's called Clipchamp now?) which is extremely basic, so it allowed me to learn without getting overwhelmed with all the bells and whistles that Davinci has. If DaVinci is too much right away, try something easier, but you might get frustrated as it's less control & options (only 1 track, limited colouring options, limited effects/transitions, can't view frame by frame, etc).
In summary: Play around with your editing software & see what happens. Watch edits, look at GIFs- observe how they edit as it might inspire you & help put some of your new skills/knowledge into context. If there's anything I can help with, just drop me a message! Good luck & happy editing ❤️
5 notes
·
View notes
Note
🐮

7 notes
·
View notes
Last Seen Blogs


bigmarcus3000
Dreamworks247

stevoniequarts
You Are An Experience

whimsicalarchives
Whimsical Books

invozioc0m
Untitled