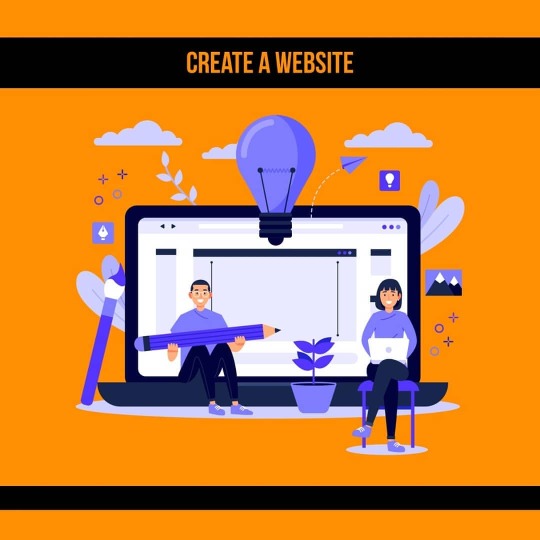
#creatingwebsites
Text
CMS
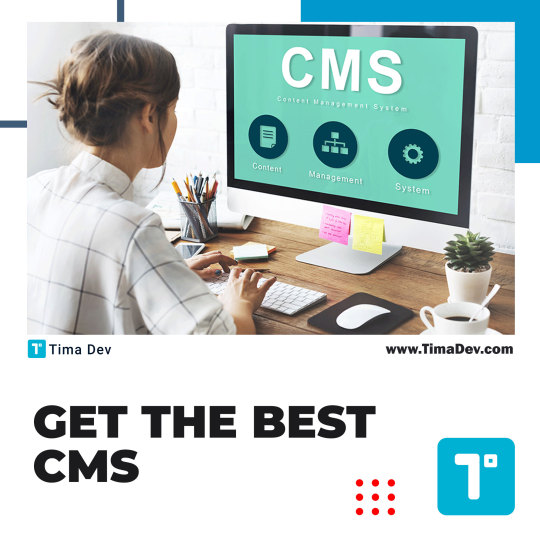
The most popular cms in the world:
1. WordPress;
2. Shopify;
3. Drupal;
4. Blogger.
5.Joomla
#cms#topcms#wordpress#joobla#drupal#magento#blogger#technoeffective#uidesign#uxdesign#itblog#webdev#itteam#it#itcompany#web#webdevelopment#creatingwebsite#website#webdesign#design#responsible#redesign#tima#timdev#keywords#keywordssearch#keywordsstrategy#ranking#websitetraffic
0 notes
Photo

How and on what ideas can you make money? Implementation of ideas. Ideas for business. Creative ideas.
Sport365days.com can be a great start for you. This is a free tool that can be used for various purposes: to find the right service, to find loyalty programs, to check the audience's interest in various ideas in the shortest possible time without attracting additional resources, and much more.
Register https://sport365days.com/add-business.
Create your pages broken down by regions and sorted by different areas: sports, beauty, wellness, etc.
Write to direct or email [email protected]
0 notes
Photo

2010 v.s. 2020 Same person, same passion 👩🏻💻💖 . . . Na 10 jaar is mijn meest favoriete plek nog steeds achter de laptop. Creatief bezig zijn met websites bouwen, foto's bewerken en ga zo maar door! 🤗 . . . After 10 years is sitting behind the laptop still my favorite spot 🤗 Bring creatieve with the making of a website, redesigning photos and more! 🤗 . . . #bijzus #kleinekelly #littleme #kleineik #passie #vankleinsafaan #2010 #2020 #10years #enjoying #mypassion #creatingwebsites #creatiefzijn #genieten #alldayeveryday #sameperson #samepassion #growingup #mijnpassie #toenvsnu #weinigveranderd #behindthelaptop #favoritespot #persoonlijkeblog #personalinstablog (bij Reuver) https://www.instagram.com/p/CBjOlSCjNA3/?igshid=1p60wf64y93he
#bijzus#kleinekelly#littleme#kleineik#passie#vankleinsafaan#2010#2020#10years#enjoying#mypassion#creatingwebsites#creatiefzijn#genieten#alldayeveryday#sameperson#samepassion#growingup#mijnpassie#toenvsnu#weinigveranderd#behindthelaptop#favoritespot#persoonlijkeblog#personalinstablog
0 notes
Photo
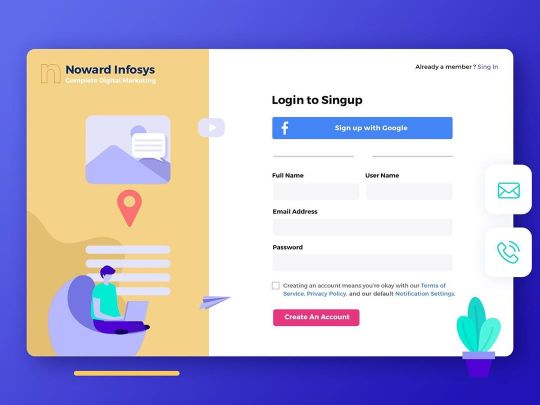
Hello Guys, this is our Create an Account page design for marketing tool. Feel free to share your thoughts and comments. Tool Used: Adobe XD Follow: @revivalpixel18 Looking for a website design and development. DM #web #createanaccount #signup #signuptoday #signupnow #creatingwebsites #webdesign #webdesigner #websitedesign #ui #uidesign #uidesign #uidesigner #uidesignpatterns #uid #uidesigns #uidaily #uxdesign #ux #uxdesigner #uxmal #uxui #uxigers #uxd #uxu #uxinspiration #webdesignagency #webdesigncompany #webdesigntrends #webdesigninspiration #webdesigntips @ui__ux @ui_gradient @ui.helen @uibysherms @uibucket @ui.snacks @design.gems @uxbrainy @uxui_daily @ui.insomniac @uixlover @day.ui @ui_lab @topuxdesigners @uix.osm @ui.mob @ux_trends https://www.instagram.com/p/B-rm6SggPRh/?igshid=1t41cbh1xx3pk
#web#createanaccount#signup#signuptoday#signupnow#creatingwebsites#webdesign#webdesigner#websitedesign#ui#uidesign#uidesigner#uidesignpatterns#uid#uidesigns#uidaily#uxdesign#ux#uxdesigner#uxmal#uxui#uxigers#uxd#uxu#uxinspiration#webdesignagency#webdesigncompany#webdesigntrends#webdesigninspiration#webdesigntips
0 notes
Photo
Be it a new business or an already established business we strategize marketing to everyone. #websitedevelopment #creatingwebsites #reachyourtargetAudience #growyourbusiness #intsnbits #digitalmarketing #appdevelopment #graphicdesigning #onlinemarketing https://www.instagram.com/p/B5AJDSNl6_l/?igshid=1egikfxkg4cwh
#websitedevelopment#creatingwebsites#reachyourtargetaudience#growyourbusiness#intsnbits#digitalmarketing#appdevelopment#graphicdesigning#onlinemarketing
0 notes
Text
How Much Does a Website Cost Per Year?
The first question on your mind is, "How much does a website cost per year?" This is a complex question with many variables. It depends on the type of website and whether or not you need eCommerce or membership features. A simple, one-page website might cost you as little as $400 a year. Depending on the complexity of the site and how it will be used, you may spend anywhere from a few hundred to several thousand dollars per year.
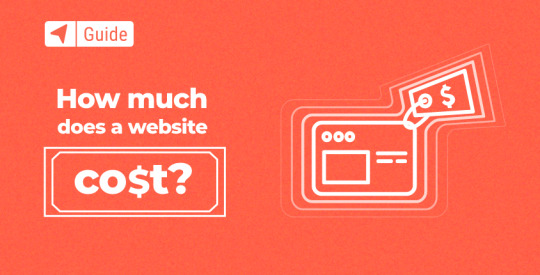
The price of a website is different for different types of websites. For example, an ecommerce site with a large product line will require more than a one-page website. A local bakery may only need a single page. In some cases, companies invest in web marketing and buy additional pages to support content marketing and SEO strategies. You can easily determine how many pages your site needs by speaking with a web design team. Then, a web designer can create an appealing layout and add interactive media. All of these costs can add up over time.
While it is possible to create a website for a small business on a shoestring budget, the technical side of the process can be complicated. While some of these services are free, others require you to pay annually. Premium plugins are a good example. Akismet, for example, is a popular spam fighting plugin that costs as little as $10. Other great forms include Gravity Forms, which start at $100 per year. If you don't need all of these features, there are free alternatives like WP Forms, Ninja Forms, and Formidable.
0 notes
Text
How to Make an Effective Web Banner
What You'll Be Creating
Website banners: we see them every day, and they are a great addition to your marketing campaign. In this tutorial, I'll show you how to make a banner. Banner designs and banner templates are composed of a couple of key elements: an offer and a call to action. You can add your logo if you’d like, and an image to enhance the message.
The offer needs to be concise and to the point. You have to let your readers know what you are promoting. The call to action is a text/button that will invite your consumer to your website. Short phrases like “Shop Now” or “Subscribe” are great anchors.
In this tutorial, we’ll design a half-page vertical banner that includes all the essential elements. We’ll apply this design to a pop-up banner size, which is a great example for you to see if you are planning on designing banner templates in the future.
Not ready to make a banner in Photoshop? Placeit is a great online ad maker that's easy to use and quick to customize. With hundreds of options to choose from, you are sure to find a banner template that suits your needs. Envato Elements also offers amazing and effective web banner templates and stock photos that can help you create a stunning campaign. Go check them out!
What You Will Need
You'll need access to Adobe Photoshop. If you don't have the software, you can download a trial from the Adobe website. You'll also need these assets:
Abacus
Blonde retro style
Awosem font
Morton font
Download the assets and make sure the font is installed on your system before starting. When you are ready, we'll get started on creating your website banner!
1. Setting Up a Web Banner Design File
Step 1
In Photoshop, go to File > New. Name the document Web Banner. Set the file to the following dimensions:
Width to 300 px
Height to 600 px
Orientation to Portrait
Resolution to 72 px
Color Mode to RGB
Click Create.
Step 2
Create margins around the document by going to View > New Guide. In the New Guide option window, select Horizontal and set the Position to 20 px. Click OK.
Go to View > New Guide, this time setting the Position to 580 px.
To create vertical lines, go to View > New Guide. In the option window, select Vertical and set the Position to 20 px. Click OK.
Go to View > New Guide, this time setting the Position to 280 px.
2. Designing Your Web Banner
Step 1
Drop the Blonde retro style image onto the document. The width of the image should match the width of the banner. If you need to resize, press Command-T to Transform.
Step 2
Press I to select the Eyedropper tool. Sample the yellow color on the image.
Head over to the Layers panel, and go to Create a New Fill or Adjustment Layer > Solid Color. The foreground swatch should automatically be set. If not, use the following code: #fcf1d3. Click OK.
Move the solid color layer under the image layer.
Step 3
Create a new layer on the Layers panel by pressing Shift-Command-N.
Using the Brush Tool (B) and the #fcf1d3 as foreground, brush over the top right corner of the image. This will create a seamless look.
Step 4
Select all the layers by holding down Shift and selecting the very first and the very last layers. Click on the Create a New Group button. Double-click on the folder and rename it Background.
Step 5
Select the Text Tool (T) from the toolbar. Add the offer or what you are advertising. In this case, I will add ‘Spring’ in a different font than the rest of the banner to emphasize the season.
Head over to the Character panel (Type > Panels > Character Panel). Set the Font to Awosem and the Size to 175 pt. Click on the Color swatch and set it to black.
Use the guides to place the text in the center of the banner.
Step 6
Using the Text Tool (T), add the rest of your copy. In this case, add the rest of the offer: ‘Sale, up to 50% off selected items. Online only.’ You can do this on a single layer or multiple layers.
Head over to the Character panel and use the following settings:
SALE: Font Morton Bold, Size 110 pt. Set the Color swatch and set it to #d82a2e.
UP TO 50%: Font Morton Bold, Size 110 pt, Leading 40 pt. Set the Color swatch to black.
OFF SELECTED ITEMS: Font Morton Bold, Size 25 pt, Leading 25 pt.
ONLINE ONLY: Font Morton Bold, Size 40 pt, Leading 35 pt.
Place this layer under the Spring layer. Select both layers and create a new folder named Copy.
Step 7
Now it’s time to create the call to action button. In this case, we will call it ‘Shop Now >.’
Using the Text Tool (T), add the call to action and use the following settings: Font Morton Bold, Size 110 pt, Tracking 100 pt. Set the Color swatch to black.
Using the Rectangle Tool (U), create a rectangle. Head over to the Control bar and set the color to white, the Width to 145 px, and the Height to 35 px.
Step 8
To make the call to action stand out, we’ll add a shadow. On the Layers panel, right-click on the Rectangle layer and select Blending Options.
In the Layer Style option window, check and select the Drop Shadow option. In the Drop Shadow settings, set the Opacity to 35%, Angle to 130, Distance to 10 px, and Size to 20px. Click OK.
Select the text and rectangle layers and combine them into one folder called ‘Call to action.’
3. Applying Your Web Banner Design to Other Sizes
There’s no right or wrong way to apply your web banner design to other sizes. Below, I'll show you an example of easily applying a half-page banner to a pop-up size. Use this as an inspiration and try to add your own spin. Then show us your design in the comments section below!
Step 1
In Photoshop, go to File > New. Name the document Web Banner 2. Set the file to the following dimensions:
Width to 500 px
Height to 350 px
Orientation to Portrait
Resolution to 72 px
Color Mode to RGB
Click Create.
Step 2
Create margins around the document. Go to View > New Guide. In the New Guide option window, select Horizontal and set the Position to 20 px. Click OK.
Go to View > New Guide, this time setting the Position to 580 px.
To create vertical lines, go to View > New Guide. In the option window, select Vertical and set the Position to 20 px. Click OK.
Go to View > New Guide, this time setting the Position to 280 px.
Step 3
Drop the Blonde retro style image and press Command-T to Transform. Head over to the Control bar and set the Width and Height to 75%.
Place the image to the left of the banner. A good guide is to have the elbow of the subject touching the margin.
Step 4
Head over to the Layers panel, and go to Create a New Fill or Adjustment Layer > Solid Color. Set the solid color to the following code: #ff634b. Click OK.
Step 5
Create a new layer on the Layers panel by pressing Shift-Command-N.
Using the Brush Tool (B) and #ff634b as the foreground color, brush over the edge of the image and the solid color to create a seamless look.
Step 6
Select all the layers by holding down Shift and selecting the very first and the very last layers. Click on the Create a New Group button. Double-click on the folder and rename it Background.
Step 7
Head back to the Web Banner 1 file. Go to the Layers panel, and select the call to action and Copy folders. Right-click and select Duplicate Layers.
In the Duplicate Layers option window, set the Document to Web Banner 2. Click OK.
Step 8
Head back to the Web Banner 2 file.
Select the Copy folder and press Command-T to Transform, moving the text towards the top left corner.
Open the folder and change the color of the ‘Sale’ text to #fceece.
Step 9
Place the call to action button above the bottom margin.
4. How to Export Your Banner Design for Web
Head over to File > Save and save the file as you would normally.
To save a JPEG for web file, head over to File > Save for Web or Shift-Option-Command-S. Select the file type you want to save the document in—I am choosing JPEG—and set 100 for Quality. Under Image size, you can change the pixel size of the image if you have any size constraints.
On the bottom left-hand side, you can see a preview of the size of the file. This is useful when there are size constraints on a website and you need to lower the quality or the size of the image.
Click on Save… to choose the location in the new window, and click on Save again.
Great Job! You’ve Finished Your Web Banner Template!
In this tutorial, we learned how to make a banner design. We covered tools that will help you design web banners for your next marketing campaign. Today, we learned to:
set up a website banner file
use Layer Masks
organize layers into folders
export a web-ready JPEG file
If you are new to Photoshop and need a banner template or promotional marketing templates right away, head over to Envato Elements and GraphicRiver. If you are in a hurry, don’t forget to check out Placeit. We’ve got many options for you to explore!
If you liked this tutorial, you might like these:
Print Design
How to Make a Banner
Laura Keung
Banner Ads
20+ Online Ad Banner (Maker) Template Designs to Customise Now
Nona Blackman
Flyers
38 Stylish Flyer Templates (PSD Flyer Templates)
Melody Nieves
Fonts
25+ Best Free Hand Lettering Style Fonts (Designs for 2018)
Melody Nieves
Graphic Design
The Graphic Designer's Resource Kit
Mary Winkler
from Envato Tuts+ Design & Illustration https://ift.tt/32YJy90 via http://www.webmasterforum.ws/rankwyz-discount-code-2015-coupons/
0 notes
Text
How To Create A Website For Beginners [NO CODING]
https://opix.pk/blog/how-to-create-a-website-for-beginners-no-coding/
How To Create A Website For Beginners [NO CODING]
https://opix.pk/blog/how-to-create-a-website-for-beginners-no-coding/
Opix.pk
#buildawebsite #createawebsite #createawebsiteforfree #createwebsite #creatingawebsite #creatingwebsite #howtobuildawebsite #howtobuildawebsiteforfree #howtocreateawebsite #howtocreateawebsiteforbeginners #howtocreateawebsiteforfree #howtodesignawebsite #howtomakeawebsite #howtomakeawebsiteforfree #howtostartawebsite #makeyourownwebsite #makingawebsite #startawebsite
How To Create A Website For Beginners [NO CODING] ✅ Hosting Discount Here : https://createwpsite.com/special-deals/ If at some point of your life you wanted to make or just wanted to know how to build a website, then this video will be really useful to you! If you go buy the commercials and the ads for the various platforms you will know that it is very simple to do. Today we’ll show you 3 ways on how you can build your own website for your business or anything else. I have used one of these ways myself so I know how to create a website 2018 and it is really easy to do! You will see when you make your own website. I say it from a firsthand experience. Music Provided By: http://www.bensound.com/royalty-free-music So lets create a website 2018. After we get over the website building tools we’ll move on to domains which are the simplest part of all! I try to make this super simple. So no matter what your skill level is, You will know how to make a website. I also make sure it’s going to be cheap to create. I always use free themes from WordPress, But only the ones that look professional. The overall goal anytime i make a video is to make it as cheap as possible when it comes to the cost but as professional as i can make it look when it comes to the design layout. WordPress: WordPress is basically software which allows you to learn how to create a website for beginners and develop your website online easier, its open source website creation tool written in PHP. Lots and lots of people are using it these days to build their own websites but this is kind of complicated for a starter so for anyone who uses this tool, it will take him/her some time to get used to WordPress and anyone who tries it, will have to look at some tutorials. After all of that is done then it becomes a really sweet ride which is amazing if you or anyone else wants to develop a quick website or something serious. I love to help people out, Especially if there new to something that i have some knowledge about. It’s never fun when your starting out and your totally clueless. It’s possible to get a website free of cost but its also tough too because it can be limited. Trust me I’ve been there when learning how to create a website for beginners and i had to kind of learn about website design the hard way (the slow way) but hopefully we can cut that learning curve in this web design tutorial for beginners and for you so you can see how to create a website for beginners and get your new website up and rolling! Old school way http://createwpsite.com/how-to-create-a-website-for-beginners-2018/ Hiring a web developer is definitely a cool way to do it, but it isn’t cheap at all. That’s why I made this and you may need a web developer but only if you can afford one. To keep working on it over and over again making a huge hole in the budget you may have when finding out how to create a website for beginners! This is a good way to get a good grasp of website making and go if you have the money but depending on how much your willing to spend, It might be easier to take the twenty minutes in this how do you make a website video and just do it yourself for $12 bucks and then you will also learn something new and if you ever needed to create a website again you can do it without getting someone to do it for you. It seems like one of the hardest things when you want to find out how to create a website for beginners when your first starting but in this video you’ll see how it was made easy. Domains and Domain Names: Do any of you guys think you can build a site by yourself and might ask urself how do i make a website and learn how to create a website for beginners with no help from anybody if you have never ever did it before? Most likely not, That is why i want to get this across to as many people possible. A good example of a place and the best website builder where you can buy domain and domain names is GoDaddy (what we use in this how to create a website for beginners video) and it help when learning how to create a website for beginners which is extremely easy to use; you just search for domain names until you’re happy with any of them, once you find the perfect domain name you purchase it and do whatever you want with it and you can take it anywhere you want too, you bought it and as long as you keep paying for it, it’s yours. Another great tool for web design and domain names and buying them is wix which is basically the same as GoDaddy but has a different user interface where you have to sign up before you do anything, nothing impossible to do and it’s very easy just to buy your own domain name and keep it to yourself. Don’t get discouraged, I know its tough in web development and the beginning and for a lot of people but in the end i know with my help and a little bit of work we can get a site up the website for your business you get to show off to all your friends and family and earn money on the side from it as well!source
0 notes
Text
Template shopping cart đẹp cho blogspot
[tintuc]Hôm nay cuahangtemplate xin giới thiêu với các bạn thủ thuật mới
1-Johny Ganteng Store
Demo | Download
2-Johny Joss Mobile Phone
Demo | Download
3-johny blackstore
Demo | Download
4-Johny Magstore
Demo | Download
cách sử dụng theme ví dụ như theme johny magstore:
1- post sản phẩm theo mẫu html sau làm như sau để lần sau khỏi quên
copy code sau
<div class="product_image">
<div class="pancontainer" data-orient="center" data-canzoom="yes" style="width:150px; height:150px;">
<img border="0" class="item_thumb" src="product_image.jpg" /></div>
<span class="item_price">$00.00</span> </div>
<div class="product_describe">
Descriptions... </div>
vào setting -> posts and comments >> post template -> paste vào
2- thanh toán paypal - theme cũng dùng simplecart
chỉnh trong html thay đổi
<script type='text/javascript'>
simpleCart.email = "[email protected]";
simpleCart.checkoutTo = PayPal;
simpleCart.currency = USD;
simpleCart.taxRate = 0.02;
simpleCart.shippingFlatRate = 3.25;
simpleCart.shippingQuantityRate = 1.00;
simpleCart.cartHeaders = ["thumb_image" , "Quantity_input" , "Total", "remove" ];
</script>
thay đổi slide ở widget ->tìm feature content slider ->
edit-> sửa thay bằng categories bạn muốn show trên slider
để qủan lý cho script của mình down script về chỉnh sửa công ty tiền tệ - :
http://bit.ly/2WSWGfD
vì paypal dùng USD nên không thay đổi gì nhiều - để thay đổi công ty thanh toán tìm :
simpleCart.currency = USD;
thay bằng ký hiệu thanh toán khác.....
Bonus khi sử dụng theme thay đường dẫn khi click vào nút order now
với theme Johny Ganteng Store, vào chỉnh sửa Edit HTML tick vào Expand Widget Templates :
<input class='order' onclick='window.location='http://johny-gantengstore.blogspot.com/p/sample-page-no-image.html'' type='button' value='Order'/> thay thế url bằng đường dẫn trang của bạn
với template Joss Mobile Phone, vào Edit HTML tick Expand Widget Templates :
<a class='item_add' href='http://johnyjoss.blogspot.com/p/sample-page-no-image.html'>Order</a>tương tự như trên ta có thể thay bằng tiếng việt
<a class='item_add' href='http://shop/p/lien-he.html'>Đặt Hàng</a>
<a class='view_detail' expr:href='data:post.url'>Chi Tiết</a>
** để sử dụng tốt nhất nên down mọi file .js về và up lên host google để dùng riêng tránh tác giả ngứa tay del đi là hỏng hết
nguồn http://creatingwebsite-maskolis.blogspot.com
Nếu có thắc mắc, hãy để lại comment phía dưới nhé, admin của cuahangtemplate.com sẵn sàng trợ giúp bạn
chúc các bạn thành công!! [/tintuc]
source https://www.cuahangtemplate.com/2019/06/template-shopping-cart-ep-cho-blogspot.html
0 notes
Text
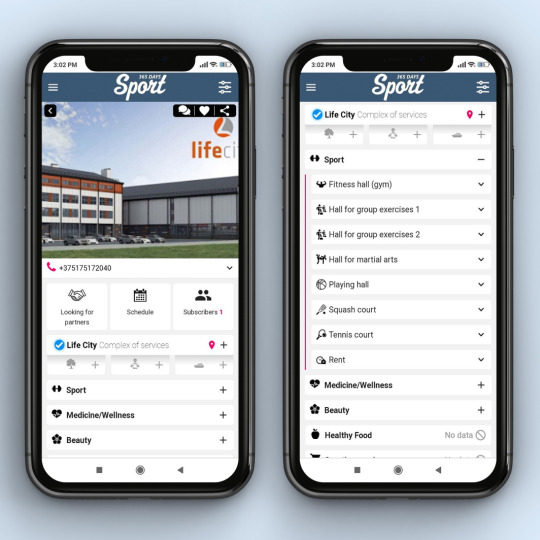
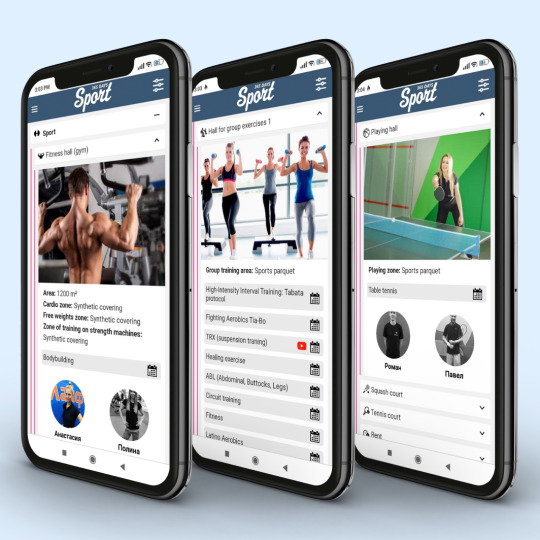
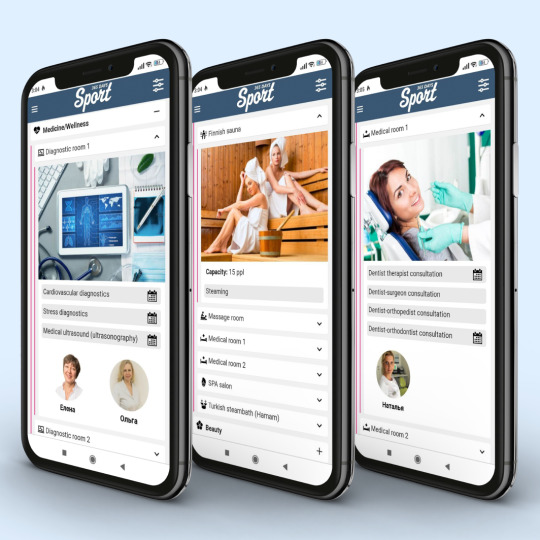
Do you want to advertise a sports and recreation complex so that thousands of people know about you? Add information to the Sport365days catalog! Life City: https://sport365days.com/public-page/5f7cbdda50b81b39d76d1b18
#sport365days_object#madeonsport365days#websitebuilder#webdesign#landing#datascience#presentation#business#investment#money#activelifestyle#creatingwebsites#siteconstructor#sport#marketing#sales
0 notes
Photo

New on my Pinterest: New Studies @SurveyCircle http://bit.ly/2De7Qh7 : Participants needed for current online survey: "Survey on Hiring a Web Developer" http://bit.ly/2DJacIQ via @SurveyCircle #WebDevelopment #Website #CreatingWebsites #Developer #Hiring #WebDeveloper http://bit.ly/2QhzjZL #SurveyCircle #Research #Survey #Study #CallForParticipants #Participants #Respondents | Participate now: http://bit.ly/2P1uQ8Z
0 notes
Text
How to Make an Effective Web Banner
What You'll Be Creating
Website banners: we see them every day, and they are a great addition to your marketing campaign. In this tutorial, I'll show you how to make a banner. Banner designs and banner templates are composed of a couple of key elements: an offer and a call to action. You can add your logo if you’d like, and an image to enhance the message.
The offer needs to be concise and to the point. You have to let your readers know what you are promoting. The call to action is a text/button that will invite your consumer to your website. Short phrases like “Shop Now” or “Subscribe” are great anchors.
In this tutorial, we’ll design a half-page vertical banner that includes all the essential elements. We’ll apply this design to a pop-up banner size, which is a great example for you to see if you are planning on designing banner templates in the future.
Not ready to make a banner in Photoshop? Placeit is a great online ad maker that's easy to use and quick to customize. With hundreds of options to choose from, you are sure to find a banner template that suits your needs. Envato Elements also offers amazing and effective web banner templates and stock photos that can help you create a stunning campaign. Go check them out!
What You Will Need
You'll need access to Adobe Photoshop. If you don't have the software, you can download a trial from the Adobe website. You'll also need these assets:
Abacus
Blonde retro style
Awosem font
Morton font
Download the assets and make sure the font is installed on your system before starting. When you are ready, we'll get started on creating your website banner!
1. Setting Up a Web Banner Design File
Step 1
In Photoshop, go to File > New. Name the document Web Banner. Set the file to the following dimensions:
Width to 300 px
Height to 600 px
Orientation to Portrait
Resolution to 72 px
Color Mode to RGB
Click Create.
Step 2
Create margins around the document by going to View > New Guide. In the New Guide option window, select Horizontal and set the Position to 20 px. Click OK.
Go to View > New Guide, this time setting the Position to 580 px.
To create vertical lines, go to View > New Guide. In the option window, select Vertical and set the Position to 20 px. Click OK.
Go to View > New Guide, this time setting the Position to 280 px.
2. Designing Your Web Banner
Step 1
Drop the Blonde retro style image onto the document. The width of the image should match the width of the banner. If you need to resize, press Command-T to Transform.
Step 2
Press I to select the Eyedropper tool. Sample the yellow color on the image.
Head over to the Layers panel, and go to Create a New Fill or Adjustment Layer > Solid Color. The foreground swatch should automatically be set. If not, use the following code: #fcf1d3. Click OK.
Move the solid color layer under the image layer.
Step 3
Create a new layer on the Layers panel by pressing Shift-Command-N.
Using the Brush Tool (B) and the #fcf1d3 as foreground, brush over the top right corner of the image. This will create a seamless look.
Step 4
Select all the layers by holding down Shift and selecting the very first and the very last layers. Click on the Create a New Group button. Double-click on the folder and rename it Background.
Step 5
Select the Text Tool (T) from the toolbar. Add the offer or what you are advertising. In this case, I will add ‘Spring’ in a different font than the rest of the banner to emphasize the season.
Head over to the Character panel (Type > Panels > Character Panel). Set the Font to Awosem and the Size to 175 pt. Click on the Color swatch and set it to black.
Use the guides to place the text in the center of the banner.
Step 6
Using the Text Tool (T), add the rest of your copy. In this case, add the rest of the offer: ‘Sale, up to 50% off selected items. Online only.’ You can do this on a single layer or multiple layers.
Head over to the Character panel and use the following settings:
SALE: Font Morton Bold, Size 110 pt. Set the Color swatch and set it to #d82a2e.
UP TO 50%: Font Morton Bold, Size 110 pt, Leading 40 pt. Set the Color swatch to black.
OFF SELECTED ITEMS: Font Morton Bold, Size 25 pt, Leading 25 pt.
ONLINE ONLY: Font Morton Bold, Size 40 pt, Leading 35 pt.
Place this layer under the Spring layer. Select both layers and create a new folder named Copy.
Step 7
Now it’s time to create the call to action button. In this case, we will call it ‘Shop Now >.’
Using the Text Tool (T), add the call to action and use the following settings: Font Morton Bold, Size 110 pt, Tracking 100 pt. Set the Color swatch to black.
Using the Rectangle Tool (U), create a rectangle. Head over to the Control bar and set the color to white, the Width to 145 px, and the Height to 35 px.
Step 8
To make the call to action stand out, we’ll add a shadow. On the Layers panel, right-click on the Rectangle layer and select Blending Options.
In the Layer Style option window, check and select the Drop Shadow option. In the Drop Shadow settings, set the Opacity to 35%, Angle to 130, Distance to 10 px, and Size to 20px. Click OK.
Select the text and rectangle layers and combine them into one folder called ‘Call to action.’
3. Applying Your Web Banner Design to Other Sizes
There’s no right or wrong way to apply your web banner design to other sizes. Below, I'll show you an example of easily applying a half-page banner to a pop-up size. Use this as an inspiration and try to add your own spin. Then show us your design in the comments section below!
Step 1
In Photoshop, go to File > New. Name the document Web Banner 2. Set the file to the following dimensions:
Width to 500 px
Height to 350 px
Orientation to Portrait
Resolution to 72 px
Color Mode to RGB
Click Create.
Step 2
Create margins around the document. Go to View > New Guide. In the New Guide option window, select Horizontal and set the Position to 20 px. Click OK.
Go to View > New Guide, this time setting the Position to 580 px.
To create vertical lines, go to View > New Guide. In the option window, select Vertical and set the Position to 20 px. Click OK.
Go to View > New Guide, this time setting the Position to 280 px.
Step 3
Drop the Blonde retro style image and press Command-T to Transform. Head over to the Control bar and set the Width and Height to 75%.
Place the image to the left of the banner. A good guide is to have the elbow of the subject touching the margin.
Step 4
Head over to the Layers panel, and go to Create a New Fill or Adjustment Layer > Solid Color. Set the solid color to the following code: #ff634b. Click OK.
Step 5
Create a new layer on the Layers panel by pressing Shift-Command-N.
Using the Brush Tool (B) and #ff634b as the foreground color, brush over the edge of the image and the solid color to create a seamless look.
Step 6
Select all the layers by holding down Shift and selecting the very first and the very last layers. Click on the Create a New Group button. Double-click on the folder and rename it Background.
Step 7
Head back to the Web Banner 1 file. Go to the Layers panel, and select the call to action and Copy folders. Right-click and select Duplicate Layers.
In the Duplicate Layers option window, set the Document to Web Banner 2. Click OK.
Step 8
Head back to the Web Banner 2 file.
Select the Copy folder and press Command-T to Transform, moving the text towards the top left corner.
Open the folder and change the color of the ‘Sale’ text to #fceece.
Step 9
Place the call to action button above the bottom margin.
4. How to Export Your Banner Design for Web
Head over to File > Save and save the file as you would normally.
To save a JPEG for web file, head over to File > Save for Web or Shift-Option-Command-S. Select the file type you want to save the document in—I am choosing JPEG—and set 100 for Quality. Under Image size, you can change the pixel size of the image if you have any size constraints.
On the bottom left-hand side, you can see a preview of the size of the file. This is useful when there are size constraints on a website and you need to lower the quality or the size of the image.
Click on Save… to choose the location in the new window, and click on Save again.
Great Job! You’ve Finished Your Web Banner Template!
In this tutorial, we learned how to make a banner design. We covered tools that will help you design web banners for your next marketing campaign. Today, we learned to:
set up a website banner file
use Layer Masks
organize layers into folders
export a web-ready JPEG file
If you are new to Photoshop and need a banner template or promotional marketing templates right away, head over to Envato Elements and GraphicRiver. If you are in a hurry, don’t forget to check out Placeit. We’ve got many options for you to explore!
If you liked this tutorial, you might like these:
Print Design
How to Make a Banner
Laura Keung
Banner Ads
20+ Online Ad Banner (Maker) Template Designs to Customise Now
Nona Blackman
Flyers
38 Stylish Flyer Templates (PSD Flyer Templates)
Melody Nieves
Fonts
25+ Best Free Hand Lettering Style Fonts (Designs for 2018)
Melody Nieves
Graphic Design
The Graphic Designer's Resource Kit
Mary Winkler
from Envato Tuts+ Design & Illustration http://bit.ly/2HYqfpJ via http://www.webmasterforum.ws/rankwyz-discount-code-2015-coupons/
0 notes
Last Seen Blogs