#convert from youtube to mp4
Text
#how to download youtube video#from youtube to mp3#youtube mp4#yt to mp3#youtube mp3#yt convert#youtube to mp4 converter download#converter#youtube mp3 converter#youtube mp4 converter#youtube to mp3 320
1 note
·
View note
Note
How do you make your gifs?
Hello hello! I love talking about gifmaking, so thank you for giving me the chance to ramble.
Instead of a detailed step-by-step walkthrough, I will link tutorials and resources written by the wonderful Tumblr creators on here along the way. Everyone has their method and preferences, and there’s no right or wrong way to make gifs. I’m going to share techniques and resources I picked up along the way that work best for me—they may or may not be suited to your preferences, but I hope you’ll find some helpful things here.
(Warning: screenshot/image heavy)
USEFUL TUTORIALS AND RESOURCES
Here are some tutorials and resources that I found very useful when I got back into gifmaking:
Gifmaking tutorial using video timeline by @hope-mikaelson is identical to my own process
Gifmaking and coloring tutorial by @kitty-forman, whose process is very similar to my own
Giffing 101 by @cillianmurphy, an incredibly detailed tutorial that covers everything you need, including a step-by-step guide to using HandBrake
Gifmaking and coloring tutorial with 4K HDR footage by @sith-maul, another incredibly detailed tutorial with many useful tips
Gifmaking tutorial by @jeonwonwoo, incredibly comprehensive and covers so many aspects of gifmaking from basics, sharpening, captioning, and text effects
Gifmaking/PS tips and tricks by @payidaresque
Action pack by @anyataylorjoy, the Save action is especially a true life-saver
@usergif and @clubgif are amazing source blogs with many tutorials on gifmaking, color grading, and gif effects, can’t be thankful enough for the members for their work curating and creating for these blog!
TOOLS
Adobe Photoshop CS6 or higher, any version that supports video timeline. @completeresources has many links to download Photoshop, have a look!
Photopea is a free alternative to Photoshop, but it has a slightly different UI, check out these tutorials for gifmaking with Photopea
HandBrake or any other video encoder, especially if you’re working with .MKV formats
4Kvideodownloader for downloading from YouTube, Vimeo, Instagram, etc.
OBS Studio or any other similar screen capturing software. To prevent duplicate frames in gifs that prevents your gifs from looking smooth, try to match the recording frame rate (FPS) with the source.
IMPORTING FOOTAGE AND WORKING IN VIDEO TIMELINE
I work exclusively in video timeline instead of importing video frames to layers or loading files into stack. For videos that don’t require converting/encoding using HandBrake, especially ones that are already in .MP4 format, I tend to open the video directly on Photoshop, and trim the videos around directly.
As mentioned above, this gifmaking tutorial using video timeline is exactly how I make gifs. I find it more efficient, especially if you’re making multiple gifs from the same video/the same scene with little to no change in lighting conditions You can simply slide around sections of gifs you want to save, and they will all be the same length.
Another thing also covered in the tutorial linked is the ability to change video speed in video timeline mode. Right click on the video and set the speed before proceeding with cropping/resizing. This is also very useful when you’re making blended gifs where you need the footage to have the same length.
Slowing footage down.
As mentioned in this post, changing the FPS before slowing down the gif results in smoother gifs. Doubling the frame rate before slowing down your gifs usually yields the best result.
Speeding footage up.
I love using this to speed up slow motion B-rolls to make the speed slightly more natural. It will result in nice, smooth gifs:

(B-roll footage, normal broadcast speed)
(200% speed)
Subject won’t stay in frame?
Another feature of the video timeline mode. Keyframes are your best friend. This tutorial by @kangyeosaang covers everything you need to know about panning gifs. I use this technique regularly, it’s a life-saver.
COLORING
Here are some coloring tutorials I found very useful:
Coloring tutorial by @brawn-gp beloved, their coloring style is second to none
Mega coloring tutorial by @yenvengerberg, for stylized /vibrant coloring
Understanding Channel Mixer by @zoyanazyalensky
Coloring rainbow gifs by @steveroger, which delves deep into Channel Mixer
I tend to go for neutral-saturated coloring in general, especially for minimalist gifsets with no effects (blending/isolated coloring/overlays etc.), but the possibility is endless for stylized coloring. Here’s what my adjustment layers look like for the example gifs above.
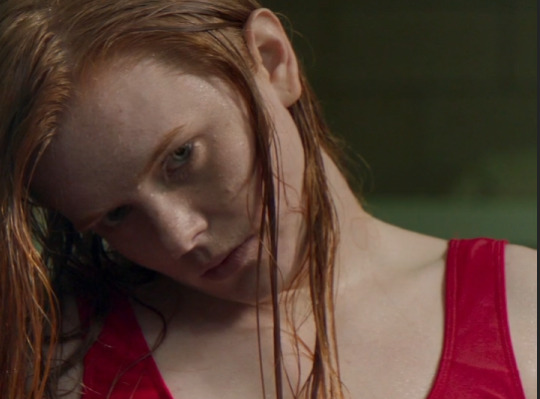
The base footage for this Charles gifset is incredibly desaturated. I started with a Curves layer to bring contrast to the gif, as well as do some color-correcting to bring the base footage to a more neutral tone. To bump contrast, I also like to add a black and white Gradient Map layer with a Soft Light blending mode at 10%-30% opacity:
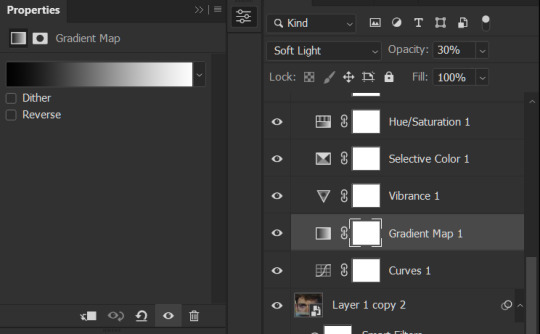
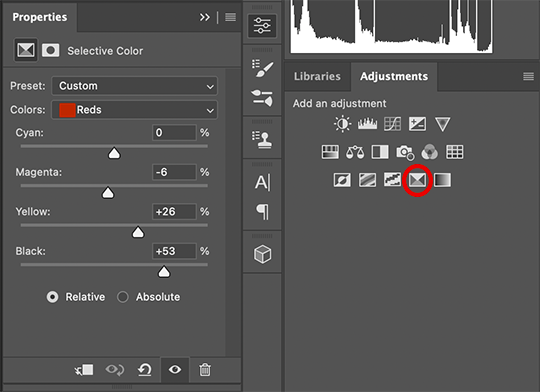
The Vibrance layer is then used to lift the saturation of the base footage, with the Selective Color, Hue/Saturation, and Channel Mixer layers to help remove the green/yellow tint to his skintone.
An underrated adjustment layer/preset in my opinion is the Color Lookup. You can layer in pre-loaded .LUT color grading presets to help speed up your process. For this gif, it’s simply a base preset Soft Warming Look to achieve a warm, pink-tinted tone.
In hindsight I feel like this gifset is too saturated, his skintone is skewing very red/pink, I could’ve bumped down the lightness of the reds with a Selective Color layer or a Hue/Saturation layer. Try to err on the side of neutral for skintones. Experiment with layer orders—there’s no right or wrong! Remember that each layer build up on the one before it.
The base footage of the Jalen gif is already quite nicely color-graded, but it’s still muddy and underexposed. As with the Charles gif, I started with a Curves layer to bring the gif to a better baseline contrast. Then I focus on brightening the gif with the Brightness/Contrast and Exposure layers.
The Hue/Saturation and Selective Color layers are to color-correct Jalen’s skin tone—it’s something I spend most of my time coloring gifs and focus a lot on, especially when color grading BIPOC skintones. Putting a Vibrance layer, upping the Vibrance and Saturation, and calling it a day would make his skintone skew very, very yellow/orange.
Focus on the reds and yellow for skintone, play around with the Saturation and Lightness sliders, use the Hue slider with caution.
It can be tricky to achieve the right skin tone when working with sports footage vs the higher quality, higher dynamic range footage of films or TV shows, but I try to keep it as close to the subject’s natural skintone as possible.
Here are some of tutorials with tips and tricks on coloring BIPOC:
How to fix orange-washed characters by @zoyanazyalensky
How to prevent pink-washing and yellow-washing by @jeonwonwoo
Coloring tutorial by @captain-hen
Changing lighting conditions?
Fret not—this is why I love working in video timeline. I’ll take this gifset as an example: it’s a deceptively difficult one to color. The footage is 720p and the sunlight shifts throughout the video, so matching across gifs was tricky.
My solution was to split the clips in sections with consistent lighting, and apply adjustment layers to the individual sections before applying general color grading layers on top of everything.
We can make use of the Fade Transition effect for sections where the lighting changes within the gif section we want to color.

(without vs with Fade on the Brightness/Contrast layer)
The difference is subtle in this example, but the brightness in the right gif is noticeably more consistent throughout. You can also add the Fade Transition effect to the beginning for a fade in, of course.
SHARPENING AND OPTIMIZING GIF QUALITY
This tutorial by @anya-chalotra covers everything you need to know about optimizing gifs for Tumblr.
Sharpening.
Sharpening is essential to making crisp gif images. Here’s another ask I answered re: my own sharpening settings and maximizing gif quality.
(base footage, unsharpened)

(color graded, unsharpened)
(color graded, sharpened)
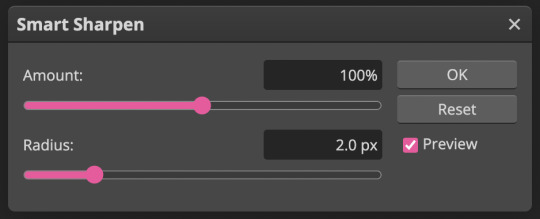
The final gif is sharpened with Smart Sharpen, 500% at 0.3px and 10% at 10px (my standard sharpening settings).
Here are some tutorials and resources on sharpening:
Sharpening process by @anya-chalotra
Sharpening tutorial with added gaussian blur by @haleths
Sharpening action by @daenerys-stormborn
Size your gifs for Tumblr correctly.
This is essential: full width gifs are 540px wide.Two side-by-side gifs should be 268px wide. Here’s a handy post on gif size guide for Tumblr.
Incorrectly sizing your gifs will take away the quality of your gifs: undersizing your gifs will especially make them grainy, blurry, and /or pixelated, and won’t display correctly on many people’s desktop theme. Oversizing usually isn't as dramatic as undersizing, but it will make the gifset glitch when displayed, and the file size will be unnecessarily bloated.
Work with HD footage if possible.
Media fandoms (films/TV shows) are luckier than us in the sports trenches—we have to work with what we have. Broadcast footage is usually subpar: lacks contrast, pixelated, very desaturated, the list goes on. But it’s possible to still make high quality gifs from subpar footage. Here are a couple of tutorials to mask low source footage quality:
low quality video ➜ “HD” gifs tutorial by @nickoffermen
Sharpening low quality footage by @everglow-ing
(This gifset I made is from a 480p footage with horrendous lighting conditions and colors, and the end result is decent I’d say)
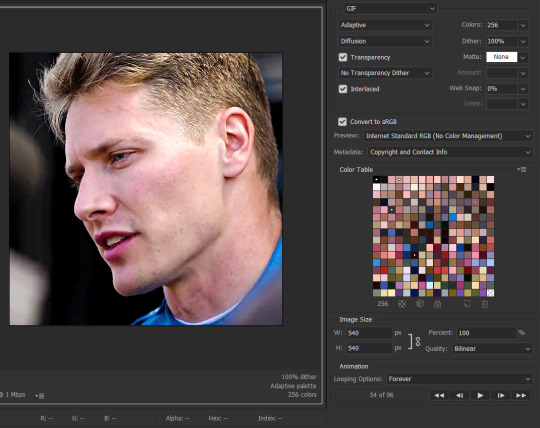
Save for Web (File > Export > Save for Web (Legacy) or Ctrl + Alt + Shift + S) settings.
I default to Adaptive + Diffusion but also use Adaptive + Pattern from time to time. Any combination of Adaptive or Selective + Diffusion or Pattern will give you a good result. In my experience some gifs will need the Selective color table for the colors to display correctly.
Here are my default settings:
SAVING AND EXPORTING FOR TUMBLR
Converting to frames and adjusting the gif speed.
If possible, avoid exporting your gif and reopening it to adjust the frame speed. I used to do this sometimes when I’m lazy, I have to admit, but this is where this Action as mentioned at the beginning comes in very handy. It converts all visible layer into smart object, then converts it back to frame animation.
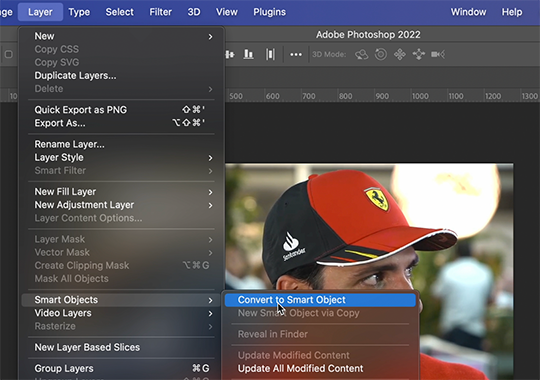
Step-by-step:
1. Select all layers
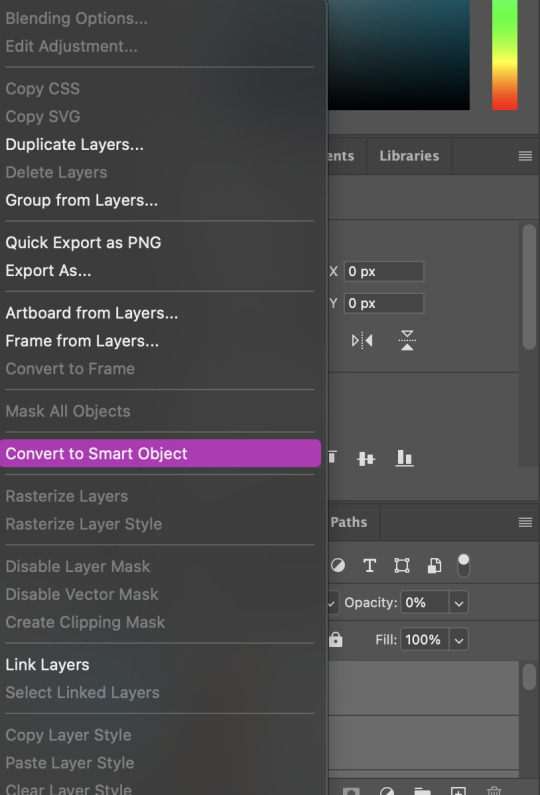
2. Right click > Convert to Smart Object
3. Go to the Timeline menu (≡) > Convert Frames > Flatten Frames into Clips
4. Go to the Timeline menu again (≡) > Convert Frames > Convert to Frame Animation
5. In the same menu (≡), select Make Frames from Layers
6. Delete the first frame (it’s a duplicate) then set your frame speed

Now you can adjust the frame speed before exporting it (Save for Web).
Pay attention to the source framerate.
The frame delay of 0.05 s is usually the default to make gifs for TV shows and films, and it is preferred by most gifmakers. This stems from the fact that most movies and TV shows are 24 or 25 FPS. This may not be the case for all source videos: you might get 30 FPS footage, and sports or gaming footage can be 50 or 60 FPS. Gif speed also depends on the FPS of your original file. Play around with gif speed and see what feels most natural to you.
My rule of thumb is the frame delay Photoshop gives you + 0.01 s. For example, 50 FPS footage will give you 0.02 s frame delay (25 FPS gives you 0.04, 30 FPS gives you 0.03, etc.), so set it to 0.03 s. I usually err on the side of a faster frame delay for smoothness in in-game sports footage, anything else (interviews, press conferences, B-rolls) can get away with being slowed down. Again, experiment and see what you think looks best!
Keep gifs under the Tumblr file size limit (10 MB).
Cut down the number of frames. My gifs are usually around 60-70 frames for 540px full-width gifs, but depending on the coloring, sometimes you can get away with more. 268px gifs can go up to 200+ frames.
Crop your gifs. Remember to keep full-width gifs at 540px wide, but if necessary, you can crop the height. My go-to sizes are 540x540, 540x500, 540x450, and 540x400.
Amp up the contrast of your gifs. Flat colors like black cut down gif size.
The Grain filter or Noise filter, though beautiful for aesthetics or simply necessary sometimes to mask low source footage quality/pixelating, may bloat your gif size.
Play your gifs back before exporting.
Pay attention to duplicate frames or glitches, you might need to get rid of them!
Hope this is helpful! Don’t hesitate to send an Ask or DM if you need any help, I will happily answer all your questions and send over PSDs. (I’m also on Discord—just shoot me a message if you need my tag!) Happy creating :]
#tutorial#PS asks#gif tutorial#Photoshop tutorial#I guess this is more of a resource link dump than tutorial but. Hey. Why reinvent the wheel...#Sorry for the late answer I hope you see this Anon :]#completeresources#allresources#userxoames#userbarbi#usernrzr
1K notes
·
View notes
Note
What got you to start editing out the intros on snapcube 2? I suppose it helps get to the games faster, but as a hardcore Vodhead, I kind of liked those.
I've gone back and forth about keeping pre-streams in the VODs for a couple years now. Whenever I decide to take them out I always have a couple people being like "aw I liked those", but then when I leave them in I can tell the majority of viewers will just skip to gameplay anyway and of course there's the age-old "skip to [timestamp here] for the game" comments. Not that I really mind people having the option per-se, but essentially over the years I've gotten the impression that there's always gonna be someone who feels like the experience of the VODs could be improved by either including them or cutting them and it's just gonna come down to individual preference, so I should go with my gut and how I like to produce things.
SO to actually answer your question as it stands technically, what got me to start removing the opening sections of streams RECENTLY is that I actually just completely upended the way I produce these VODs. I used to have an entire, seamless recording running from the moment I started streaming to the very last second, when I hit my "go live" button the recording would turn on automatically and I never touched it. Then when it came time to post I would put the recording in my editing software, cut out the starting soon screen and all the breaks, and then render and upload manually. At some point during or right before the Tears of the Kingdom series I changed this completely. Having to render out new versions of cut down VODs overnight became way more trouble than it was worth, literally hours of downtime where I couldn't do much on my PC while it was working on exporting them.
So I created a new method that goes something like this:
start the stream, play music
after a few songs, hop on mic and settle in with chat. talk about stuff, chill.
once i am ready to Do The Actual Content, i hit the button to start recording stream locally so the recording only ever begins when i'm ready to go.
i address vodheads and introduce them to the stream separately, then the show starts for real
if there are any stream breaks, i pause the recording as i leave and start it up again once i come back so there is literally nothing i have to edit out of the final recorded file
once the stream is over, take the recording and quickly convert it to mp4 so i can upload it to youtube as-is. every cut is already made, it's in full quality, and i don't have to render it.
now, i totally could just start recording once i hit my "bootup jingle" sound and hop on mic earlier in that process! the practical difference would not be really much to sneeze at on my end. i actually have already done this a couple times! however, what also ended up happening is that the Tears of the Kingdom series like.... REALLLY cut down on how much time i was even spending in the pre-stream to begin with. i was so pumped about that playthrough and i wanted to really maximize my time playing the game while i was live, so often there just really wasn't anything interesting in the pre-stream chat to begin with. this wasn't always the case, but it was reliable enough that i got used to just starting the recording when i started the game. then once i got used to it i kinda started to like it and like how the final VODs turned out when you could just click on it and jump right in, and i've kinda kept up a similar pacing and cadence to my streams post-TOTK.
ultimately, the TL;DR answer is that it's just how i prefer to produce the VODs right now and it makes my workflow a lot easier and makes me feel good about the final product! not saying this will never change, again it's something i go back and forth on. but it's how it is rn!
169 notes
·
View notes
Note
Hi! Happy 4k celebration 🥰 Can you share how you make your gifs or make a gif tutorial?
hi !! tysm <3 i'm more than happy to give you a little tutorial on how i make my gifs ! of course, my process is not the same to other gifmakers and may not always work for everyone but i hope it helps !
for this tutorial, i'm using the most recent edition of photoshop (2023) on my mac. full explanation under the cut.
full disclaimer: most of what i've learnt about photoshop and the giffing process is through pure trial and error. this won't work for everyone and others may think it's a little weird, but this is just how i make my gifs !!
1.find your scenes.
finding your scenes is sometimes very time consuming but you want to get it right the first time !! for this tutorial, i'm using a music video in mp4 format.
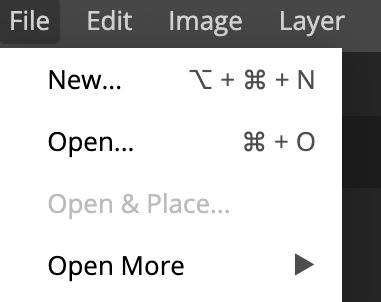
2. loading your scenes.
to load your scenes, you want to go: 'file' > 'import' > 'video frames to layers'. i know that this step varies on the user because some people like to go to timeline first, but i'd advise starting in frames first !
after that, a screen like i've depicted below will pop up. i've also annotated everything for you as well.
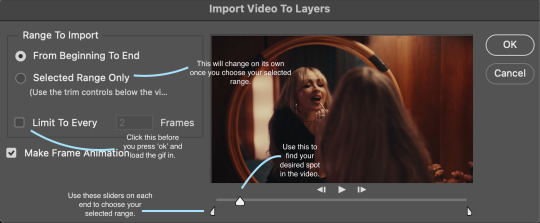
so, select your desired range, press 'ok' and then it will all load into ps !
3. setting up your gif.
i'm grouping this all into one step, but it's broken down into a few things.
the first part of this is: cropping. the recommended dimensions i follow are on this guideline here, but for the sake of this tutorial i'm just going to crop my gif 540x540 (as a w x h setting). the crop tool is on the left hand tool bar.
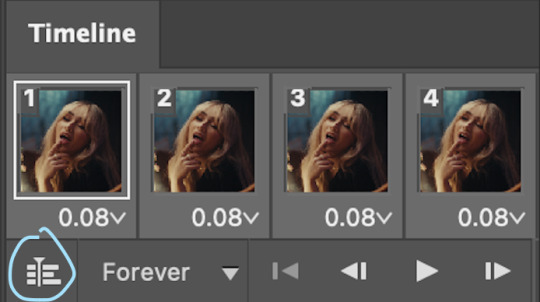
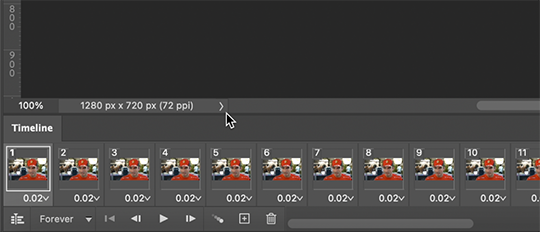
now, my gif looks like this. from here, i'm going to click on the timeline (the space along the bottom that has every frame). from there, click on the three lines to get this menu (i've circled where to go + what you'll click):

from there, go 'select all frames' and then click on any of the frames NUMBERS (where it says 0.04 with an arrow besides it, or whatever yours says) then change the frame rate. with most youtube videos i will use 0.08 as my desired frame rate, but when i'm gifing a show or something, it loads in as 0.02, so i change it to 0.05. 0.05-6 on any normal screen cap should be fine, but obviously you can change it depending on if it looks right or not.
from there, you've basically done the first half of the basics. now, you'll want to click on this button:
and now you'll be taken to the video timeline ! from here, select command + option + a (this is for mac, i think it would be control if you're on another device) then, right click on your layers and go 'convert to smart object'.
from here, i'll sharpen my gif before i colour. for this step i have two alternative sharpening settings first one by anyataylorjoy (rb to download !) and the other by maygrant (please ask !). the first one is tuser maygrant's and the second one is tuser anyataylorjoy's. i typically use morgan's for all my basic gifs but anyataylorjoy's for creative sets. every user has a different preference but just find what's good for you !

4. colouring your gif.
definitely the most tedious, this can be a little bit of a hassle depending on the scene. if the colouring isn't riddled with heavy yellows or cyans, colouring is usually a breeze but if it is, it can be hard.
CURVES

the circle with the arrow dropdown and that's half grey-white is the circle you want to click on to find curves. it'll open a menu and curves will be at the top.
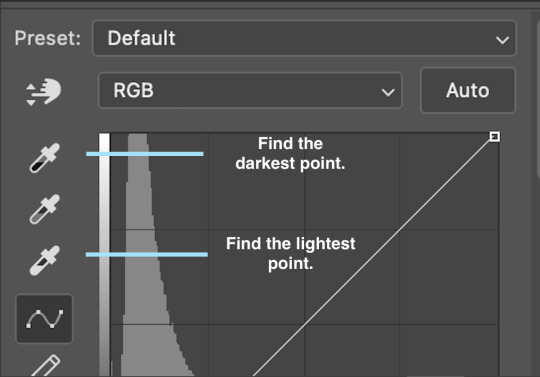
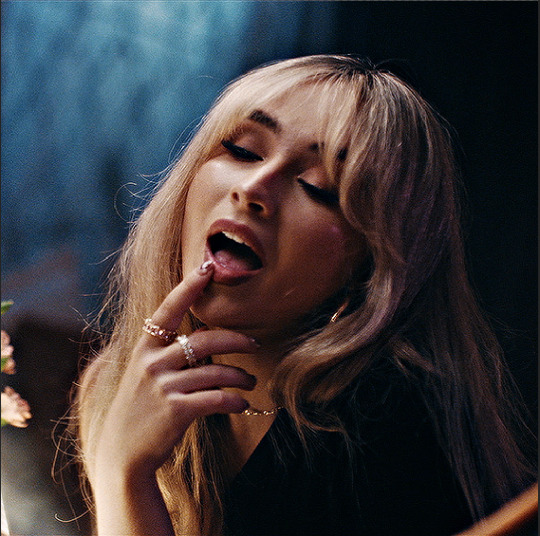
you'll see a little menu like above appear. now, select the dropper i've indicated as being the "light point" and then, using the zoom tool, we're going to zoom in and find the brightest point on the gif. this is typically where the light source is.
in this section here, i can see a couple of bright points. using the dropper, i'll click on the closest to white (note: i find that white rarely changes the colouring of the gif, so if there's like, a really really light yellow, for example, click on that) and then i'll do a similar process with the "dark point" dropper, finding the darkest spot, which is usually in shadows or in the corners. unlike with the light dropper, you want the closest to black, whether that's a dark dark brown or dark dark blue.
now, we can see how the colouring has changed:

optional: you can change the white line on the curves menu, which can make it lighter, or darker in different points of the gif.
LEVELS
levels is an optional step, but i recommend it on very light gifs, or if you want to add a little more depth. probably don't do it on an already very dark gif.
the levels menu looks like this:
the far left slider adds shadows and the far right slider makes it lighter. on this particular gif, i only need a little bit of depth to her face and i only need to contrast that a little bit. by just dragging the slider a little bit:
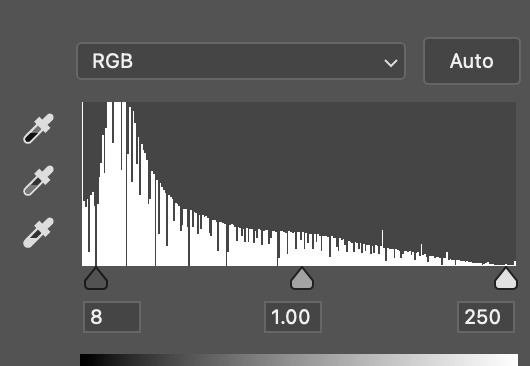
this is the result:
with levels, it can very quickly alter skin tone/make your gif look bad !! with levels, i don't think you need to go above 1-12 in adding depth.
OPTIONAL: BRIGHTNESS/CONTRAST
brightness/contrast is optional !! only add it if it's necessary :)
COLOUR BALANCE
a colour balance layer is great for fixing the tones for the gif !!

this one's pretty self explanatory. if you want it to be more yellow, slide it towards yellow. if you want it to be more red, slide it more towards red, etc etc. i've attached some gifs showing how i change tone:
but just play with it until it looks right. be very careful with skin tone !! colour balance can very easily whitewash/colour wash and that is not something encouraged, in the slightest.
SELECTIVE COLOUR
a selective colour layer is basically a "final touch" to colouring. where colour balance just kind of does an overall change of the gif, selective colour allows you to alter your specific tones, ie. reds, magentas, blues, etc. for me, i'll do the bulk of getting my desired colouring with colour balance, but if it overcorrects reds, for example, i'll add some cyan to red tones in selective colour, to diffuse that.
currently, in my gif, it's very red/yellow heavy. to balance that out, i want to add cyans. so, on the drop down list of the selective colour menu, i'll select 'red' and then i'll ADD cyans (so move the slider to the right, not the left to decrease) and then repeat that on other tones that i want to correct, with different colours.
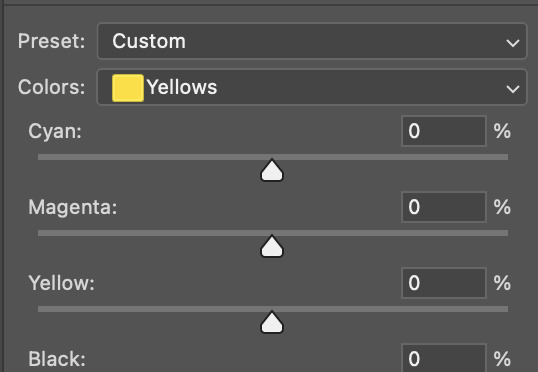
with each of the sliders, just add or decrease how much of that colour is in that tone. once again, be mindful of skin tone and whether it is appropriate or not.
with selective colour, if there are any standout colours (eg. in my gif, there's a big patch of cyan) that don't interrupt their face (eg. reds and yellows are always in faces) and change the way the subjects look, you can change those colours to make it more vibrant. so, in this gif, i'll enhance the cyans and blues and magentas to make the colours pop more.
5. saving your gif
once your happy with the colouring of your gif and done what you need to do with it, save it as a smart object with all your colouring layers, then go to 'file' > 'export' > 'save for web (legacy)...' . play back your gif, and it should be all good !! congrats on making your gifs !
i've included a playback of each layer, which is staggered to show each layer come into effect.
in order: nothing -> curves -> levels-> brightness/contrast -> colour balance -> selective colour.
hope this helped !!
#*tutorial#gif tutorial#ps help#ps tutorial#userriel#userautie#userraffa#usernorah#userrsun#usercats#thingschanged#**l.myeditss
88 notes
·
View notes
Text
How to Make High Quality Gifs
A few people have asked me for a gif tutorial, so here we go! As a disclaimer, there are many parts of gif-making that are subjective, and this is just my personal process/preferences. If anyone is confused about a particular step, or wants more in-depth info about something, just message me!
Tools:
✧Laptop/computer
✧Adobe Photoshop 2024
✧External Hard Drive (mine is 250GB)
✧Video Downloader (I use the Video Downloadhelper extension on Firefox)
PHASE ONE: Make Animated Gif
1. Download high quality video
This is very important! You should download the highest quality of the video you can find. I use the free Video DownloadHelper extension on Firefox, but it doesn't download audio sometimes (it could be me not using it properly, or they want you to pay to get audio). No audio is fine for gifs, but if I'm doing a video edit, I either need to record the audio separately with Quicktime or use a free online downloader for youtube, twitter, or instagram videos.
For this gif, I downloaded an HD interview from the F1 website with the Video DownloadHelper extension on Firefox.
Tip: Make sure your video file is an .mp4 -> photoshop can struggle with .mov files bc they're larger
2. Import: Video Frames to Layers...
File -> Import -> Video Frames to Layers... -> Open your video -> Selected Video Range -> Make Frame Animation
If photoshop has to load a while to make the frames, it means you should select a smaller portion of the video to animate.
Tip: If you discover that there are duplicates of every frame or that there are way too many frames for the portion of video you want to gif, you may need to re-import and check the "Limit to Every _ Frames" box, and write in "2". This will import every other frame of the video and get rid of duplicates or too many frames.
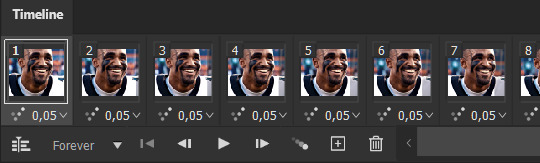
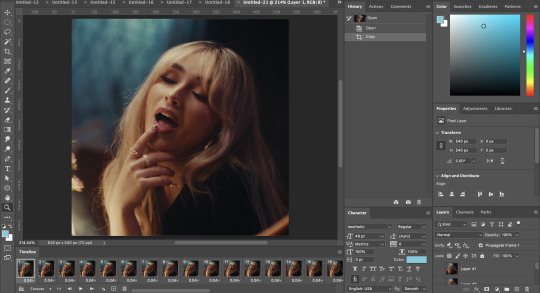
Once your frames are imported, make sure you're working in the "Motion" workspace by going to the top to Window -> Workspace -> Motion.
Now, all your frames should appear at the bottom in the Timeline. Make sure that the box in the left corner is set to "Forever", and now it should play the frames and loop back to the beginning each time.
3. Choosing your frames
I usually aim for around 60 frames total for a gif, but sometimes I'll go under or over that number. This particular gif is 55 frames in total. In general, I want my gif to be around 3 seconds in length bc under that feels too short and over that starts to be a large file size. Totally subjective, though! (edit: I have started to experiment with up to 80 frames for some gifs, which comes out to about 4 sec.)
Play through your frames and if you want to delete some, select them and click on the trashcan icon, which you can see in the screenshot above. (If you don't delete them this way, you'll have issues later.)
4. Set Frame Delay

Once you're happy with your frames, select all of them and click on the part that says "0.02", then go to "Other..." I usually choose 0.05 or 0.06, to land my gif around 3 seconds, but it depends on the video and how many frames you have. This particular gif is set to 0.06 because it looked good and brought me to around 3 seconds.
You can always choose a delay and if you don't like it, go back and change it! Just do what looks good to you.
5. Convert to Video Timeline
Click on the symbol that looks like 4 lines stacked, and choose "Convert to Video Timeline". Now is usually when I play through the gif to see what the speed is looking like/if I like the frame delay and it's landing somewhere around 3 seconds. If not, you can just Undo and adjust anything when it's still in the frame animation stage.
Next, scroll through the Layers on the right side and delete any layers that don't have the "eye" symbol next to them -> these are frames you deleted in the frame animation stage, but they need to be deleted in the timeline stage as well. Lastly, select all your remaining layers (which should all have the "eye" symbol) so they're all highlighted.
6. Convert to Smart Object
With all layers selected, go to the top to Layer -> Smart Object -> Convert to Smart Object. Ta da! You have a gif.
I always make sure to save my file at this point (you can do it before, but it just depends on how fast you work). Remember to frequently save your progress while gif-making: sometimes, photoshop gets overwhelmed and quits while you're mid-color correction 🥲. You never want to start over from scratch...
Now, some people like to crop & resize their gifs first. Or do sharpening before color. Or color, resize, then sharpen. It's really up to you. The order I like to do is Color, Sharpen, Crop, Resize, Export.
PHASE TWO: Color & Sharpening
(the fun part!)
1. Brightness/Contrast
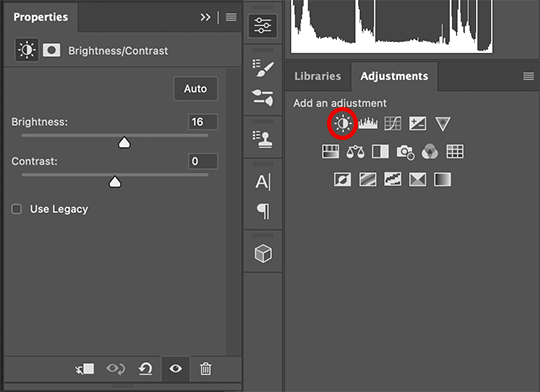
So here's where we start getting into the really subjective stuff. I always use the Brightness/Contrast and the Selective Color adjustment layers to do my coloring. I rarely touch the contrast bc that can be adjusted in selective color, but almost always, the gif needs overall brightening.
Tip: Even when I think a video looks bright to my eyes, sometimes I post the gif and they look dark once they're in the app. My advice is to always brighten a little bit, even when you don't think it's needed...
Here shows the very subtle shift in brightness I did for this gif. It can be a lot more intense depending on the video quality/lighting. The difference will also look a lot more stark after the color layer is applied.
2. Selective ColorNext is color. This is totally up to you and what looks good to your eyes. Make sure you have any software turned off that might change the color of your screen (like a nighttime filter or something that removes blue light).
I use selective color bc you can adjust the levels of cyan, magenta, yellow, and black in each color channel independently. This is how I adjust the specific color of red that Charles and Carlos wear, or the amount of cyan in the blacks, etc. The "Neutral" layer effects the whole image, so I'll sometimes add some yellow there if I'm wanting a warmer image, or I'll add or remove black to brighten or darken the mid-tones.
Just play around! Sometimes, I'll take the slider from +100 to -100 back and forth just to see what it's doing to the gif. And I frequently turn on and off the color layer to see what the gif looked like before and after color. (I've found that most F1 content is really magenta-skewed, which you may not even notice until you've corrected it out).
Above is Color vs. No Color.
It might look extreme to you presented this way, but when the whole gif is colored, no one questions it! As long as there's consistency across gifs, that's all that matters. I frequently copy and paste my adjustment layers onto another gif from the same interview/video so the look stays consistent.
Above is Color w/ Brightening vs. Without.
This gives you a better idea of how much of a difference that Brightness/Contrast layer makes.
3. Sharpening
I got my Sharpening routine of choice from this tutorial on gif-making. To be honest, I don't know if it's the best sharpening procedure bc I haven't taken the time to in-depth compare to other ways of doing it, but it looks good to me! So I've stuck with it. (edit: I've also added a Reduce Noise filter to my sharpening routine. But as always, just do what looks nice to you!)
I copy and past the sharpening from my other gifs onto new ones so I don't have to do all the steps again. There are quicker ways of doing this, like using quick actions and stuff, but how I do it is fast enough for me.
If you want to figure out your own Sharpening routine:
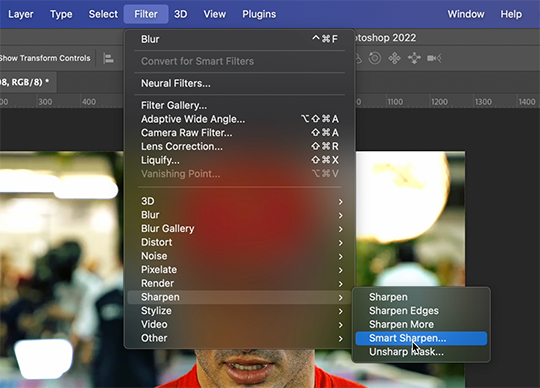
With the gif layer selected, go to the top to Filter -> Sharpen -> Smart Sharpen. It will bring up this window:
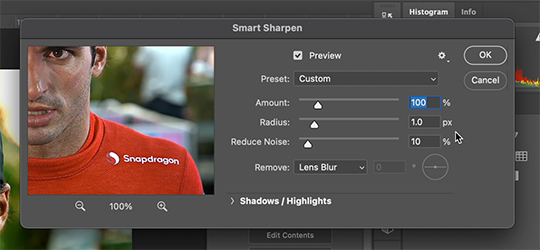
Here you can play around with the amount, radius, noise reduction, etc. and see what you like.
I also add a Gaussian Blur effect, which you'll find under Filter -> Blur -> Gaussian Blur.
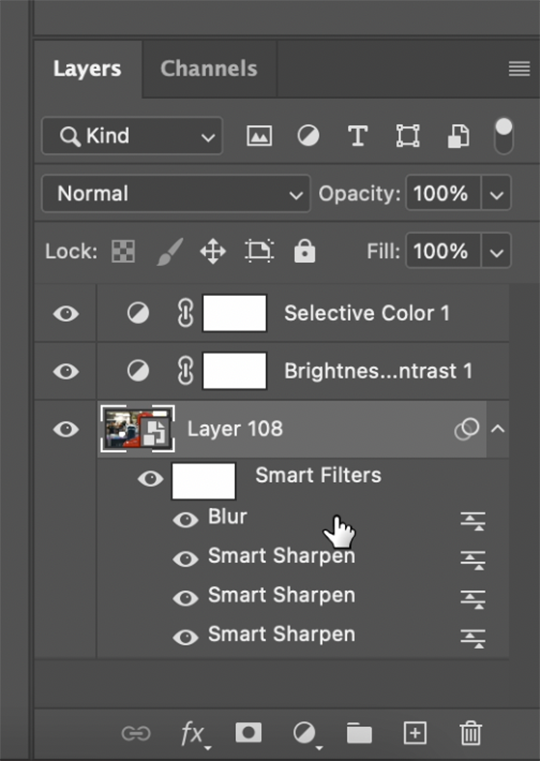
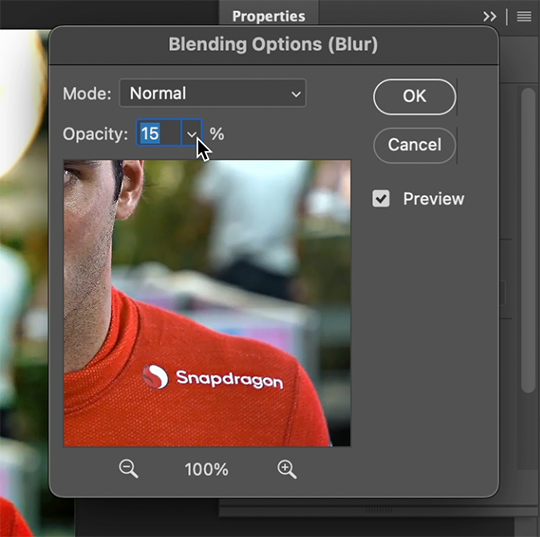
^All of your Sharpen and Blur effects will stack up underneath your gif layer like this. To adjust the opacity of one of these effects, double click on its adjustment/slider symbol to the right, and it'll bring up the Blending Options window.
If there's any sharpening or blurring layer you don't like, you can easily drag it into the trashcan symbol to get rid of it.
Above is a visual of Sharpened vs. None.
You can really tell with the difference in the Snapdragon logo on either shoulder. But I also personally love how much more Carlos' eyes pop to me on the Sharpened side.
As you can see, it's up to your preference. Sometimes, I really love gifs I see that aren't sharp, but rather really smooth and almost painterly. It's up to the gif-maker!
PHASE THREE: Crop & Resize
1. Cropping
Go to the toolbar on the left and choose the Crop Tool. Above where it says "Ratio", you can choose from preset ratios that photoshop has, or you can make your own. I like to use the presets, or at the very least, clear numbers that you can apply to a whole gifset. Free transforming without a ratio makes it nearly impossible to maintain consistency across a gifset.

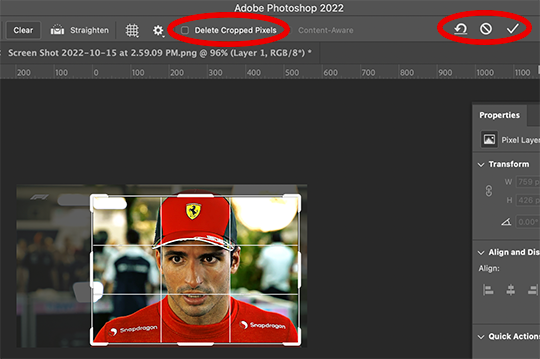
If it isn't already, uncheck "Delete Cropped Pixels". This will allow you to move the gif around inside the cropped area later if you want to adjust what's in frame. It also gives you the option to increase the frame later, if you want. You can also click the gear icon next to "Delete Cropped Pixels" and change how you view the gif during cropping.
When you're done, click the check mark or hit Enter. Now, you've got a cropped gif!
2. Resizing
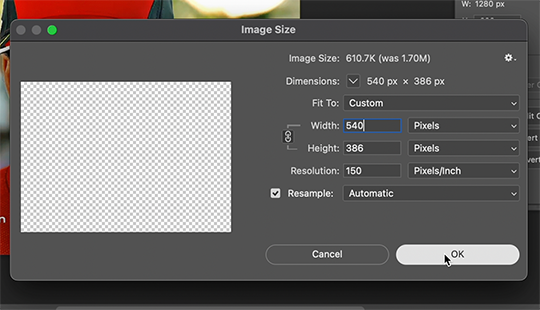
Go to the top to Image -> Image Size...
Make sure you have Pixels selected. For the Resample tab, I have it set to Automatic here, but sometimes I'll use Bicubic smooth or sharpen, depending on what I'm doing. Here's a cool post that compares the different settings. Just experiment with it.
(edit: I no longer change the resolution to 150. I've found that increasing the resolution, and therefore the size, before ultimately resizing down to 540 px means you are compressing even more (the larger something is, the more it has to be compressed within 540 px). I now leave the resolution at 72, which is what it's set at originally, and if the image composition allows it, try to crop in as close to 540 px as I can get so that when I resize, there's the least amount of compression happening.)
If I know a gif is going to be the full width of a tumblr post, I'll resize the width to 540 pixels (the height doesn't matter). But if I make a portrait-style gif which will be sharing a row with another gif, I'll resize anywhere from 270 px -> 350 px. If it's smaller than 270 px, tumblr will enlarge the gif and it'll look bad. If it's wider than 270 px, tumblr might reduce its quality a bit and it won't look as good. But personally, I prefer that if someone clicks on the gif to enlarge it, it looks better enlarged, so I usually will leave it around 345 px as long as the file isn't too big.
PHASE FOUR: Export (last one!)
Once you're happy with everything about your gif, it's time to export. (Remember to save your progress frequently!)
Go to the top to File -> Export -> Save for Web (Legacy)...
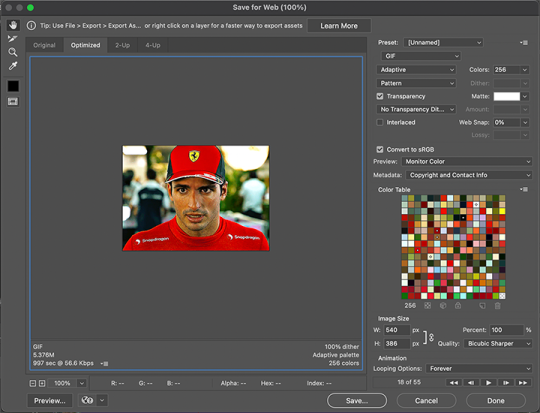
^It'll bring up this Save window.
These are the settings I like to use for gifs. You'll find a lot of differing opinions out there about Adaptive vs. Perceptual/Pattern vs. Diffusion, but you should always have "GIF" selected, "Transparency" checked with "No Transparency Dither" selected, Looping set to "Forever", and Colors set to "256". I like "Bicubic Sharper" for my Quality tab, but there are whole tutorials just about comparing those settings. The best thing to do though is to try them out and compare for yourself.
(edit: I've discovered that if a gif is slightly too large and I don't want to shorten it or resize it down, I can try to reduce the colors from 256 to 128 to get it under the limit. I'll never go below 128, and sometimes I will go to 200 or 170 to try to eliminate as little color variety as possible, but often there is not a noticeable difference in your finished gif. But always compare, of course, to make sure.)
On the bottom left is where the size of the gif is shown -> tumblr requires gifs 10MB and under, but in my experience, gifs load/play best on tumblr when they're around 6MB. I always leave a little growing room as well, bc it might say 5.8MB in this window, but after it saves, the file will have grown a little bit and will likely be over 6MB at that point. (edit: I now regularly post gifs that are around 9.5MB and tumblr seems to be able to handle it better.)
AND THAT'S ALL!
If you've made it this far...congratulations! haha
I know this is a whole lot of information and you might be feeling overwhelmed! But I hope, if anything, this shows you just how complex gif-making can be, and how it is absolutely an art! No one should be stealing anyone's gifs, as a lot of hard work and love goes into the process.
This doesn't include things like adding text to a gif, or more complex adjustments and corrections like masking or key frames. But I'm happy to do more of these if there are specific questions people have.

Let me know what you're curious about or if something is unclear! And happy gif-making! ❤️
#wooow this was a process to make lol#people can let me know if they're curious about adding text or more complex adjustments - i am at your service!#gif tutorial#ask
196 notes
·
View notes
Note
Hi there! I saw the screen recording you did for the Aemond gifset (superb work, by the way) and I was wondering if you would be open into doing a step-by-step tutorial on how you played with the colors (what was the graph on the right side of the window?) and how you manipulated the color palette when saving the gifs? No pressure! Was just curious :) Thank you!
Hi there, nonny! Step by step below the cut here.
I don't keep the psd files of my gifs, mostly because I don't have the storage space to do that, so I've made a different gifset of the same scene, so it should be much the same, if not better.
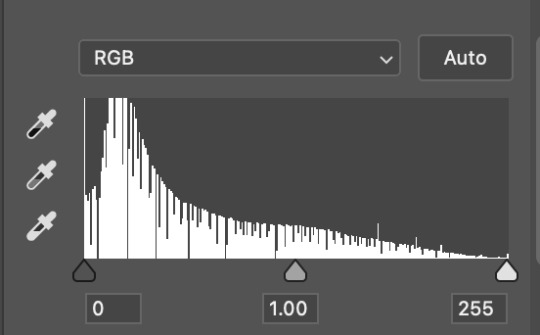
I believe this:

is the graph you were asking about? This is the histogram. I don't believe it has any practical usage in gifmaking. If any other gifmaker here has a different opinion, please share it. (I'm doing a photography degree, photoshop is my next unit so I'll know more about it soon)
Right, step by step. Hold your horses, this is long:
Step 1: get the clip. Some gifmakers use screen caps to make gifs. I do not know how to make them or how to use them and I find my own method works. If another gifmaker could add on how you make your screen caps, and if it is better than my own method, please add it. 😊
Where you get the clip from is a question. YouTube, somewhere else... as long as it's saved as a MP4 file on you computer/laptop, it doesn't matter. What does matter is the quality of your clips. A lot of people use 4K (super high quality) clips. I find those to be slow and arduous and may have been responsible for the fall of my old, decrepit laptop. HD or UHD are likely enough for some decent quality.
Step 2: Get the clip in the software (I use Adobe Photoshop. For some softwares, you might have to clip the clip i.e. make it shorter before just dumping it in) In Photoshop go to File > Import > Video Frames to Layers and a window will come up. Move the sliders until you have approximately what you want (don't worry about being exact. Just as long as you have what you need.) (Don't forget to click Limit to every 2 frames)
Step 3: Once the clip has opened and your ready to start, crop out any black/white edges. Then cut out the frames you don't want

Step 4: We are now ready to begin editing!! 🥳🥳🥳 Editing tends to just be a huge pile of trial and error. I have an order to things, but I often have to go back and adjust my first layers later.
I like to start with the Brightness/Contrast, for obvious reasons (I like to SEE what I'm doing *cough cough* HBO *cough cough*
The I adjust the Hue/Saturation, where I reduce the saturation of each individual colour. That reduction tends to be useful when I make further adjustments in effort to 'fix' as much of the shit colour grading as I can.
The next step is a combination of a Photo Filter (set to the default warming filter) and a Vibrance adjustment layer.
Next the where most of the magic happens. The Colour Balance allows me to adjust the colours in the shadows, midtones and highlights. The aim of this is to attempt to restore some colour. It can look a little weird when editing.
Finally is the Levels. This is a final brightness edit where I add most of my contrast.
Video featuring both sets here. Pause as needed to see the adjustments
Then, change the frame delay to 0.1, or whatever suits your fancy, but 0.1 is the most natural. Then, Click the button in the bottom left corner of the timeline which Converts to Video Timeline, then select all the layers, right click and Convert for Smart Filters.
After this is sharpening, cropping and then exporting. Either File > Export > Save for Web (Legacy) or Alt + Shift + Ctrl + S
Here I change the size. (Usually adjust the height to 540px. Width depends on how I've cropped it. I my source clip excluding black edges was in the ratio 16:9, 540px is usually half that)
If you are uploading gifs to Tumblr, keep an eye of the file size. Tumblr doesn't allow for file sizes about 10MB, although for me it's always been more like 9.5MB. If that number is too high and you have made the gif as short as possible (no more the 50 frames if possible) and you have reduced the size (my limit tends to be about 480px height dependant on my crop ratio), then you change the number of the colours from 256 to NO LESS THAN 200. (lower than this may considerably reduce your quality)
Then you press Undo or Ctrl + Z a few times until you have all of your frames again and then repeat.
And all that can take half an hour or more. Hope this answers the question as well.
13 notes
·
View notes
Note
hi i just read your blog description and
how does one even begin to go about downloading an entire bootleg onto a Nintendo 3DS, of all things? what exactly prompted you to do this?
I am so glad you asked!
I enjoy the 3DS (and have an alt blog dedicated to my Nintendo shenanigans!) and I absolutely love having access to media entirely offline and without a buffering time! And to complete the trifecta, I had very bad writers block at the time. So uh there’s the why, the but how is chaos so do buckle in
First, I needed a bootleg as an MP4 as the 3DS no longer runs YouTube and I wanted to have it 100% offline. YouTube downloader and 5 minutes and that part was done. Next, actually getting it on the 3DS. A 3DS doesn’t tolerate MP4 files, and despite mine being homebrewed, I couldn’t find a program to play MP4 files. I, being me, tried to finagle it into working anyway. Unsurprisingly it didn’t, so back to the drawing board.
It took a few minutes of furious googling to remember that the 3DS had a pre-installed camera. That could take videos. However, there were some unfortunate limits..
- The filetype needed to be changed from MP4 to AVI.
- The videos could not exceed 10 minutes.
- The resolution is.. bad. 480x240. But if I wanted to watch Tanz with good resolution, why would I download it to a 3DS, eh? A grade-A viewing experience is clearly not the goal here.
Got to work chopping Tanz into 7-10 minute segments in the most sensible places I could. This is what took the longest, as I wanted the cuts to make some sort of sense. I tried to cut between songs or scenes, on top of an already present break in the music. Next, I ran all of these files through a converter to get them in the AVI that the 3DS can understand. Lastly, there was the small task of getting them onto the SD card and storing backup files in an organized manner on my computer so I can get Tanz onto my OTHER 3DS consoles at a later date. I also have a Switch Lite that I’d like to put it on, but my silly camera exploit won’t work because the Switch doesn’t have a camera. Shame.
Anyway I had to name the files so they would appear in order on the laptop and on the 3DS, and I had an AVI and MP4 for each portion. I think there were like 15 parts? I’ll check in the morning, I’m very tired and the system is dead at the moment. But there’s a folder in the applications section than I transferred the video files into, checking every so often to make sure they were working and uploading properly, and luckily they were so it was just a drag and drop operation from there. And that’s how I got Tanz on a 3DS.
I’ll proofread and add images (I think my blog banner is the Tanz credit screen on the 3DS) in the morning, and better explain some stuff. If you have any questions about this or other 3DS stuff please feel free to ask! I love to talk about it!
5 notes
·
View notes
Text
Sobbing I am fighting for my LIFE trying to convert a youtube video to an mp4 but I think the converter I'm using runs a copyright scan automatically and blocks downloads for copyrighted content 😭 I tested it and I can download other videos that aren't from the movie I'm trying to download from, so it's JUST these videos in particular >:/
#i am open to suggestions if anyone has experience with this stuff#but GOD this is so annoying#ruby rambles
18 notes
·
View notes
Note
drop the how to download music tutorial. unless you like actually pay for each song in which case do not
oh i don't pay for digital music because usually the fuckers that sell it can take it back at any moment so what's the point. that being said,
how to download music tutorial
there's easier ways to do this, mind you, but i'm scared of sketchy websites most of the time, also the easy way is literally just googling "youtube to mp3" and following your heart. ANYWAYS without further ado,
step 1: download vlc media player (that's what i use to download music, but again if you prefer sketchy websites go for it)
step 2: grab the link to the song you want from youtube
the rest of the tutorial is gonna be under the cut because it got too long
step 3: go to media on the top left and click open network stream
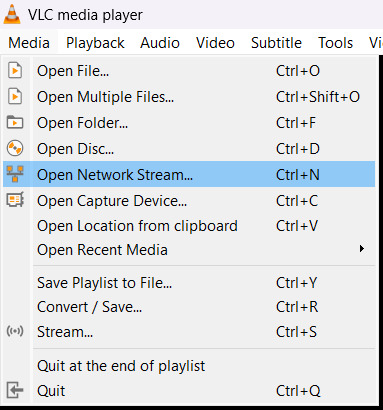
[image ID: the options on the media menu on the toolbar on vlc. open network stream is highlighted. end ID.]
step 4: paste the link and click play
step 4.1: if the video starts playing, congratulations, skip to step 5 you lucky bastard. if not,
step 4.2: get the youtube.lua file from vlc on the least sketchy website you can find (i'm so sorry i forgot where i found it)
step 4.3: right click the vlc shortcut that probably is on your desktop and select open file location. that's gonna open the vlc folder in your computer.
step 4.4: open the lua folder (inside the folder you just opened), and then the playlist folder (inside the lua folder)
step 4.5: scroll down until you find the youtube.luac file and delete it
step 4.6: put the youtube.lua file you downloaded earlier in that same folder. now it should work fine, try step 4 again, and if it doesn't work, i have no idea why, sorry but you're on your own
step 5: go to tools on the top left and click media information

[image ID: the tools menu on vlc. the media information option is highlighted. end ID.]
step 6: copy the link on the location thingy (it's the link on the bottom of the current media information window) and paste it on your browser of choice
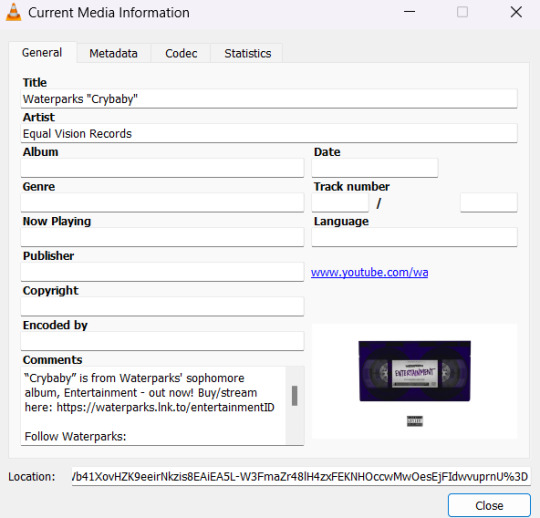
[image ID: the current media information window on vlc. end ID.]
step 7: right click the bastard (the video in the browser) and click save video as...

[image ID: the first video i could find for this tutorial opened with the link i got from the location thingy on step 6. the right click menu thing is there. save video as is highlighted. end ID.]
step 8: save the video as mp4
step 9: open the mp4 file you just downloaded with vlc
step 10: go to the media menu on the top left and click convert / save

[image ID: the options on the media menu on the toolbar on vlc. convert / save is highlighted. end ID.]
step 11: click the add button on the convert / save window. find the mp4 file you downloaded and add it. then, click convert / save on the bottom of the window.
step 12: make sure the profile thingy on the settings section of the convert window is set to mp3
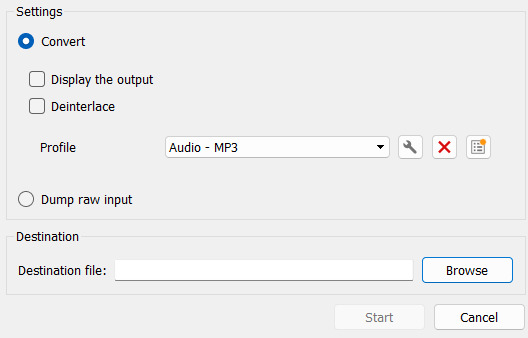
[image ID: the settings and destination sections of the convert window on vlc. end ID.]
step 13: choose the destination path for the mp3 file you're about to bring into the world, and click start (look at the image from step 12 if you need an image, i'm tired)
step 14: wait for the file to convert. and it's done! that's it! (the mp3 file is going to be on the path you chose on step 13)
i hope this helped because holy shit it was so many words to type
anyways have fun
15 notes
·
View notes
Text
how to make gifs for free*
*okay, for $5. which is far less than what you would pay for photoshop!
this is my tutorial for people who want to make gifs but do not want to pay the steep monthly fee for photoshop. i feel especially qualified to make this tutorial because i did pay for the monthly photoshop fee a few months ago and honestly, i hated the process of making gifs on photoshop. it was extremely onerous and also cost a lot of money? no thanks! now, are gifs made on photoshop typically better quality than gifs made through free services? yes, but only marginally. and, to me, the slightly-higher quality gifs do not make up for: (a) the cost of photoshop, and (b) the ease of the free-gif making process. it will seem like there are a lot of steps below, but i promise it will all become like second nature soon enough.
BEFORE WE PROCEED: this tutorial is tailored towards the apple ecosystem. however, i’m sure most of the steps in here also apply to windows computers; i’m just not totally sure since i don’t have one.
without further ado, click below to follow the tutorial!
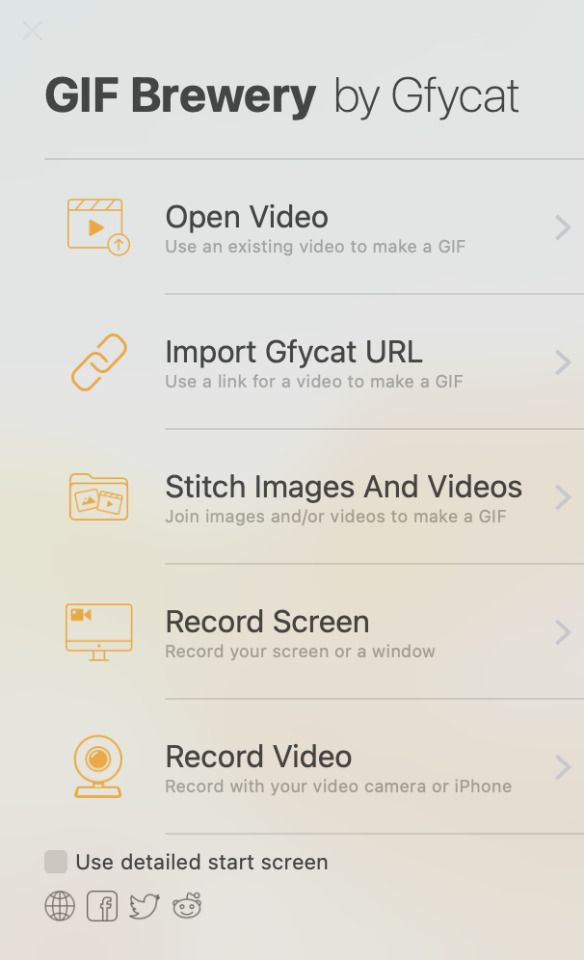
STEP 1: purchase gif brewery 3
this is the only stage where you will need to spend money - this app is integral to the process of creating gifs for free. i have tried out many different giffing apps, and this one is by far the best. it’s called “gif brewery 3 by gyfcat” and you can get it on the app store:

STEP 2: download or screen record your video
now that you’ve got your giffing software downloaded, you’re going to download your video in an .mp4 format.
downloading: i typically download from youtube or vimeo. for youtube downloads, you simply copy the link and paste it into a “youtube to mp4″ converter, which you can find through a simple google search of “youtube to mp4″ (a lot of these sites often get taken down and new ones pop up, so don’t get attached to a specific site because it’ll probably be gone like, 4 days later lmfao). for vimeo, i typically google “vimeo video downloader” and a few websites will pop up.
screen recording: there are a few different screen recording extensions you can add to google chrome, and i’ve tinkered with those in the past. however, recently i’ve been using the built-in macbook screen record function, which can be brought up by pressing command + shift + 5. once that’s brought up, you can change the size of your recording area, click record, and then save the video to your desktop. note that there IS a screen record option built into gif brewery, but i have never used it so i can’t speak to its functionality.
STEP 3: add your video to gif brewery
now that you’ve either: (a) downloaded your video from youtube/vimeo or (b) screen recorded your video and saved it on your computer; you’re now going to add the video to gif brewery and get giffing! this is where the fun part starts.
1. open up gif brewery and select “open video”
2. head into your computer and find the video you have downloaded/recorded, and select “open”
3. drag the green and red bars to the areas of your video where you want your gif to start and end. i’m using a video i giffed last week as an example:

4. click on “settings” in the top righthand corner to bring up this panel:
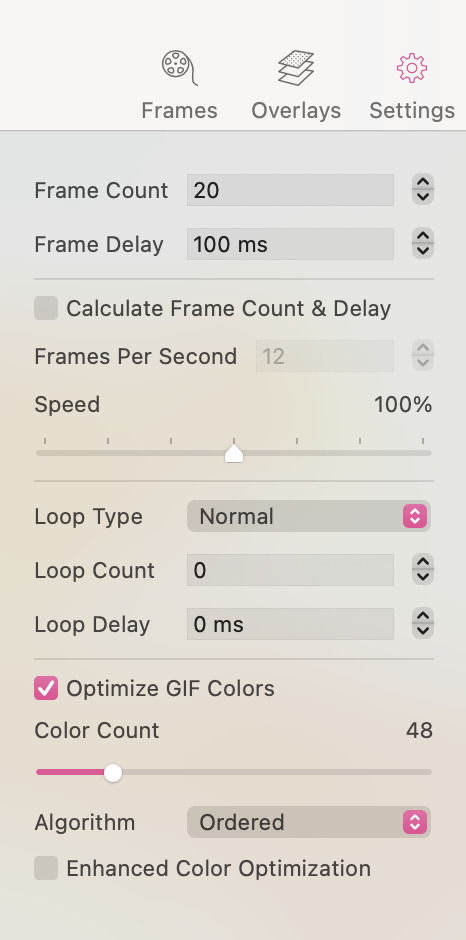
5. this is a VERY important step to ensure that your gifs turn out all right. you’ll want to change the settings in the above panel to something like this:

as you can see, i typically use 25 fps as this helps the gifs flow and not look choppy. some videos, though, work better with 20 fps (this is something you’ll get a sense for when you make a lot of gifs). i typically bring the speed down to between 70-90%, as 100% speed always feels too fast to me. and then i ALWAYS optimize the gif colours to 256. yes, even for black and white gifs.
an interlude about gif sizes: you’ll note that in the above picture, the frame count says “79″. if your gif is larger than say, 600px wide, 79 fps will probably have you producing a decently large gif. keep in mind that tumblr does not allow gifs to be over 10mb, so you’ll need to adjust accordingly. you can apply these settings and then go back and re-adjust those green and red lines from before to shorten your gif to ensure that it adheres to the size requirements of tumblr. also keep in mind that the editing process will add (sometimes significantly) to the size of your gif. so you want to aim for your gif to be well under 10mb at this stage. for small gifs, i don’t limit my fps too much, but for bigger gifs (i.e. ones that are over 600px wide), i will try to limit my fps to under 50. just keep that in mind as a barometer.
6. once you’re happy with your settings, click “create”

7. clicking “create” will bring up a window which will showcase your gif, as well as your gif size (see red circle):

at this stage, i’ll often click the “cancel” button in the lower lefthand corner and fiddle with the gif, as my gif sizes at this stage are typically enormous. this is actually a rare example where the gif is well under 10mb. however, for this gif i would crop the black edges out and probably re-size it down a bit to have it further below 5 mb (this video is far too low quality to produce a gif that’s as high as 5mb. this will vary, though, depending on the quality/size of the video).
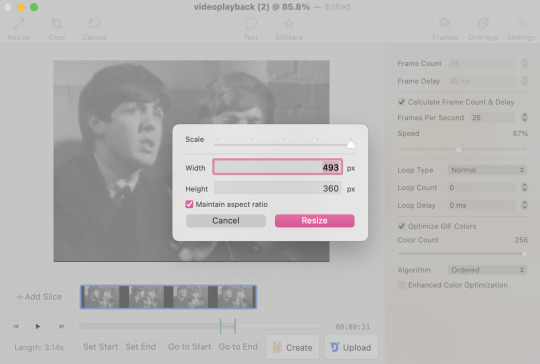
8. so, clicking “cancel” above, i am going to crop and resize the gif:
- when you click on “crop”, this window will come up where you can adjust the size of your crop:

when you crop it to where you’re happy with it (if you need to crop your gif, that is), you’ll likely want to resize your gif:
when you click the “resize” button, the dimensions of your gif will pop up:
a second interlude about gif sizes: okay. here’s the thing about using a software that isn’t photoshop to make gifs. the quality of your gifs will likely suffer, compared to gifs processed through photoshop. through trial and error, i have learned that i have to make my gifs slightly bigger than the standard tumblr sizes in order for their quality to hold up. it has something to do with pixel compression, which i don’t need to go into right now. i have also learned that low resolution videos (like the one i’m using in this example, which frankly looks like it was filmed using a toaster) should almost never be used for full-sized gifs. instead, the quality of these gifs from a low-resolution video will look much better as half-sized, side-by-side gifs in a two, four, six, or eight-gif pattern (god, does that make sense? message me if it doesn’t). standard tumblr sizes are, i think, 540px wide for a full-sized gif, and 270px wide for a half-sized gif. AS SUCH, i typically make my full-sized gifs around 700px wide, to enhance the quality of them once they’re put into tumblr. yes, this means your gifs will have a higher MB output, which means your gifs will need to be shorter than those that could be made through photoshop. these are the struggles we face as Free Gif Makers, however it is worth it to me.
alright, as you can see above, after i’ve cropped the black edges out, this gif is 493x360px. so, it’s under the 540px requirement for a tumblr full-sized gif. the GOLDEN rule of gif-making is to NEVER use a gif that is under 540px wide as a full-sized gif. the gif will be stretched and will lose a lot of quality in the process. however, 493px wide is still well-above the 270px wide standard size for a side-by-side gif. i am going to size this down slightly to 350px wide (remember, we want to be well above the 270px wide standard size, as described above) so my total MBs will be smaller.
9. now that i’ve cropped and resized, my gif is now only 2.7mb:
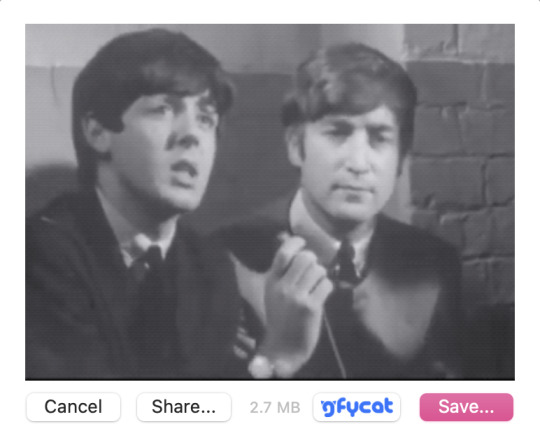
i like this a lot better than the 5mb before, as it gives me more wiggle room in the editing process. i’m happy with it now, so i will click “save...” and save it to my desktop for editing now.
STEP 4: repeat step 3 for all the gifs you want to make for that specific gifset
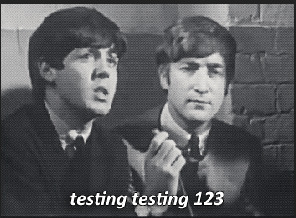
i am going to make two gifs to demonstrate to you the side-by-side gif thing i was talking about above. these are the gifs at this stage, pre-editing:

STEP 5: add your gifs to photopea to begin the editing process
once you’ve created all your gifs in gif brewery 3, you can close the app. for editing the gifs, i use photopea desktop. photopea is basically a walmart photoshop, and i think it works really well considering it’s free.
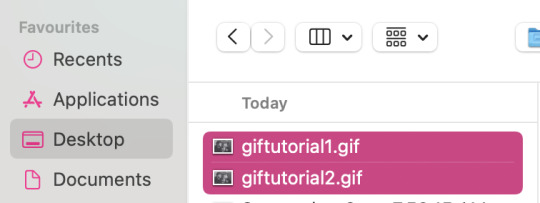
1. click file > open
2. locate your gifs that you save from gif brewery
3. now is the actually fun part. this is where you can fiddle with the brightness, exposure, temperature, etc., and/or you can add a psd or two to your gif. i almost exclusively use PSDs and then will fiddle with the brightness/contrast/levels/curves/temperature/sharpening/grain on my own after i’ve applied the PSD. i’ve found all the PSDs i use here. that blog should also have tutorials on how to download a PSD. a PSD is basically a file folder with elements in it which will enhance the colouring/lighting of your gif. PSDs are EXTREMELY trial and error when it comes to working with a certain gif or not, so be patient as you try out PSDs on your gifs. when you download a PSD, you will add the file to photopea (file > open > find the PSD and add it), and then drag it on top of all the layers of your gif, like so:

a note on manually adding brightness/contrast/temperature/sharpening/grain, etc.: you must select all the layers in your gif for these edits to apply these changes, so they all must be highlighted like the below:

a note on sharpening/grain: adding sharpening/grain to a gif without being careful will HUGELY add to the size of the gif, and will often push it well over tumblr’s 10mb size limit. sharpening can also make your gifs look very bad if you go overboard. i often either don’t sharpen my gifs at all, or am very careful when i do. i always choose smart sharpen (as opposed to “sharpen”, which just adds a shitload of sharpening without you being able to adjust the amount), as i can adjust the sharpening elements with smart sharpen. to find the sharpen tool, go to filter > sharpen > smart sharpen:

these are the properties i sometimes choose for sharpening. however remember that most of the time i don’t even sharpen my gifs, OR i will do 50% instead of 100%. but i am going to use these properties for the gifs i’m making for this tutorial. you can typically be a bit more liberal with sharpening when you’re making smaller side-by-side gifs, as there is more room for the extra MBs added from sharpening:
the properties you choose for sharpening will ultimately totally depend on the gifs you’re making, so don’t be afraid to fiddle around with them! i wouldn’t recommend going over 150%, though.
now, grain is something i hardly use in my gifs, as grain adds even MORE to the file size of a gif than sharpening does. however, sometimes it’s cool to have a bit of grain in your gif, so this is what i would do.
locate grain, which is found in filer > noise > add noise:
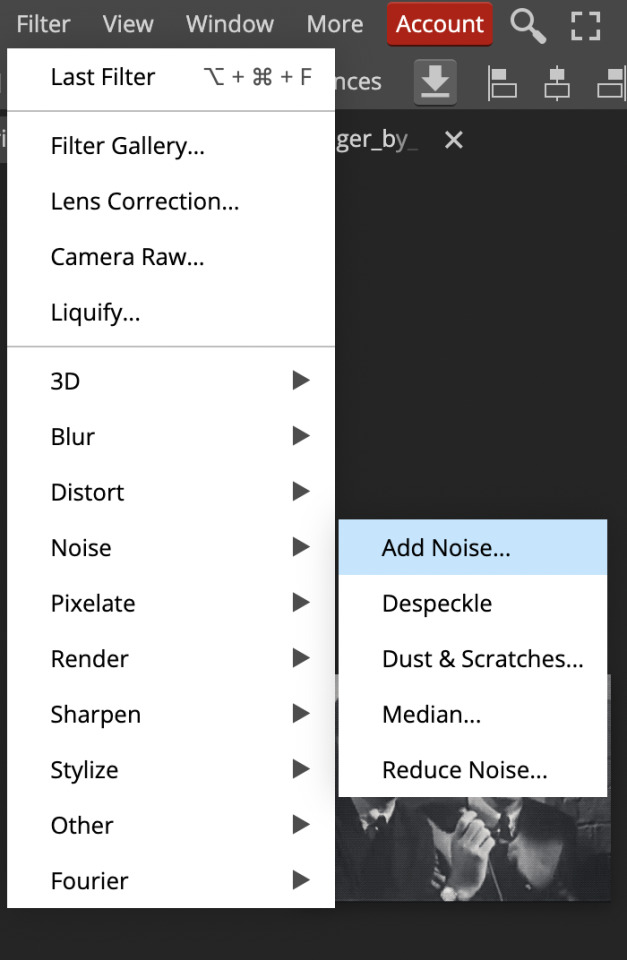
use this percentage:
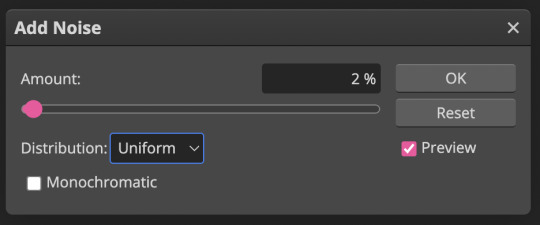
unless your gif is super tiny, anything above 2-3% grain will make your file size extremely massive. use grain with caution!
STEP 5.1: adding text to your gifs
if you want to add text to your gifs, read this step. if you don’t, skip to step 6.
the most common font used with gifs on tumblr is calibri bold italic. photopea does not have calibri built in, so you will need to download it from an external source like here and then add the font into photopea. you will likely have to add it in every single time you make a gif, which is mildly annoying, but yet another tribulation of making Gifs For Free:
1. select the “T” icon on the left sidebar:

2.select the font bar which will appear up top, and then click “load font”
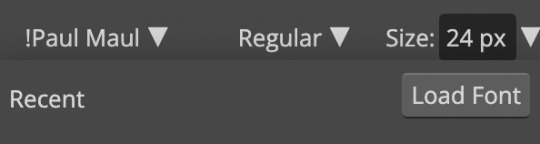
3. locate the calibri font file that you’ve downloaded in your computer and add it in. i suggest adding it in via zip file, because the zip file will include all of the different versions of calibri (i.e. bold/italic/bold italic, etc.). once you’ve loaded it in, search for it in the photopea font list and select it:

4. select bold italic

5. use these properties for the stroke (the outline of the font) and drop shadow (these are the only two elements i add to my fonts):

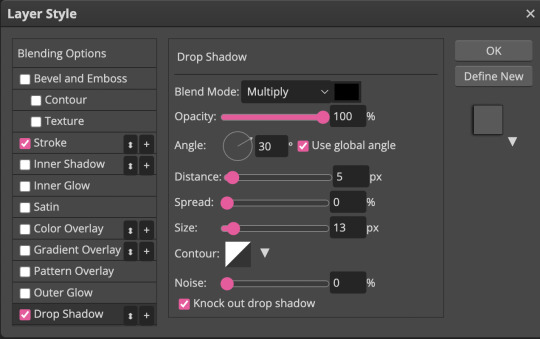
this is what your text should look like (sorry, it’s all pixelated because i had to zoom in):
you can adjust the size of the font as necessary and drag the text around to make sure it aligns with the centre of your gif (i’m not actually going to be using text for these gifs, but i wanted to show you because it does add a handful of extra steps)
STEP 6: save your gifs
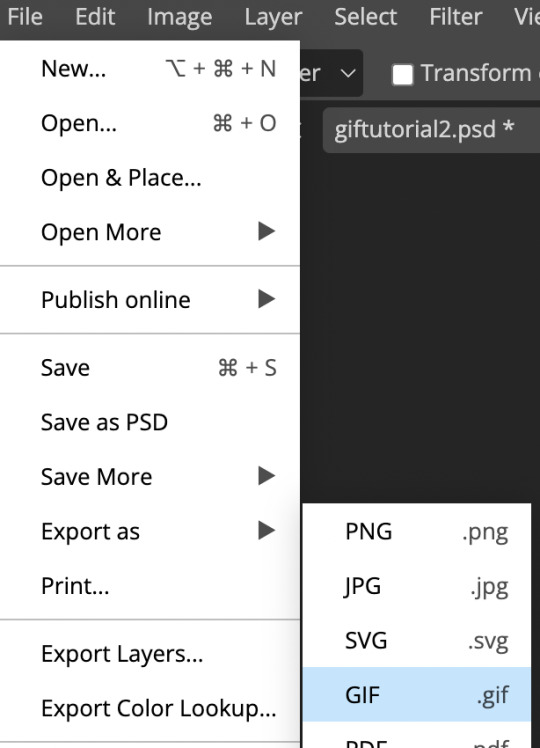
once you’re done adding your PSDs/manually editing your gifs, you’re going to save them by going file > export as > gif:
here, you will see a preview of your gif, as well as the MB total in the bottom right hand corner:
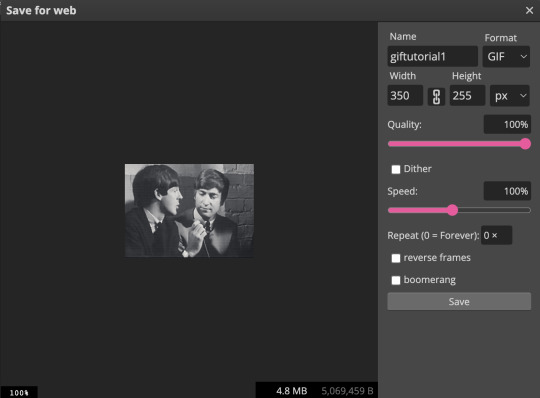
note how our gif went up to 4.8mb from 2.7mb after we originally saved it from gif brewery? that is almost entirely from the sharpening we added to the gif, and that is actually a pretty small increase; typically file size increases are much greater than that if you’ve sharpened your gif, especially with coloured gifs (black and white gifs inherently have smaller file sizes due to the lack of colour).
also note the “speed” bar - sometimes if i feel like my gif is still too fast, i’ll reduce that 100% to 80-90%.
if your file size limit is under 10mb and you’re pleased with your gif, click “save”
STEP 7: upload to tumblr
click photo > upload photos > and add your gifs. now, this is what i meant by the “half-size, side-by-side” gifs:

now, to add a caption with smaller font and smaller spaces between lines, you need to go into the HTML of your caption, which can be done by clicking the gear icon in the top right corner of your gifset and selecting HTML:

this is a sample HTML caption code. you can learn the principles of HTML by googling it, or just deducing it from the below:

and this is what that code looks like:

you can also add colour to your captions by adding a code into your HTML from this website
STEP 8: click post!
congrats! if you’ve made it to the end of this tutorial, you’ve successfully created a gif for *almost* free. i really do promise that this all becomes really fast and like second nature once you get the hang of it!
please feel free to shoot me a message if you have any questions at all! 🤍
- xoxo, caro, aka pennie
#holy mother this was a lot more work than anticipated#but it was fun!#please message me if you have any questions#i mean it!#i feel like this got very convoluted at times - especially discussing gif sizes - so plz message me if you need anything cleared up#gif tutorial#mine#giffing#gifs#tutorial
130 notes
·
View notes
Text
Youtuber voice: make a gifset with me :)
alright folks, welcome to another episode of Jo talking to the void. Gonna try and do a "follow my process" thing.
It's very- VERY long and image heavy. Under the cut and feel free to send me an ask if you have any questions/want me to elaborate on anything.
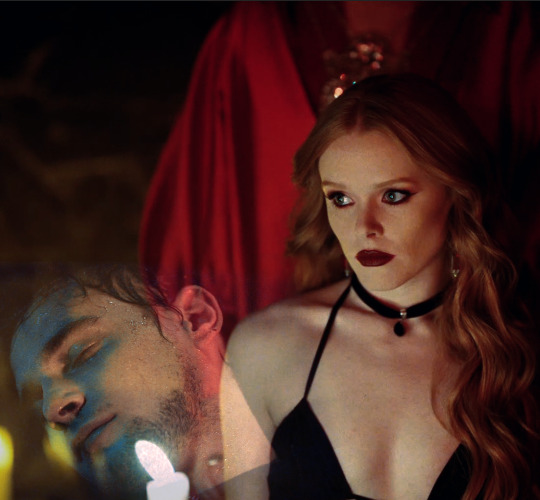
Part 1: Grab at any idea that sparks joy. Anything. Today mine is the word "horror", so we'll try and do a horror set.
Part 2: Scene analysis and reference hunting. I'll open a new folder on my pc named "Horror gifset" and dump there all the FTWS scenes I already have and that I think could be fun. Open pinterest and behance and type "horror", see if anything sparks an idea.
This takes me roughly 20 mins, here's what I have:
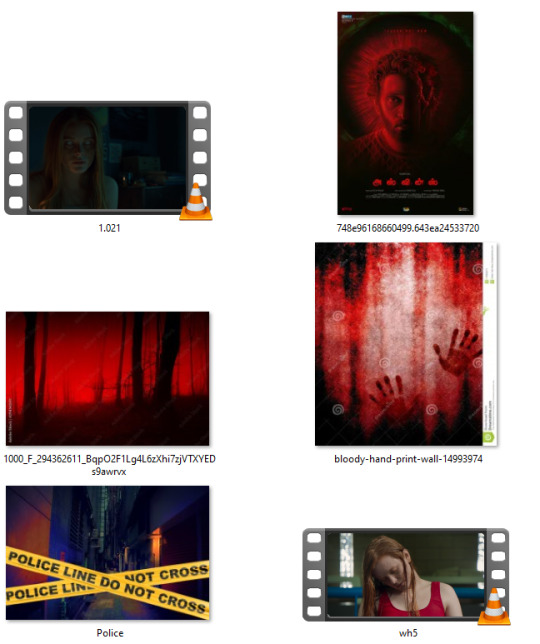
I try to take a step back and see what is it about these designs that attracted me. Clearly the red & black contrast, Bloom and I actually just like the "police line" because of the amount of storytelling it brings by doing basically nothing. (Don't be fooled, I saved many many pics before narrowing it down)
Part 3: To me this is the hardest one. I want to have a small storyline in my gifset, so time to think of it. I open a notes document and just start typing whatever comes to mind, trying to keep the mood of the previous images.
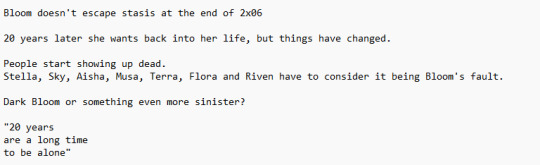
Here's what I landed on. It's not much, but I can now start the fun part of structuring the gifset.
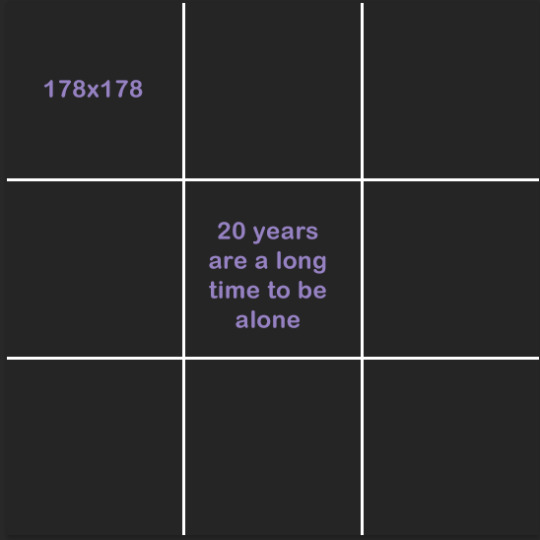
Part 4: I've really been into layout lately, so now's the time to do math.
The first panel I knew I wanted to have the text centered in the middle and surrounded by the mini-gifs. Here are the two layouts I thought of. I decided to go with the second one because it's more interesting, but I already knew I'd tweak a lot, to resemble an actual police line, etc.
I separated all of the scenes from 2x06. Both when Bloom is arrested and when she's released, considering I could use them in reverse.
When making layouts the only things to keep in mind is that the dashboard optimal width is 540 px and that the space in between every piece of "frame" you put within a gif is 2px. So let's say I was going with the square layout 1. It's 540 px width, BUT I can't just divide 540/3 and make that the size of my layout, because I need to account for the space in between the squares too. So the math is actually 540 - 4 (because I have three columns - two gaps)/3 = 178 px. All the squares in that image are 178 x 178.
On Scene grabbing: I do everything I can to use footage that's high quality. This is the easiest way for your gifs to come out pretty, avoid anything lower than 1080. Especially if you're grabbing a scene that'll need loads of adjustments like a night scene or a period piece with too much yellow, grab even higher quality than 1080.
When I work with Redeeming Love's footage, I work with 4k quality, because I know I'm about to destroy the quality by adjusting it.
I mean look at the amount of yellow.
I t*rrent all my scenes in MKV, then use Avidmux to chop the entire movie/show into smaller sized scenes and convert it into mp4.
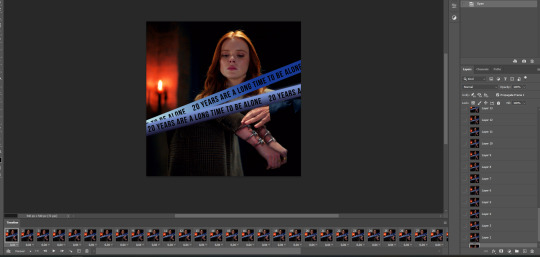
Part 5: Back to the set. Once I have the basic layout, I pull in my scenes and check if they make sense. One big tip is to stop thinking of scenes as what you watched, but as what you're seeing.
Scenes meaning are very easily altered by whatever context they're put in. Look for scenes in unexpected places (the romantic scene can absolutely be horror footage) and reverse the order or add in effects to alter their meaning.
Each one of these gifs had it's own peculiarities. So to break it down:
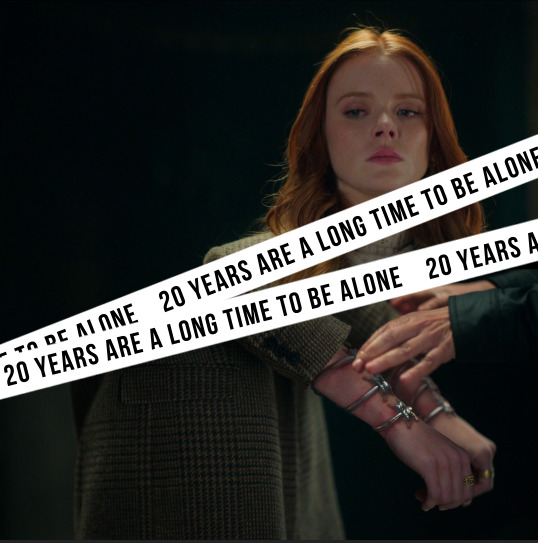
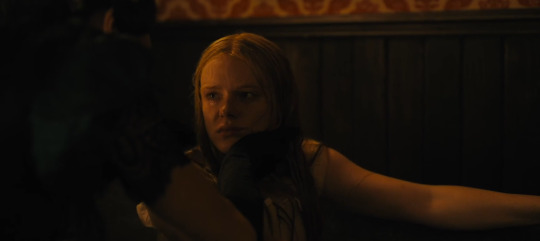
Gif 1: I colored it to bring out the black and added the blue because I knew I wanted to use overwhelming red later and this would pop-out. Shaded the white streaks so they'd appear more like police lines and colored them using a gradient just so it'd be more interesting. I didn't like how Bloom's upper part lined up with the cuffs, so I inverted it and brought out the red


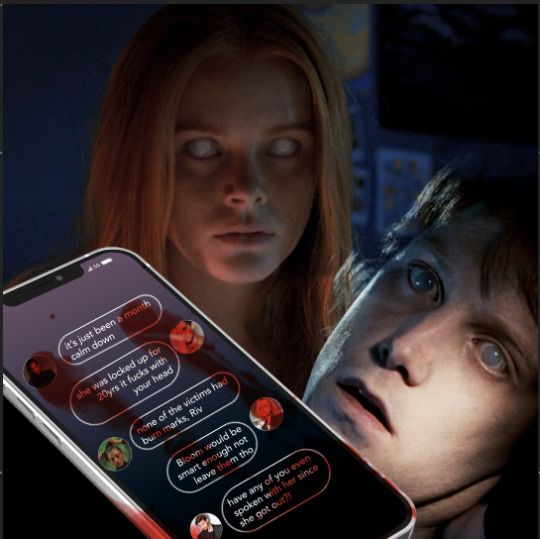
Gif 2: First off, I scavenged my memory to try and find a scene where a character appears with white eyes like Bloom's. This poor fella is from The Covenant (2005). I color matched both Bloom's and his scenes so the green was neutralized and we had more blue and red. Then finally I added the phone where the actual storyline I wrote back up starts to unfold.

Gif 3.1: First off, this gif is 540 width, but not 540 px tall. It's actually 400 px tall, which is a good tip: You don't have to stick to one format when giffing. Sometimes a layout or scene simply won't work in a tall format and that's fine.
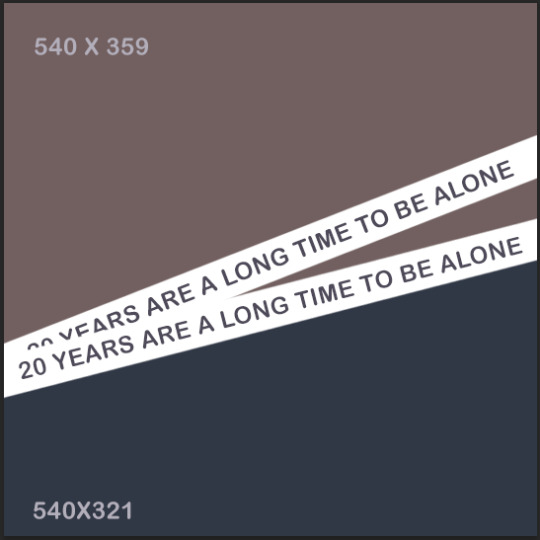
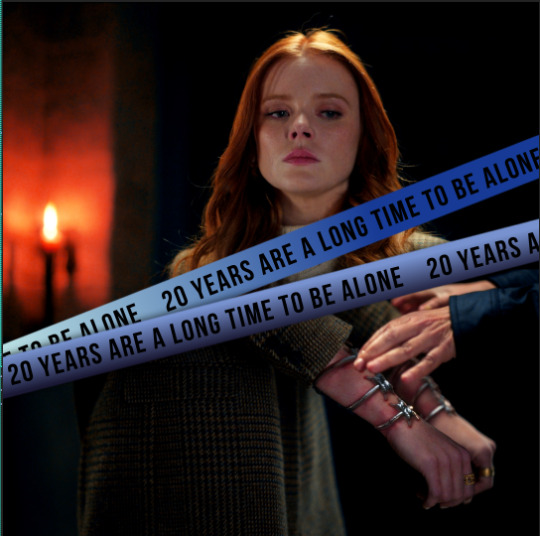
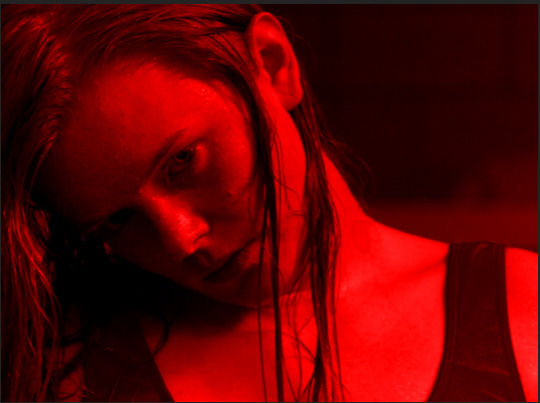
For this first part all I did was color Bloom, slap the all red color map and the text. Then I realized I didn't like her swimsuit under blending, so I went back and specifically desaturated the red in the starting layer and made it dark, so it'd show up black. The "20 years" are subtle, but in my head it'd be what the characters are hearing in their nightmare, so it's just a faint whisper in the corner.
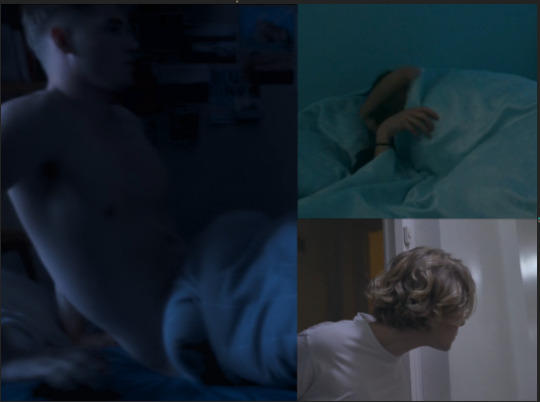

Gif 3.2: I colored all scenes to match each other. Sky's was the darkest one, so I knew I'd try and match to his because then I wouldn't have to destroy the quality of his footage to match the others. Musa's scenes was tricky because in the actual scene she's waking up slowly and happy. I chose to speed it up and start the gif already in her movement, so you don't realize she's actually very relaxed in the scene.
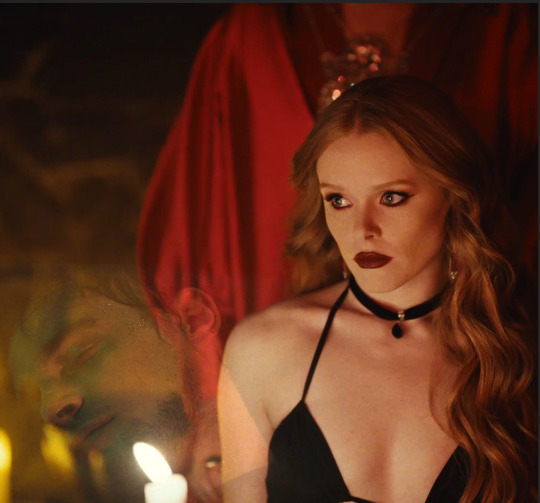

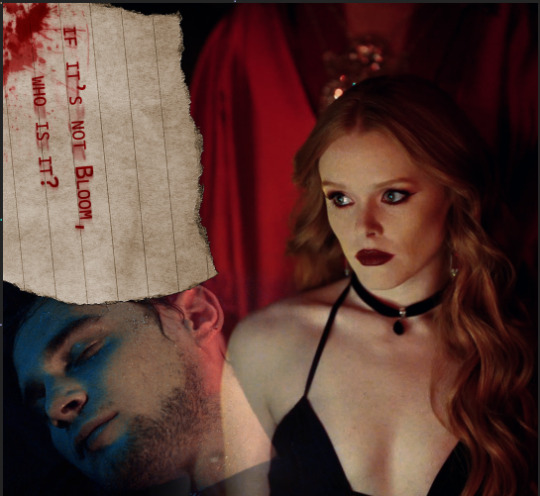
Gif 4: I started by coloring Bloom and Riven's footage, reducing the yellow and bringing out the blue and red in both. As you can see there's still a candle behind Riven, that makes it hard to see his face, so what I did was add a black shape under (or you could paint a layer in PS) with black and just blur the edges, so his footage would actually show. Finally there was that big empty spot in the upper left, so I added a note and used it to wrap up the story of the set.
There are two layers of text, both set to multiply: one is the actual text, the second one is in a brighter red and blurred in one direction, so it looks like the text got smeared in a rush. Added the blood and ta-da! We're done.
Exporting:

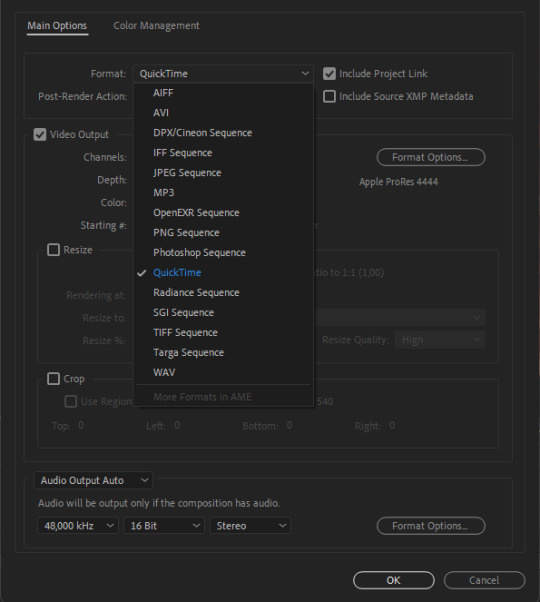
If you're exporting from After Effects, I've found exporting in MOV works better than trying to export in mp4, since it doesn't compress the file. You'll notice I'm using the format "apple ProRes 444", that's simply because this format keeps the alpha channel (transparent). While I didn't need it in this set, it's an habit.
Once I export from after effects, we're importing in Photoshop.
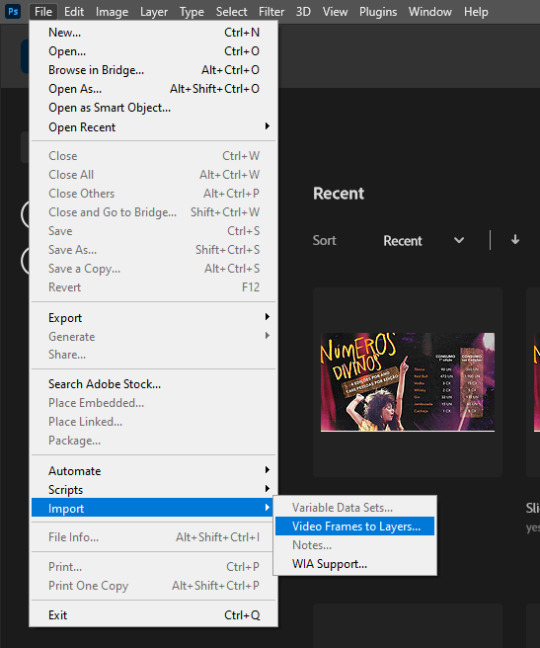
I import by going File > Import > Video Frame to Layers. Then you select your file and you should have this:

Hit OK.
If you don't have the timeline here, simply go in "Window > Timeline"
You'll end up with something like this. Now here's the most boring part of giffing, but don't give up now!
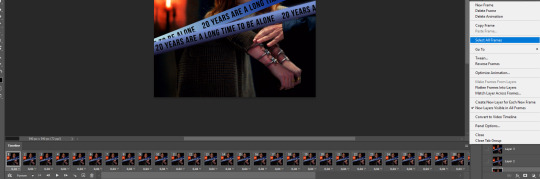
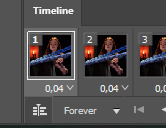
Go on the 3 lines on the bottom right of the timeline (=) and click on "select all frames". Once they're all selected, click the little down arrow under the little thumbnails to change the timing. I change mine from 0.04 to 0.05
Then I select all my LAYERS (not frames), put them inside a group. And click:
On this little piled up icon to transform into the video timeline. This is so we can sharpen our gifs.
Right Click on top of the group on the layers panel and select "convert to smart object". Then in the upper bar, click Filter > Sharpen> Smart Sharpen and use these settings:

This is what makes gifs look clear and crispy.
FINALLY we're saving. You can do it manually, like a peasant, by going on file > export > save for web (legacy). Or you can play keyboard piano and hit alt+shift+ctrl+s.
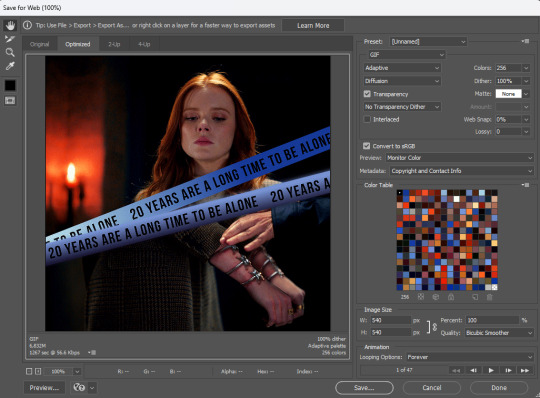
These are my export settings.
Things to keep in mind:
"Diffusion" is just one of the types of exporting you can do. TWEAK THIS for every gif. Sometimes very detailed gifs will look better with Pattern. Very colorful ones with Diffusion. It varies a lot.
"Adaptive" is just another way the pixels are laid out. I don't actually see much difference here, but I always tweak on all settings, just to make sure I'm getting the best quality by the smaller size.
On the bottom left you'll see your size. Mine is currently 6.82M. All you have to know is that Tumblr won't allow any gif bigger than 9.8M.
Looping Options: make sure it's in forever, otherwise your gifs won't play.
And then... finally, hit save.
....
Now rinse repeat and do this for 200 other gifsets, because it's a totally fun hobby to have!
26 notes
·
View notes
Text
Quick reminder that YOU DON'T HAVE TO PAY YOUTUBE TO DOWNLOAD STUFF!! literally just look up "YouTube to MP3/MP4 converter" and there are like 5 million. You paste the YouTube link in, pick your quality, click download and you have it. A lot of them have popups and stuff so be careful but I do it like all the time and still don't have a virus yet, it's fine.
Don't pay youTube for like the simplest function to find from a quick search!! Make your animation memes and download your favorite video essays!! For free!!
#purr purr purr#youtube#idk what to tag this with?#anticapitalist#piracy#those probably work for tags lmao
11 notes
·
View notes
Note
if you have vlc media player installed you can go to open network stream in media, put the youtube url in, then go to tools and codec information and itll give you a url to the source video just on its own instead of on youtube and you can download it from there. a little roundabout but completely unreliant on third party websites
good to know! i just download the mp4 if the browser extension wont let me fetch the mp3 and convert it its not really a hassle
51 notes
·
View notes
Text
Gif tutorial by Alinelovelace
Alright, I'll be doing 3 things here today:
1.) Sharing the programs and websites I use
2.) Showing y'all a tutorial on how I make my gifs (this is my first tutorial, so if anything doesn't make sense, don't hesitate to message me, send me an ask, or comment on this post!!!!!)
3.) Sharing some resources by insanely talented gif makers (because I learned how to make gifs by following tutorials)
It's probably important(?) to mention that I use a Windows laptop
A.) Programs and websites:
ezgif: to make my gifs and do light editing
You can make gifs with video clips or screen caps. I'm not advanced enough to use screen caps, though they're supposed to make gorgeous gifs. I use ezgif to make the actual gif and edit the timing (which I end up having to tweak on Photoshop but...)
I also like ezgif because no watermarks!! I will do anything in my power to get rid of watermarks from websites and editing programs because they bother the hell out of me!
Photoshop: for the rest of my editing
This is where I recolor and add text.
A great alternative to Photoshop is Photopea, which I've used before I "obtained" Photoshop. It's FREE and online, so you don't have to download anything! I highly recommend it if you really want to get into gif coloring !!!!
Currently, I get my videos from torrents (bc I have a wide selection for my family to watch on our tv). But I used to use the Xbox game bar on Windows to record the clips I wanted on online streaming sites (unfortunately there's not a whole lot up and running anymore), then cropped and cut them. If anyone's interested in that, I could probably post a separate tutorial for that another time :)
There's also screen cap websites out there and YouTube. And probably dozens of other ways to get videos that I don't know about!
Video cutter
If you use full length episode videos and don't know how to crop them on your laptop (like me)
★★★★★★★★★★★★★★★★★★★★★
B.) Tutorial:
I'll be remaking the first gifset I ever made since I've learned A LOT since then! It should be pretty simple since there's only one set of subtitles.
Another time, I could do an edit tutorial like my That 70s Show ones. It's just taking the same concepts as this tutorial though, and playing around with colors, fonts, and font placement.
1.) Find your video/screen caps:
Since I no longer have the video from my first gifset, I just googled "Mulder throwing pencils season 10" on YouTube. After finding the video, I copied the link and pasted it into a YouTube to MP4 site ((this site has never given me popups or tried to get me to download something that isn't my video file)).
2.) If your downloaded video clip is short enough, you can just stick it into ezgif. If not, you may have to cut it using a website or a computer program.
Ezgif.com -> video to gif -> browse -> select your file -> upload video
3.) After clicking upload video, you should find yourself on this page:
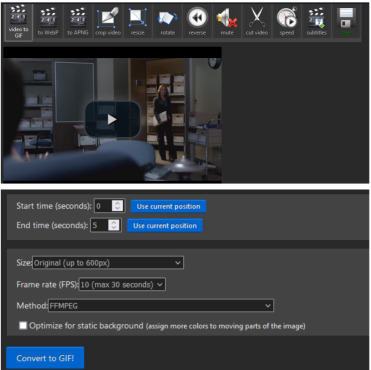
If you need to do any kind of video editing (cropping, rotating, resizing, etc) this is the place to do it! This is also where you make your gifs.
For the first gif, I don't need to change the start time, since I'm starting at the beginning of the video. 0 seconds is fine. But for the stop time, I'm going to play the video, pause where I want my first gif to end, then press "use current position" by end time.
I don't usually touch the settings for size, FPS, or method. If the gif doesn't have a lot of movement, I check "optimize for static background"
Then press convert to gif.
Here's the product I got. Since it's such a short clip, it moves a little fast for me.
I'm going to click "speed" which is below the gif. You're brought to this page:
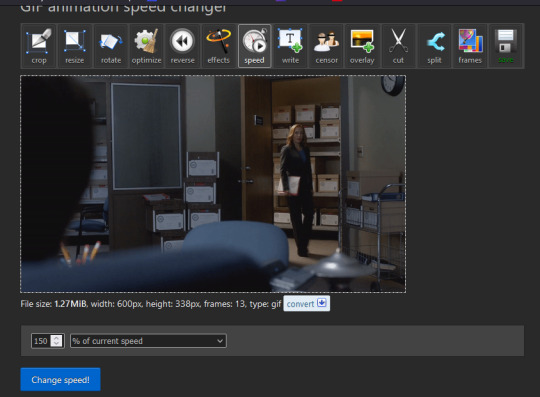
This is completely up to you for speed, but I find that between 60% and 85% end up looking good. If you don't like it, just change the number in the box and press "change speed".
I ended up with mine at 65% of current speed.

A little better, right?
The gifs that turn out best are 3 seconds to 10 seconds in my experience. This one is 1.5 seconds, so it's a little fast.
After that, rinse and repeat for every gif you need to make.
4.) Editing time! This is for Photoshop (if you use Photopea, I very much recommend this tutorial. It's very well explained!)
Go ahead and open all of your gifs once Photoshop is booted up. Then click window -> timeline
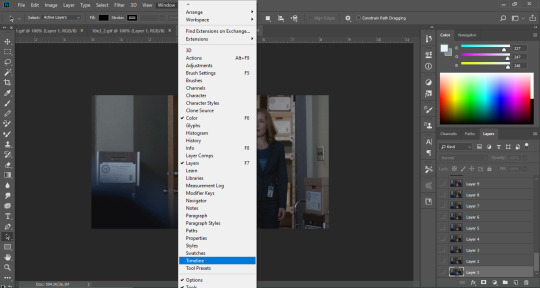
Now you have a handy dandy little timeline on the bottom.
The first thing you're going to do click play and decide whether or not your gifs are running at the speed you want. If yes, move on to next step.
If not: click on the three lines -> select all frames -> little drop down arrow. You should have a variety of times available to choose. Usually, I click other, then put somewhere between 0.04 and 0.08 seconds. Click play again. If you don't like it, try this step again.
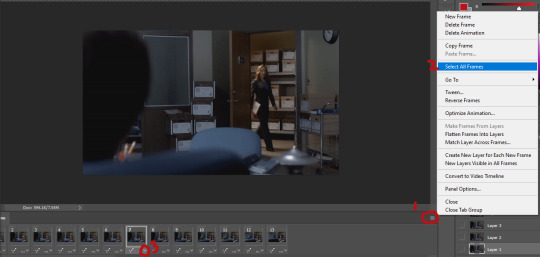
If you need to crop your gif, three lines -> select all frames. Press "c" on your keyboard and crop accordingly.
4a.) Color editing
This is where things get complicated. Just remember coloring is subjective and everyone does it differently. This is just an intro to the different tools most gif makers use to alter color.
You don't have to use all of these! I definitely pick and choose depending on how I want the coloring to look. When I'm making a gif set, my coloring isn't as adventurous as when I'm making an edit. It doesn't feel worth it to give away my settings for this gifset since it changes depending on the coloring and lighting of the scene.
All of these tools can be found under "create new filter adjustment layer"
• Brightness/Contrast
This one is the easiest in my opinion. It's pretty straightforward. The more you drag brightness the right, the brighter your gif gets. The more you drag contrast to the right, the higher the contrast is.

• Curves
This adjusts lighting with color values. It's another tool that's hard to explain. I just drag the little circles on the chart until it looks good

• Color Balance
Like every other setting, exactly what you do with this tool is up to you. Color Balance adjusts the overall tint of your gif. I recommend editing highlights, shadows, and midtones for the best results.
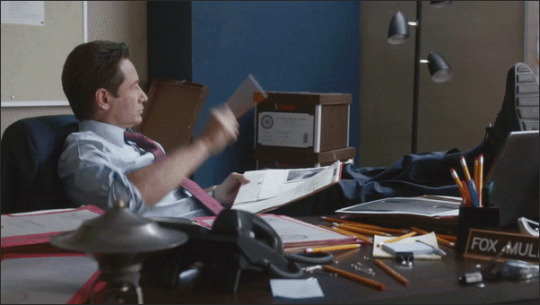
• Channel mixer
This one is one of the most complicated tools when making gifs in my opinion. It's best for getting rid of weird colored tints (think the blue coloring in Twilight). I'll just link a tutorial here for it. I don't make enough gifs to know how to explain it.
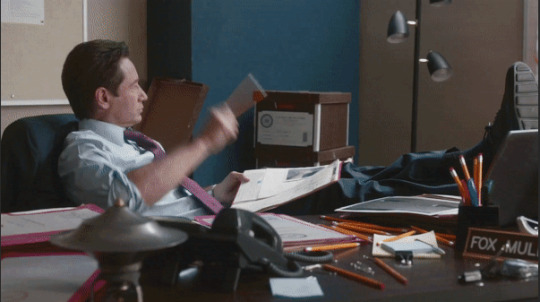
• Selective color
Hands down my favorite tool, though not only specifically for gif making. This tool allows you to select a color (reds, yellows, greens, cyans, blues, magentas, whites, neutrals, blacks) and edit each color group. For example: my skin in photos usually has a weird red tint. I can edit the reds in my photo using this tool to make it look less abrasive.
You just play around with the different colors and bars for each color until each color group looks good. I recommend hitting the highest value to see how the color changes/what parts of the gif are affected by the change.
In the instance below, I wanted to see how magenta affected the blue colors, so I dragged magenta to 100. Now, knowing what kind of color changes magenta will make to blue, I can adjust accordingly.
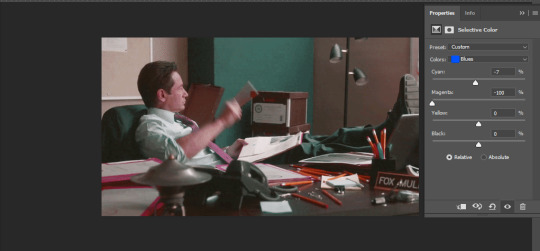
Messing around with the each color put me here:
• Vibrance
Another pretty self explanatory tool! Vibrance and saturation bars make the gif colors more colored and vibrant.
• Applying the filters to all frames
Shift click to select all the filters, and drag them above all the layers. They should now be applied to all the frames.
If not, select all frames with the three lines menu drop down like before -> click the little eye to turn off visibility, then click it again to turn it back on. You should be able to see everything now.
In order to carry the same colors from gif to gif, I take pictures of each setting and edit each filter adjustment layer accordingly. I side by side compare and make adjustments if the coloring doesn't match quite right. I'm sure there's a better way to do this, but I'm not experienced enough yet.


4b.) Subtitles
This part isn't too bad. For subtitle text, I use Calibri. Myriad pro bold italic and Arial are also really good options though!
• Text
Go to the sidebar and select text. Drag yourself out a box approximately where you want your subtitles. Type whatever you want. If you don't like where it is, click the move tool and drag it wherever you'd like.
Here are my text settings:

• Blending options
Right click your text layer and select "blending options" at the top. I edit stroke, which adds an outline. I also edit drop shadow, just because it adds a little depth to the text

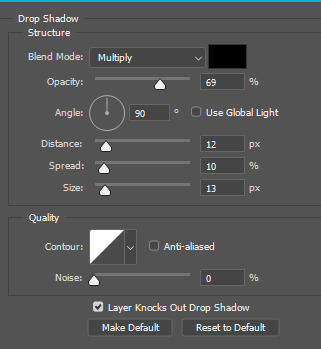
• Applying to all frames
Drag the text layer to the top, just like you did with the adjustment filter layers when coloring. The same troubleshooting applies.
5.) Exporting
I know there's other ways to do this, but this is the way that makes the most sense to me.
Select all frames on the timeline -> file -> export -> save for web (legacy) -> save
With everything together, you go from:
To:

I had the subtitles in two parts because my first one had the subtitle in two parts (consistency).
Happy giffing!~~
★★★★★★★★★★★★★★★★★★★★★
C.) Resources:
This is a collection of resources both for Photopea and Photoshop
Photopea Resources:
Photopea giffing tutorial by @heroeddiemunson
Photopea gif coloring tutorial by @heroeddiemunson
Photopea removing yellow tint tutorial by @lacebird
Photopea gif making tutorial by @aragarna
Photopea gif making tutorial by @ashleyolsen
Photopea changing background color of gifs by @benoitblanc
Photoshop tutorials:
Giffing tutorial by @dqmeron
Subtitle tutorial by @itsphotoshop
Blurring gif backgrounds by @clubgif
Inverted colored text tutorial by @spaceslayer
Gradient text tutorial by @tawaifeddiediaz
Gif coloring tutorial by @logangarfield
Color consistency tutorial by @clubgif
Channel mixer tutorial by @zoyanazyalensky
11 notes
·
View notes
Text
Would like to apologise for infrequently checking my emails, I am a final year University student working on my dissertation and preparing to do a Masters, so I've been a little bit skittish over the last few months.
With that said, somebody (please let me know if you want to be credited - I chose to exclude any details from this post for the sake of your privacy but am happy to give you proper thanks) very kindly emailed me in November to send a few videos from "some strange website" which are interviews explaining how Soushi and Leo met. I will convert these to .mp4, update the archive with them and then upload them to the YouTube channel.
These videos are titled "Watashime - Comment.asx" (a 2:17 interview with Soushi and Leo), "Watashime - SC24 Comment.asx" (a 1:18 video of Soushi and Leo talking while playing Wii Sports Tennis), and "Watashime - Special Comment.asx" (a 0:31 video of Soushi and Leo talking to the camera)
If anybody has any more information about these that may be relevant, or you're willing to help provide translations / transcriptions, then please do email me or send me a message here.

Note the overlay in the top right - does anybody recognise this branding? It's on all three videos, so I'm going to make an educated guess that these are promotional pieces that were potentially run on a network or blog. I think it could maybe be SoraNews24, as they were active in 2008, but I really don't want to make any claims like that without guaranteeing their validity first.
#ワタシメスラッグ#watashime slug#music archival#music archive#visual kei#jrock#vkei#music preservation#promotional#interview#extra content#video footage
4 notes
·
View notes
Last Seen Blogs

mighelucccio
video
xlilly1
Bridgerton Fan

rocksolidmotivation
Rock Solid Motivation
em-draws
I ❤️ hole
super-estimada
(3) Facebook