#chop off the entire top and bottoms of bell peppers so you have flat
Text
major pet peeve: watching cooking shows on youtube and seeing the cooks be wasteful with their ingredients
#like what's the deal with that??#take out the stem of champignons and throw them away so you can put them flat on the board for easier cutting :)#chop off the entire top and bottoms of bell peppers so you have flat#and DON'T use any of the perfectly fine flesh on there#cut away about an extra inch from the stems of those spring onions because why not#throw away whole broccoli stem#i don't care if they spill some shit with their chaotic energy#but just not using half your shit because you want to make the most low effort prepping? hellfire#have i just been raised to ultra use all my ingredience#is it me who is the outlier#i don't know but i angy
2 notes
·
View notes
Text
Meal Prep Week-Long Power Bowls
You’ve probably seen the meal prep trend online where dozens and dozens of meals are prepped in containers for the entire week? Holy moly. I can say that will probably never be me. I once tried an over-ambitious meal prep and not only did I end up with way too much food, but it took up most of my day.
On the flip side, I’ve realized that my veggie intake falls pretty flat when I don’t do any prep at all.
Soooo….there has to be a happy medium!?
This little dilemma is exactly why I came up with a simple plan that totally fits into my life these days. The recipe below (which is totally customizable!) takes less than 30 mins of active prep time, but makes enough food for several portions, increasing the odds that you’ll be a veggie powerhouse for the workweek. *arm flex* I love how I can quickly reheat a couple things and build a hearty, nutritious bowl in a matter of minutes!
My meal prep method has been going like this:
Roast two huge sheets of veggies
Cook a grain
Chop a couple fresh veggies (sometimes I skip this if I’m tight on time)
Have toppings on hand, ready-to-roll—things like avocado, nuts/seeds, beans, dressing, etc.
This method has dramatically changed my meals in recent weeks (specifically, lunches) and increased my veggie consumption a ton. All of the ingredients can be changed up so it never has to be repetitive and you can be flexible with using what you have in your fridge/pantry. It helps cut down waste because you can easily use up those “on the verge of dying” veggies in your crisper. Just throw ‘em in the oven and roast the heck out of ‘em! And if you get tired of bowls, throw the prepped food into delicious wraps or even soups/stews.
If you’re feeling extra-ambitious and want to prep even more food, I’d recommend adding one or more of the following tasty items:
Homemade dressing (try my Lemon-Tahini Dressing, Shake-and-Go Balsamic Vinaigrette from Oh She Glows Every Day, p. 273, or Roasted Garlic and Red Wine Vinaigrette)
Energy bites/balls (such as my Chocolate Hemp or Triple Almond Energy Balls)
Soup/stew
Chia pudding (lately I’ve been making a double-batch of my 2-Ingredient Chia Pudding found in the new “Blissed Out Breakfast Bowls” recipe in the app! Such a perfect snack.)
I’ve provided a detailed recipe below because it helps to have something to work from the first time, but like I said, feel free to run with it. If you simply commit to roasting 2 big sheets of veggies, cook a grain, and chop some fresh veggies….you’ll be well on your way to making easy throw-together power bowls all week long. My future hangry self has been thanking me a lot.
Before I go, I want to mention that The Oh She Glows Recipe App is still on sale for 99 cents in the Apple iTunes Store until mid-March! You’ll find these delicious power bowls in there, as well as more than 160 of my favourite plant-based recipes (this number includes 30 app exclusive recipes too). Happy cooking :)
5 from 1 reviews
Meal Prep Week-Long Power Bowls
Vegan, gluten-free, nut-free, refined sugar-free, soy-free
I love having prepped food in the fridge, but don’t love doing hours of meal prep each week. So I came up with this simple method that takes just 25 minutes of active prep time. The healthy food components can be enjoyed for several days in power bowls, wraps, and even stirred into soups! Power bowls are so fun for family meals because you can switch up the veggies and toppings to suit each palate, giving kids control to build their own bowls. This recipe is also a handy make-ahead option if you’re having friends over for a meal. Simply chop all the veggies the night before and refrigerate them in containers. Just before your guests arrive, pop the veggies into the oven, cook the quinoa, and prep the toppings. After cooking, you can all have fun assembling your own power bowls and everyone will be super impressed by the stunning rainbow-coloured meal!
Yield
8 servings
Prep time
25 Minutes
Cook time
35 Minutes
Total time
1 Hour
Ingredients:
For the roasted veggies:
3 small (680 g) sweet potatoes, peeled and chopped (4 cups)
4 cups (500 g) brussels sprouts, trimmed and halved*
1 medium (800 g) cauliflower, chopped into small florets (4 heaping cups)
1 medium (230 g) red onion, peeled and chopped
2 large (500 g) red bell peppers, seeded and chopped
3 tablespoons (45 mL) extra-virgin olive oil, divided
Salt and pepper, to taste
For the quinoa:
2 cups (400 g) uncooked quinoa**
For the fresh veggies:
1 medium (370 g) English cucumber, chopped
1 medium (135 g) bunch green onions, chopped
2 cups (255 g) grape tomatoes (1 dry pint)
For the power bowl toppings:
Chopped lettuce/greens (Romaine, Iceberg, kale, etc)
Salad dressing***
Ripe avocados
Cooked beans or lentils
Nuts and seeds (I use hemp hearts and roasted pepitas)
Hummus or pesto
Directions:
Position two oven racks near the middle of the oven. Preheat the oven to 400°F (200°C) and line two extra-large (15- x 21-inches) rimmed baking sheets with parchment paper. It’s important to use extra-large baking sheets so there’s enough room for all those healthy veggies.
Divide the chopped, “to-be-roasted” veggies onto the baking sheets. Drizzle 1 1/2 tablespoons of oil over top each sheet and toss the veggies until they’re fully coated in the oil. Sprinkle generously with salt and pepper.
Roast the veggies for 30 to 40 minutes (I find 35 minutes is perfect in my oven for lightly charred veggies) until fork tender and golden. There’s no need to rotate/move the pans or flip the veggies halfway through baking unless you’re particular about even cooking.
While the veggies are roasting, add the quinoa to a large pot along with 3 1/2 cups (875 mL) water. Stir. Bring to a simmer over medium-high heat, then immediately reduce the heat to low-medium, cover with a tight-fitting lid, and cook for 12 to 14 minutes, until the water is absorbed and the quinoa is fluffy. Remove the lid and fluff the cooked quinoa with a fork.
While the quinoa cooks, chop the cucumber and green onions. Rinse the tomatoes (I hold off slicing them until just before serving).
Remove the roasted veggies from the oven. Once mostly cool, transfer all of the veggies and quinoa into containers, seal with airtight lids, and place into the fridge for up to 4 days.
To make the power bowls: Add a couple generous handfuls of chopped lettuce/greens to the bottom of a large shallow bowl. Drizzle with a bit of dressing and toss the lettuce/greens until coated. Top with spoonfuls of your prepped food (quinoa, roasted and fresh veggies)—I always warm up the quinoa and roasted veggies first! Now, add diced avocado, more salad dressing, cooked beans or lentils, nuts and seeds, and hummus or pesto. Keep the power bowl flavours interesting by changing up the toppings each day!
Tips:
* If your brussels sprouts are quite large, quarter them instead of halving.
** If you don't think you'll eat this much quinoa in 4 to 5 days, feel free to halve this amount (use 1 cup uncooked quinoa + 1.75 cups water).
*** Looking for a delicious homemade dressing? Try my Lemon-Tahini Dressing, Shake-and-Go Balsamic Vinaigrette (Oh She Glows Every Day, p. 273), or Roasted Garlic and Red Wine Vinaigrette. I always keep Maison Orphee Italian on hand when I don't have homemade dressing prepped.
Feel free to roast a head of garlic along with the veggies. The roasted cloves are especially delicious thrown into my Roasted Garlic and Red Wine Vinaigrette found in my Warm + Roasted Winter Salad Bowl recipe.
Make it nut-free: Top your bowl with seeds (such as roasted pepita seeds and hemp hearts) instead of nuts and make sure your dressing is nut-free.
Comments (23) | function fbs_click() {u=location.href;t=document.title;window.open('//www.facebook.com/sharer.php?u='+encodeURIComponent(u)+'&t='+encodeURIComponent(t),'sharer','toolbar=0,status=0,width=626,height=436'); return false;}Share on Facebook | Tweet | Pin It | Snapchat | Google+
© copyright 2019 Oh She Glows. All Rights Reserved.
Meal Prep Week-Long Power Bowls published first on https://brightendentalhouston.tumblr.com/
0 notes
Text
Meal Prep Week-Long Power Bowls
You’ve probably seen the meal prep trend online where dozens and dozens of meals are prepped in containers for the entire week? Holy moly. I can say that will probably never be me. I once tried an over-ambitious meal prep and not only did I end up with way too much food, but it took up most of my day.
On the flip side, I’ve realized that my veggie intake falls pretty flat when I don’t do any prep at all.
Soooo….there has to be a happy medium!?
This little dilemma is exactly why I came up with a simple plan that totally fits into my life these days. The recipe below (which is totally customizable!) takes less than 30 mins of active prep time, but makes enough food for several portions, increasing the odds that you’ll be a veggie powerhouse for the workweek. *arm flex* I love how I can quickly reheat a couple things and build a hearty, nutritious bowl in a matter of minutes!
My meal prep method has been going like this:
Roast two huge sheets of veggies
Cook a grain
Chop a couple fresh veggies (sometimes I skip this if I’m tight on time)
Have toppings on hand, ready-to-roll—things like avocado, nuts/seeds, beans, dressing, etc.
This method has dramatically changed my meals in recent weeks (specifically, lunches) and increased my veggie consumption a ton. All of the ingredients can be changed up so it never has to be repetitive and you can be flexible with using what you have in your fridge/pantry. It helps cut down waste because you can easily use up those “on the verge of dying” veggies in your crisper. Just throw ‘em in the oven and roast the heck out of ‘em! And if you get tired of bowls, throw the prepped food into delicious wraps or even soups/stews.
If you’re feeling extra-ambitious and want to prep even more food, I’d recommend adding one or more of the following tasty items:
Homemade dressing (try my Lemon-Tahini Dressing, Shake-and-Go Balsamic Vinaigrette from Oh She Glows Every Day, p. 273, or Roasted Garlic and Red Wine Vinaigrette)
Energy bites/balls (such as my Chocolate Hemp or Triple Almond Energy Balls)
Soup/stew
Chia pudding (lately I’ve been making a double-batch of my 2-Ingredient Chia Pudding found in the new “Blissed Out Breakfast Bowls” recipe in the app! Such a perfect snack.)
I’ve provided a detailed recipe below because it helps to have something to work from the first time, but like I said, feel free to run with it. If you simply commit to roasting 2 big sheets of veggies, cook a grain, and chop some fresh veggies….you’ll be well on your way to making easy throw-together power bowls all week long. My future hangry self has been thanking me a lot.
Before I go, I want to mention that The Oh She Glows Recipe App is still on sale for 99 cents in the Apple iTunes Store until mid-March! You’ll find these delicious power bowls in there, as well as more than 160 of my favourite plant-based recipes (this number includes 30 app exclusive recipes too). Happy cooking :)
Meal Prep Week-Long Power Bowls
Vegan, gluten-free, nut-free, refined sugar-free, soy-free
I love having prepped food in the fridge, but don’t love doing hours of meal prep each week. So I came up with this simple method that takes just 25 minutes of active prep time. The healthy food components can be enjoyed for several days in power bowls, wraps, and even stirred into soups! Power bowls are so fun for family meals because you can switch up the veggies and toppings to suit each palate, giving kids control to build their own bowls. This recipe is also a handy make-ahead option if you’re having friends over for a meal. Simply chop all the veggies the night before and refrigerate them in containers. Just before your guests arrive, pop the veggies into the oven, cook the quinoa, and prep the toppings. After cooking, you can all have fun assembling your own power bowls and everyone will be super impressed by the stunning rainbow-coloured meal!
Yield
8 servings
Prep time
25 Minutes
Cook time
35 Minutes
Total time
1 Hour
Ingredients:
For the roasted veggies:
3 small (680 g) sweet potatoes, peeled and chopped (4 cups)
4 cups (500 g) brussels sprouts, trimmed and halved*
1 medium (800 g) cauliflower, chopped into small florets (4 heaping cups)
1 medium (230 g) red onion, peeled and chopped
2 large (500 g) red bell peppers, seeded and chopped
3 tablespoons (45 mL) extra-virgin olive oil, divided
Salt and pepper, to taste
For the quinoa:
2 cups (400 g) uncooked quinoa**
For the fresh veggies:
1 medium (370 g) English cucumber, chopped
1 medium (135 g) bunch green onions, chopped
2 cups (255 g) grape tomatoes (1 dry pint)
For the power bowl toppings:
Chopped lettuce/greens (Romaine, Iceberg, kale, etc)
Salad dressing***
Ripe avocados
Cooked beans or lentils
Nuts and seeds (I use hemp hearts and roasted pepitas)
Hummus or pesto
Directions:
Position two oven racks near the middle of the oven. Preheat the oven to 400°F (200°C) and line two extra-large (15- x 21-inches) rimmed baking sheets with parchment paper. It’s important to use extra-large baking sheets so there’s enough room for all those healthy veggies.
Divide the chopped, “to-be-roasted” veggies onto the baking sheets. Drizzle 1 1/2 tablespoons of oil over top each sheet and toss the veggies until they’re fully coated in the oil. Sprinkle generously with salt and pepper.
Roast the veggies for 30 to 40 minutes (I find 35 minutes is perfect in my oven for lightly charred veggies) until fork tender and golden. There’s no need to rotate/move the pans or flip the veggies halfway through baking unless you’re particular about even cooking.
While the veggies are roasting, add the quinoa to a large pot along with 3 1/2 cups (875 mL) water. Stir. Bring to a simmer over medium-high heat, then immediately reduce the heat to low-medium, cover with a tight-fitting lid, and cook for 12 to 14 minutes, until the water is absorbed and the quinoa is fluffy. Remove the lid and fluff the cooked quinoa with a fork.
While the quinoa cooks, chop the cucumber and green onions. Rinse the tomatoes (I hold off slicing them until just before serving).
Remove the roasted veggies from the oven. Once mostly cool, transfer all of the veggies and quinoa into containers, seal with airtight lids, and place into the fridge for up to 4 days.
To make the power bowls: Add a couple generous handfuls of chopped lettuce/greens to the bottom of a large shallow bowl. Drizzle with a bit of dressing and toss the lettuce/greens until coated. Top with spoonfuls of your prepped food (quinoa, roasted and fresh veggies)—I always warm up the quinoa and roasted veggies first! Now, add diced avocado, more salad dressing, cooked beans or lentils, nuts and seeds, and hummus or pesto. Keep the power bowl flavours interesting by changing up the toppings each day!
Tips:
* If your brussels sprouts are quite large, quarter them instead of halving.
** If you don't think you'll eat this much quinoa in 4 to 5 days, feel free to halve this amount (use 1 cup uncooked quinoa + 1.75 cups water).
*** Looking for a delicious homemade dressing? Try my Lemon-Tahini Dressing, Shake-and-Go Balsamic Vinaigrette (Oh She Glows Every Day, p. 273), or Roasted Garlic and Red Wine Vinaigrette. I always keep Maison Orphee Italian on hand when I don't have homemade dressing prepped.
Feel free to roast a head of garlic along with the veggies. The roasted cloves are especially delicious thrown into my Roasted Garlic and Red Wine Vinaigrette found in my Warm + Roasted Winter Salad Bowl recipe.
Make it nut-free: Top your bowl with seeds (such as roasted pepita seeds and hemp hearts) instead of nuts and make sure your dressing is nut-free.
Comments (4) | function fbs_click() {u=location.href;t=document.title;window.open('//www.facebook.com/sharer.php?u='+encodeURIComponent(u)+'&t='+encodeURIComponent(t),'sharer','toolbar=0,status=0,width=626,height=436'); return false;}Share on Facebook | Tweet | Pin It | Snapchat | Google+
© copyright 2019 Oh She Glows. All Rights Reserved.
Meal Prep Week-Long Power Bowls published first on https://wittooth.tumblr.com/
0 notes
Text
Meal Prep Week-Long Power Bowls
You’ve probably seen the meal prep trend online where dozens and dozens of meals are prepped in containers for the entire week? Holy moly. I can say that will probably never be me. I once tried an over-ambitious meal prep and not only did I end up with way too much food, but it took up most of my day.
On the flip side, I’ve realized that my veggie intake falls pretty flat when I don’t do any prep at all.
Soooo….there has to be a happy medium!?
This little dilemma is exactly why I came up with a simple plan that totally fits into my life these days. The recipe below (which is totally customizable!) takes less than 30 mins of active prep time, but makes enough food for several portions, increasing the odds that you’ll be a veggie powerhouse for the workweek. *arm flex* I love how I can quickly reheat a couple things and build a hearty, nutritious bowl in a matter of minutes!
My meal prep method has been going like this:
Roast two huge sheets of veggies
Cook a grain
Chop a couple fresh veggies (sometimes I skip this if I’m tight on time)
Have toppings on hand, ready-to-roll—things like avocado, nuts/seeds, beans, dressing, etc.
This method has dramatically changed my meals in recent weeks (specifically, lunches) and increased my veggie consumption a ton. All of the ingredients can be changed up so it never has to be repetitive and you can be flexible with using what you have in your fridge/pantry. It helps cut down waste because you can easily use up those “on the verge of dying” veggies in your crisper. Just throw ‘em in the oven and roast the heck out of ‘em! And if you get tired of bowls, throw the prepped food into delicious wraps or even soups/stews.
If you’re feeling extra-ambitious and want to prep even more food, I’d recommend adding one or more of the following tasty items:
Homemade dressing (try my Lemon-Tahini Dressing, Shake-and-Go Balsamic Vinaigrette from Oh She Glows Every Day, p. 273, or Roasted Garlic and Red Wine Vinaigrette)
Energy bites/balls (such as my Chocolate Hemp or Triple Almond Energy Balls)
Soup/stew
Chia pudding (lately I’ve been making a double-batch of my 2-Ingredient Chia Pudding found in the new “Blissed Out Breakfast Bowls” recipe in the app! Such a perfect snack.)
I’ve provided a detailed recipe below because it helps to have something to work from the first time, but like I said, feel free to run with it. If you simply commit to roasting 2 big sheets of veggies, cook a grain, and chop some fresh veggies….you’ll be well on your way to making easy throw-together power bowls all week long. My future hangry self has been thanking me a lot.
Before I go, I want to mention that The Oh She Glows Recipe App is still on sale for 99 cents in the Apple iTunes Store until mid-March! You’ll find these delicious power bowls in there, as well as more than 160 of my favourite plant-based recipes (this number includes 30 app exclusive recipes too). Happy cooking :)
Meal Prep Week-Long Power Bowls
Vegan, gluten-free, nut-free, refined sugar-free, soy-free
I love having prepped food in the fridge, but don’t love doing hours of meal prep each week. So I came up with this simple method that takes just 25 minutes of active prep time. The healthy food components can be enjoyed for several days in power bowls, wraps, and even stirred into soups! Power bowls are so fun for family meals because you can switch up the veggies and toppings to suit each palate, giving kids control to build their own bowls. This recipe is also a handy make-ahead option if you’re having friends over for a meal. Simply chop all the veggies the night before and refrigerate them in containers. Just before your guests arrive, pop the veggies into the oven, cook the quinoa, and prep the toppings. After cooking, you can all have fun assembling your own power bowls and everyone will be super impressed by the stunning rainbow-coloured meal!
Yield
8 servings
Prep time
25 Minutes
Cook time
35 Minutes
Total time
1 Hour
Ingredients:
For the roasted veggies:
3 small (680 g) sweet potatoes, peeled and chopped (4 cups)
4 cups (500 g) brussels sprouts, trimmed and halved*
1 medium (800 g) cauliflower, chopped into small florets (4 heaping cups)
1 medium (230 g) red onion, peeled and chopped
2 large (500 g) red bell peppers, seeded and chopped
3 tablespoons (45 mL) extra-virgin olive oil, divided
Salt and pepper, to taste
For the quinoa:
2 cups (400 g) uncooked quinoa**
For the fresh veggies:
1 medium (370 g) English cucumber, chopped
1 medium (135 g) bunch green onions, chopped
2 cups (255 g) grape tomatoes (1 dry pint)
For the power bowl toppings:
Chopped lettuce/greens (Romaine, Iceberg, kale, etc)
Salad dressing***
Ripe avocados
Cooked beans or lentils
Nuts and seeds (I use hemp hearts and roasted pepitas)
Hummus or pesto
Directions:
Position two oven racks near the middle of the oven. Preheat the oven to 400°F (200°C) and line two extra-large (15- x 21-inches) rimmed baking sheets with parchment paper. It’s important to use extra-large baking sheets so there’s enough room for all those healthy veggies.
Divide the chopped, “to-be-roasted” veggies onto the baking sheets. Drizzle 1 1/2 tablespoons of oil over top each sheet and toss the veggies until they’re fully coated in the oil. Sprinkle generously with salt and pepper.
Roast the veggies for 30 to 40 minutes (I find 35 minutes is perfect in my oven for lightly charred veggies) until fork tender and golden. There’s no need to rotate/move the pans or flip the veggies halfway through baking unless you’re particular about even cooking.
While the veggies are roasting, add the quinoa to a large pot along with 3 1/2 cups (875 mL) water. Stir. Bring to a simmer over medium-high heat, then immediately reduce the heat to low-medium, cover with a tight-fitting lid, and cook for 12 to 14 minutes, until the water is absorbed and the quinoa is fluffy. Remove the lid and fluff the cooked quinoa with a fork.
While the quinoa cooks, chop the cucumber and green onions. Rinse the tomatoes (I hold off slicing them until just before serving).
Remove the roasted veggies from the oven. Once mostly cool, transfer all of the veggies and quinoa into containers, seal with airtight lids, and place into the fridge for up to 4 days.
To make the power bowls: Add a couple generous handfuls of chopped lettuce/greens to the bottom of a large shallow bowl. Drizzle with a bit of dressing and toss the lettuce/greens until coated. Top with spoonfuls of your prepped food (quinoa, roasted and fresh veggies)—I always warm up the quinoa and roasted veggies first! Now, add diced avocado, more salad dressing, cooked beans or lentils, nuts and seeds, and hummus or pesto. Keep the power bowl flavours interesting by changing up the toppings each day!
Tips:
* If your brussels sprouts are quite large, quarter them instead of halving.
** If you don't think you'll eat this much quinoa in 4 to 5 days, feel free to halve this amount (use 1 cup uncooked quinoa + 1.75 cups water).
*** Looking for a delicious homemade dressing? Try my Lemon-Tahini Dressing, Shake-and-Go Balsamic Vinaigrette (Oh She Glows Every Day, p. 273), or Roasted Garlic and Red Wine Vinaigrette. I always keep Maison Orphee Italian on hand when I don't have homemade dressing prepped.
Feel free to roast a head of garlic along with the veggies. The roasted cloves are especially delicious thrown into my Roasted Garlic and Red Wine Vinaigrette found in my Warm + Roasted Winter Salad Bowl recipe.
Make it nut-free: Top your bowl with seeds (such as roasted pepita seeds and hemp hearts) instead of nuts and make sure your dressing is nut-free.
Comments (0) | function fbs_click() {u=location.href;t=document.title;window.open('//www.facebook.com/sharer.php?u='+encodeURIComponent(u)+'&t='+encodeURIComponent(t),'sharer','toolbar=0,status=0,width=626,height=436'); return false;}Share on Facebook | Tweet | Pin It | Snapchat | Google+
© copyright 2019 Oh She Glows. All Rights Reserved.
from Oh She Glows https://ift.tt/2NM36pW
0 notes
Link
You’ve probably seen the meal prep trend online where dozens and dozens of meals are prepped in containers for the entire week? Holy moly. I can say that will probably never be me. I once tried an over-ambitious meal prep and not only did I end up with way too much food, but it took up most of my day.
On the flip side, I’ve realized that my veggie intake falls pretty flat when I don’t do any prep at all.
Soooo….there has to be a happy medium!?
This little dilemma is exactly why I came up with a simple plan that totally fits into my life these days. The recipe below (which is totally customizable!) takes less than 30 mins of active prep time, but makes enough food for several portions, increasing the odds that you’ll be a veggie powerhouse for the workweek. *arm flex* I love how I can quickly reheat a couple things and build a hearty, nutritious bowl in a matter of minutes!
My meal prep method has been going like this:
Roast two huge sheets of veggies
Cook a grain
Chop a couple fresh veggies (sometimes I skip this if I’m tight on time)
Have toppings on hand, ready-to-roll—things like avocado, nuts/seeds, beans, dressing, etc.
This method has dramatically changed my meals in recent weeks (specifically, lunches) and increased my veggie consumption a ton. All of the ingredients can be changed up so it never has to be repetitive and you can be flexible with using what you have in your fridge/pantry. It helps cut down waste because you can easily use up those “on the verge of dying” veggies in your crisper. Just throw ‘em in the oven and roast the heck out of ‘em! And if you get tired of bowls, throw the prepped food into delicious wraps or even soups/stews.
If you’re feeling extra-ambitious and want to prep even more food, I’d recommend adding one or more of the following tasty items:
Homemade dressing (try my Lemon-Tahini Dressing, Shake-and-Go Balsamic Vinaigrette from Oh She Glows Every Day, p. 273, or Roasted Garlic and Red Wine Vinaigrette)
Energy bites/balls (such as my Chocolate Hemp or Triple Almond Energy Balls)
Soup/stew
Chia pudding (lately I’ve been making a double-batch of my 2-Ingredient Chia Pudding found in the new “Blissed Out Breakfast Bowls” recipe in the app! Such a perfect snack.)
I’ve provided a detailed recipe below because it helps to have something to work from the first time, but like I said, feel free to run with it. If you simply commit to roasting 2 big sheets of veggies, cook a grain, and chop some fresh veggies….you’ll be well on your way to making easy throw-together power bowls all week long. My future hangry self has been thanking me a lot.
Before I go, I want to mention that The Oh She Glows Recipe App is still on sale for 99 cents in the Apple iTunes Store until mid-March! You’ll find these delicious power bowls in there, as well as more than 160 of my favourite plant-based recipes (this number includes 30 app exclusive recipes too). Happy cooking :)
Meal Prep Week-Long Power Bowls
Vegan, gluten-free, nut-free, refined sugar-free, soy-free
I love having prepped food in the fridge, but don’t love doing hours of meal prep each week. So I came up with this simple method that takes just 25 minutes of active prep time. The healthy food components can be enjoyed for several days in power bowls, wraps, and even stirred into soups! Power bowls are so fun for family meals because you can switch up the veggies and toppings to suit each palate, giving kids control to build their own bowls. This recipe is also a handy make-ahead option if you’re having friends over for a meal. Simply chop all the veggies the night before and refrigerate them in containers. Just before your guests arrive, pop the veggies into the oven, cook the quinoa, and prep the toppings. After cooking, you can all have fun assembling your own power bowls and everyone will be super impressed by the stunning rainbow-coloured meal!
Yield
8 servings
Prep time
25 Minutes
Cook time
35 Minutes
Total time
1 Hour
Ingredients:
For the roasted veggies:
3 small (680 g) sweet potatoes, peeled and chopped (4 cups)
4 cups (500 g) brussels sprouts, trimmed and halved*
1 medium (800 g) cauliflower, chopped into small florets (4 heaping cups)
1 medium (230 g) red onion, peeled and chopped
2 large (500 g) red bell peppers, seeded and chopped
3 tablespoons (45 mL) extra-virgin olive oil, divided
Salt and pepper, to taste
For the quinoa:
2 cups (400 g) uncooked quinoa**
For the fresh veggies:
1 medium (370 g) English cucumber, chopped
1 medium (135 g) bunch green onions, chopped
2 cups (255 g) grape tomatoes (1 dry pint)
For the power bowl toppings:
Chopped lettuce/greens (Romaine, Iceberg, kale, etc)
Salad dressing***
Ripe avocados
Cooked beans or lentils
Nuts and seeds (I use hemp hearts and roasted pepitas)
Hummus or pesto
Directions:
Position two oven racks near the middle of the oven. Preheat the oven to 400°F (200°C) and line two extra-large (15- x 21-inches) rimmed baking sheets with parchment paper. It’s important to use extra-large baking sheets so there’s enough room for all those healthy veggies.
Divide the chopped, “to-be-roasted” veggies onto the baking sheets. Drizzle 1 1/2 tablespoons of oil over top each sheet and toss the veggies until they’re fully coated in the oil. Sprinkle generously with salt and pepper.
Roast the veggies for 30 to 40 minutes (I find 35 minutes is perfect in my oven for lightly charred veggies) until fork tender and golden. There’s no need to rotate/move the pans or flip the veggies halfway through baking unless you’re particular about even cooking.
While the veggies are roasting, add the quinoa to a large pot along with 3 1/2 cups (875 mL) water. Stir. Bring to a simmer over medium-high heat, then immediately reduce the heat to low-medium, cover with a tight-fitting lid, and cook for 12 to 14 minutes, until the water is absorbed and the quinoa is fluffy. Remove the lid and fluff the cooked quinoa with a fork.
While the quinoa cooks, chop the cucumber and green onions. Rinse the tomatoes (I hold off slicing them until just before serving).
Remove the roasted veggies from the oven. Once mostly cool, transfer all of the veggies and quinoa into containers, seal with airtight lids, and place into the fridge for up to 4 days.
To make the power bowls: Add a couple generous handfuls of chopped lettuce/greens to the bottom of a large shallow bowl. Drizzle with a bit of dressing and toss the lettuce/greens until coated. Top with spoonfuls of your prepped food (quinoa, roasted and fresh veggies)—I always warm up the quinoa and roasted veggies first! Now, add diced avocado, more salad dressing, cooked beans or lentils, nuts and seeds, and hummus or pesto. Keep the power bowl flavours interesting by changing up the toppings each day!
Tips:
* If your brussels sprouts are quite large, quarter them instead of halving.
** If you don't think you'll eat this much quinoa in 4 to 5 days, feel free to halve this amount (use 1 cup uncooked quinoa + 1.75 cups water).
*** Looking for a delicious homemade dressing? Try my Lemon-Tahini Dressing, Shake-and-Go Balsamic Vinaigrette (Oh She Glows Every Day, p. 273), or Roasted Garlic and Red Wine Vinaigrette. I always keep Maison Orphee Italian on hand when I don't have homemade dressing prepped.
Feel free to roast a head of garlic along with the veggies. The roasted cloves are especially delicious thrown into my Roasted Garlic and Red Wine Vinaigrette found in my Warm + Roasted Winter Salad Bowl recipe.
Make it nut-free: Top your bowl with seeds (such as roasted pepita seeds and hemp hearts) instead of nuts and make sure your dressing is nut-free.
Comments (0) | function fbs_click() {u=location.href;t=document.title;window.open('//www.facebook.com/sharer.php?u='+encodeURIComponent(u)+'&t='+encodeURIComponent(t),'sharer','toolbar=0,status=0,width=626,height=436'); return false;}Share on Facebook | Tweet | Pin It | Snapchat | Google+
© copyright 2019 Oh She Glows. All Rights Reserved.
via Oh She Glows
0 notes
Text
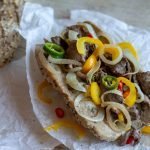
Philly Cheese Steak Sandwich with Quick Pickled Sweet and Spicy Peppers

This is not a classic Philly cheese steak recipe. A true cheese steak sandwich from Philadelphia is something exclusive to its location, save for a few rare sandwich shops speckled around the US. This leaves few options to those far from the north east corner of the country, and in particular, to those of us around the world who often are afflicted with an acute culinary homesickness for a bite of America. So, to alleviate such hunger we must adapt to our current situation.
When adaptation is the only way to fill a food craving, the idea isn’t to change everything, it’s to come as close to the sense memory of the best version you had in the past. If successful, that means you get something very close, but, more often than not, includes a bit of nostalgia as an unintended ingredient. If luck is with you, however, you may wind up with something different enough to allow it to be branded with new memories while keeping the essence of the original idea intact. This Philly cheese steak sandwich does just that.
It’s not an easy task to create a recipe that can accomplish that goal. The first step is to figure out what must be there, and how it can be shaped to be similar but different. For such a sandwich there are three main elements and, in this case, an extra that is not a “must have” but a highly suggested “should have”; meat, cheese, bread, and peppers.
Thinly sliced beef is first on that list, and while it can be substituted with other meats, it’s what the classic calls for. The classic does not call for the cheapest cut of beef you can find, which is often tough and chewy if not treated properly. So instead of the pricy traditional rib eye, I used an acidic, herby, marinade to break down the firm fibers of the meat into slices of tender lightly sweet but unquestionably savory sandwich meat.
Next is the cheese. Purists believe that only an orange oozing melted cheese or pale slices of provolone will do for a true Philly cheese steak sandwich. I always have been the provolone type, but it’s a rare find for me. Goat cheese, on the other hand, is always readily available. Slices of firm earthy goat cheese turn this from an almost-but-not-quite-right reminder of home into something that will satiate the sandwich craving.
Last of the fundamentals is the bread. This, for many, is what makes the Philly cheese steak sandwich authentic. Unfortunately, the amoroso roll isn’t available to the hungry masses outside of that area usually. I fully believe they’d be a fantastic addition if they weren’t so scarce, but I found a substitute that works and probably help to make this less likely to create a longing for the old times. Crusty on the outside, soft on the inside, whole wheat hoagie type rolls do the trick. They soak up the steam from the hot meat while cooking, and soak up the juices without falling apart.
The cherry, or rather pepper, on top is a handful of quickly prepared hot and sweet pickled peppers. These take less than 5 minutes to make and the combo of sweet, sour, crunchy, and spicy elevates and pulls together the rest of the sandwich in a way that truly makes it stand out from the classic it originated from.
If all of that doesn’t make you want to try your hand at creating something new, but still inspired heavily from something old, I don’t know what will!
Philly Cheese Steak Sandwich with Quick Pickled Sweet and Spicy Peppers
Prep Time 6 hours
Cook Time 15 minutes
Total Time 6 hours 15 minutes
Servings 4
Ingredients
Beef Marinade
4
cloves
garlic
1
sprig fresh rosemary
2
sprigs fresh oregano
3
leaves
fresh basil
1
lemon
¼
cup
Worcestershire sauce
3
tablespoons
olive oil
1½
teaspoons
ground black pepper
1
pound
beef steak or roast
Pickled Peppers
1
yellow bell pepper
2
mini green bell peppers
2
red jalapeno peppers
½
cup
white vinegar
2
tablespoons
olive oil
1
tablespoon
sugar
1
teaspoon
salt
Sandwich
2-3
tablespoons
olive oil
4
slices
of goat cheese or provolone
1
white onion
4
whole wheat hoagie roll
4
tablespoons
mayonnaise
Instructions
Beef marinade
Peel and crush the garlic on a cutting board with the flat side of a chef’s knife. Cut the lemon in half and squeeze out the juice. Wash the rosemary and oregano well and shake off any excess water. Stack the basil leaves and roughly chop them.
Put the beef into a sealable bag and add in the lemon juice, Worcestershire sauce, olive oil, black pepper, garlic cloves, rosemary, oregano, and basil into the bag. Seal the bag, pushing as much air as possible out beforehand, and shake to coat the beef with the marinade.
Allow it to marinate in the refrigerator 6-8 hours or overnight.
Pickled Peppers
Remove the stems from all of the peppers and thinly slice the bell peppers. Carefully thinly slice the jalapenos, making sure not to touch the white pith or seeds with bare hands. Put the sliced peppers into a bowl.
Add the white vinegar, olive oil, sugar, and salt to the bowl and mix well with tongs or spoon. Cover and refrigerate at least 10 minutes to overnight.
Sandwich
2½ hours before cooking, transfer the marinating beef to the freezer to harden. Remove the beef from the freezer after 1 hour.
Lay the firm beef on a cutting board and with a sharp knife, slice the beef into thin strips. Put the sliced beef into a bowl.
Peel and cut the onion into thin rounds and add it to the bowl with the beef. Cover the bowl and return the bowl to the refrigerator to thaw. 30 minutes before cooking, remove the bowl from the refrigerator, keeping it covered, let the beef thaw the rest of the way while preparing the rest of the ingredients for the sandwich.
Cut the hoagie rolls 3/4ths of the way through lengthwise, lay out the cheese, and take out the pickled peppers to have them ready before cooking the meat.
Heat the olive oil in a sauté pan over medium-high heat. Add the sliced onions and cook 2-3 minutes.
Add the beef slices to the pan, in batches if necessary, in a single layer and cook 4-5 minutes, stirring to keep them from sticking to the bottom of the pan as they cook and to mix them with the onions.
When the beef is almost done, lay a slice of the cheese on each portion of meat. Spread the mayonnaise on the inside of the bread and lay it open on top of the cheese. Allow it to cook 2 more minutes and, using a spatula, pick up the sandwich and close the bread around the meat.
Transfer the sandwich to a cutting board and top it with the pickled peppers. Serve immediately.
Notes
Spice, isn’t your thing? Remove the seeds and white pith from the jalapenos or leave them out entirely!
STEP ONE – PREPARE THE MARINADE

Place the garlic on a cutting board and lay a chef’s knife on top of a clove. Press down on the knife, crushing the garlic between the blade and the cutting board and trim off the root end. Cut the lemon in half and remove any seeds. Squeeze the juice from each half of the lemon into a bowl. Run cold water over the rosemary and oregano to remove any dirt or debris then shake off the water. Roughly chop the basil leaves.
STEP TWO – MARINATE THE BEEF

Put the beef into a sealable bag and add in the garlic, herbs, Worcestershire sauce, lemon juice, olive oil, and black pepper. Seal the bag and massage the meat around with your fingers to coat it well.
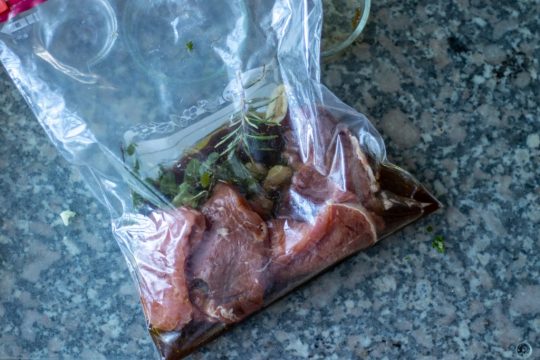
Put the bag in another container and place it in the refrigerator to marinate at least 6 hours to overnight.
STEP THREE – PREPARE THE PEPPERS

Cut the tops off the peppers and remove the stems. Cut the yellow pepper into thin strips and the green peppers into thin rounds. Carefully remove the stems from the red jalapeno peppers and thinly slice them into rounds, making sure not to touch the white membrane inside or the seeds with bare hands. Use gloves if necessary.
STEP FOUR – PICKLE THE PEPPERS

Put all of the sliced peppers into a bowl and add the vinegar, olive oil, sugar, and salt to it and stir well. Cover the bowl and refrigerate until ready to use.
STEP FIVE – FREEZE THE BEEF AND SLICE IT

Remove the marinating beef to the freezer about 2 ½ hours before cooking to firm it up before slicing. After 1 hour, it should be firm enough.
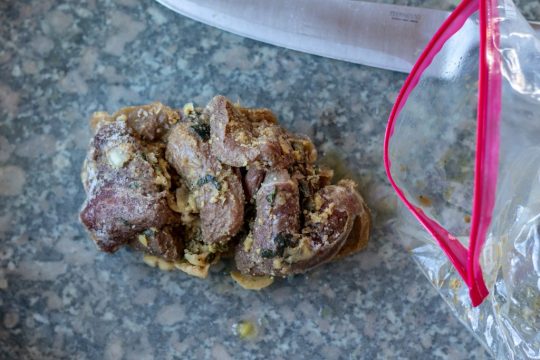
Put the hardened meat on a cutting board and slice it as thinly as possible with a sharp knife. Transfer it into a medium sized bowl.
STEP SIX – CUT THE ONIONS

Peel the onion and cut the root end off. Slice the onion into thin rounds and add it to the bowl with the beef.
STEP SEVEN – ALLOW THE BEEF TO THAW

Cover the bowl and place it back into the refrigerator thaw some more. Remove the bowl from the refrigerator about 30 minutes before cooking to let the meat finish thawing, but keep it covered.
STEP EIGHT – PREPARE THE SANDWICH INGREDIENTS
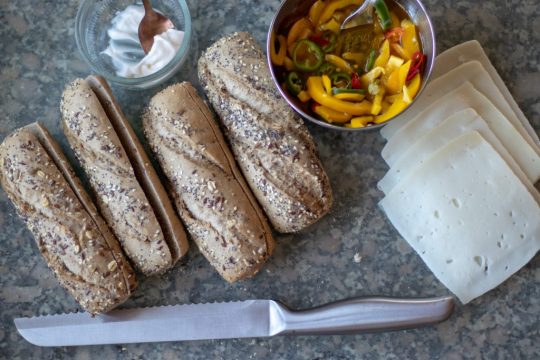
Lay the bread on a cutting board and using a serrated bread knife, cut down the length of it about 3/4ts of the way through so that that one side is still attached. Lay the cheese on the cutting board for easy access while cooking the beef and remove the pickled peppers from the refrigerator.
STEP NINE – COOK THE ONIONS

Pour the olive oil into a sauté pan and heat it over medium-high. Toss the onions into the pan and sauté them for a couple of minutes.
STEP TEN – COOK THE BEEF
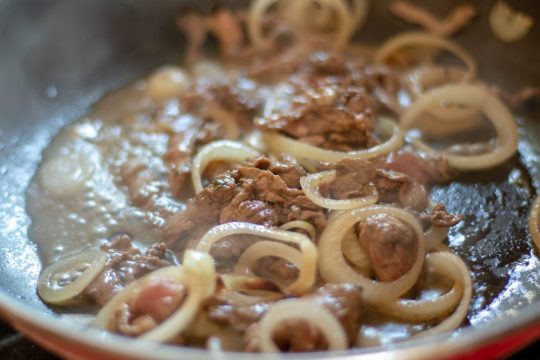
Add the beef slices in a single layer to the hot pan, sauté them, and mix them with the onions as they cook.
STEP ELEVEN – ADD THE CHEESE TO THE BEEF

Divide the beef into portions and lay a slice of cheese on top of each and let it melt slightly.
STEP TWELVE – ADD THE BREAD TO THE BEEF AND CHEESE
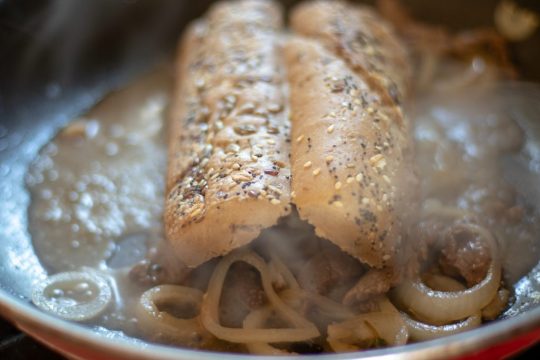
Spread mayonnaise on the inside of the bread before laying it, inside down, on top of the cheese and beef. Allow the bread to sit on top a couple of minutes to soak up the steam before picking it up with a spatula and turning it over to rest on a cutting board.
STEP THIRTEEN – ADD THE PEPPERS TO THE SANDWICH
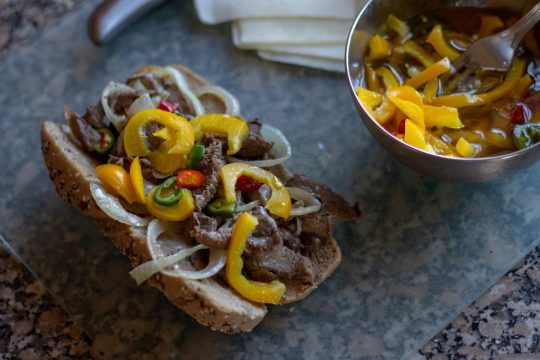
Add the pickled peppers on top of the sandwich and serve them immediately.
This sandwich isn’t the classic Philly cheese steak, but it is taken from the same idea and uses the same elements in a new way!
How would you make this your way? Mushrooms instead of beef? Use all sweet peppers or a mixture of different varieties of spicy ones for pickling? You’re favorite bread perhaps? Let us know!
Let's block ads! (Why?)
Read the full article
#bacon#baking#cooking#Food#Foodie#foodporn#Grilled#igotthatfire#jenreviews#loveoffood#Recipes#Smoked
0 notes
Text
Meal Prep Week-Long Power Bowls
You’ve probably seen the meal prep trend online where dozens and dozens of meals are prepped in containers for the entire week? Holy moly. I can say that will probably never be me. I once tried an over-ambitious meal prep and not only did I end up with way too much food, but it took up most of my day.
On the flip side, I’ve realized that my veggie intake falls pretty flat when I don’t do any prep at all.
Soooo….there has to be a happy medium!?
This little dilemma is exactly why I came up with a simple plan that totally fits into my life these days. The recipe below (which is totally customizable!) takes less than 30 mins of active prep time, but makes enough food for several portions, increasing the odds that you’ll be a veggie powerhouse for the workweek. *arm flex* I love how I can quickly reheat a couple things and build a hearty, nutritious bowl in a matter of minutes!
My meal prep method has been going like this:
Roast two huge sheets of veggies
Cook a grain
Chop a couple fresh veggies (sometimes I skip this if I’m tight on time)
Have toppings on hand, ready-to-roll—things like avocado, nuts/seeds, beans, dressing, etc.
This method has dramatically changed my meals in recent weeks (specifically, lunches) and increased my veggie consumption a ton. All of the ingredients can be changed up so it never has to be repetitive and you can be flexible with using what you have in your fridge/pantry. It helps cut down waste because you can easily use up those “on the verge of dying” veggies in your crisper. Just throw ‘em in the oven and roast the heck out of ‘em! And if you get tired of bowls, throw the prepped food into delicious wraps or even soups/stews.
If you’re feeling extra-ambitious and want to prep even more food, I’d recommend adding one or more of the following tasty items:
Homemade dressing (try my Lemon-Tahini Dressing, Shake-and-Go Balsamic Vinaigrette from Oh She Glows Every Day, p. 273, or Roasted Garlic and Red Wine Vinaigrette)
Energy bites/balls (such as my Chocolate Hemp or Triple Almond Energy Balls)
Soup/stew
Chia pudding (lately I’ve been making a double-batch of my 2-Ingredient Chia Pudding found in the new “Blissed Out Breakfast Bowls” recipe in the app! Such a perfect snack.)
I’ve provided a detailed recipe below because it helps to have something to work from the first time, but like I said, feel free to run with it. If you simply commit to roasting 2 big sheets of veggies, cook a grain, and chop some fresh veggies….you’ll be well on your way to making easy throw-together power bowls all week long. My future hangry self has been thanking me a lot.
Before I go, I want to mention that The Oh She Glows Recipe App is still on sale for 99 cents in the Apple iTunes Store until mid-March! You’ll find these delicious power bowls in there, as well as more than 160 of my favourite plant-based recipes (this number includes 30 app exclusive recipes too). Happy cooking :)
Meal Prep Week-Long Power Bowls
Vegan, gluten-free, nut-free, refined sugar-free, soy-free
I love having prepped food in the fridge, but don’t love doing hours of meal prep each week. So I came up with this simple method that takes just 25 minutes of active prep time. The healthy food components can be enjoyed for several days in power bowls, wraps, and even stirred into soups! Power bowls are so fun for family meals because you can switch up the veggies and toppings to suit each palate, giving kids control to build their own bowls. This recipe is also a handy make-ahead option if you’re having friends over for a meal. Simply chop all the veggies the night before and refrigerate them in containers. Just before your guests arrive, pop the veggies into the oven, cook the quinoa, and prep the toppings. After cooking, you can all have fun assembling your own power bowls and everyone will be super impressed by the stunning rainbow-coloured meal!
Yield
8 servings
Prep time
25 Minutes
Cook time
35 Minutes
Total time
1 Hour
Ingredients:
For the roasted veggies:
3 small (680 g) sweet potatoes, peeled and chopped (4 cups)
4 cups (500 g) brussels sprouts, trimmed and halved*
1 medium (800 g) cauliflower, chopped into small florets (4 heaping cups)
1 medium (230 g) red onion, peeled and chopped
2 large (500 g) red bell peppers, seeded and chopped
3 tablespoons (45 mL) extra-virgin olive oil, divided
Salt and pepper, to taste
For the quinoa:
2 cups (400 g) uncooked quinoa**
For the fresh veggies:
1 medium (370 g) English cucumber, chopped
1 medium (135 g) bunch green onions, chopped
2 cups (255 g) grape tomatoes (1 dry pint)
For the power bowl toppings:
Chopped lettuce/greens (Romaine, Iceberg, kale, etc)
Salad dressing***
Ripe avocados
Cooked beans or lentils
Nuts and seeds (I use hemp hearts and roasted pepitas)
Hummus or pesto
Directions:
Position two oven racks near the middle of the oven. Preheat the oven to 400°F (200°C) and line two extra-large (15- x 21-inches) rimmed baking sheets with parchment paper. It’s important to use extra-large baking sheets so there’s enough room for all those healthy veggies.
Divide the chopped, “to-be-roasted” veggies onto the baking sheets. Drizzle 1 1/2 tablespoons of oil over top each sheet and toss the veggies until they’re fully coated in the oil. Sprinkle generously with salt and pepper.
Roast the veggies for 30 to 40 minutes (I find 35 minutes is perfect in my oven for lightly charred veggies) until fork tender and golden. There’s no need to rotate/move the pans or flip the veggies halfway through baking unless you’re particular about even cooking.
While the veggies are roasting, add the quinoa to a large pot along with 3 1/2 cups (875 mL) water. Stir. Bring to a simmer over medium-high heat, then immediately reduce the heat to low-medium, cover with a tight-fitting lid, and cook for 12 to 14 minutes, until the water is absorbed and the quinoa is fluffy. Remove the lid and fluff the cooked quinoa with a fork.
While the quinoa cooks, chop the cucumber and green onions. Rinse the tomatoes (I hold off slicing them until just before serving).
Remove the roasted veggies from the oven. Once mostly cool, transfer all of the veggies and quinoa into containers, seal with airtight lids, and place into the fridge for up to 4 days.
To make the power bowls: Add a couple generous handfuls of chopped lettuce/greens to the bottom of a large shallow bowl. Drizzle with a bit of dressing and toss the lettuce/greens until coated. Top with spoonfuls of your prepped food (quinoa, roasted and fresh veggies)—I always warm up the quinoa and roasted veggies first! Now, add diced avocado, more salad dressing, cooked beans or lentils, nuts and seeds, and hummus or pesto. Keep the power bowl flavours interesting by changing up the toppings each day!
Tips:
* If your brussels sprouts are quite large, quarter them instead of halving.
** If you don't think you'll eat this much quinoa in 4 to 5 days, feel free to halve this amount (use 1 cup uncooked quinoa + 1.75 cups water).
*** Looking for a delicious homemade dressing? Try my Lemon-Tahini Dressing, Shake-and-Go Balsamic Vinaigrette (Oh She Glows Every Day, p. 273), or Roasted Garlic and Red Wine Vinaigrette. I always keep Maison Orphee Italian on hand when I don't have homemade dressing prepped.
Feel free to roast a head of garlic along with the veggies. The roasted cloves are especially delicious thrown into my Roasted Garlic and Red Wine Vinaigrette found in my Warm + Roasted Winter Salad Bowl recipe.
Make it nut-free: Top your bowl with seeds (such as roasted pepita seeds and hemp hearts) instead of nuts and make sure your dressing is nut-free.
Comments (4) | function fbs_click() {u=location.href;t=document.title;window.open('//www.facebook.com/sharer.php?u='+encodeURIComponent(u)+'&t='+encodeURIComponent(t),'sharer','toolbar=0,status=0,width=626,height=436'); return false;}Share on Facebook | Tweet | Pin It | Snapchat | Google+
© copyright 2019 Oh She Glows. All Rights Reserved.
Meal Prep Week-Long Power Bowls published first on https://wittooth.tumblr.com/
0 notes
Text
Meal Prep Week-Long Power Bowls
You’ve probably seen the meal prep trend online where dozens and dozens of meals are prepped in containers for the entire week? Holy moly. I can say that will probably never be me. I once tried an over-ambitious meal prep and not only did I end up with way too much food, but it took up most of my day.
On the flip side, I’ve realized that my veggie intake falls pretty flat when I don’t do any prep at all.
Soooo….there has to be a happy medium!?
This little dilemma is exactly why I came up with a simple plan that totally fits into my life these days. The recipe below (which is totally customizable!) takes less than 30 mins of active prep time, but makes enough food for several portions, increasing the odds that you’ll be a veggie powerhouse for the workweek. *arm flex* I love how I can quickly reheat a couple things and build a hearty, nutritious bowl in a matter of minutes!
My meal prep method has been going like this:
Roast two huge sheets of veggies
Cook a grain
Chop a couple fresh veggies (sometimes I skip this if I’m tight on time)
Have toppings on hand, ready-to-roll—things like avocado, nuts/seeds, beans, dressing, etc.
This method has dramatically changed my meals in recent weeks (specifically, lunches) and increased my veggie consumption a ton. All of the ingredients can be changed up so it never has to be repetitive and you can be flexible with using what you have in your fridge/pantry. It helps cut down waste because you can easily use up those “on the verge of dying” veggies in your crisper. Just throw ‘em in the oven and roast the heck out of ‘em! And if you get tired of bowls, throw the prepped food into delicious wraps or even soups/stews.
If you’re feeling extra-ambitious and want to prep even more food, I’d recommend adding one or more of the following tasty items:
Homemade dressing (try my Lemon-Tahini Dressing, Shake-and-Go Balsamic Vinaigrette from Oh She Glows Every Day, p. 273, or Roasted Garlic and Red Wine Vinaigrette)
Energy bites/balls (such as my Chocolate Hemp or Triple Almond Energy Balls)
Soup/stew
Chia pudding (lately I’ve been making a double-batch of my 2-Ingredient Chia Pudding found in the new “Blissed Out Breakfast Bowls” recipe in the app! Such a perfect snack.)
I’ve provided a detailed recipe below because it helps to have something to work from the first time, but like I said, feel free to run with it. If you simply commit to roasting 2 big sheets of veggies, cook a grain, and chop some fresh veggies….you’ll be well on your way to making easy throw-together power bowls all week long. My future hangry self has been thanking me a lot.
Before I go, I want to mention that The Oh She Glows Recipe App is still on sale for 99 cents in the Apple iTunes Store until mid-March! You’ll find these delicious power bowls in there, as well as more than 160 of my favourite plant-based recipes (this number includes 30 app exclusive recipes too). Happy cooking :)
Meal Prep Week-Long Power Bowls
Vegan, gluten-free, nut-free, refined sugar-free, soy-free
I love having prepped food in the fridge, but don’t love doing hours of meal prep each week. So I came up with this simple method that takes just 25 minutes of active prep time. The healthy food components can be enjoyed for several days in power bowls, wraps, and even stirred into soups! Power bowls are so fun for family meals because you can switch up the veggies and toppings to suit each palate, giving kids control to build their own bowls. This recipe is also a handy make-ahead option if you’re having friends over for a meal. Simply chop all the veggies the night before and refrigerate them in containers. Just before your guests arrive, pop the veggies into the oven, cook the quinoa, and prep the toppings. After cooking, you can all have fun assembling your own power bowls and everyone will be super impressed by the stunning rainbow-coloured meal!
Yield
8 servings
Prep time
25 Minutes
Cook time
35 Minutes
Total time
1 Hour
Ingredients:
For the roasted veggies:
3 small (680 g) sweet potatoes, peeled and chopped (4 cups)
4 cups (500 g) brussels sprouts, trimmed and halved*
1 medium (800 g) cauliflower, chopped into small florets (4 heaping cups)
1 medium (230 g) red onion, peeled and chopped
2 large (500 g) red bell peppers, seeded and chopped
3 tablespoons (45 mL) extra-virgin olive oil, divided
Salt and pepper, to taste
For the quinoa:
2 cups (400 g) uncooked quinoa**
For the fresh veggies:
1 medium (370 g) English cucumber, chopped
1 medium (135 g) bunch green onions, chopped
2 cups (255 g) grape tomatoes (1 dry pint)
For the power bowl toppings:
Chopped lettuce/greens (Romaine, Iceberg, kale, etc)
Salad dressing***
Ripe avocados
Cooked beans or lentils
Nuts and seeds (I use hemp hearts and roasted pepitas)
Hummus or pesto
Directions:
Position two oven racks near the middle of the oven. Preheat the oven to 400°F (200°C) and line two extra-large (15- x 21-inches) rimmed baking sheets with parchment paper. It’s important to use extra-large baking sheets so there’s enough room for all those healthy veggies.
Divide the chopped, “to-be-roasted” veggies onto the baking sheets. Drizzle 1 1/2 tablespoons of oil over top each sheet and toss the veggies until they’re fully coated in the oil. Sprinkle generously with salt and pepper.
Roast the veggies for 30 to 40 minutes (I find 35 minutes is perfect in my oven for lightly charred veggies) until fork tender and golden. There’s no need to rotate/move the pans or flip the veggies halfway through baking unless you’re particular about even cooking.
While the veggies are roasting, add the quinoa to a large pot along with 3 1/2 cups (875 mL) water. Stir. Bring to a simmer over medium-high heat, then immediately reduce the heat to low-medium, cover with a tight-fitting lid, and cook for 12 to 14 minutes, until the water is absorbed and the quinoa is fluffy. Remove the lid and fluff the cooked quinoa with a fork.
While the quinoa cooks, chop the cucumber and green onions. Rinse the tomatoes (I hold off slicing them until just before serving).
Remove the roasted veggies from the oven. Once mostly cool, transfer all of the veggies and quinoa into containers, seal with airtight lids, and place into the fridge for up to 4 days.
To make the power bowls: Add a couple generous handfuls of chopped lettuce/greens to the bottom of a large shallow bowl. Drizzle with a bit of dressing and toss the lettuce/greens until coated. Top with spoonfuls of your prepped food (quinoa, roasted and fresh veggies)—I always warm up the quinoa and roasted veggies first! Now, add diced avocado, more salad dressing, cooked beans or lentils, nuts and seeds, and hummus or pesto. Keep the power bowl flavours interesting by changing up the toppings each day!
Tips:
* If your brussels sprouts are quite large, quarter them instead of halving.
** If you don't think you'll eat this much quinoa in 4 to 5 days, feel free to halve this amount (use 1 cup uncooked quinoa + 1.75 cups water).
*** Looking for a delicious homemade dressing? Try my Lemon-Tahini Dressing, Shake-and-Go Balsamic Vinaigrette (Oh She Glows Every Day, p. 273), or Roasted Garlic and Red Wine Vinaigrette. I always keep Maison Orphee Italian on hand when I don't have homemade dressing prepped.
Feel free to roast a head of garlic along with the veggies. The roasted cloves are especially delicious thrown into my Roasted Garlic and Red Wine Vinaigrette found in my Warm + Roasted Winter Salad Bowl recipe.
Make it nut-free: Top your bowl with seeds (such as roasted pepita seeds and hemp hearts) instead of nuts and make sure your dressing is nut-free.
Comments (0) | function fbs_click() {u=location.href;t=document.title;window.open('//www.facebook.com/sharer.php?u='+encodeURIComponent(u)+'&t='+encodeURIComponent(t),'sharer','toolbar=0,status=0,width=626,height=436'); return false;}Share on Facebook | Tweet | Pin It | Snapchat | Google+
© copyright 2019 Oh She Glows. All Rights Reserved.
Meal Prep Week-Long Power Bowls published first on https://brightendentalhouston.tumblr.com/
0 notes
Last Seen Blogs

brinch29dissing
The Life of Farrell 501

sunnycosmology
Cosmology (S) (BuGs)

hotelsidhv
hotelsidhvedantha

justanothersad-depressedgirl
I’m A Sad Girl
29/‘95 Baby
She/Her

zariyahfiyahofficial
Femme On Fire