#but my quads and calves are making their complaints known
Text
My Hardboot Splitboard Setup
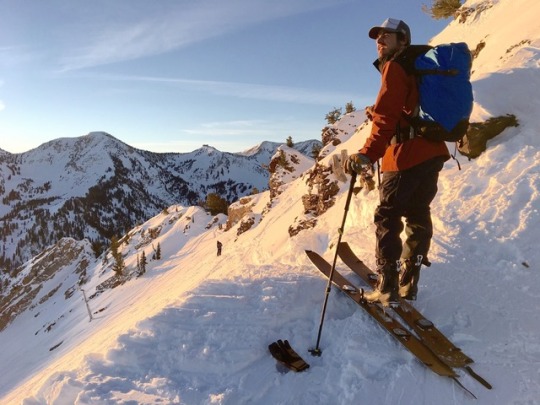
After a lot of research and pondering I decided to switch to a hardboot splitboard setup last April. Unfortunately there has turned out to be very little information on the subject, and diving into this whole hardboot world has proven to be quite the experience in tinkering and problem solving. I try to be an intentional as possible with my gear purchases and decisions, and building out my current setup has been exactly that. I realize that there is so little information out there regarding all this stuff, I figured I would share some of my thoughts on how I ended up with the setup I have now.
The obvious first question was why hardboots? This is a complicated answer and the reasons are many. My personal reasons are as follows:
- Uphill efficiency, significantly less weight swinging on feet each step
- Walk mode comfort while skinning, longer strides
- Lateral stability on the uphill for sidehilling and skinning confidence
- General weight saving
- Speed of transitions
- Crampon compatibility, mountaineering ability
- Lack of suitable suitable/appealing soft boot options
- Downhill sacrifice vs uphill sacrifice
- Never extremely impressed with downhill comfort of normal split bindings
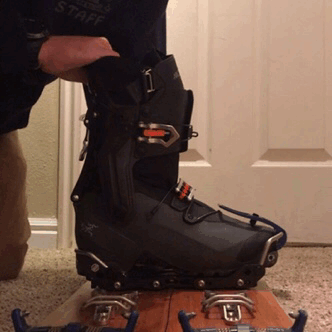
Once I decided on hardbooting was the way to go, it has been a very long road to actually getting to a point where I can see the advantage. Things have finally come together after months of research, modding, setting up, testing, more modding and more adjusting. Here is my setup as it is now:
My Current setup includes:
-Arc’teryx Procline Boots (lite version, the non carbon ones)
- Spark R & D tech toes
- Spark R & D canted pucks
- Spark R & D Dyno DH bindings
- Jones Hovercraft 156cm
-Jones Pro Skins
- Phantom Heel risers
- Phantom Hercules Hooks
The Board/skins:
This is the least unique part of the setup. It’s simply a rad board that rips and is playful. The skins work great and didn't need to be trimmed at all. Jones has a nice proprietary tail clip/hook for the skins which is really simple to use and is lighter than a lot of other ski tail clip options out there. The only complaint I would have is that the skins don’t grip quite as much on really steep stuff compared to other High traction skins that I have used.
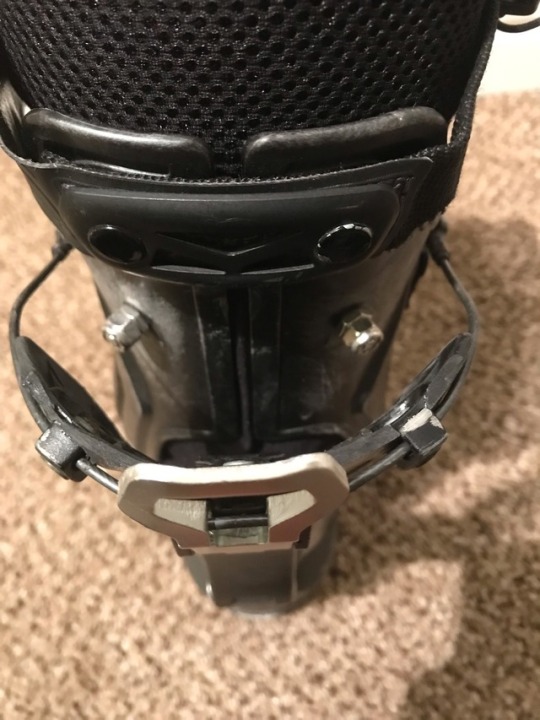
The Boots:
Upon first thinking about hardboots, I tried find as much info as possible about splitboard hardboots online; there was not much out there. I quickly realized my boot options were narrowed down to the Dynafit TLT6 and the Arc’Teryx Procline. The TLT6 has been a go to boot for boarders for a long time now, although pretty significant mods were needed to make them work better. I was able to go try on both the TLT6s and the Proclines, and my decision was pretty easy as soon as I tried both boots on. The Proclines felt significantly better in every way compared to the TLT6. The Proclines felt lighter, there was a much more free feeling walk mode, and the flexing seemed to be more beneficial to snowboarding. The boots split cuff works really well for snowboarding, with far less material above the ankle compared to the TLT6. Even out of the box, the boots felt in the range of being able to ride with. I knew mods would probably be necessary, but I wanted to ride in them to get an idea of the extent of mod needed. I thought about the carbon version of the Proclines, but they apparently weren't actually any lighter than the normal version. Plus the carbon version was apparently stiffer than the plastic version, and stiffness is the opposite of what I needed for snowboarding. Plus, saving a couple hundred dollars wasn't bad either. I also went with the “Lite” liner over the “support” liner. The Lite liner is thinner and less stiff than the support liner. Again stiffness is less important for snowboarding, so it was better to go with the lighter, more flexible, less stiff option.
I only had one serious concern with the Proclines, and it is a well established issue. The toe bail on the Proclines is very small and less than ideal for purchase with a splitboard binding. The general shape of the toe and its low profile has also been known to cause problems with certain bindings. There are some solutions out there to remedy this concern. I reached out to Phantom Splitboard bindings about the ability for Proclines to fit in their system, and they said it was possible with an extended set screw.
The Bindings:
Everyone in the hardboot splitboard world points to Phantoms as the go to choice. I was really interested in their system and did a lot of research on it. The shape of their toe bail connector was still suspect for me with the shape of the toe on the Procline boot. They assured me it would work, but from pictures and posts I saw, you would have to set the front angle quite high to accommodate the lack of purchase on the front. The security and confidence of that connection is super important, as it would be very bad if that failed. One more negative of the Phantom system is the inability to add a cant to the setup. Having a canted stance is something that was important to me with hardboots. With already limited flex, especially laterally, the ability to have a canted stance would really help with comfort and board control.
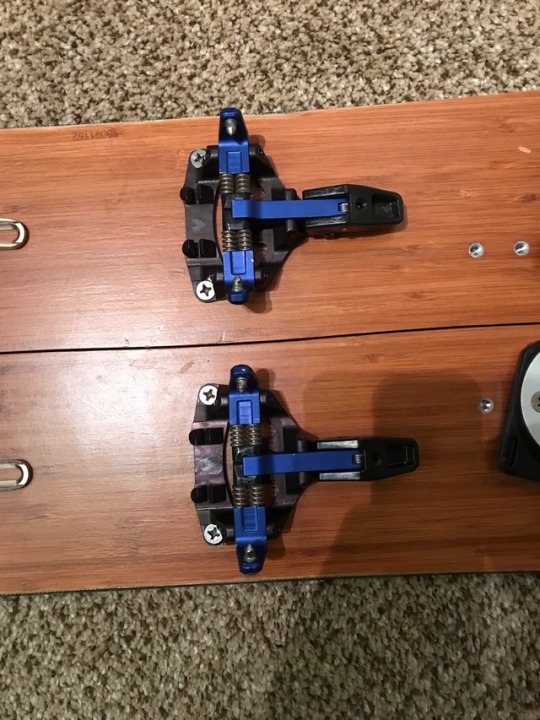
Enter the Spark R&D Dyno DH binding:
I was able to find some information on the 2019 Spark Dyno DH binding and the improvements and possibility made it a real contender for me personally. Spark had created a toe connector out of metal that was lower profile and fit the shape of the Procline much better than that of the Phantom. No odd set screw rigging was necessary. The Sparks are also compatible with their canted pucks. The bindings just slide in and click in just like the Tesla T1 binding system that I was previously riding. They are easy to transition and seem to clear snow well. Although every single ounce isn't super important to me and I am not sure on exact weight, but I remember reading somewhere that the Spark bindings are actually slightly lighter than the Phantom setup. There is certainly not a weight disadvantage in the Spark system. The setup for these bindings was also a process. The amount of adjustments to accommodate different sole lengths are a lot, but the instructions do make it pretty clear as to what you need to do. I was unfortunately right between 2 recommended lengths, so I had to do a mix of adjustments to get my boot to fit. Once they are dialed the bindings are solid, just don’t expect to rip right out the box.

Spark R&D Tech Toe:
It was rad to see Spark manufacture in house a splitboard specific tech toe. This is another step towards hardboots becoming more accepted in the splitboarding world. The quality of construction is great and it is nice to not have to use an adaptor plate in order to use a dynafit tech toe. This is truly the best option on the market for boarders as evidenced with Phantom partnering with Spark to make a co-branded version. I have the Spark version because the anodized blue looks cool and matched the Dynos and no other reason.
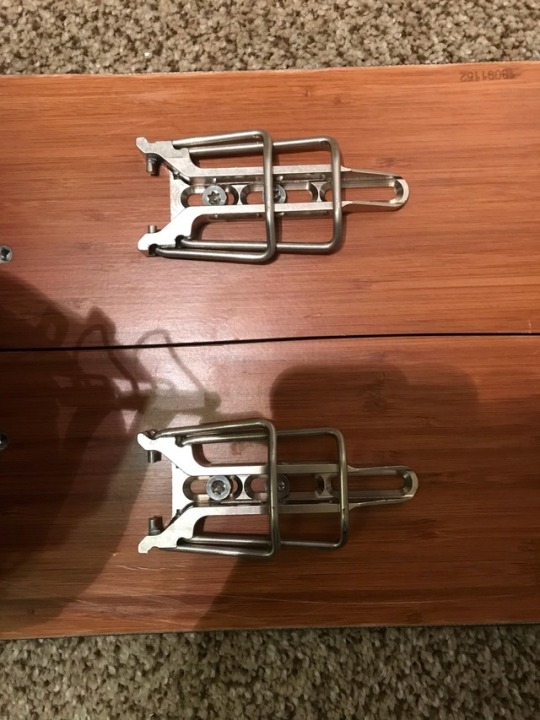
Phantom Hercules Hooks:
These hooks are super simple and really low profile. Having a static hook option is really appealing after dealing with other options flapping around and working to varying levels of success out in the field. I am all about the elimination of moving parts if possible, and Phantom came up with a bomber setup that just works. These things are super light and crank down the board great. The setup on these was quite a process of dialing in though. It took a lot to get the right tension for keeping the board tight vs being able to actually get the board apart. Once its dialed it is great and you don’t have to worry about it at all out in the field.
Phantom Heel risers:
These machined pieces are exactly what you want in a heel riser. They are well built, and solidly constructed out of metal. I can easily rise both levels with a pole. These things just work. The one wish I have with these is a simpler/ better solution for split skiing. They currently recommend looping a voile strap around the riser and your foot. While that would work, it does not seem like the kind of elegant solution that I have come to expect from Phantom. Hopefully Phantom or Spark can figure out something better there.
Boot mods:
I rode in the boots once completely stock and made some clear conclusions. They are great on the uphill. The walk more in the Proclines is leaps and bounds better than any snowboard boot out there and most ski boots really. The lateral stability while edging finally gave the splitboard the same stability that skiers take for granted and splitboarders yearn for. I left all the buckles loose on the way up which helped with more flexibility. On the downhill the boots performed better than expected with no mods at all. It was clear that the forward lean was way to severe for any comfortable riding. I ride my resort board with 0 forward lean, so the angle of the ski boots was aggressive on the calves and quads. The lateral stability was acceptable and the boots just rode like a really responsive soft boot.
I had to do a lot of thinking and staring at the boots in order to figure out how to decrease the forward lean as well as accommodate for forward flex. The Proclines have specific system for locking the boots in ski mode and adjusting the angle of this adjustment by even just a few degrees was going to make all the difference. The boot needed to flex backwards a few degrees while still being able to flex to a forward position about equal to where it sits stock.
Warning: doing any of these mods will void the warranty of your boots. None of this is approved by the manufacturer. This is what I did to my boots, but most people will find a solution that works for them. I just want to provide more info for people who want to get an idea of what can be done to mod the Proclines.
To achieve this I had to make a few adjustments:
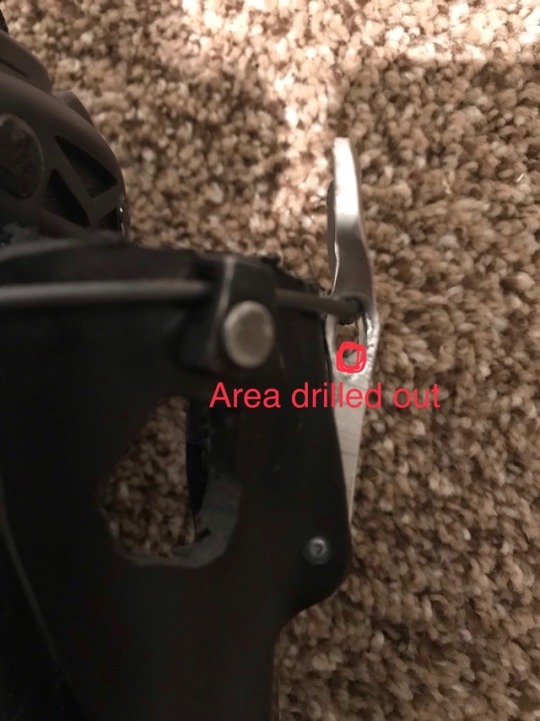
1. Cut off/ grind down the rectangle on the inner cuff that sits inside the hole for the outer cuff when in ski mode.
2. Sand/grind down the top of the outer cuff on the top of the back. As the boot flexes backwards this part hits the strap/ plastic area above it, thus stopping the boot from flexing further back. I grinded down this area as much as I could before running into other functional hardware.
3. Dremel out the outer cuff hole to a larger size. Specifically the bottom edge of the rectangle shaped hole on both the left and right side. I took about a 1/4 inch of material off here.
4. Sand the lip down of the inside cuff on the side to allow the outer cuff to slide over it.
5. Drill out a larger hole for the wire to go through on the metal switch. This allows the spot where the boot stops going back to be further. This could be done by replacing the entire wire with a piece of paracord and lengthening it compared to the length of the wire. I did not want to go through that process and a piece of paracord would have much more flex in it (which might be better for flex, although I am not convinced). I might eventually go to a paracord for this piece, but for now this setup is working. I took maybe an 1/8 of an inch off of the hole. This might seem like a small amount, but it makes all the difference in allowing the boot to articulate further back.
6. Drill a hole on the top edge of where the old rectangle used to be on the inner cuff. I put a #8 bolt through the hole with about ⅜” sticking out the outside. I put a lock washer on the inside and a lock nut plus one regular nut on the outside. The space above the bolt will be the forward flex amount, and the space below the bolt will be the max the boot will be able to flex back. I found that I have to really weight the boot backwards in order to get close to the max backwards lean. I put a bolt on each of the inside and outside holes. I tried just one bolt on the outside and it actually provided a lot more lateral flex by doing so. I think it was actually too much lateral flex even, as it felt some control might have been sacrificed there as well as risk of the split cuff failing due to too much flex in a way it is not intended to flex at all.
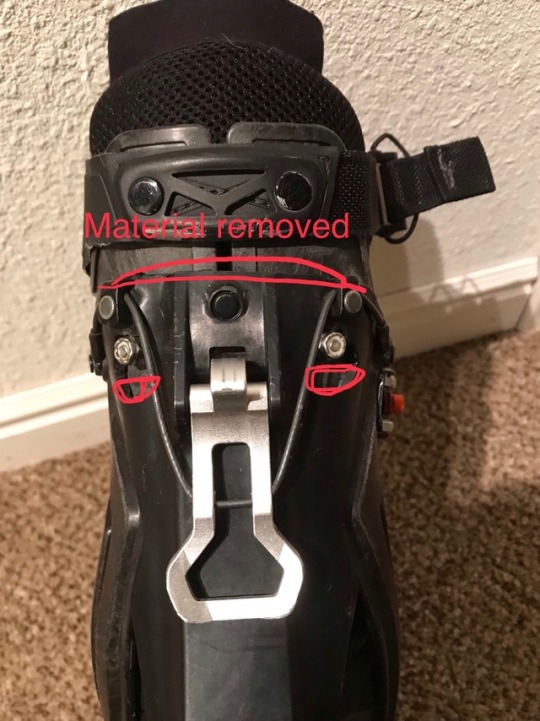

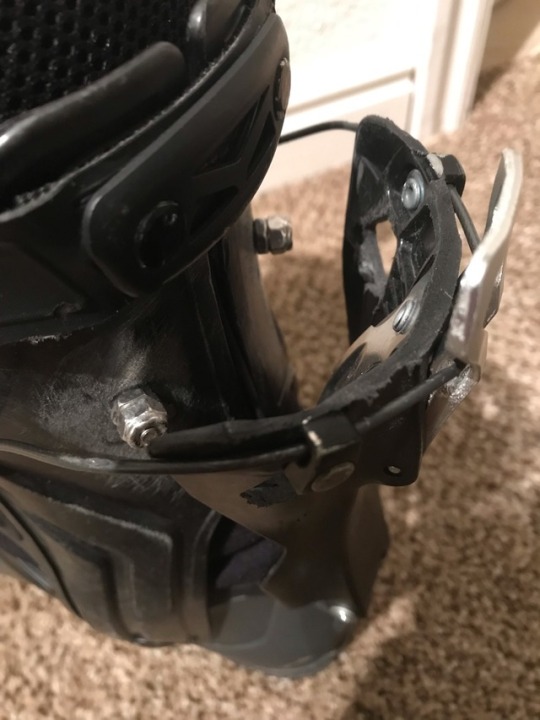
As my boots are now I would say that the minimum forward lean is probably about 1 or 2 degrees, not the 0 I have at the resort, but well within the comfortable range for riding. This is probably compared to at least 3 or 4 degrees as the boot is stock. The flex amounts much better replicated a soft boot and high back. I think I would still like to be a little bit further back for the lean, but I can continue that evolution after some more testing. As mentioned before the lateral flex of the boot is quite good out of the box. This mod actually helps a little bit with lateral flex too. The amount of room the bolt has on the left and right side determines the amount of lateral flex. I didn’t dremel out the holes to the left or right at all, but the bolt is smaller than the stock rectangle, so there is a natural play in there which helps with lateral flex.
As with any new ski boot it definitely helped to break the boots in a bit and get the liners heat molded. The fit is getting more dialed now, and I can start to use the buckles more often on the up and down to lock down the fit a bit more without causing significant pain.
There are still some more upgrades and adjustments to be made with the setup, but for now this thing rips and I feel more confident than ever to get to new zones safer and more efficiently. I hope this information is useful to somebody out there.
0 notes
Last Seen Blogs

itsstevenmartin-blog
Steven Martin

7fish-blog
Untitled

julie-xxx
Julie.

zenikkuma
gay aliens galore

albright38mcmahon
The Life of Duus 415