#also one more tip:
Text
Apparently much-needed reminder that reposting artists' art (by saving the images or screenshotting them and reuploading them yourself) on other platforms without the artists' expressed permission and without credit is theft and an insult to their passion and craft. You are profiting (in views, in attention, in feedback) from someone else's work and ideas, who do not get that feedback for sharing their creation.
If you are an art reposter, you are a thief and I have no respect for you.

#learn basic internet etiquette i am begging but also holding a knife. yes i'm mad. more about others than myself.#do you know how many artists i have seen leave social media because their art started being reposted all over?#tip: way too fucking many#i've had many people tell me about people reposting my art on tiktok#no one ever asked to repost my art on tiktok. ever. they just save super fried bad crunchy jpegs of my art and repost them#they get 20k likes and don't even bother naming me#also a reason i started signing my name more legibly and why my blog web address is always there but apparently no one can even read that#a few people got an ok for translations on other platforms though#i'm going to be annoying with this post and reblog it a few times to try to catch the people who apparently need to be told#tiny skk adventures#nawy's comics#nawy's doodles#apparently those are reposters' favourites so here look at this
4K notes
·
View notes
Text
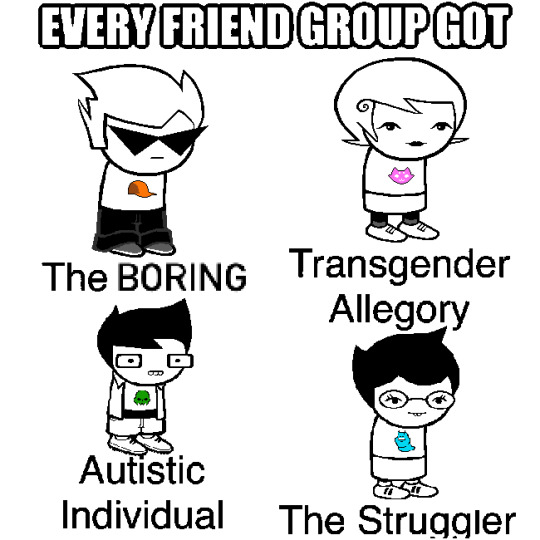
The world isn’t ready for my alpha kid readings.
#jane crocker#jake english#roxy lalonde#dirk strider#homestuck#alpha kids#Jane is the struggler don’t you EVER contest that#many might argue it’s Jake but he doesn’t struggle inherently#usually he just vibes until he’s forced into situations wherein he struggles#Jane struggles from the beginning#her entire arc is a struggle#also had to change it from “the fujoshi” mostly cause I don’t like that and also cause it’s not as versatile as the other labels#I don’t actually think Dirk is boring btw i just think that when put up against his friends he has a lot less complexity going on#like his arc is fairly simple as opposed to Jane and Jake’s#and even Roxy’s#His problems seem inherently a lot more straight forward to me simply because he’s articulate enough to realize he has problems#Jane and Jake are almost there#problems are like on the tip of their tongues#and Roxy is kinda like the John of the team where she isn’t even gonna acknowledge the possibility of problems#girl is like “problems? haha not me#I’m the put together one in this group :)”#and just ignores all her internalized misogyny and heteronormativity#she is a mirror to Vriska in that they both put a lot of emphasis on preforming romanticism as a means of affirming their gender#anyway my alpha kid readings are way too boring so I feel like nobody would really be interested in them Sighhhh
584 notes
·
View notes
Note
Duke, talking to Steph: So he's prime Blorbo material.
Steph, nodding: So skrunkly.
Bruce, passing by: What does that mean?
Duke: Skrunkly?
Bruce: No, the other one.
Steph: Oh, a Blorbo is like. A character that you really like and will defend to your last breath no matter what they've done.
Duke: They're like your special little boy.
Bruce: Hmm.
*later*
Bruce: You're my Blorbo, Jason.
Jason: Alright, who the fuck taught you that?
Cue Steph cackling in the background
#annoying bruce is the only valid pastime#and it gives Steph life#duke catches on pretty quick#and while he doesn’t go about annoying Bruce outright#he enables Steph#and executes plans to perfection#no one can prove a thing#Cass gives him tips#Jason would be more supportive if it weren’t also causing him continued suffering#but at least Bruce is suffering too so it’s all good#duke thomas#stephanie brown#bruce wayne#jason todd#batfam#batkids#batman#blorbo
2K notes
·
View notes
Note
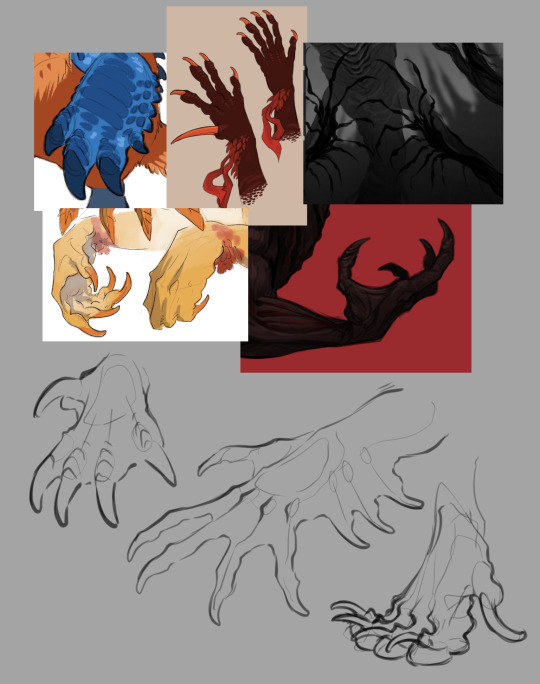
:V Do you have any tips on how to better draw paws/claws/monster hands?
To me this is a very broad question. I don't understand exactly what you're asking for. So I'm gonna throw some thoughts and hope that at least some of it is useful. X3
(btw I don't want to call this a "better way" to draw, it's just some tips and thoughts. I'm not an expert. :p)
There's no right or wrong way to draw monster hands and anatomy. You can do whatever you want with it, it's wonderful!
But if you want to know how I like to think when drawing and designing, here ya go!
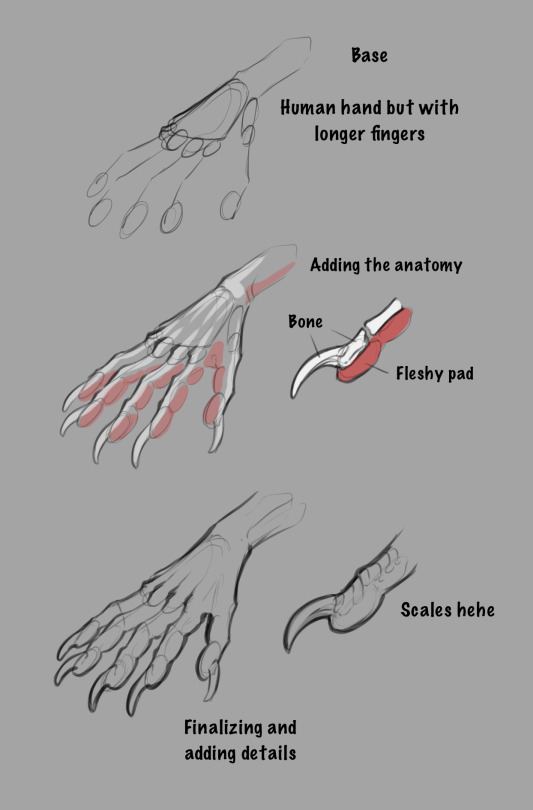

(The anatomy can of course be completely different, these are just more human like hands as easy examples.)
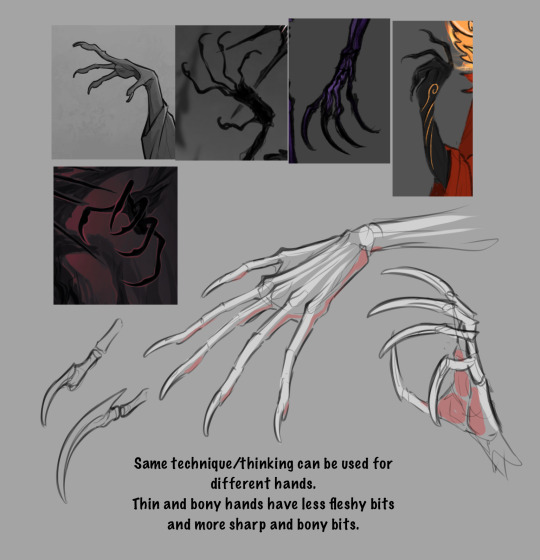
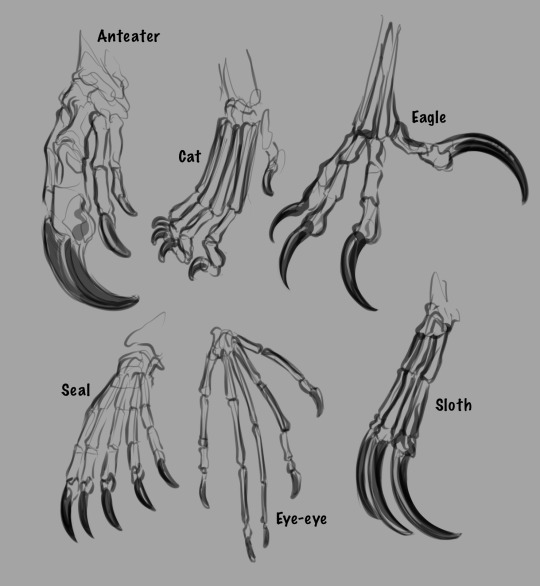
For me, having an understanding of human hand anatomy along with animal paw anatomy is the key to designing and drawing believable monster/creature hands.
There are so many weird and cool clawed hands/paws out there! Getting inspiration from them and using them as reference is always helpful!
But remember to have fun! Experiment! Play with the anatomy or throw it all out the window, all approaches are valid as long as you're having fun! :3
#hope any of this was helpful pfdhfhfj#if you got any more specific tips you'd like to get. please don't hesitate to ask for them!#I'll try to answer them to the best of my abilities! :3#also thank you for making me draw so many hands! i really enjoyed drawing every single one#asks#anatomy#creature design#tutorial#art tips
810 notes
·
View notes
Text
it was watching this for the first time that mcr tipped over from "awesome band i really fucking dig" to an all-time hyperfixation for me. ray's enthusiasm, the way they wordlessly jump into exactly the part ray's thinking about, the way those parts work together and sound so fucking wonderfully insane...like these are two very talented guys but they could only get as good as they are through dedication to their instrument of choice and their band could only sound as good as it does because of their dedication to working with each other and that's what it's all about baby
#watching this was also bc i wanted to understand more about guitar and it definitely tipped me towards starting to learn myself 🥹🥹🥹🥹🥹#thank u mcr <333#bro i watched this video for the first time exactly three years from TOMORROW.....happy anniversary to me.........#(obvs there were many many things that contributed to this but this video is definitely one of the finite Moments i can point to lol)#*#gb#video#mcr talk
1K notes
·
View notes
Text
#ive not sketched or shared sketches here for a while so this is one from the other week#maybe i will again.. idk.. anyway today im gonna try to catch up on some things ive been keeping track of / archiving on here#reminded me of also slacking on this#although idk if id call it slacking. more like overwhelmed with all this and not being able to harvest all that#energy into the tip of a pen but instead just letting it bounce off the walls and get lost something like that. rambles.#my art
491 notes
·
View notes
Text
#hollow knight#thought this would be fun to do!#just including these ones since all the others are either (comparatively) easy enough and/or are prerequisites for one of the options here#i guess i could've also added the one for beating Grey Prince Zote since you can block him from the pantheons and he isn't required for 112%#but. c'mon now. dhdhshshf#i guess i also could've included Purity (kill the nailsmith) for the Emotional Difficulty but. i want this to be a bit more serious dhsdhf#also i'm only including the actual in-game achievements. so no path of pain; pantheon bindings; or radiant hall of gods bosses#anyway. there IS a Correct Answer in my mind dgdhshf#and if something besides that one wins or gets a lot of votes then i'll try and offer some tips for it
121 notes
·
View notes
Note
Ay. An offer; one doodle of lovelie for the price of answering my question 🦅

Eh? Eh?— Anyways my question is; what’s an art tip you can give that really helped you? Anything special when drawing or do you just have a hand of god?
(Btw your one of my favorite artists and I love seeing your work homie, number 1 inspo fr. Keep on cookin 🦅💞)
WAHHH THEY LOOK SO SCRUNGLYYYY (despite his many, m a n y crimes)
#Also art tips?#One of them is don't follow some of my footsteps they are unhealthy LMAOOOO#Like me pushing through despite my artblock? Very unhealthy it can lead to a unhealthy relationship with art#Ya deserve breaks when your mind and body tells you you need it! Art should be a comforting experience!#No matter how long it takes smhh#I remember my partner had a really bad art block for like a year but they are still going strong with their art! Never feel discouraged!#Also another one is sometimes a messier lighter sketch is better for more dynamic pieces#If ya work too hard on your base it can lead to your piece feeling flat and too stiff#Go crazy go stupid! You might be surprised with what you can accomplish!#Don't be afraid to go outta your comfort zone with art stuff! You might find details you quite enjoy! HUZZAH!#Also also I fuggin love the liddol beetle doodles on the side of her LMAO SO TEENSY TINY#I'M SO HAPPY YA GAMERS ENJOY MY DUM LIDDOL ARTS IM JUST A LIL GUY BDJDJDJDJD;;;;
434 notes
·
View notes
Text
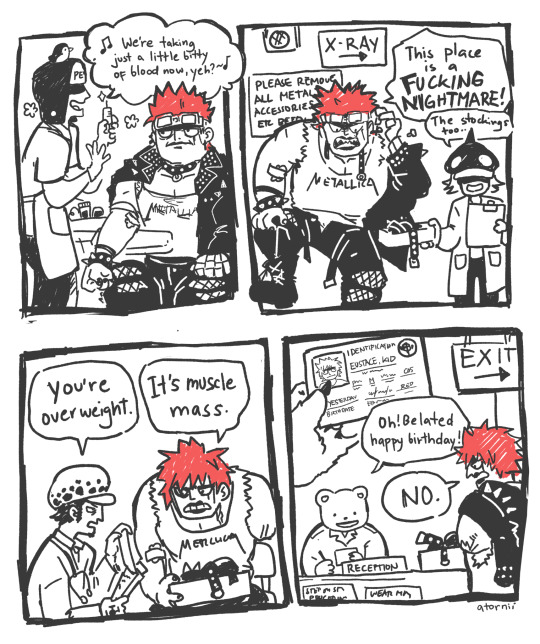
i had to take my annual physical exam today for work so im subjecting kid to everything ive had to this morning
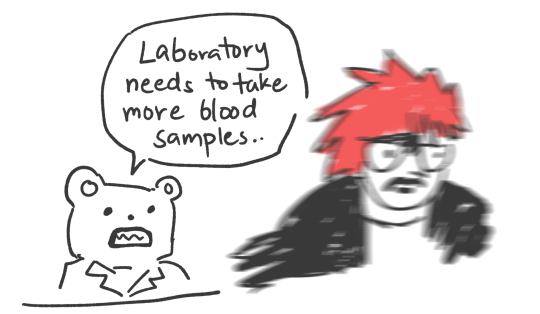
bonus
#one piece#one piece fanart#trafalgar law#eustass kid#op penguin#op sachi#op bepo#heart pirates#i havent eaten bc i needed to fast for the blood test#you can tell my hands are shaking more and more each panel#also why tf did they need me to remove my fishnet stockings#anyway pro tip dont dress like a heavy metal groupie when taking the APE
639 notes
·
View notes
Text
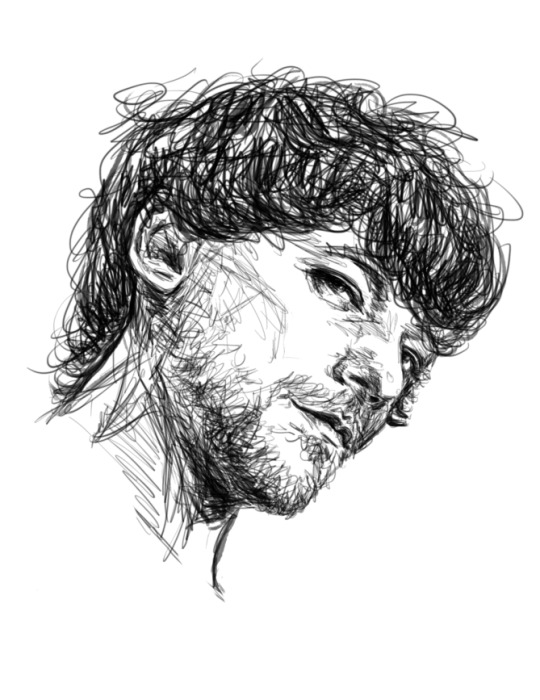
taking some extra anatomy classes this year, here are some of my notes in case they could help someone. should be updated every weekend (aside from october 28th and november 4th which are free days) with the following lesson's notes. (further explanations at the end)
anyway. here goes:
SCENE 0-1: LEARNING HOW TO LOOK/OBSERVE
when drawing, we each more or less have our own methods when approaching certain subjects, with multiple tools at our disposal in order to achieve the desired results.
but generally, when drawing a model (or most things from life, actually) we can in some sort of way define a general order as to when to draw what:
Looking / Observing
Blocking In
Correcting
Details
for today i’ll focus on the first one of the list, looking / observing.
the existing nuance between “seeing” and “looking” exists in the sense that “seeing” is more passive than “looking”. when you say “i can see a cat”, you aren’t paying too much attention to the cat. but when you say “i am looking at a cat’, you are actively paying attention to the cat and what they’re doing.
(given the class is in French, the nuance was similar, using the words “voir” and “regarder”. but due to French not having a close equivalent to “watch” i cannot make more parallels about this, as my knowledge of English and French-to-English translation is still fairly limited)
when looking at a subject, the primary objective should be to understand what you’re looking at. you can look at a subject (or the world as a whole) under multiple filters: values, hues, proportions, in 2D or 3D, and so on. you need to define how you want to look at a subject following these filters of vision. what do you want to look at first? what do you want the viewer to look at first? this is important to define before you put your tool to your support.
generally when drawing from life, it’s a bit reckless to rush to draw the model without actually observing them a minimum. you should take the time to observe, you are allowed to take your time to observe. no amount of limited time should paralyze you from examining the model the best you can before you put your tool to use.
getting this more precise vision of your model can give you a better vision of their body, which is often hidden under detail. when drawing them, you should ask yourself “how is the model posing?”
why look/observe? (probably like the most given piece of advice by pros and art youtubers who aren’t pros but still get called pros cause they have 1 million subscribers on youtube)
this question is very easily asked but also very easily answered:
to know how and what you’re going to draw
to time yourself correctly and have a good time management (drawing a pose in 2 minutes is completely different to drawing a 10 minutes one), thus,
to avoid rushing to draw the subject. as said previously, take your time. start slow, but stay accurate to the model. (teacher compared it to a musician rehearsing a piece, first slowly, then speeding it up progressively as he gets to know the piece itself better and better. unfortunately as someone who is as farthest from a musician as can be, i cannot honestly attest to if this is accurate).
but really, there is actually no such thing as a “finished” drawing. a graphite drawing could always have color added afterwards, a painting could always get more and more detailed. a piece is “finished” only when you deem it is finished. the French Académie des Beaux Arts didn’t like the Impressionists because to them, what the impressionists were doing were half assed jobs, since the idea of “transmitting a vague feeling, or an emotion through a specific style of very visible strokes” was absolute fuckery to them. speaking of,
to transmit an emotion, or a feeling through the posing of the model. the more technical and controlled the strokes will be, the finer the wanted sensation will be felt by the viewer. this also ties in the physical aspect of the model. ideally, in order to achieve this, you can try posing the same way the model does. it may be a bit awkward but it works (depending on your learning type, of course.)
to understand how the whole “body system” works. “i know the rules of the human body, therefore i make little to no mistakes.”
adding a whole context to the pose helps: adding a situation in which the pose could work in gives some meaning to your drawing, as well as helping you remember it better. it also adds a narrative element to your drawing(s), which are absolutely always a plus. (memorization is also an important tool!)
now let me play devil’s advocate and ask: why not look/observe?
well, uh, there are two reasons my teach told us:
to let your instinct and imagination go wild and free, trust your gut and have fun!!
and, tying back,
to let yourself be surprised by what you’ve done.
form synthesis (or just different types of approaches to draw form)
when drawing a model, there’s a few things that can be mentioned:
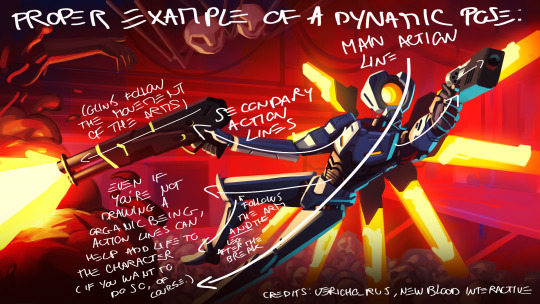
multiple types of lines exist with different purposes within the drawing: the action line(s), structural lines, and contour lines.
action lines define the overall movement of the pose. the principal one is the one you see when giving a better look at how dynamic the pose is. the secondary ones are the ones you can find in secondary rhythms when examining the pose a little longer.

(here's a better example, actually:)
structural lines are pretty much the “stickman skeleton” you sometimes see in certain how to draw books (specifically the more advanced manga themed ones).

contour lines surround the form in a way as to draw all of the outer body without using inside shapes or lines. (it is also the basis for the Bargue method which will be slightly discussed below. there unfortunately won’t be any talk about cross-contour lines, as it hasn’t been talked about in class (yet?))

generally, lines take either an I shape, a C shape or an S shape. (teach said it’s preferable to mostly use I and C type lines when drawing live models. probably due to the fact that S shapes are much trickier to use “effectively” within a piece (effectively not meaning much in this context, if nothing at all. again, have fun.)). using these lines tell a lot about the model and the pose, telling a sort of dynamic storytelling which varies depending on what type of line you choose to represent your model.
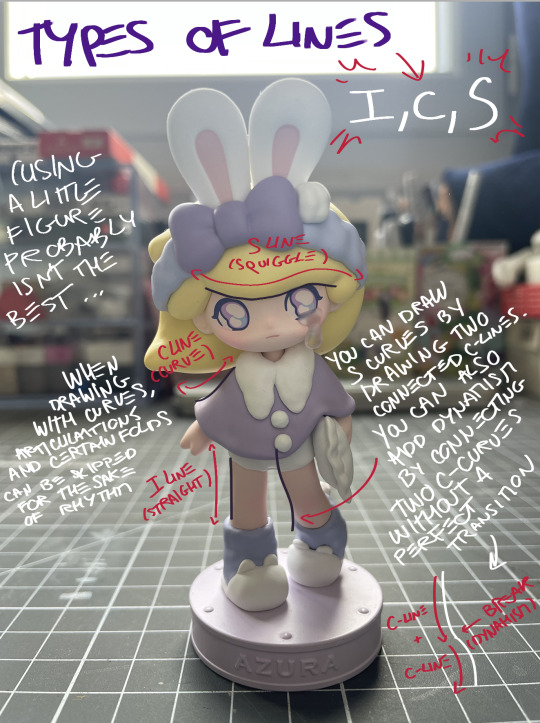
we can mostly talk about 2D shapes when three or more points have been linked by lines. sometimes, lines can skip articulations for the sake of dynamism. shapes should be thought about in their entirety, the difficulty that can be encountered usually being remaining vague but accurate with your form.
now, a quick word about:
the Bargue method (or, the fuck do you mean the Americans used it in art schools before us, Bargue was literally born in Paris, i fucking hate the Académie des Beaux-Arts)
the Bargue method is probably fairly well known among certain art schools or artistic communities. if i do recall correctly; it originated with Bargue noticing the low level of the students of the Académie des Beaux-Arts de Paris (or some other place basing itself solely on academic style art and paintings located in the city of Paris in the country of France on the continent of Europe) and devising a simple way to learn how to draw accurately from life (or plaster casts, depending on what you prefer). it solely based itself on straight, contour lines, forming a base around which to slowly add details to. apparently, a lot of art schools in america base their teaching of life drawing on this method, but given i do not feel like getting over $200k in debt without even mentioning living and travel costs, i cannot say if that is actually true.
here's an example of it:

it’s pretty much basing yourself on simplifications of the form to attain absolute accuracy. no curves here to distract you, only straights. somehow, when pulled off correctly, it gives a very neat impression of realism.
anyway, that’s all i wrote down. hope teach won’t see this anytime soon, and hope this kinda helped a little bit. next week’s notes should be about blocking in shapes, so we’re starting to be a little more concrete with the actual drawing process.
these classes were taught by Mr Francis Buchet at a class given at the Académie de la Grande Chaumière, so most of the things i’m saying here are taken from him and his class. if you live in/close to Paris and are interested in learning artistic anatomy, i suggest you look up where he is giving public classes, since they’re infinitely more engaging than these notes. his instagram is be linked below. (hoping he doesn’t get mad at me for sharing these notes… in any case i will use my own example sheets to avoid getting in any more trouble.)
and, may i remind you: these notes are only here to showcase one approach among many others, so they don’t mean much in the grand scheme of things. i myself am in absolutely no way a professional, so please, take all of this with a grain of salt (or a spoonful, even). draw how you enjoy drawing, and find happiness in the way you want to draw.
Francis Buchet's instagram: x
so, seeyou next weekend! (or earlier, if i draw something i want to show here.)
#artist tips#art tutorial#art tips#art help#drawing tips#literally no one asked but why not#that was something i've wanted to do for a while tbh#god i hope that doesn't sound pretentious#next time i'll try to show more examples since this one seems a little bit bare#first four classes will be about drawing theory so it might take a little while before we get to actual anatomy :(#so it's gonna be a little bit boring for the first while :((#really sorry about this#next ones should be a little more concrete so. yea#i apologize if this sounds abit confusing; it's the first time i try to make a “tutorial” or anything like that for art#will also try to find a spot to put my own drawings i did while attending the class to show the stuff we do there#in any case#hope this helps someone!
242 notes
·
View notes
Note
If it's not too much to ask, how do you shade complex patterns easier?
Its not too much to ask at all!!
My easy trick for shading complex patterns in cel shaded Neopets style art, where you'd want to hand pick your shadow colors for each element:
First, I make a flat base layer, and put each unique color on its own layer that i clip to the base.
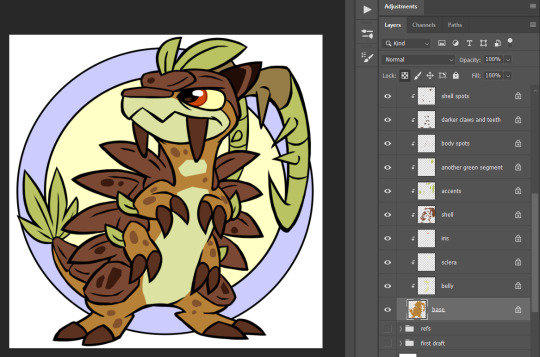
After i finish the flats, i then duplicate ALL of those layers, lock them, and recolor each duplicate with the color i want to use for that element's shadow. these are now effectively my Shadow layer, and i rename the base duplicated layer so i know its my shadow base.
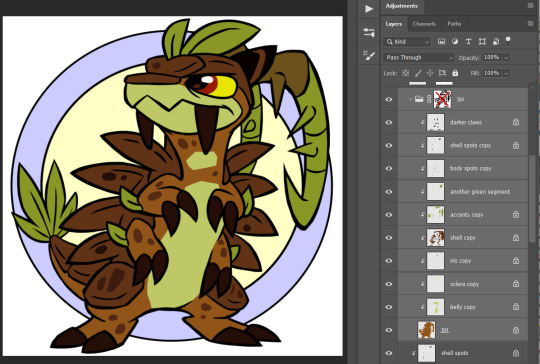
and then i use a layer mask on either the base layer or a folder i put the shadow layers in- i use this to paint in the spots where i want the unshaded areas to be.

This method makes it really easy to change my mind on a shading color for a specific area without having to carefully repaint the shadows, or tweak where i want the shadows to fall without having to worry about matching the colors, similarly to having the shadows painted on a multiply layer.
if i'm using a PSD where I already made a shadow layer, like my basic Centibyte base, i just duplicate all of the clipped areas from the flat color base, clip the dupes onto that shadow layer, recolor it to be the shadow color for the base color, and proceed from there.
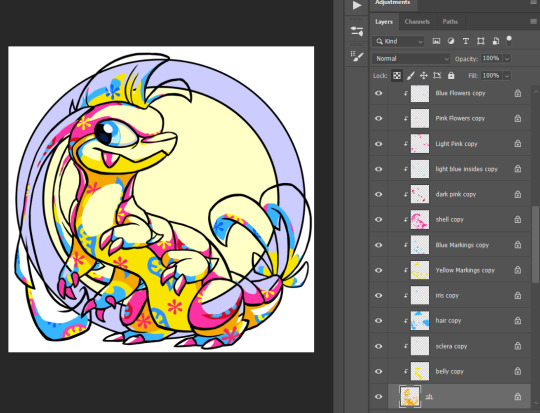
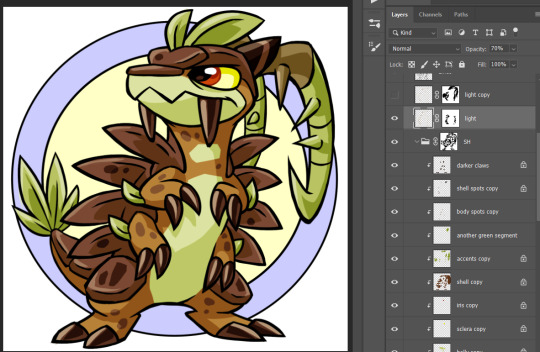
You can do this trick for highlights also- I've noticed that highlights are typically used sparingly in Neopets art though, so I kind of just go with whatever i think looks right.
For Tyrannian, I decided it looks fine with solid white highlights at a lowered opacity of 70%, so i didn't bother coming up with a unique highlight color for each area. Sometimes I'll make the highlight layer an Overlay layer since that can help the highlights with not looking washed out, but it feels a little inauthentic and loses contrast over certain colors, and in this instance Normal ended up looking better.
I hope this was helpful and not too unclear! I'm not super experienced with making tutorials, but I'm always happy to share what works for me as best I can!
#asks#neopets#neoart tips#god maybe i need a better tag for this stuff. i had to hunt down that it was 'neoart tips'#my older version of this method is ALSO in that tag- its a little more convoluted than this one though so i wanted to share the new version#lmao i was like 'lock your shading layer duplicates' and some of mine are unlocked in the screenshot. don't live like me. play soccer
144 notes
·
View notes
Note
obsessed with your latest steddie au! steve’s relationship with his parents is so emotionally abusive and manipulative and my heart is breaking that nobody seems to recognise that
Thank you!!
I really wanted to focus on how Steve's parents are abusive in a way that is a lot harder to clock.
They're not out there screaming and kicking him out of the house. These people want you to like them, and they lie like they breath.
These are the adults who downplay serious issues, who make you doubt yourself, who smooth things over or even apologize on your behalf as a way to control and isolate you.
If everyone thinks you're terrible, and your amazing, doting, angelic parents are once again swooping in to save you, then your escape routes close up rapidly--which is of course, the whole point. They want their victims to rely on them and them alone.
For a lot of the Party, that's just not an evil they've encountered yet.
Throw in the fact that Steve does in fact, have a head injury, and things get muddy FAST.
It makes for delicious, angst-ridden scenarios and I am delighted everyone's happy to come along for the ride.
#its not as obvious in part one#but Steves brain injury does come into play a lot more in part two#t I gave Steve my own traumatic brain injury so hes just having a blast on all fronts#and you can see it more when both parts are together but he IS struggling to explain himself. The beauty of his asshole parents though#is that even if he DIDNT HAVE a TBI and six million concussions#hed still struggle to get his friends to fully believe him#because hes rich#hes outwardly “happy” or otherwise not showing signs of being abused in the way people tend to think of abuse#Steves fighting against public perception#his parents very good PR#and his own upbringing and mindset he was trained to have to break out of it#in his head he has no safety net#and his friends are proving that with each argument he has#its also why Tommy tips him off but doesnt “help” him because Tommy is in similar situations--he does what his parents want and doesnt caus#problems or else he too#will face the consequences of no safety net
207 notes
·
View notes
Text

What the fuck.
#this better turn out to be nothing because one pandemic in a decade is more than enough#also is the alt text okay? I’m not very good at doing them so if anyone has any tips they’d be appreciated#cows#trending#pandemic#oh also as far as I can tell it’s something about a mutation of the bird flu#po posts
73 notes
·
View notes
Text
OH I THINK I JUST REALIZED WHY THE CAMPERS FROM CAMP HALFBLOOD WEAR ORANGE SHORTS SPECIFICALLY
They live in a valley surrounded by forest
And they have their own little monster-filled forest inside the boundary line
When hunting you want to wear bright fucking orange, bc it can get really dark in the woods and most other colors will start to look black or brown
Plus, bright colors, like that specific shade of orange, don’t normally occur in nature, and especially not forests.
It’s safety, so you don’t accidentally shoot a human person instead of an animal. Deer and shit are colorblind anyway so you can have your Real Tree Camo over an orange background and it’ll work just the same
Some people wear bright red, thinking it’ll be fine, but I heard a story from one older guy who almost shot someone bc it was early in the morning, they had a turkey call, and their red shirt looked brown
The campers wear bright orange t-shirts so they can find each other if they can lost in the woods, and so they don’t accidentally mistake someone taking a walk for a monster and loose an arrow in their head
it also occurs to me that since demigods have to do quests and shit and might have to be in the wilderness for a while they should teach the kids how to hunt for food and prepare it to eat so they don’t starve bc they can’t find a McDonald’s or something
#PJO#percy jackson#Apollo kids knowing they could feed the whole camp if needed#at least the ones who’s specialties lie in archery#also it would be neat if when the Hunters visited they shared some expert tips to some of the kids who’re struggling more#or just want to be more prepared just in case
2K notes
·
View notes
Text

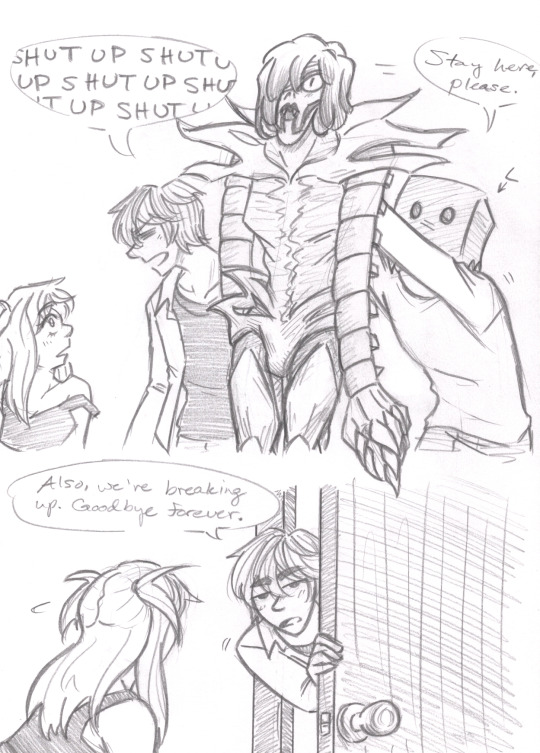
Light breaks the news to Misa that he's leaving forever. Eh, Rem's cautiously happy.
Previous
Influences below the cut.
Script/behavior references inspired by/stolen from Foster's Home for Imaginary Friends:
Light's stream of shut ups are from "Dinner is Swerved." I can't find a direct link to that specific clip. It's when Mac and Bloo steal Duchess's bedsheets and mattress so they can safely escape out a window, and Bloo just quickly repeats shut up to her over and over to prevent any argument. I have Light use that same strategy to keep Misa from objecting.
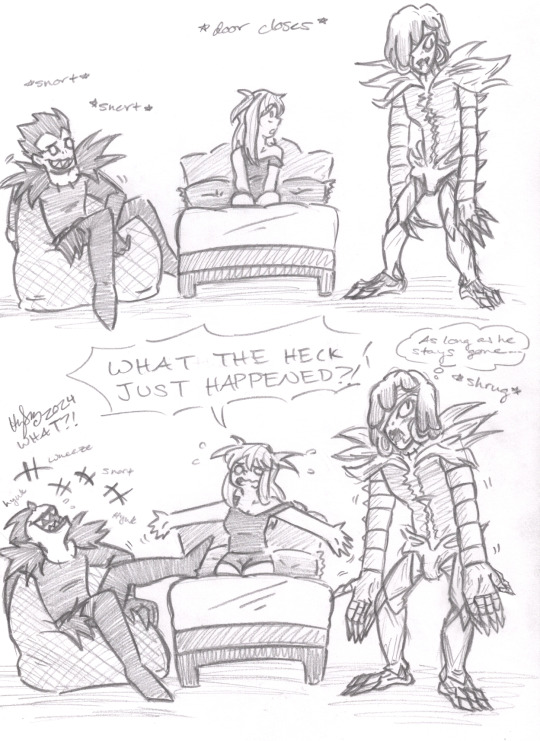
Misa's disbelief is inspired by Bloo's at the end of this clip from "Everyone Knows it’s Bendy": link
#a graceful breakup#drawn by me#my fanart#my fancomic#Death Note#Light Yagami#Misa Amane#L#implied lawlight#Rem#Ryuk#shinigami#crack#unoriginal script#Sorry Misa. You're not joining those dumb boys this time. Maybe next time. :(#went simple with Ryuk because I really like drawing him in a simple silly style~#struggled with Rem's hands a little#Light knows that Misa has the Eyes so L's gotta wear a bag over his head#she may ask Rem to kill L for her because of this but she may not do it because Light staying away is more likely if he's alive#probably lol I don't know#this isn't the least bit serious#future additions will probably be a bit more original. I just needed to get these ones out of my system REALLY BAD#also we’ve all agreed that Misa writing in the death note with a fuzzy tipped pen is basically canon now right?
61 notes
·
View notes
Text
bruce wayne just ordered a sandwich that was maybe $5 at most to his work and then paid me with a 100-dollar-bill because he "didn't have any change" and told me to just keep the rest when i couldn't give him change
#sometimes my work is great#just as long as i don't have to deliver to the riddler#he only pays or tips if you solve all of his newest riddles he wants to try out#but the waynes are always nice and tip a lot#i was still surprised tho#this is more money than i've ever had#also it's usually one of the kids who orders food#and it's a different kid every time#there are so many of them#but this was the first time bruce opened the door#i think he usually sends the butler#maybe he was busy...#bruce wayne#only in gotham#just gotham city things#unreality
81 notes
·
View notes
Last Seen Blogs

superbudiesinfo
BUDI SANTOSA

thesleepycreek
sleepy!!

bfcdentalgroup-blog
Untitled

cleopatradinekomata
The Neko Demon

mercyll
Ships That Pass In The Night