#a tour of the julian 3D model
Text
Site Navigation
My Apprentice, Jinana Aditya
About Jinana
RP Blog
OC and LI Ships
Timelines Reference
Jinana-related lore and hcs
Hir lemon-y headcanons 🔞
Shipping With Jinana 🔞
Things to See
Arcana Rewrite: Tides of Chaos [Ao3 version]
Arcana Headcanons and Worldbuilding
My renders and art (beware of 🍋!)
Fanart and things I commissioned!
All of my major fics (plus special guests!)
My general writing tag
Miscellany
My Taglist
About Me
The Smut Generator🔞
The Kink Oracle🔞
What I’m Working On
3D Model List
Series: A Grand Tour of the Julian 3D Model
Enjoy!
6 notes
·
View notes
Text
Shoreditch High Street, East London
Shoreditch High Street, East London Office Refurbishment, English Architecture Development Images
Shoreditch High Street in East London
24 Sep 2020
141-143 Shoreditch High Street, London
Architects: Patalab Architecture
Location: Shoreditch, East London, England, UK
This Shoreditch High Street office refurbishment project is located within East London’s fashionable Shoreditch area. The four-storey building, featuring both a generous internal and entrance atrium, has been substantially upgraded; offering modern office floors, which benefit from natural light, high ceilings, and full air conditioning. The three-storey high, fully glazed entrance lobby has been completely remodelled, introducing a bespoke facade and sculpted staircase feature composed of curved pipework.
Materials and construction methods have been chosen carefully with respect to the area’s rich history of clothing, furniture and printing; exposing the craftsmanship and rawness inherent in each. The offices feature exposed brickwork while the lobby stair and sculpture are constructed from waxed steel. The core is equipped with a lift, kitchen units, showers and bathrooms, which are accessed via a naturally lit, timber veneered corridor.
An important aspect for the Shoreditch project has been to create a street presence and identity for the refurbished building. This has been achieved largely through the visibility of the distinct staircase that is also very much in keeping with the highly creative character of this part of the city.
The design process involved exploring several design options through sketches and physical models, which gradually evolved in combination with 3D CAD modelling. Material, manufacturing and Building Regulation limitations were also closely considered in refining the design following discussions with the specialist subcontractor and consultants. The final design was then translated into CAM software in preparation for fabrication.
Whilst state of the art CNC laser cutters were used to precisely cut and translate the 3D information to create the stringer sections, it was fantastic to see that traditional bending methods were still prevalent in the process and in tailoring the unique curvature of all the sculptural curves intrinsic to the stair. Once the stair was test fitted off-site and inspected, each section was delivered to site for final assembly and welding; a process which took around 8 weeks. Due to the slight changes in curvature to each section, final adjustments on site were made to ensure the fluid geometry was achieved.
The near-completed stair was carefully cleaned in preparation for waxing, which protects the mild steel from rusting and produces warmth to the finish without masking the rawness of the material itself. LED lights were then fed through the pipes to light up the 200, individual fixed, 3D printed light diffusion lenses.
The completed stair, standing 10 meters tall, and its now unobstructed entrance atrium easily serves the 4 companies occupying 14,000 ft2 office space, whilst creating a fitting and memorable feature both night and day to the Shoreditch streetscape.
141-143 Shoreditch High Street in East London – Building Information
Architect: Patalab Architecture
Project size: 1300 sqm
Site size: 300 sqm
Completion date: 2016
Building levels: 5
Photography: Julian Abrams
Shoreditch High Street, East London images / information received 240920
Location: Leytonstone, London, England, UK
London Building Designs
Contemporary London Architecture Designs
London Architectural Designs – chronological list
London Architecture Walking Tours – tailored UK capital city walks by e-architect
London Architects Offices
London Architecture News
North East London Building Designs
Contemporary North East London Buildings
Wallis Road Building at Hackney Wick
Design: Stockwool, Architects
image courtesy of Hectic Electric / Stockwool
Wallis Road Hackney Wick Building
Frampton Park Baptist Church
Design: Matthew Lloyd Architects LLP
photos : Benedict Luxmoore, Patricia Woodward
Frampton Park Baptist Church Building
Kings Crescent Estate Phases 1 and 2
Architects: Karakusevic Carson Architects and Henley Halebrown
photo © Peter Landers
Kings Crescent Estate
The Old Smoke House, Tower Hamlets, East London
Architects: HWO Architects
photography : Craig Auckland
The Old Smoke House
Comments / photos for the Shoreditch High Street, East London page welcome
Website: East London
The post Shoreditch High Street, East London appeared first on e-architect.
0 notes
Video
youtube
MACHU PICCHU : TURISMO EN 360 GRADOS ( REALIDAD VIRTUAL )
a machu picchu de mochilero,
a machu picchu en auto,
a machu picchu en moto,
calle 13 machu picchu,
claudio iturra machu picchu canal 13,
dschinghis khan machu picchu,
famosos en machu picchu 2016,
g adventures machu picchu,
julian casablancas machu picchu,
k-on machu picchu,
kaliman machu picchu,
karl pilkington machu picchu,
katy perry machu picchu,
los jaivas machu picchu 2011 hd,
los jaivas machu picchu full album,
machu picchu,
machu picchu 100 años,
machu picchu 100k,
machu picchu 1080p,
machu picchu 14,
machu picchu 1911,
machu picchu 1911 fotos,
machu picchu 2,
machu picchu 2007,
machu picchu 2012,
machu picchu 2015,
machu picchu 2016,
machu picchu 2017,
machu picchu 2017 david cruz,
machu picchu 360,
machu picchu 360 grados,
machu picchu 360 travel,
machu picchu 360 video,
machu picchu 360 video cloudscape 8k,
machu picchu 360 virtual tour,
machu picchu 3d,
machu picchu 3d model,
machu picchu 3d tour,
machu picchu 3d virtual,
machu picchu 4 day hike,
machu picchu 4k,
machu picchu 4k drone,
machu picchu 4k ultra hd,
machu picchu 4k video,
machu picchu 5 dias 4 noches,
machu picchu 5 pasos,
machu picchu 60fps,
machu picchu 7 maravillas,
machu picchu 7 maravillas del mundo,
machu picchu 88,
machu picchu 8k,
machu picchu al descubierto,
machu picchu al descubierto - national geographic hd,
machu picchu alan x el mundo,
machu picchu alejandro guerrero,
machu picchu alienigenas,
machu picchu alienigenas ancestrales,
machu picchu all fest,
machu picchu antiguas megaestructuras,
machu picchu antiguo,
machu picchu arquitectura,
machu picchu banda,
machu picchu banda de musicos,
machu picchu banda sinfonica,
machu picchu barato,
machu picchu barman in red,
machu picchu bbc,
machu picchu bebida,
machu picchu blog,
machu picchu brasil,
machu picchu buen viaje,
machu picchu cancion,
machu picchu cara del inca,
machu picchu chapter 3,
machu picchu chato grados,
machu picchu chile,
machu picchu chileno,
machu picchu coctel,
machu picchu como se construyo,
machu picchu construccion,
machu picchu cusco,
machu picchu cuy,
machu picchu de noche,
machu picchu descubrimiento,
machu picchu desde el aire,
machu picchu discovery,
machu picchu documental,
machu picchu documental history channel en español,
machu picchu documental para niños,
machu picchu documentary,
machu picchu drone,
machu picchu dschinghis khan,
machu picchu electro,
machu picchu elegida maravilla del mundo,
machu picchu en 3d,
machu picchu en 4k,
machu picchu en 5 pasos,
machu picchu en gta 5,
machu picchu en ingles,
machu picchu en minecraft,
machu picchu es chileno,
machu picchu es de chile,
machu picchu explicada por ingenieros,
machu picchu extraterrestres,
machu picchu famosos,
machu picchu fantasmas,
machu picchu fifa 12,
machu picchu foods,
machu picchu foods planta callao,
machu picchu footage,
machu picchu forma de cara,
machu picchu foster the people,
machu picchu fotos,
machu picchu full day,
machu picchu full hd,
machu picchu google,
machu picchu google earth,
machu picchu google earth 3d,
machu picchu gopro,
machu picchu gratis,
machu picchu grupo,
machu picchu guia turistica,
machu picchu guiado,
machu picchu guitar cover,
machu picchu guitarra,
machu picchu hd,
machu picchu hd 1080p,
machu picchu hecho por extraterrestres,
machu picchu hidroelectrica,
machu picchu history,
machu picchu history channel español,
machu picchu hotel,
machu picchu hq,
machu picchu huaylas,
machu picchu huayno,
machu picchu imagenes,
machu picchu in english,
machu picchu inca trail,
machu picchu incas,
machu picchu indu,
machu picchu ingenieria,
machu picchu ingenieria inca,
machu picchu ingles,
machu picchu instrumental,
machu picchu isaac sanchez,
machu picchu jaivas,
machu picchu january,
machu picchu japon,
machu picchu jorge orellana,
machu picchu jout jout,
machu picchu jungle trek,
machu picchu k-on,
machu picchu karaoke,
machu picchu kayak fest,
machu picchu kids,
machu picchu kramer,
machu picchu la cara del inca,
machu picchu la ciudad perdida de los incas,
machu picchu la joya del emperador,
machu picchu la puerta secreta,
machu picchu la verdad,
machu picchu live,
machu picchu los simpson,
machu picchu love for you,
machu picchu lugares turisticos,
machu picchu luisito comunica,
machu picchu maqueta,
machu picchu maravilla,
machu picchu maravilla del mundo,
machu picchu maravilla del mundo patrimonio de la humanidad,
machu picchu marca peru,
machu picchu minecraft,
machu picchu misterios,
machu picchu mochilero,
machu picchu montaña,
machu picchu musica instrumental,
machu picchu natgeo,
machu picchu national geographic,
machu picchu national geographic english,
machu picchu national geographic hd,
machu picchu neon dreams,
machu picchu neruda,
machu picchu netflix,
machu picchu noche,
machu picchu nublado,
machu picchu nueva maravilla del mundo,
machu picchu o chichen itza,
machu picchu obra,
machu picchu obra banda,
machu picchu obra de extraterrestres,
machu picchu obra maestra de los dioses,
machu picchu obra maestra de los dioses full hd,
machu picchu oficial full hd,
machu picchu ombligo del mundo,
machu picchu orquesta,
machu picchu ovnis,
machu picchu para peruanos,
machu picchu pedida de mano,
machu picchu pelicula completa,
machu picchu peru,
machu picchu perú #1,
machu picchu pio pio,
machu picchu pop up,
machu picchu portugues,
machu picchu preparacion,
machu picchu promperu,
machu picchu pueblo,
machu picchu que forma tiene,
machu picchu que llevar,
machu picchu que visitar,
machu picchu quien construyo,
machu picchu quien descubrio,
machu picchu quien lo creo,
machu picchu quien lo edificó,
machu picchu quien lo hizo,
machu picchu quilapayun,
machu picchu qué es,
machu picchu reaction,
machu picchu realidad virtual,
machu picchu recorrido,
machu picchu reportaje,
machu picchu reportaje al peru,
machu picchu restaurant,
machu picchu resumen,
machu picchu road to the sky,
machu picchu rock,
machu picchu ruinas,
machu picchu salkantay,
machu picchu salsa,
machu picchu satoshi yagisawa,
machu picchu secretos,
machu picchu secretos ciudad perdida,
machu picchu simpsons,
machu picchu sin alcohol,
machu picchu song,
machu picchu strokes,
machu picchu su historia,
machu picchu the strokes,
machu picchu the strokes lyrics,
machu picchu the strokes subtitulado,
machu picchu tiene dueño,
machu picchu tour,
machu picchu trago,
machu picchu trago preparacion,
machu picchu travel,
machu picchu turismo,
machu picchu turistas,
machu picchu ubicacion,
machu picchu ufo,
machu picchu ultimos descubrimientos,
machu picchu ultra trail,
machu picchu un misterio en el mundo,
machu picchu una de las 7 maravillas del mundo,
machu picchu una de las maravillas del mundo,
machu picchu unesco,
machu picchu viaje,
machu picchu video,
machu picchu video corto,
machu picchu video promocional,
machu picchu visita,
machu picchu vista aerea,
machu picchu vr,
machu picchu vr 360,
machu picchu vs isla de pascua,
machu picchu walk,
machu picchu walls,
machu picchu water,
machu picchu water system,
machu picchu weather,
machu picchu wikipedia,
machu picchu wikipedia english,
machu picchu willyrex,
machu picchu wind ensemble,
machu picchu wonder of the world,
machu picchu y cusco,
machu picchu y el huascaran saya,
machu picchu y el rio vilcanota,
machu picchu y huayna picchu,
machu picchu y la puerta secreta,
machu picchu y los extraterrestres,
machu picchu y los ovnis,
machu picchu y montaña,
machu picchu y su arquitectura,
machu picchu youtube national geographic,
machu picchu zipline,
machu picchu zoofunktion,
ovnis en machu picchu 2016,
spirits of machu picchu 2,
terra x machu picchu,
the strokes machu picchu karaoke,
trial xtreme 4 machu picchu,
trial xtreme 4 machu picchu 11,
trial xtreme 4 machu picchu level 11,
until dawn machu picchu,
viaje a machu picchu 2016,
zumba en machu picchu
#machu picchu en 360#machu picchu 360 vr#videos en 360#videos vr#videos peruanos en 360#videos peruano vr#realidad virtual peru#realidad aumentada peru#mejor video 360 peru
1 note
·
View note
Text
New Post has been published on Jacksonville FL Real Estate
3D New Construction Virtual Home Tour | Concord NC | 4 Bedrooms | 2.5 Bathrooms | 2 Car Garage

youtube
Roberta Ridge | Concord NC | Cabarrus County NC | New Construction | DR Horton | 3D Model Home Tour
▶Pinehurst Floor Plan
▶Single Family Home
▶4 Bedrooms
▶2.5 Bathrooms
▶2 Car Garage
▶2 Story
▶2207 SQFT
▶Neighborhood priced from $299,990. This floorplan is currently priced at $322,690. Prices are subject to change.
▶For more information about this featured floor plan in Roberta Ridge or any other floor plan please contact:
Ed Averette
Realtor/Broker
The Averhome Group/Fathom Realty
☎ Toll Free: 1.888.672.5093
☎ Direct: 678.761.5198
☎ Direct: 704.804.3230
Email: [email protected]
▶Ask me how I can be your buyers agent at no cost to you.
▶About The Averhome Group
We understand that buying or selling a home is more than just a transaction: it’s a life-changing experience. That’s why our team of highly-seasoned real estate professionals is dedicated to providing exceptional, personalized service for all of our clients. We take great pride in the relationships we build and always work relentlessly on the client’s behalf to help them achieve their real estate goals.
Our team of experts represents the best and brightest in the industry, and we’re always striving to lead the field in research, innovation, and consumer education. Today’s buyers and sellers need a trusted resource that can guide them through the complex world of real estate. With our extensive knowledge and commitment to providing only the best and most timely information to our clients, we are your go-to source for real estate industry insight and advice.
▶OUR MISSION STATEMENT:
Our philosophy is simple: clients come first. We pledge to be in constant communication with our clients, keeping them fully informed throughout the entire buying or selling process. We believe that if you’re not left with an amazing experience, we haven’t done our job. We don’t measure success through achievements or awards, but through the satisfaction of our clients.
▶Licensed in North Carolina, South Carolina, Georgia and Florida and serving the following areas:
▶North Carolina:
Apex, Browns Summit, Cary, Chapel Hill, Charlotte, Clayton, Concord, Cornelius, Dallas, Davidson, Durham, Fayetteville, Fuquay Varina, Gastonia, Greensboro, High Point, Huntersville, Indian Trail, Julian, Kannapolis, Kernersville, Matthews, Mint Hill, Monroe, Mooresville, Raleigh, Reidsville, Stallings, Stem, Thomasville, Trinity, Wake Forest, Waxhaw, Weddington, Winston Salem, Youngsville
▶South Carolina:
Blythewood, Cayce, Columbia, Easley, Fort Mill, Greenville, Indian Land, Irmo, Myrtle Beach, Rock Hill, Tega Cay, York
▶Georgia:
Alpharetta, Atlanta, Buford, College Park, Conyers, Dacula, Decatur, Douglasville, Duluth, Fairburn, Fayetteville, Hampton, Lawrenceville, Lithia Springs, Lithonia, Loganville, Marietta, McDonough, Powder Springs, Smyrna, Snellville, Suwanee,
▶Florida:
Jacksonville, Jacksonville Beach, Mandarin, Miami, Nocatee, Orange Park, Orlando, Riverside, St Augustine, St Johns, Tallahassee, Tampa
✱Disclaimer: All information provided is deemed reliable, but is subject to change and should be independently verified.
Video: © copyright 2020 Avervision
- https://is.gd/NOdd6i
0 notes
Text
This Just In: Jaguar Teams Up with Hot Wheels for Unique Reveal of New F-TYPE
youtube
The new Jaguar F-TYPE has completed its journey from sketchpad to showroom with a unique tour – in Hot Wheels® model form – of the Jaguar Design Studio. The 1:64 scale sports car model, complete with perfectly recreated black and white camouflage wrap, navigated 25 loop-the-loops, three gravity-defying jumps and 44 corners along the 232-metre long Hot Wheels orange track laid out around the studio. On the way, it raced from a design review of original sketches, past digital renderings, colour and materials samples and a clay model, revealing the details of new F-TYPE’s purposeful, beautiful and timeless design before coming to rest beside the real thing. Julian Thomson, Design Director, Jaguar, said: “As a designer and huge car enthusiast, Hot Wheels models have been a part of my life since childhood. They capture the imagination, make owning the car of your dreams a reality, and give you the first opportunity to actually ‘drive’ a car. “We are used to creating models in clay but seeing such a finely-detailed 1:64-scale model of the new F-TYPE race around the studio, showcasing every stage in our design process, was a truly unique experience.” Working in close collaboration, designers from Jaguar and Hot Wheels used the CAD data of the real car to craft the precise 3D-printed model, recreating every beautiful detail of the new F-TYPE, including its striking new clamshell bonnet, distinctive super-slim Pixel LED headlights and more sculpted front and rear bumpers. The Hot Wheels team also faithfully recreated the Velocity Blue colour from the SVO Premium Palette, and even hand-painted the F-TYPE badge on the back before the model was camouflaged ahead of its own ‘reveal’ in the film.
from MotorWeek Entries https://ift.tt/3820AWb
via IFTTT
0 notes
Text
New Jaguar F-TYPE ready to hit the road after taking unique tour of the Jaguar Design Studio in miniature, camouflaged, Hot Wheels® form
1:64-scale model sports car made a dramatic entrance on a custom-designed 232-metre Hot Wheels® track, making 25 loop-the-loops and three gravity-defying jumps
New F-TYPE’s timeless design evolves with flowing clamshell bonnet, subtly enlarged grille, super-slim Pixel LED headlights*, sculpted new bumpers and slender rear lights with ‘Chicane’ signature
New 12.3-inch HD virtual instrument cluster with Interactive Driver Display, luxurious materials and beautiful detailing define driver-focused interior
Engines include 300PS turbocharged four-cylinder, 380PS supercharged V6 and 450PS and 575PS supercharged V8s**, all offering outstanding performance and driver reward
Available to order now at www.jaguar.com and priced from £54,060 in the UK
Monday 2 December 2019, Whitley, UK – The new Jaguar F-TYPE has completed its journey from sketchpad to showroom with a unique tour – in Hot Wheels® model form – of the Jaguar Design Studio.
#gallery-0-7 { margin: auto; } #gallery-0-7 .gallery-item { float: left; margin-top: 10px; text-align: center; width: 33%; } #gallery-0-7 img { border: 2px solid #cfcfcf; } #gallery-0-7 .gallery-caption { margin-left: 0; } /* see gallery_shortcode() in wp-includes/media.php */
The 1:64 scale sports car model, complete with perfectly recreated black and white camouflage wrap, navigated 25 loop-the-loops, three gravity-defying jumps and 44 corners along the 232-metre long Hot Wheels orange track laid out around the studio.
On the way, it raced from a design review of original sketches, past digital renderings, colour and materials samples and a clay model, revealing the details of new F-TYPE’s purposeful, beautiful and timeless design before coming to rest beside the real thing.
Julian Thomson, Design Director, Jaguar, said: “As a designer and huge car enthusiast, Hot Wheels models have been a part of my life since childhood. They capture the imagination, make owning the car of your dreams a reality, and give you the first opportunity to actually ‘drive’ a car.
“We are used to creating models in clay but seeing such a finely-detailed 1:64-scale model of the new F-TYPE race around the studio, showcasing every stage in our design process, was a truly unique experience.”
Working in close collaboration, designers from Jaguar and Hot Wheels used the CAD data of the real car to craft the precise 3D-printed model, recreating every beautiful detail of the new F-TYPE, including its striking new clamshell bonnet, distinctive super-slim Pixel LED headlights and more sculpted front and rear bumpers.
#gallery-0-8 { margin: auto; } #gallery-0-8 .gallery-item { float: left; margin-top: 10px; text-align: center; width: 25%; } #gallery-0-8 img { border: 2px solid #cfcfcf; } #gallery-0-8 .gallery-caption { margin-left: 0; } /* see gallery_shortcode() in wp-includes/media.php */
The Hot Wheels team also faithfully recreated the Velocity Blue colour from the SVO Premium Palette, and even hand-painted the F-TYPE badge on the back before the model was camouflaged ahead of its own ‘reveal’ in the film.
While the Hot Wheels model features a full interior, you need to step inside the life-size F-TYPE to truly experience the rich, luxurious materials such as Windsor Leather and Noble Chrome which define the new F-TYPE’s driver-focused cabin. Beautiful details surround the occupants, such as the monogram stitching in the seats and door panels and ‘Jaguar Est. 1935’ markings in the glovebox release button surround – a subtle reference to the year when the Jaguar name was first used by company founder Sir William Lyons to brand one of his beautiful cars.
Where the model relied purely on gravity to accelerate it up to speed, the new Jaguar F-TYPE is available with a range of powerful and efficient engines: a 300PS turbocharged four-cylinder, 380PS supercharged V6, and 450PS and 575PS supercharged V8s. The latter is exclusive to the new F-TYPE R and, combined with all-wheel drive, delivers truly extraordinary performance in all gears and in all conditions. Launching from 0-60mph takes just 3.5 seconds.
The tiny F-TYPE reached scale speeds of up to 300mph along the custom-built track which was designed and developed with the guidance of Official Hot Wheels master track designer Paul Schmid.
Bryan Benedict, Senior Manager of Product Design at Hot Wheels, said: “We’ve been working with Jaguar for over 40 years but this was an opportunity to do something really special with a car that was not yet on sale. To go behind the doors of the top-secret Jaguar Design Studio and work with the talented design team to bring this car to life and reveal it on our unmistakable orange and blue track was a unique opportunity.”
The state-of-the-art Jaguar Design Studio opened in September, bringing the entire design team into one purpose-built creative space for the first time in the marque’s 84-year history. The most technologically-advanced design studio in the world, it features industry-leading modelling robotics, virtual reality, an 11-metre 4K powerwall, and has double the floor space of the previous site – allowing 20 full-size clay models to be worked on simultaneously.
Available to order now at www.jaguar.com and priced from £54,060 in the UK.
* Pixel LED headlights are exclusively available on the F-TYPE R
** The new global engine line-up is market-dependant
NEW JAGUAR F-TYPE MAKES WORLD PREMIERE WITH A LITTLE HELP FROM #HOTWHEELS ® New Jaguar F-TYPE ready to hit the road after taking unique tour of the Jaguar Design Studio in miniature, camouflaged, Hot Wheels® form…
0 notes
Text
The Edge of the Earth. Climate Change in Photography and Video
The Edge of the Earth. Climate Change in Photography and Video. Critical essays by author and historian TJ Demos and curator Bénédicte Ramade. Introduction by Director of Ryerson Image Centre Paul Roth.
On Amazon USA and UK.
Black Dog Publishing writes: Increasingly and forebodingly, contemporary artists are turning their attention to the subject of climate change, in poignant and often confrontational ways. The Edge of the Earth: Climate Change in Photography and Video explores recent and historic work in the context of present-day environmental concerns, considering the future consequences of the age of the anthropocene, and humanity’s harsh imprint on our planet.
The Edge of the Earth accompanies a major exhibition at the Ryerson Image Centre in Toronto, and includes works by pioneering and renowned artists such as Edward Burtynsky, Naoya Hatakeyama, Richard Misrach and Robert Rauschenberg; critical propositions on present situations by Chris Jordan, Gideon Mendel and Brandi Merolla; plus visionary works by Jean-Pierre Aube, Adrien Missika, Evariste Richer and Andreas Rutkauskas. Photojournalism from the RIC’s Black Star Collection is also included, contextualising artistic reflections within half a century of historical reportage on the environment.
Paola Pivi, Untitled (Ostriches), 2003
Paul Walde recording sounds on BC’s Farnham Glacier. Photo: Pat Morrow
The Edge of the Earth is the most poignant, upsetting and stunning book i’ve read (so far) this year. The catalogue of an exhibition that closed recently at the Ryerson Image Centre in Toronto, it builds a visual iconography of climate change and of environmental repercussions so complex that they probably surpass our comprehension and control.
In her text, curator Bénédicte Ramade explains how the images selected for the show and the book offer far more than mere depiction of landscapes, natural (or rather man-made) events and hyperobjects. They add urgency and a more tangible dimension to phenomena that would otherwise be little more than headlines in newspapers and tragedies that happen to other people, they remodel our definition of environmentalism in the light of climate change, and force us to reassess our individual and societal responsibilities.
TJ Demos wrote a thoughtful essay on the visuality of the anthropocene. His concluding lines are particularly moving. He believes that it might not be the spectacular accidents caused by the fossil-fuel economy that should worry us the most but the silent, accident-free and uninterrupted march of the industry. This new normal background is the one that we should resist politically, civically, morally and economically.
Hicham Berrada, Celeste (video still), 2014. Photo courtesy Kamel Mennour, Paris
Whether they are of the documentary or the speculative type, the photos in the book often made me feel uncomfortable. How do you deal with the ambiguous emotions prompted by beautiful photos depicting ecological disasters in the making? What do you do with the anxiety and the feeling of being powerless that these images inevitably trigger? Should we put our fate into the hands of geo-engineers? Or should we take a step back and re-evaluate our understanding of innovation, progress and survival?
I’m going to let you weep over these questions and list below some of the most remarkable artworks i discovered in the book:
vimeo
Andreas Rutkauskas, Oil!, 2013
Taking its title from a 1927 Upton Sinclair novel, the video Oil! introduces us to the early days of oil extraction in North America. The video follows the mechanism of a rusty jerker line system, developed in the 1860s and still used today to draw crude oil from the wells. The tranquil and trusty mechanism runs day and night, throughout the year.
Jean-Pierre Aubé, Electrosmog World Tour 2012, Mumbai (video still), 2012
Jean Pierre Aubé makes visible the electromagnetic fields that envelop a city. During his performances around the world, the artist uses radios, antennas and network computers to collect and record radiofrequencies, revealing the invisible presence of thousands of emissions from personal communications systems, security, commercial beacons and satellites.
Isabelle Hayeur, Chemical Coast 02, 2011,
Isabelle Hayeur‘s Underworlds series exposes the transformations of rivers, lakes and other aquatic environments. She dives into polluted waters with her waterproof equipment and reveals dying ecosystems and other man-made disturbances.
vimeo
Paul Walde, Requiem for a Glacier (trailer), 2012-2014
Requiem for a Glacier honours British Colombia’s Jumbo Glacier area, a landscape leftover from the last ice age, under threat from global warming and resort development. The center piece of the project is a four movement oratorio scored for orchestra and choir that converts information such as temperature records for the area into music notation. It seems that the project of the resort has since been abandoned.
Julian Charrière Panorama
Julian Charrière Panorama Behind the Scene. Photo via Bugada and Cargnel
Julian Charrière Panorama consists of photographs seemingly depicting majestic alpine landscapes under various weather conditions. However, the images are the result of ephemeral interventions in various construction sites in Berlin. Using extracted soil that was covered by flour and fire extinguisher foam, the artist fabricated miniature, model Alps inspired by his native Switzerland in the middle of the city. The series questions not only how perception works, but also our fantasized relation to “Nature” and the sublime.
Benoit Aquin, Equestrian Statue of Genghis Khan, Inner Mongolia, 2006. From the series Chinese Dust Bowl
Chinese Dust Bowl documents one of the largest conversions of productive land into sand anywhere in the world. Today, 22% of the deserts located in China have been caused by human activities such as over-exploitation of arable land, overgrazing and increasingly deep drilling for water. The resulting dust is picked up by the wind and transported, in the form of giant sandstorms, all over China and into Japan, Korea and even North America.
Amy Balkin, The Atmosphere: A Guide, 2013-2016. Image via zkm
The Atmosphere, A Guide is a poster-essay depicting human influences on the sky and their accumulated traces, whether chemical, narrative, spatial, or political.
Visually referencing the Cloud Code Chart, another interpretive aid for looking up, the Guide visualizes some ways humans occupy present, past, and future atmospheres, from sea level to the exosphere.
Nicolas Baier, Réminiscence 2, 2013
Conceived using a 3D model based on climatological data, Réminiscence is a speculative photo that imagines the gas formation at the early ages of our planet.
Sharon Stewart, Outfall Drainage Ditch at the Union Carbide Plant. From the series Toxic Tour of Texas, 1988-1992
Texas has the largest concentration of oil refineries and chemical plants in the U.S. It also ranks first in the country in the amount of known or suspected carcinogens released by the industry into the environment.
Sharon Stewart‘s Toxic Tour of Texas is guided by farmers, priests, mothers, ranchers, engineers, nurses, teachers and other grassroots activists who are intent on protecting their homes and their communities from exposure to hazardous waste. Some of their actions reversed governmental decisions and halted harmful industrial practices.
Joel Sternfel, Robert Kofi Bamfo, Corporate Manager, Forestry Commission, Ghana. From the series When It Changed
In 2005, Joel Sternfeld attended the 11th United Nations Conference on Climate Change, in Montreal. Almost all the participants agreed that not only was climate change occurring, it was also about to reach a tipping point and become irreversible. His photos portray the delegates at the moment when the horror of what they were hearing was visible on their faces.
Gideon Mendel, João Pereira de Araúj, Rio Branco, Brazil, 14 March 2015. From the series Drowning World
Gideon Mendel has spent 8 years traveling the world, photographing people whose lives have suddenly been devastated by floods.
Peter Goin, Accelerated Erosion, July 1987, from the series Nuclear Landscapes. This canyon is in the South Silent Canyon area on the grounds of the Nevada Test Site. Although the area is not used for testing it demonstrates the accelerated erosion caused by nuclear testing nearby. Vibrations from underground testing fracture the rock cliffs, breaking loose huge boulders
Brandi Merolla, What the Frack!, 2013. From the series Fracking Photographs
Photo on the homepage: Paola Pivi, Untitled (Zebras), 2003. Photography by Hugo Glendinning. Courtesy of Galerie Perrotin.
from We Make Money Not Art http://ift.tt/2oI7Na0
via IFTTT
0 notes
Text
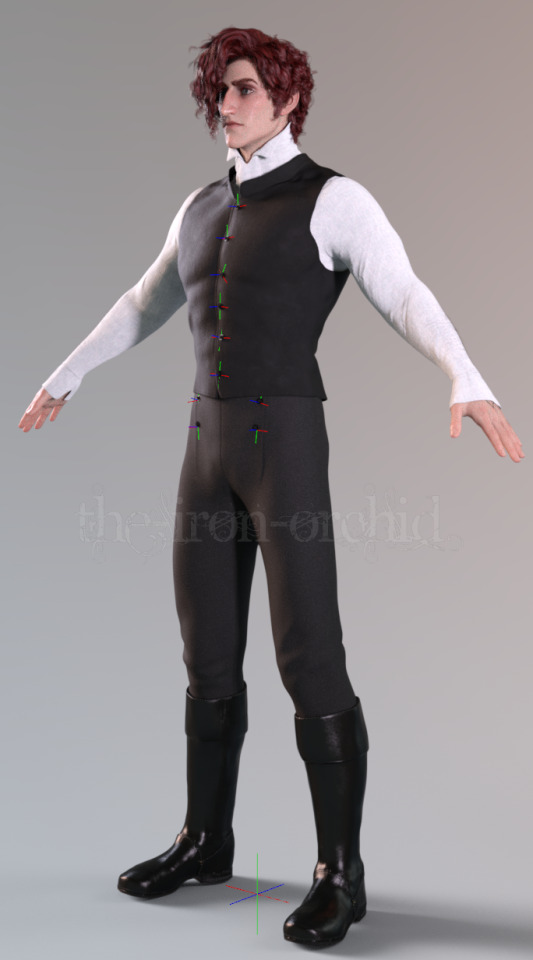
A Grand Tour of the Julian 3D Model, Part 1: Hot Potato
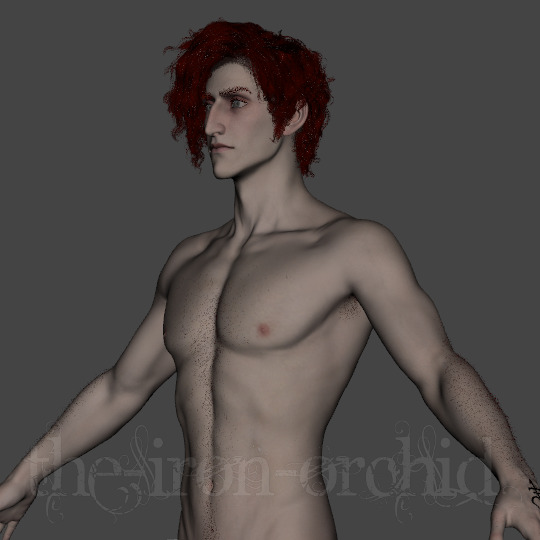
Meet the Genesis 8.1 Basic Male:
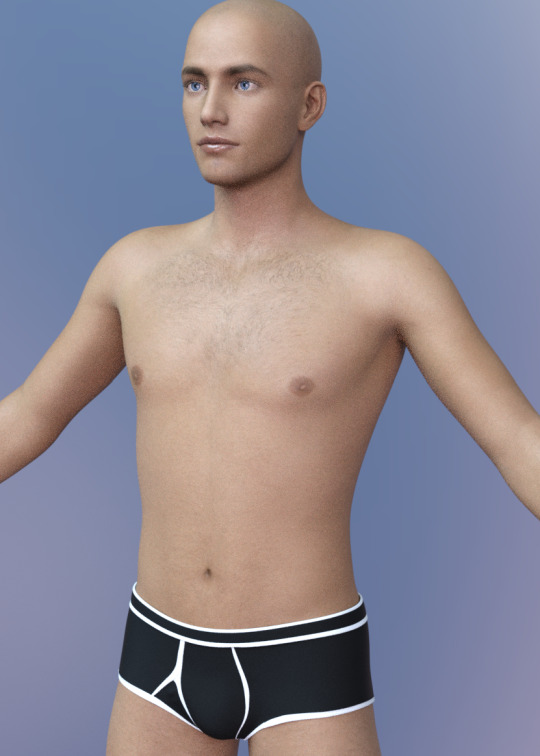
He is fully rigged, with hundreds of precision morphs available to change the way he looks, and hundreds more to make sure he looks reasonably good when you pose him.
He also looks like a potato-mannequin in lip gloss, and unless you place his (rather unprepossessing) geografted junk on him, he has the undefined groin bulge of a Ken doll.
It’s a very long way from that to this:

But they are the same exact base mesh!
Come with me on a magical tour of what went into making this potato-man into the Julian model we love today...

He has 124 individual morphs dialed in at various percentages, each by eyeballing it, rendering it, making a tiny alteration, rinse and repeat. Some control large areas of his body, other control tiny areas like the distance between the peaks of his upper lip.
I could just directly sculpt his mesh in Zbrush to exactly what I want, but that can cause unexpected results when posing, especially in his face. I prefer to use as many fully-featured vendor morphs as I can for shaping, because they contain built-in ‘helper morph’ fixes that automatically load when posing. I then use custom Zbrush morphs for fine-tuning and fixing mesh problems later on, after he has been posed and dressed. (More on that later!)
As an example, here is what happens when a morph doesn’t have the helpers to fix them automatically:

That little bit of his lower eyelid does not close properly, and I have to compensate for it when doing closed-eye renders.
Next, I had to give him a custom detailed skin, so he doesn’t look airbrushed...
Over time, through multiple iterations of the model, I have made over 200 customized 4K texture resources for him. 😵 At any given time, he is using about 20+ of them, along with 20+ additional maps that I have shamelessly stolen from other models I own, mostly for things like skin pore details and specularity (shine) control.
I create the custom maps by layering and remixing multiple 4K texture resources, hand-painting details like veins, makeup and the shadows around his eyes, until I get the look I want. His face texture file alone has 14 layers that I can turn on and off to make him flush to various degrees, look more/less tired, or wear makeup.

I spent all my money on Zbrush and Marvelous Designer, I can’t afford Photoshop. ;P
Compare the relative lack of detail in the very first iteration of the model:
With the most recent version:

Some of this is an improved physically-based skin shader, but a lot of it is the more detailed base textures I created from additional resources, plus some additional full-body HD morphs I got my grubby little hands on. I also made significant improvements to the base hair shape and shaders.
There are things I really liked about the first rev of Julian, but in the end he just looked too cartoony next to Jinana. (S/he was created from a very detailed HD base figure that came with skin textures scanned from an actual person of Indian ethnicity, but that’s a whole different story...) I had to make a lot of Choices to make Julian look like an actual human being, but overall I’m pretty happy with him. (I still make tiny incremental changes over time, so he’s always evolving!)
In the next installment, we’ll take a look at his extra features, from body hair to third-party genitals! ;P
(On to Part 2)
138 notes
·
View notes
Text
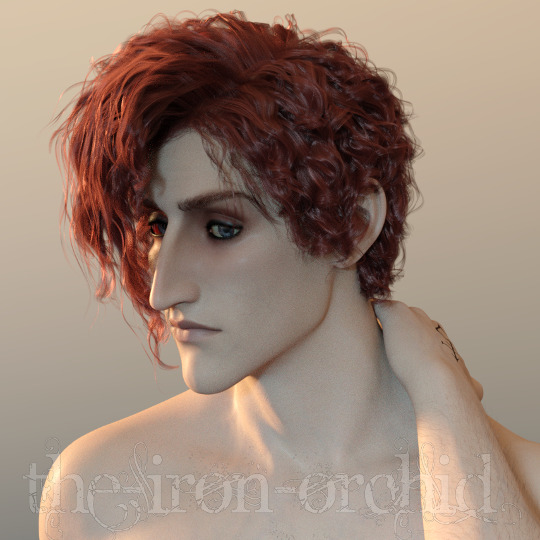
A Grand Tour of the Julian 3D Model, Part 2: Fuzzy Bits
(Back to Part 1)
The next step in turning our smooth potato man into a suitably fuzzy Julian is something called strand-based hair. It used to be that all hair was made up of a bunch of polygon ‘cards’ (see: video game hair). But now, we can essentially give the rendering engine a set of instructions to generate the individual strands of hair at render time.
Behold, a moderately-fuzzy Julian: (click here for big)

Each of those body hair strands has its own geometry, and in fact they are all the same color! But they react to light differently at different angles, just like real hair.
(Warning: near the end of the post I talk about his pubes and there is a hilariously-censored wireframe n00d, with links to ‘full’ versions of the image.)
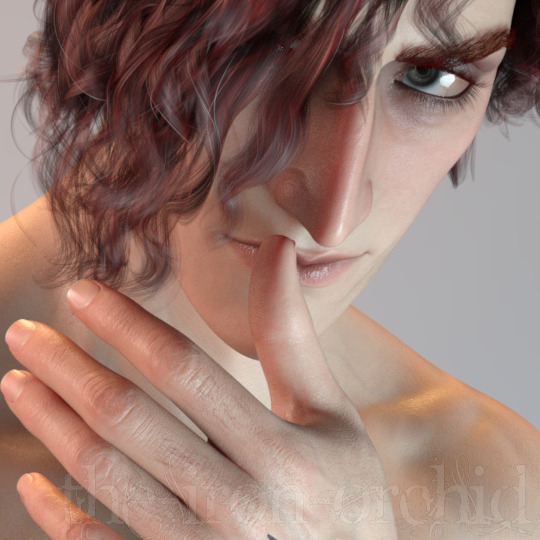
See how his upper lashes look red, but his lower lashes look almost black? (Also check out those wee hairs on the first joints of his fingers, I’m especially happy with those lol). His eyebrows are the same color, a shade darker than his head hair, but they are catching the light and look more red.

Here you can see that his eyelashes are made up of small ‘cards’ with opacity/alpha maps, and his eyebrows are fibermesh - a similar procedure to strand-based hair, but the generated hair geometry is then exported and brought back in as static geometry. It can then be further altered for thickness, expression, etc. But they all react similarly to light.
See how the glancing light on the edge of his forearm brings out the red, but it looks much darker everywhere else? (You can also see where I need to improve the falloff of the hair density map on his arm, lol, it ends too abruptly!)
Strand-based hair is controlled in several ways, and it’s a huge subject by itself. But basically, you paint out an area that says where the hair is to appear and how dense it should be:

Then you adjust the length and direction to your taste - you can even ‘comb’ it in the direction you want!
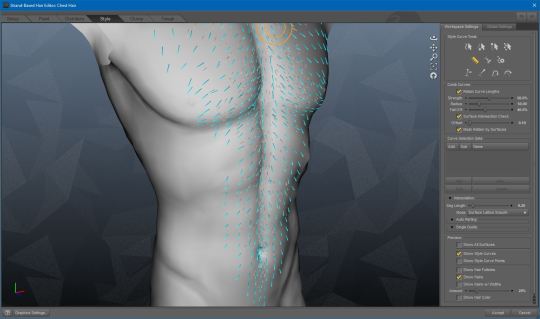
Finally, you can add texture and randomize the length:
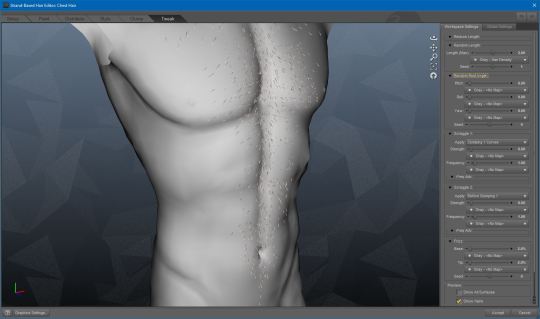
Repeat this process for every single individual patch of body hair, because you’ll need the ability to turn them off and on so they don’t poke through clothing, etc. Plus, this allows you to individually adjust each patch of hair on the fly. This is important because you might want to temporarily make the hairs thicker so they show up better in a distance render, or thin them out for a render that is very close up.
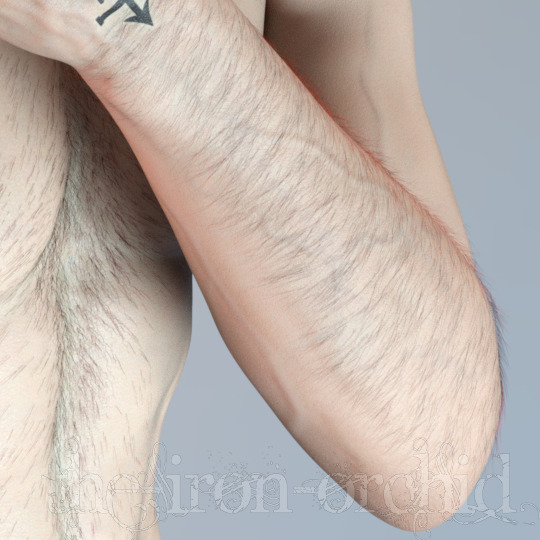
Plus, you may want to stack multiple hair instances for a more realistic effect, as I did with his pubes: scrotal hair lmao
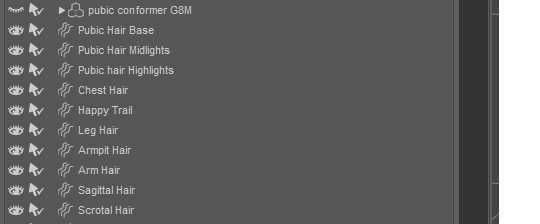
Because the ‘twig and berries’ models are grafted on, he also needs a sort of invisible patch that sits on top of it all for the pubes to ‘grow’ from, otherwise some of it would be covered up when the extra geometry is attached. That’s what the conformer is for!
Here you can see his leg hair and pubes in wireframe mode...

By rights the pubes should actually go down into the inner thigh area, but it causes some weird issues when posing the legs, so I usually just adjust this in post work.
🔞 Links to the full versions of this image, and a fully-rendered version, may be found below. 18+ only!
Wireframe / Rendered (peen warnings in full effect!)
Fun Fact: the Julian model has two sets of junk, one that is ‘relaxed’ and one that is ‘active’. The ‘relaxed’ version is not really suitable for anything but artistic n00ds, it doesn’t quite look right if you try to pose it upright. Because of this, he also has his ‘hero junk’ - the third-party gens he has on here. For the most part, they use the same textures.
BUT... this third-party model is uncircumcised by default, and because of his Jewish-coding, I hc that Julian is circumcised. This meant that I had to go into Zbrush and smooth away the foreskin geometry *cough* by hand (the extra geometry loops you see near the tip in the ‘full’ version of the wireframe).
Next time: The actual process of making a render with this guy! I plan to take you all from dressing, to posing, to lighting, to rendering and postwork. The final result will be a lovely soft-Julian render in period clothing. There’s a lot left to do!
(Onward to Part 3)
76 notes
·
View notes
Text
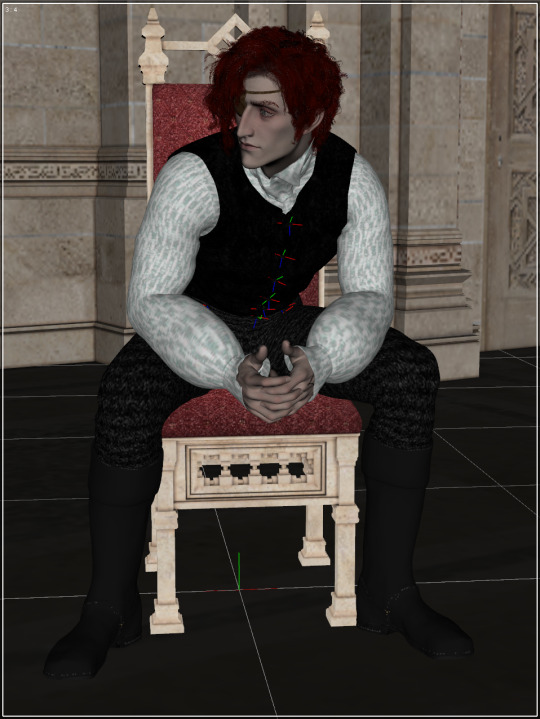
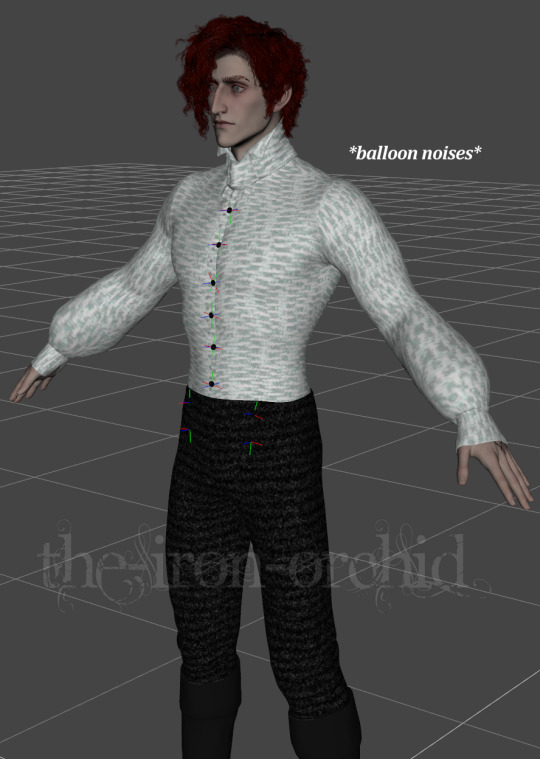
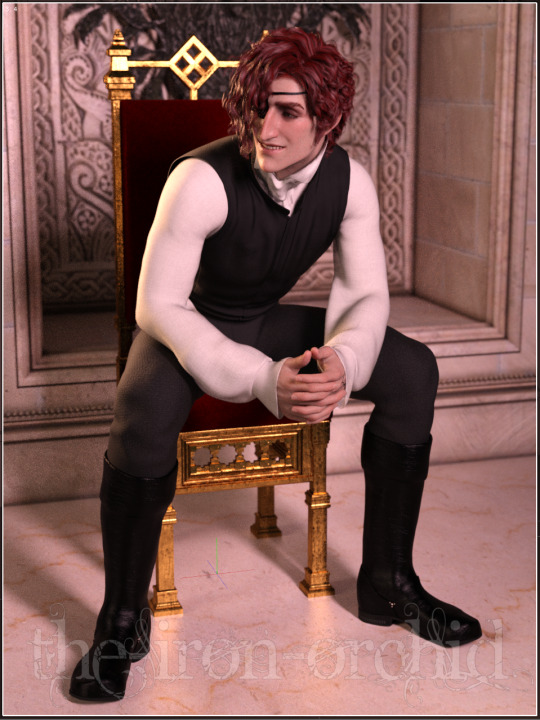
A Grand Tour of the Julian 3D Model, Part 4: Strike a Pose
(Part1) (Part 2) (Part 3)
OK, so I have done three things here:
Loaded a pose preset on Julian (and added his eyepatch)
Added a chair to the scene (scaled up slightly because he is so large)
Added a partial environment from my library
Looks great, right? ....nah.
Hold on to your butts, because this is a beefy post!
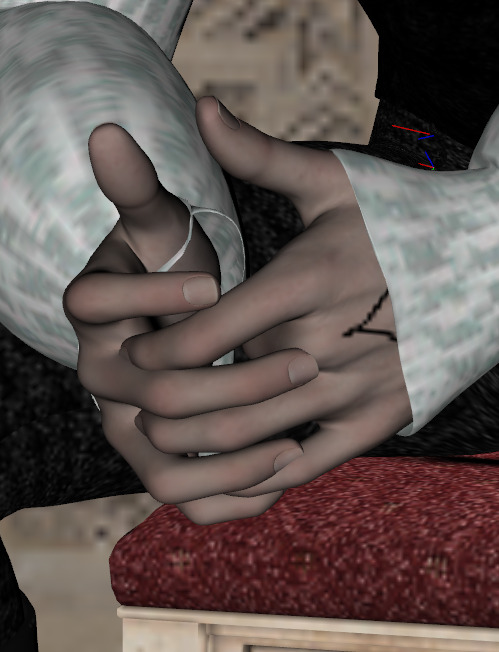
The hands don’t meet properly because Julian has Spider Hands, and the right cuff is doing something weird

What the hell ass balls is going on here??? I think the pose creator just did not want to deal with this finger and tried to hide it lol
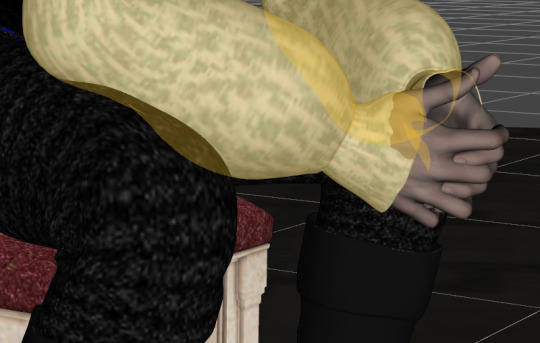
The boofy sleeves are clipping through his pants.

His butt is hovering slightly above the dip in the chair seat.
This is actually very good as far as using a preset pose goes - they are made for specific figures (like the potato-shaped Basic Male), and can sometimes cause really weird results on customized figures. I got lucky with this one - they are often only a vague starting point for me.
First, we’re going to fix all those little pose problems!
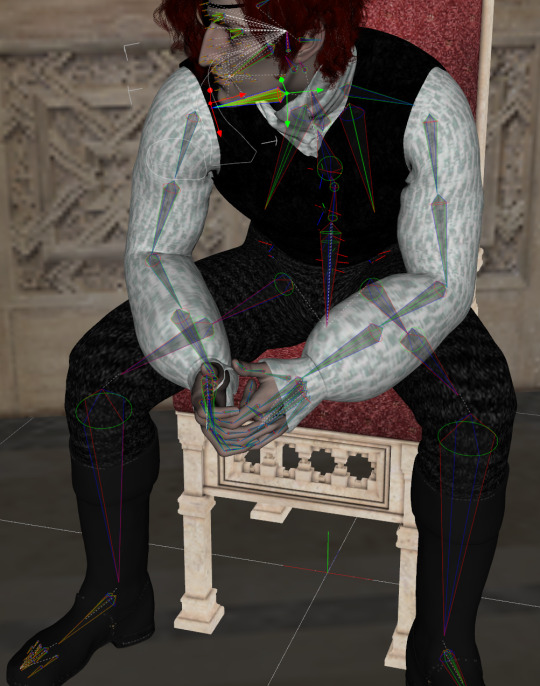
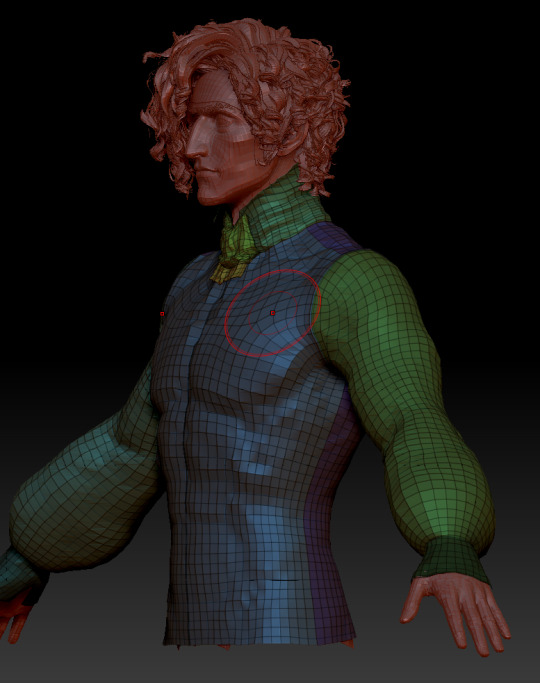
Those cone things represent ‘bones’ in Julian’s rigging. Each bone can be rotated on its virtual joint, and doing so alters the mesh connected to it - the mesh follows and stretches itself to accommodate the movement. How much the movement of a given bone changes the shape of the mesh around it is controlled by weight mapping.
I have selected the bone that moves his upper right arm and shoulder. The red area is the most stretched or compressed by movement of that bone. The blue area is less affected. The yellow area marks the edge polygons of the area of effect. The grey area is not affected at all. Every single bone has this kind of mapping to tell the software how to handle movement of that bone. This bone also has child bones - the lower arm, hand, and fingers. These follow the parent bone, the same way your forearm and hand will follow your upper arm if you lift it.
Moving a bone may also automatically engage helper morphs that change the shape of the mesh to something more natural looking - for example, squishing the underarm area if the arm touches the chest or ribcage. If you look closely at his left shoulder (on the right side of the image), you can see a weird dent - his custom shape doesn’t play well with the helper morph! Fortunately, his shirt will hide this sin.

That’s better! I moved his elbows, hands, and individual finger joints for a better pose. The fingers don’t actually squish, but since he has thin spidery fingers, it’s fine.
Now... making clothing dynamic for draping is a huuuuuuge subject. Suffice to say that I applied a Dforce modifier to his shirt, which tells the software that this mesh should deform when it collides with another surface. You can also tell the software how much something should be affected by Dforce with a weight map - here, I want the collar and cuff seams to be much stiffer, or less affected by gravity or collision.

It looks like he’s wearing a Weird Dad Sweater, but this is the weight map I just painted! The bluish areas won’t move very much in simulation. The red areas will be fully affected by the Dforce settings (a whole post by itself, too much to go into here!)
I repeat this process with the vest, which does open in the front - if I don’t make the buttoned area rigid, his vest will just fall right open!
Now, it’s time to simulate! The simulation process sends Julian back to A-pose, then incrementally brings him into the final pose. That way, the sleeves will collide with his legs as they slowly come to rest on them. I am simulating the shirt and vest together so that his shirt doesn’t sag outside the confines of the vest. (It’s much more common to simulate layers one at a time to prevent explodies; this is a special case.)
After simulation, the shirt is much less puffed over his torso and shoulders, and the sleeves have collided properly with his legs and elbows. The vest has bunched over his pants at the waist and sagged forward slightly. It’s a good start! But as I mentioned earlier, there isn’t really enough geometry for the lower sleeves to simulate well; they just look like partially collapsed balloons.
Time to go back to Zbrush!
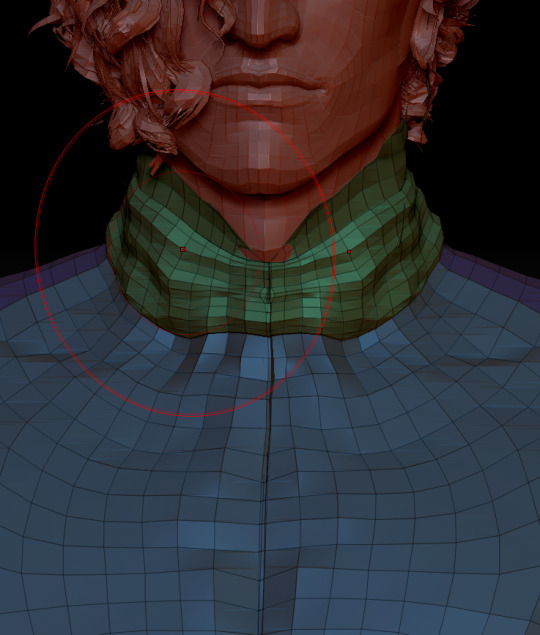
You can see something interesting here: the shirt mesh actually clips through Julian’s shoulders and the vest slightly. That’s ok! In DAZ3D, the mesh has a smoothing modifier that compensates for these little things. So I don’t have to worry about it!
You can also see there’s some weird distortion around the elbows and armpit that I can fix while I’m here (although the smoothing modifier reduces those, too). Also his left collar got a bit distorted, which I can fix manually.
Here it is after a bit of fiddling in Zbrush - I actually did not have to do the mesh-resolution tango, because it turns out that Zbrush’s cloth simulation handles low-poly quite well. This isn’t perfect... but it’s better, and probably good enough for now. (Until it bothers me.)
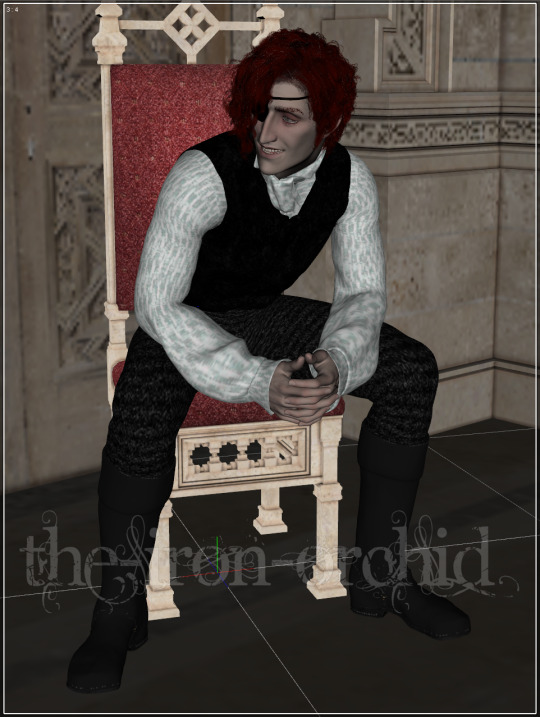
Then I put a cheesy smile on his face! :D I actually do want to render him smiling/laughing in this one, but expressions always look weirdly exaggerated and ghastly in the Viewport. So right now he looks like he’s got a fuccboi grin going lmao

But it looks a LOT different in a quick test render!
So we’re ready to render now, right? Right?
Not even close! 😤 Next time, we tackle surfaces, shaders and lighting!
(Onward to Part 5)
57 notes
·
View notes
Text
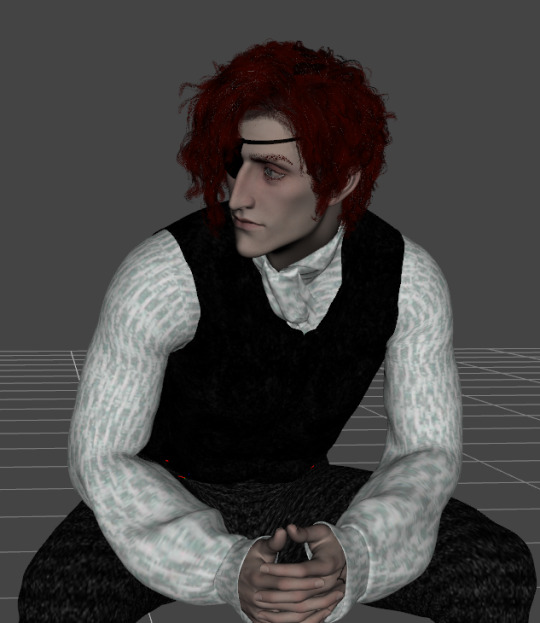
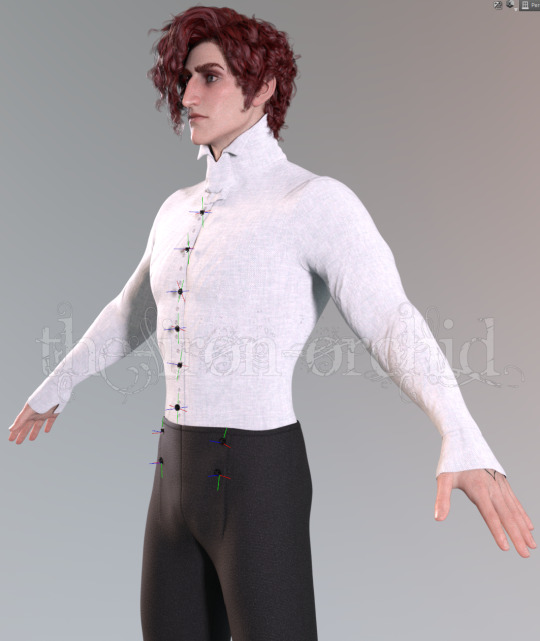
A Grand Tour of the Julian 3D Model, Part 3: Put That Thing Away
(Part 1)
(Part 2)
OK, so we have a reasonable facsimile of a Julian. He has all the body hair you could ever ask for, and fully-featured junk. Now what?
We remove half of that stuff so we can put some clothes on him. 😂 I gave him all the features necessary for spicy renders, but these things get in the way when we want to dress him up! The hairs will poke right through his clothing, and can also cause cloth draping simulations to explode.
Here's Julian in the DAZ3D Viewport, staring stoically into the distance, ready to be dressed up:
The first thing I have to do is remove his junk, because the clothing would just ignore it and his happy dingledonger would clip right through his pants. Hilarious, but not the effect we want. Same for his painstakingly-crafted bush, so away they go!
Warning: weird Ken-doll-like nudity under the cut...

L E G G I E S
Fun fact: the Viewport is actually a type of render - any time you are seeing a 3D model in space, you are seeing a render. The viewport uses an engine called OpenGL that is much faster but much lower quality, so you can see the changes you make in realtime. When I’m ready to test lighting or other things that only appear in a full render, I will switch my viewport to use the Iray engine, which is much much slower but simulates the effects of light in the real world. You may have heard of PBR, or physically-based rendering; that’s exactly what Iray is.
Now we’re going to stuff Julian into something like this outfit, using assets that I already have in my library that are similar:
As you can see, it’s not quite the same, but there are some things I can do to get it closer. The textures look very different in an Iray render, as you can see here:
You can also see all the problems - the clothing is somehow both poofy and clinging to him like a coat of paint, the textures are OK but lacking in detail, and the vest is doing some weird things around his armpit. Nothing works perfectly right out of the box, especially with a custom character!
(Those little green-blue-red marks are rigid follow nodes; they tell rigid objects like the buttons where they should go when I pose or shape the model. It lets them follow the garment without the geometry stretching, warping, or doing anything weird.)
This kind of 3D clothing is called conforming clothing. It conforms to your model. It changes size and shape to fit your model (sometimes a little too much), and it has rigging so that it can move along with posing. When you stack this kind of clothing, it takes the shape of the mesh you choose to collide it with, usually the item right underneath it. So the shirt has the shape of Julian’s torso, and the vest is following on top of that shape. This is why it looks so exaggerated and puffed out. (A lot of clothing also looks puffed because they’re trying to keep the model underneath from poking through, which is a subject all its own...)
But I want this shirt to do something different - I want it to be dynamic. I want it to drape over his body like real cloth. Depending on how an item was made, it can be very easy to do this, or you may as well remake the thing from scratch. Making it dynamic will be a topic in the next installment!
For now, I just want to make some changes to the overall shape of the shirt: I want the sleeves to poof out over the cuff. To do this, I use the GoZ plugin to send the entire model and its wearables to Zbrush:

A quick detour: the model looks faceted in Zbrush because models have multiple resolutions. When you subdivide or SubD a model, it smooths out... but each subdivision level quadruples the number of polygons! For the work we’re doing here, it’s best to work at the lowest level of resolution, or base resolution. It will propagate to the higher SubD levels just fine.
Also, this is the mesh without any smoothing or helper morphs the artist may have put into the product, so it’s much more shrink-wrapped to the figure.
OK, so I have hidden the vest, buttons, and half his body polygons to make things easier to work with, and poofed out his sleeves. This is a shaping morph I can send back to DAZ3D.
Side note: you can move vertices and stretch polygons as much as you want, but you cannot add or subtract even one vertex. If you do, it’s now considered an entirely different mesh, and DAZ3D will consider it an all-new static object with no rigging or helper morphs!
Here you can see that his cravat is FAKE! 😱 I hid the loose ends, and you can see that the geometry of the collar and the cravat is all one thing. There is also no opening in the front of the shirt! There’s just a crease to make it look like it opens. Sigh. But these don’t really matter for the purposes of this render.
More importantly, this mesh does not have enough polygons to drape very well at all; it will just sort of collapse slightly on top, like a deflating balloon. Not ideal.
So, here is my plan:
Move on to the posing and use DAZ3D’s internal dynamic cloth engine (Dforce) to roughly collide the poofy sleeves with other elements in the scene (his lap, a table, whatever it ends up being). It won’t be pretty, but it will give us a rough shape to work with.
Once posing is finalized, I bring him back into Zbrush - there’s no turning back from the next step, so the pose has to be final!
Subdivide the shirt mesh 2-3 times to get a lot more polygons. Like thousands more.
Use Zbrush’s own cloth-simulating tools to refine the draping (they’re an entirely different beast - powerful, but can be very tricky).
Reimport the shirt mesh to DAZ3D as a static mesh (.obj file). I will not be able to re-pose the mesh after this, the rigging will be totally lost. But I will be able to send it back and forth into Zbrush for further refinement if needed.
(Onward to Part 4)
39 notes
·
View notes
Text
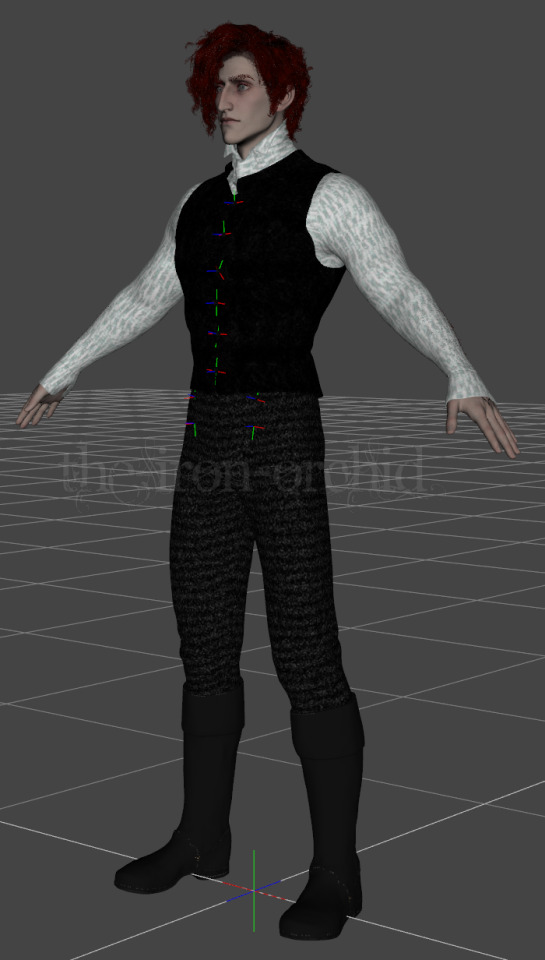
A Grand Tour of the Julian 3D Model, Part 5: The Devil is in the Details
(Part1) (Part 2) (Part 3) (Part 4)
OK, so I’ve spent a bunch of time re-simulating Julian’s clothing, and I’ll finish posing his fuccboi expression once I set up the final lighting, because it will have a huge effect (which you will see later). So now what?

The textures on this outfit are a bit exaggerated in some places. I don’t care for the way the boots have these wrinkles (1) and the baked-in wrinkles of the shirt now make no sense because I have altered the shape of the shirt (2). (I’m test rendering in bright light so you can see all of this!)
Time for a crash course in textures...

A 3D model on its own is just a blank eggshell. Texture maps, slotted into shaders, are what make them look like fabric, skin, metal, glass, or whatever.
To vastly oversimplify, a shader is a bit of software that figures out how light affects the model. Texture maps are plugged into the shader so they can be taken into account during this process. Here you can see a small sample of the many, many shader and texture settings on Julian’s ‘Face’ surface:

Fun Fact: Julian has over 50 individual shader settings on his skin surfaces!
Texture maps may be a seamless repeating tile, or they may be a single hi-res image that is created for a specific part of the geometry, like Julian’s face above. These textures are often ‘painted’ directly on the model in a texturing program, and then ‘unwrapped’ like an orange peel and flattened into a 2D image. (The 2D image can then be modded fairly easily for things like makeup, freckles, etc.)
Most 3D models have, at minimum, a Diffuse or Albedo map (the base color/texture), a Bump or Normal map (helps ‘fake’ fine detail), and some kind of Glossiness or Specular map (controls shine and reflectivity). But there are lots and lots more kinds of maps for various functions. Different shaders will make use of different additional maps - and some shaders use no maps at all, just color values and math!
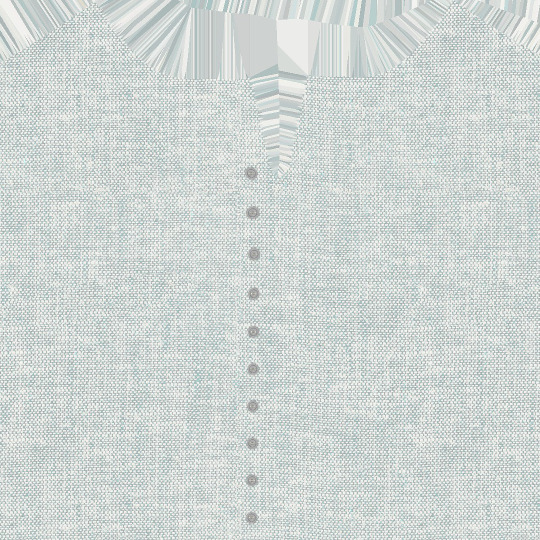
This is part of the shirt’s diffuse map - texture maps are copyrighted by the artist, so I’m not putting them here in full, just a small sample to illustrate what I’m talking about.
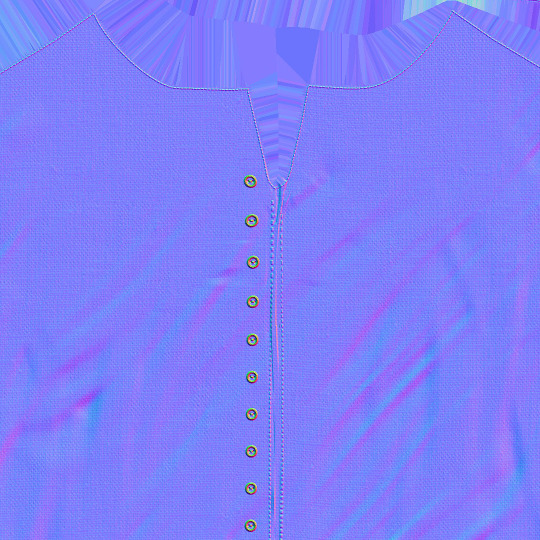
And this is part of the normal map - see how it shows fine details like topstitching? But overall, it’s too coarse of a weave for my tastes, and I want to apply a different texture. Since the vest is being worn over it, losing the fake bump effect on the buttons won’t matter very much.
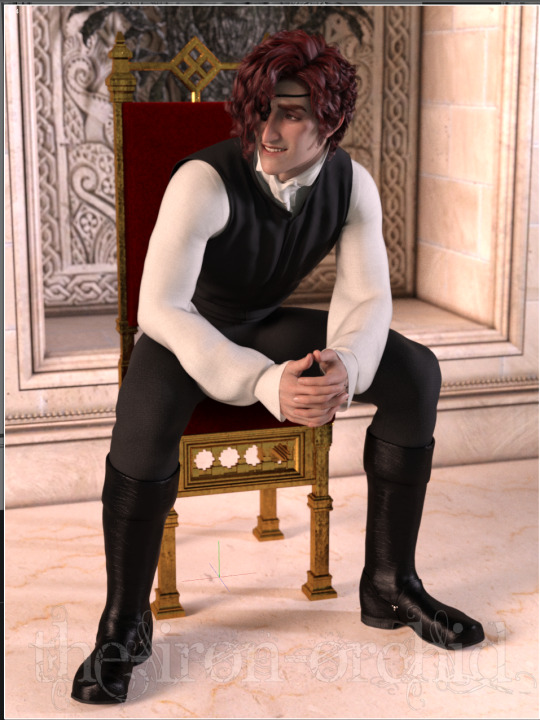
Here I’ve applied new shaders to several surfaces. These are all shader presets - just a little bundle of tiling texture maps and appropriate shader settings. I used a cotton shader preset on the shirt, a slightly creased leather preset on the boots, a velvet preset on the chair cushion, and an aged gold preset on the chair body. I added depth-of-field on the camera to push the background into, well, the background. This slightly blurs everything behind him, and helps make Julian the focus of the image.
Now it’s time for lighting! This, too, is a huge subject, but it is almost exactly like lighting for IRL photography. Here is the ‘studio’ view of the scene, including the camera and the spotlight:

There is also another source of ambient light, not visible outside of a render, that adds an even lighting to the whole scene. The spotlight on the right was placed so that details were more visible - it’s a bit too bright and neutral for the final render, and it casts some odd shadows on Julian’s face.
Literally the only thing I have changed in the image below is the lighting - because of the cast shadows, you can see that it even changes the composition of the image, making it less top-heavy!
I wanted to accomplish three things here: 1) bring focus to his face, 2) warm the scene slightly, and 3) bring up highlights on his hair and skin. So I placed an orange light on his right slightly behind him, and a pinkish light from the opposite side. Then I turned off the ambient lighting. It makes a tremendous difference.
If I zoom out, the studio scene looks like this:

You can just barely see the rim light on the left side of the image as a blue line; it’s partly intersecting with the wall geometry.
...And then I took Julian back into Zbrush to fix a bunch of small things that were bugging me, like his eyepatch. And then I added a little more scene clutter. And then I spent entirely too long trying to get a catchlight in his eye - difficult, because it has to be a reflection from something that is actually present in the scene. His eyes have layers of geometry that represent the moisture of the eye, causing it to reflect light just like the real thing. And then I moved the lights some more to fix weird shadows...
This kind of fiddling often takes up the lion’s share of my time! Truly, the devil is in the details.
But at long last... we are (probably) ready to do the full render! Here’s the latest preview:
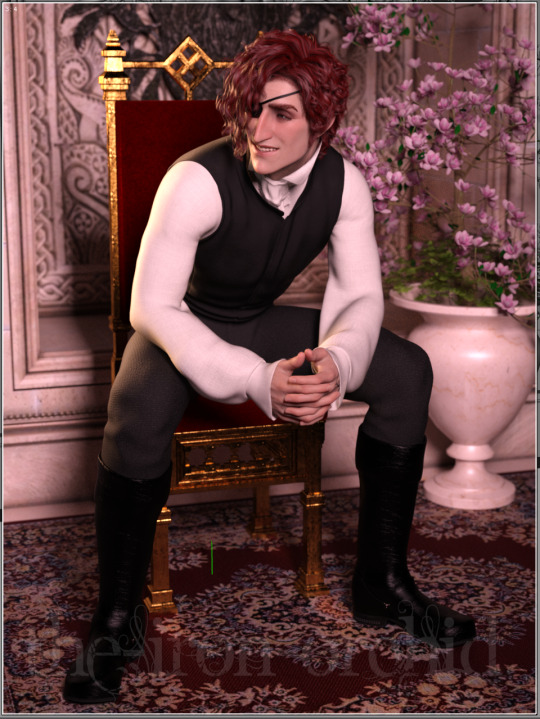
I’ve been rendering at about 1500px wide by 2000px high for most of my stuff - big enough to get some good detail, not so monstrous that it won’t fit on people’s monitors. When there’s a metallic prop like this, I will sometimes use a bloom filter to bring up those fun glowing highlights (I also use it for renders with light-emitting effects like magic sparkles, or renders with a setting/dawning sun to mimic the glare).
Not going to lie, I will usually stop and restart my ‘final’ render several times because I notice things that only show in the full-resolution render (not these little low-res Viewport snapshots). And even then, I may have to go into GIMP afterward to fix ‘fireflies’ (overly bright pixels that often appear on hair and shiny items), adjust contrast, and of course apply my watermark (I’ve experienced art theft in the past and it’s... not fun).
Next time: the finished render!
24 notes
·
View notes
Text
Welcome to Horny Jail!
🔞18+ only, please! Minors will be blocked, sorry.🔞
Arcana Rewrite: Tides of Chaos [Ao3 version]
My Apprentice, Jinana Aditya
About Jinana
Timelines Reference
RP Blog
Jinana-related lore and hcs
Hir lemon-y headcanons 🔞
Shipping With Jinana 🔞
Things to See
Arcana Headcanons and Worldbuilding
My renders and art
Fanart and things I commissioned!
All of my fics (plus special guests!)
My Taglist
About Me
The Smut Generator🔞
The Kink Oracle🔞
What I'm Working On
Render Queue
3D Model List
Smut Prompts Pool
Series: A Grand Tour of the Julian 3D Model
Enjoy!
48 notes
·
View notes
Text
Time to tear my own hair out trying to get Asra’s hair to look good in 3D
When I get too frustrated with that, I suppose I’ll start crafting my series of posts touring the Julian model in excruciating detail :D
16 notes
·
View notes
Text
Going to have to be creative in my next installment of the Julian 3D Model Tour, because it covers some... areas of him that ol’ tunglr does not care for ;p
I think that I’ll place hilariously-censored versions in the post itself, with links to a private post that in turn contains links to the full versions on my personal server, because a) this platform has such a huge heckin hatred of external links that you have to leapfrog it 🙃 but also b) some people don’t care to see full 3D peen and I respect that
9 notes
·
View notes
Last Seen Blogs

hserath
H.Serath!

yorozufarm
YAOYOROZU

numnum-num
numnumnum

iv9r
•̶ I̶n ̶a ̶s̶p̶l̶i̶t ̶s̶e̶c̶o̶n̶d̶ •
drewcent
Drewcent