#Photopea
Text

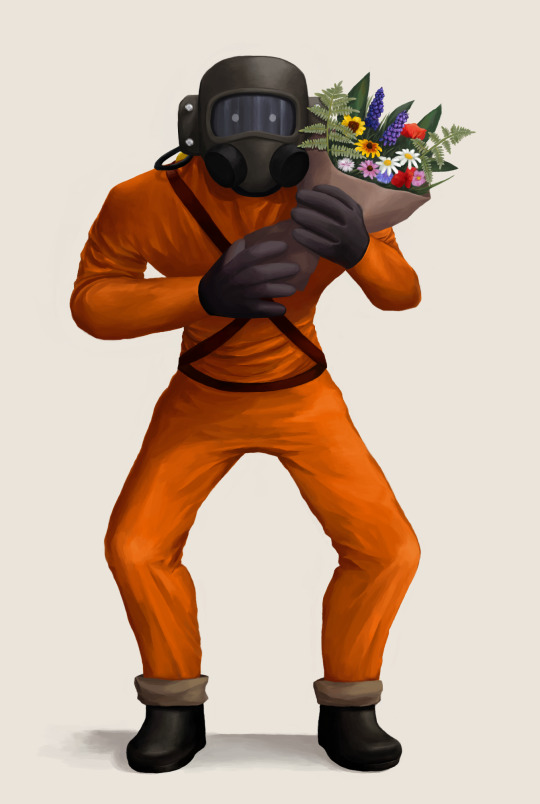
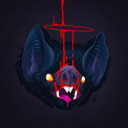
Flowers from the Child of a Flowerman and a Human
(Drawn in MS Paint. Scanner HUD and text added with Photopea.)
#myart#digital#mycharacter#my oc#full color#beeter#lethal company#lethal company oc#mspaint#photopea
390 notes
·
View notes
Text
— RANDOM TEXTURES
ENG.RULES: a. add to favorites and comment (please be kind) if you download; b. please contact us in case of errors/failures in the download; c. don't including in other packs or transfers. PT.REGRAS: a. adicione aos favoritos e comente (seja gentil) se baixar; b. entre em contato no caso de erros/falhas no download; c. não inclua em outros packs ou repasse — download ↺
#psd#psd coloring#effect#moodboards#aesthetic#kpop#png#collage#capas#capa de fanfic#free#resources#photoshop#photopea#pack#packs#coloursource#brushes#actions#moodboard#icons
375 notes
·
View notes
Text
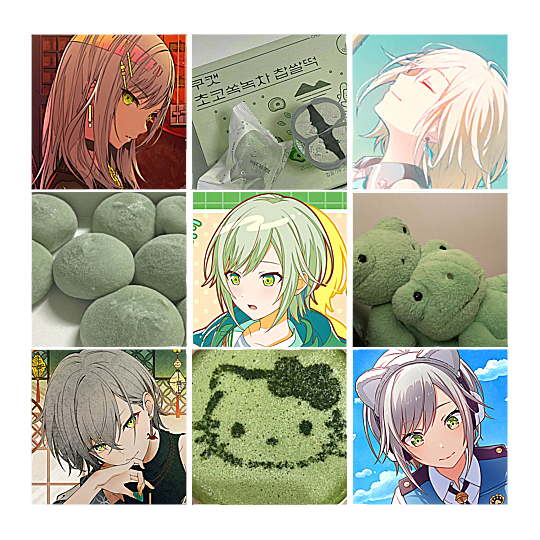
⠀ ⠀ 🖇️ ₊˚⊹ ⠀ random ⠀ ᜴⠀ ⠀ lys ⠀ 。゚ 📐୨୧


#icons psd#rp icons#tw icons#gg icons#quackicons#gg#photopea#banners#twitter layouts#layouts#twt headers#kpop headers#cute moodboard#green moodboard#anime moodboard#random layouts
214 notes
·
View notes
Photo

PHOTOPEA GLITCH TRANSITION TUTORIAL by kai @heroeddiemunson
howdy! so i’ve recently come to realize that i haven’t come across any tutorials for creating a glitch transition on photopea. as someone who has done this transition many times in photopea, i figured that i should create a tutorial to show how i personally do this effect!
what you need:
photopea (basically photoshop in your browser, completely free!)
basic giffing knowledge, because i won’t cover it in this tutorial (other tutorials: tutorial by @benoitblanc, tutorial by @ashleysolsen)
i also recommend watching this youtube video for a real time visual of what i’m going to be describing in this tutorial. this video is what taught me how to do this glitch effect, so if how i’m describing it is at all confusing, check out the video to see it in action!
without further ado, make sure you save your psds regularly and let’s begin the tutorial :)
step one: making your gifs
before we do anything, you have to first make the gifs that you are going to doing the glitch in between. for the sake of this tutorial, i will be transitioning between two gifs, but this tutorial works for however many gifs you want to glitch between for your edit. here are my two gifs that i will be transitioning between:

i highly recommend keeping these individual gifs small in their frame count to make sure your final gif doesn’t go over tumblr’s size limit. the gifs i am working with are both 22 frames; you dont have to make the gifs have the same amount of frames, but i do it because i think it looks cleaner.
with your two gifs, edit them however you would like. if you have a specific order you’d like the gifs to look/a way that your finished product will look like (ex: black and white with a transition to fully colored), then you should color them accordingly. here are what my gifs look like after fully editing them:
once you’re happy with your editing, go to file > export as > GIF and save your gifs. now that we have our gifs to transition between, let’s make our canvas!
step two: making your gifs’ canvas
now that we have the gifs we’re going to be transitioning between, we need to make a “canvas”, or place where we put these two gifs in order to transition between them. so, going to file > new…, create a new canvas. here are the specifications for my canvas (size of your canvas may vary, depending on your cropping for your gifs):

the background for this canvas doesn’t really matter like it does when you’re blending two gifs, but i still made my canvas’s background black because it contrasts the brightness of the gifs i’m placing onto it.
with your canvas now created after clicking “Create”, open up the two gifs that you will be transitioning between. right click the gif’s folder in the layers panel on the right, and select duplicate into… and choose the canvas you just created. once your gifs have been duplicated into the canvas, your layer panel should look something like this:

if you didn’t duplicate your gifs in order, arrange your gifs however you want them to appear. from here, we can now get to the purpose of the tutorial, creating the glitch effect!
step three: creating the glitch effect
generally, with any transition effect, i like to make my gifs seem like they are endlessly looping. while this is a little more work when it comes to giffing, i do think it gives the gifs a nice polish and doesn’t make it feel like there’s a harsh transition between the gif’s looping cycle.
click the eye next to your top most gif(s) in order to make it invisible, as we will worry about it later. scroll down to the layer titled “_a_frm0,50”, right click, and select “duplicate layer”. this should create a new layer, “_a_frm0,50 copy”, on top of the original layer. double click on the copy, and you should see this pop up:
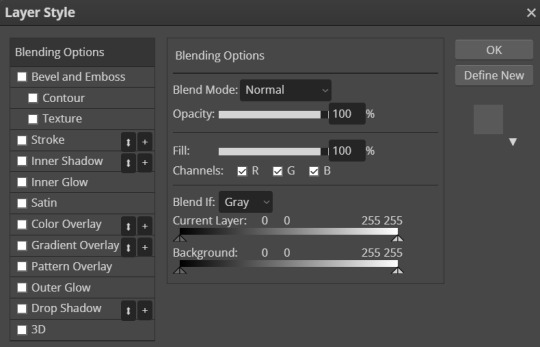
below the fill slider, you should see something titled “channel” with three checkboxes with R, G, and B next to each checkbox. you can uncheck any one of these checkboxes for a different effect; unchecking the R box creates the stereotypical red/blue glitch effect, unchecking the G box creates a green/pink glitch effect, and unchecking the B box creates a blue/yellow glitch effect. for my transition, i have chosen to go with the blue/yellow glitch effect by unchecking the B box. however, you can play around with whatever effect you prefer for your gif.
once you have chosen what checkbox to uncheck, click “OK”. with the “_a_frm0,50 copy” still selected, make sure you have the move tool selected (the curser at the top of the left toolbar), and choose the direction you want your glitch to go and move the layer using the arrow keys on your keyboard. it can move as much or as little as you want, whatever looks good to you! i chose to move this first layer 10 clicks to the left and 5 clicks up, which creates this effect for my first layer:
which looks cool, right? now, you could stop here with the glitch effect, but me being me, i’m extra, so i’m going to include the next half-step that you don’t have to follow unless you want to.
step 3.5: the glitch effect, advanced
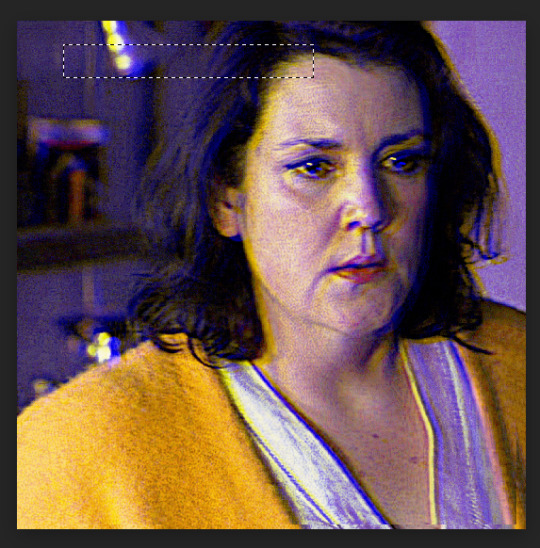
with “_a_frm0,50 copy” still selected, go to the left toolbar and find the rectangle select tool (right under the move tool from before). this part is a bit tedious, but i like the results, so i feel that the work is worth it.
using the rectangle select tool, make a shape around part of the layer, and then go back to your toolbar and select the move tool again so we can move the selected section. do you remember how many clicks you used to move your layer and in what direction it goes in? well, now, do the opposite; since i moved 10 clicks to the left and 5 clicks up, my selected section needs to go 10 clicks right and 5 clicks down. below is what this looks like before and after moving the selected area:
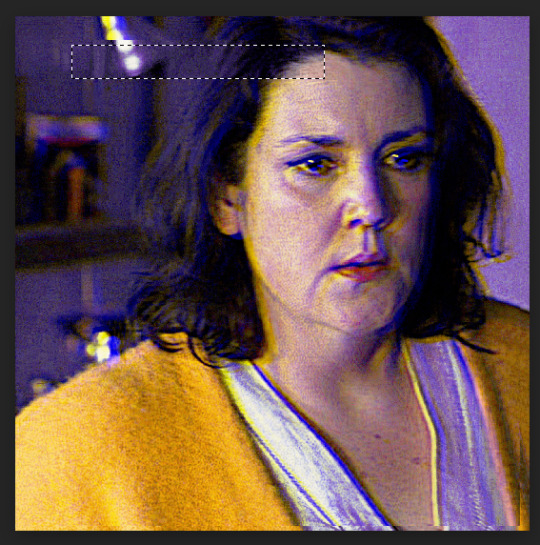
once you’re happy with the moved selection, go to the top bar and go to select > deselect so that you are no longer selecting the section you just moved. repeat this step however many times you like; i tend to do this about 5 times for each layer of varying sizes/lengths to allow variety. here is what the final product looks like for this first layer:
and viola! your fully glitched layer one. now we can move on with the rest of the tutorial.
step three, continued: creating the glitch effect
now that you have finished this layer, make sure you have selected both frames “_a_frm0,50” and “_a_frm0,50 copy” by left clicking while holding down CTRL on your keyboard. with both layers selected, right click and choose the “merge layers” option in the popup; this ensures that the glitch effect that you have created stays as one frame.
now we get to do this many more times! make your next layer, “_a_frm1,50”, visible by clicking the little box next to it in the layer panel, and repeat the before steps. i personally alternate between what direction my glitches go in to add more variety and interest for my gifs. so, for example, with my “_a_frm0,50” frame, i moved it 10 clicks to the left and 5 clicks up; this means, for “_a_frm1,50”, i’m going to move it 10 clicks to the right and 5 clicks down, so on and so forth.
i do this for the first 3 frame layers and the last 3 frame layers for both gifs. when your gifs are finished with their individual gif transitions, they should (individually) look like this:

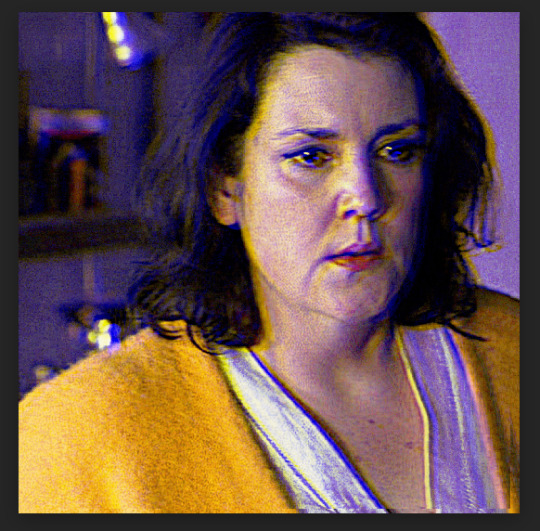
and together, they should look something like this:
and that’s the hard part done! congratulations, you just made a glitch transition!
step four: finishing touches
now, this entire step is optional, as if you already did stuff like add text to the individual gifs you are using this transition with, you’re probably already done. however, if you’re like me and you’re making a gif where the text remains stationary on top as the gif itself transitions underneath, take this time now to do so.
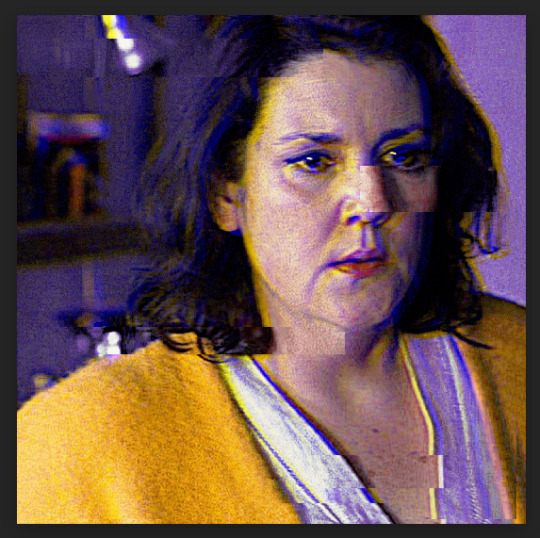
i will also note that if you want your gif transition to match with the rest of your gifs, you can do that in this layer. for example, i want the blue in the transition to be purple like in the rest of my gif; to accomplish this, i will use a combination of a hue/saturation layer and a selective color layer to make the blue be purple (which does change the purple a little from how it was originally, but i don’t mind). i would put these layers on top of both of my gif layers so that the transition layers in both gifs get the same coloring. doing so creates this effect:

(that isn’t a step that’s required by any means (nor do i do it all the time), but in case you wanted to do that, now you know!)
now that i am fully happy with how the gif looks, i will add my finalized text and end up with this as my final product:
now, if you run into the problem of your gif being a little too large for tumblr’s size limit (for example, my finished gif was 10.7MB, and the limit for 540x540 gifs is 10MB) and don’t want to redo all of the process of doing the glitch effect after deleting some frames, i recommend using ezgif’s gif optimizer. it helps shrink the size of your gif without costing you the quality of your gifs. :) i dont normally recommend that for other types of gifs where it’s easier to delete frames, but in this case i know that deleting frames and having to recreate the glitch effect may be annoying!
other than that, this is the end of the tutorial — congrats, you know how to make a glitch transition in photopea! good for you! :) if you ever need any help with photopea, or have a request for how i have done an effect, please feel free to shoot me an ask and i’ll do my best to explain or make another tutorial to help!
#photopea tutorial#photopea gif tutorial#gif tutorial#glitch transition tutorial#photopea#dailyresources#allresources#completeresources#usergif#userars#tusergeo#userlace#tusersai#mystuff#mytutorials#eyestrain#pulsing lights
383 notes
·
View notes
Text


♡ ┈┈┈ #005 True☆Heart
𐙚 ︵ cr me when using . feel free to make adjustments to some layers .
─ for @cherryshh !
#🌻 𓂃 psds.file◞#kokoa shinomiya#shinomiya kokoa#psd#coloring psd#psd coloring#free psd#red psd#rp psd#photopea#coloring#pink psd#aesthetic#d4dj unichord#unichørd#d4dj#d4dj all mix#d4dj groovy mix#photoshop#showcase
157 notes
·
View notes
Photo
WELCOME TO PHOTOPEABLR
a blog dedicated to the gif and graphic makers across Tumblr who use Photopea, the free in-browser version of Photoshop. we not only reblog from Photopea users, but we also post and reblog Photopea-based tutorials, templates, fonts, and other resources!
we are currently looking for members and affiliates! if you are interested, please fill out the appropriate form here. we have no requirements for members posting on the blog, but it would be appreciated if you could post at least once every other month. however, you must be a photopea gif/graphic maker to be a member. :)
we track #photopeablr — to all Photopea users, please tag us in your creations! ♡
#photopea#filmedit#tvedit#musicedit#gamingedit#popcultureds#filmgifs#usergif#lgbtqcreators#userpunk#userlace#userars#usersaskua#lextag#tusergeo#tuserstilinski#photopeablr#*#*admin#*kai
183 notes
·
View notes
Note
Hii you're so talented!! i wonder if you could explain how you did this gif effect with the squares? and do you have any tips on colouring because yours is always top notch <3333
heyy thank you so much 🥹 and of course! i've never really done a tutorial before but i'll try my best to explain it in a way that makes sense 😅

so i start off with making my two gifs seperatly and colouring them as i normally would, once i've done that i load both gifs into the same project and once i've done all that i started on the grid part:
now go to view -> add guides and this window should pop up:
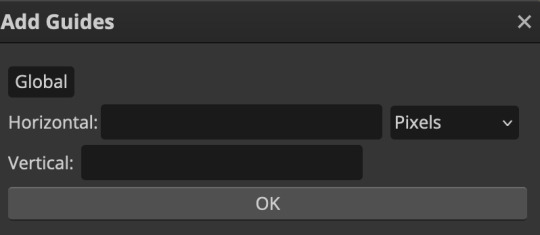
(it's was so daunting at first when i saw this i was like ????? and started putting in random numbers and was like oh that's how this works 🤣)
here's the settings i used for my gif which is 540px x 500px in size with 5 squares x 4 squares: (if you want more or less you just have to play around with it)
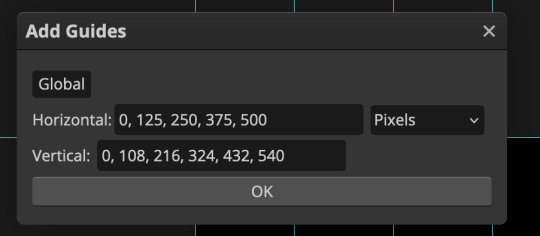
once you've done that it should look something like this:
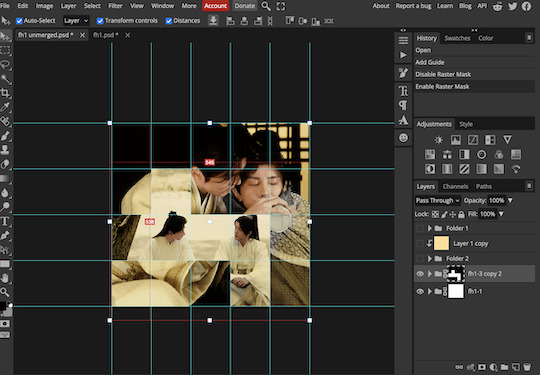
now the next part is really up to preference again: add a vector mask onto the gif that's above the other one like this: (ignore the name of my folder that is irrelevant 🤣)

and then i used the rectangle select tool (this is because the rectangle select should lock onto the grid squares making it easier to erase certain sections) + a black brush tool to erase the squares to show the other gif that's underneath (you can reposition both gifs to your liking which is what i did)
before & after:
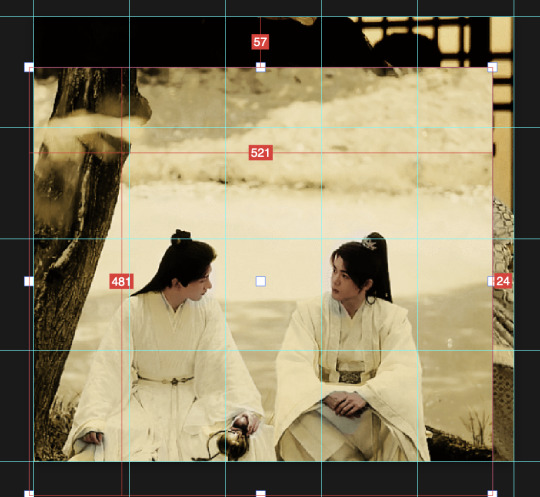

so my vector mask looks like this afterwards

(you don't have to do the squares so close together like i did it was just how i liked it & because of the scenes i had chosen that mine turned out this way)
now onto the grid lines: i used the line tool with these settings

just like with the rectangle select tool the line tool should lock onto the grid line you want to redraw, do this for every line that you want/have for your grid & once you're done go to view -> clear guides and it should look something like this: (added a version with just a black background so it can be seen a little easier)

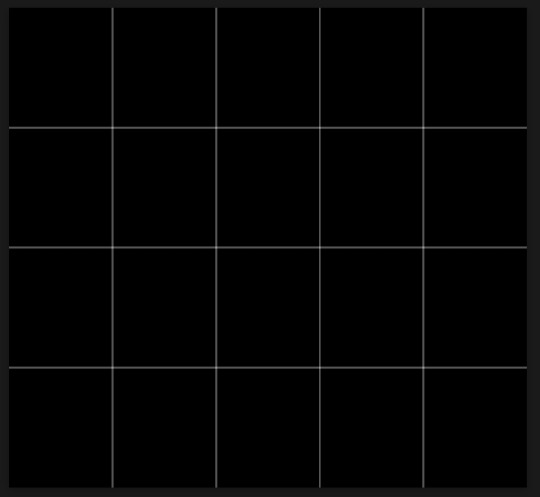
(i'm ngl idk why my lines ended up kinda faded and not white 🤣 i think it might be because i used a white fill instead of white stroke but it doesn't really matter to me because i got my ideal outcome anyway 🤣)
bonus step: you can stop here if you'd like but i wanted my lines to match my colouring & my intended typography so i put all my line layers into a folder and set the mode to difference & added a yellow fill layer with a clipping mask, like this:
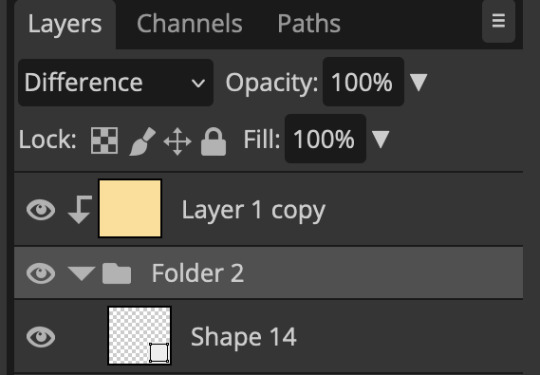
and it should look like this:
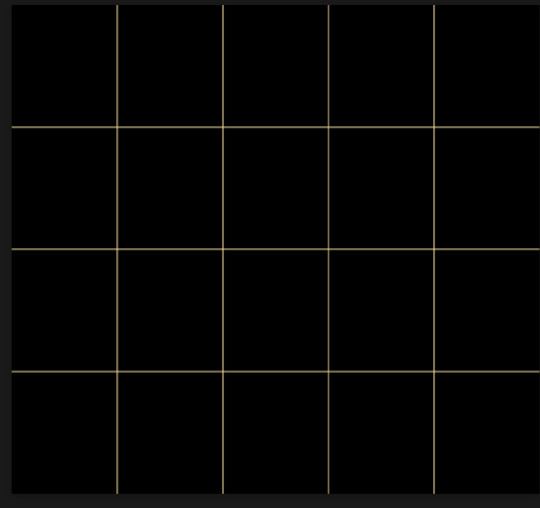
you can also play around with the opacity of the lines too which is what i tried out but i prefered for my set the lines being at 100% opacity but it's really up to you with what you want to play around with
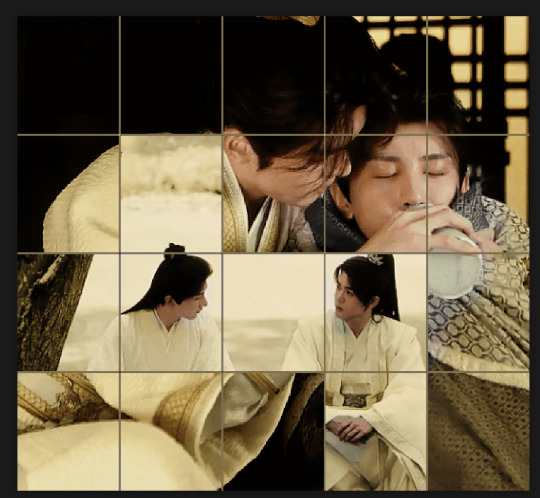
now once you're happy with everything merge those layers together (make sure they have the same amount of frames first before merging them) and either save as it is or add some typography like i did and you should end up with this:
for tips when it comes to colouring it really depends on what you're colouring, if you want to manipulate the colours as much as i do i recommend choosing a colour within the scene so you're not having to change too much, or finding scenes that have colours that can be manipulated more easy (any colour that aren't skin tones, unless you're working with red or yellow like i did here, i chose yellow because one of the outfits in the gif was yellow toned and it looked better with the gifset being yellow than my original colour which was blue), also looking for scenes were the people in it don't move as much also is a big help!
i hope this helps :) feel free to ask more questions if you didn't understand or want some more tips i honestly don't mind!
#replies#mrmalcolmslist#photopeablr#tutorials#photopea tutorials#completeresources#usergif#mine | tutorials#gif tutorial#photopea#resources#gif resources#gifmakerresource#i hope i didn't forget anything aksjdskds#photopea tutorial#tutorial#gif tutorials
123 notes
·
View notes
Text
photopea gif tutorial!
i recently started learning the craft of gifmaking with the free software photopea. when i first started, i had to piece together several different tutorials as well as extrapolate from some photoshop tutorials because-- no one uses photopea.
but they should! it's free! it can run in your browser! it can do most everything photoshop can do and you don't have to deal with adobe or torrenting. so i'm making a tutorial of my photopea gifmaking process because that's what i needed a couple months ago, and i hope it can be of use to some others. let's go!
1: PREPARING
source the scene you want to gif. it's best to download your video when you can, but screen recording can work in a pinch. this is the video downloader software i use.
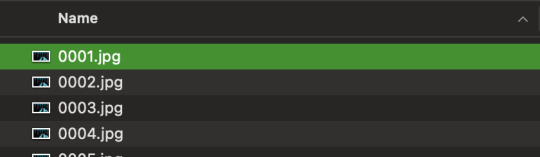
once the source video is downloaded, i like to pick out the specific moments i'm going to gif and save them as their own files-- this makes future steps easier. an individual gif shouldn't be more than 4ish seconds, so limit your selections to about that. name your files in a way that makes sense to you:

2: CONVERTING TO .JPG
i like to convert my video clips to .jpg format. it is possible to load video clips directly into photopea, but unless it is a very short <30fps clip, it is likely to freeze or crash in my experience. i use this website as it downloads a higher framerate (~25fps) than others i've used.

convert your video files and download the .zip folder containing your frames. make sure to unzip them and name them something helpful if you need to.
3: OPENING YOUR FRAMES IN PHOTOPEA
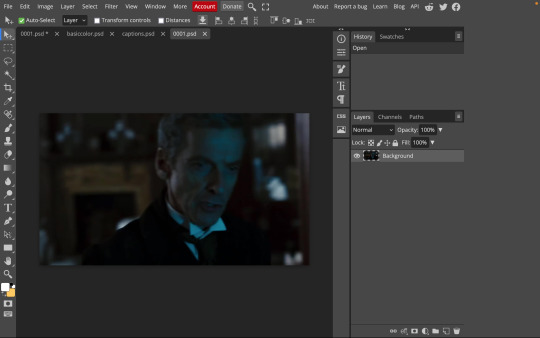
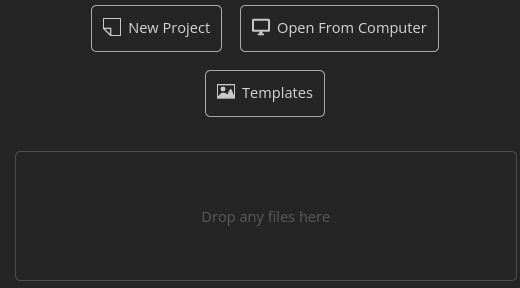
photopea looks like this when you open it:

select "open from computer" and select only the first frame of your first gif:
your environment should look like this (ignore the other projects i have open, you should just have 0001.psd or similar):
go to file> open and place, and select ALL of the rest of the frames from your first clip:
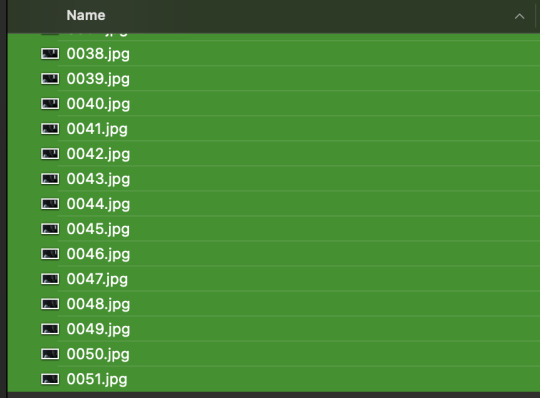
they'll load in one by one, and your environment should look like this:
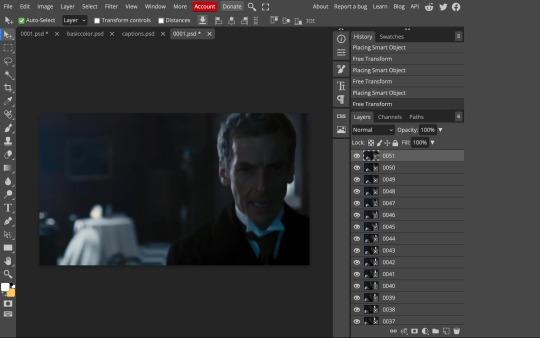
notice how all the frames have a little square in the corner? that means they are smart objects, and we need them to not be for our purposes. select all of your frames, right click, and choose rasterize:

in order to make the series of jpgs move as a gif upon download, select all of your frames and go to layer> animation> make frames:
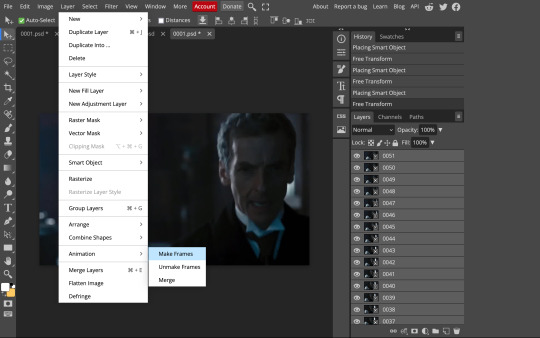
all your layer names should now start with _a_. you can really do this at any point in the process so it's not a big deal if you forget at the beginning.
finally, you want to limit the frames in individual gifs to around 50 or less. if you find you have more, delete some frames off of the beginning or end by right clicking and selecting delete.
4: CROPPING AND RESIZING
select the crop tool on the left hand panel:

at the top bar, select fixed size:

gifs on tumblr are limited to 540px wide for single column gifs, 268px for two columns, and 178px for three columns. the height is up to you; i like to use 350px height with the 540px width.
enter your values into the W and H fields and do not press enter yet. drag the cropped area to where you want it to be-- try to line up the top and bottom edges so as not to lose too much of your image. once you're satisfied with the selection, press enter. your gif is now cropped and resized to tumblr standards.
5: SHARPENING
(if you are working with low-qual video, check out this tutorial by @hellboys before sharpening. basically filter> filter gallery > grain, select soft and play with the settings. then proceed!)
still making sure all of your layers are selected, navigate to filter> sharpen > smart sharpen:
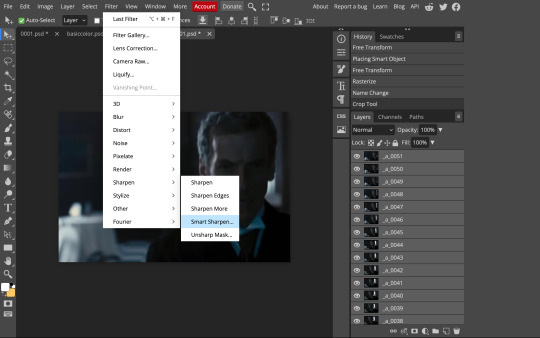
you should see this dialog box:
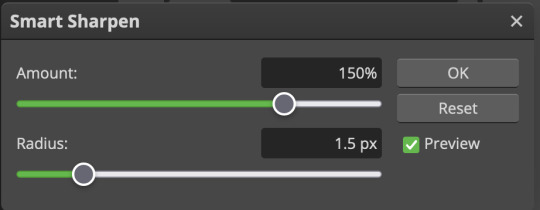
these are the settings i like to use, but you can play around to see what you like. here's the before and after of my sharpening settings:
the difference will be more noticeable once we complete the next step-- brightening and coloring.
6: BRIGHTENING & COLORING
navigate to layer > new adjustment layer:
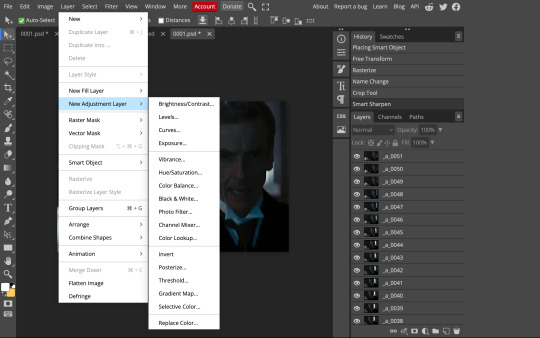
at any time, you can edit your adjustment layers by clicking this button in the right hand panel:

for each edit you make to your gif, you will add a new adjustment layer. always make sure they're at the top of your layer stack. i like to start with adjusting the brightness and exposure, which are both pretty straightforward.
additionally ,you can select a curves adjustment layer, choose the RGB channel, and drag the curve just slightly upwards to further brighten your gif, like so:
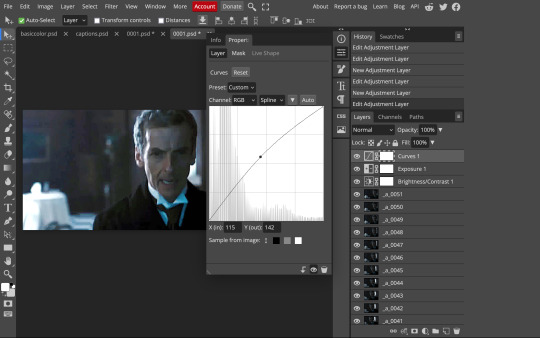
here's a before and after:
now for coloring-- i mostly use the saturation/vibrance, curves, color balance, and selective color adjustment layers. just play around with all of these until you find a style you like. i like my gifs to look really bright and colorful, so i push the saturation and try to draw out warmer tones in the color balance:
7: CAPTIONS
the font i like to use for captions is arial bold italic. you can download it (or any font of your choosing) from pretty much any free font website. if you choose to download a font not in photopea, go to file> open and select your font; it will now show up in the list of fonts.
navigate to the text button in the left hand panel:

and type in the captions for your gif. i make the font size 20 for 540px gifs.
next, while only your text layer is selected, navigate to layer> layer style > blending options:
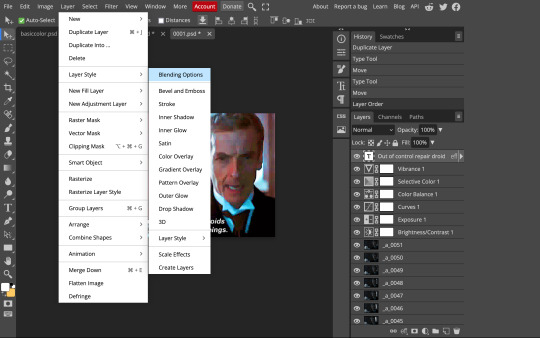
click on drop shadow, and play around with the settings until you get something you like. here's mine:

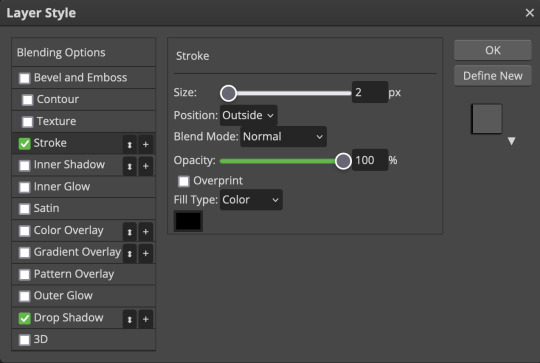
next, click on stroke and do the same thing:
when you're done, make sure your text is your top-most layer.
8: EXPORTING
you're done! head to file> export as> GIF. you'll be prompted with a dialog that looks like this, with your gif playing (you can also do these steps without saving if you want a preview of your gif during editing):
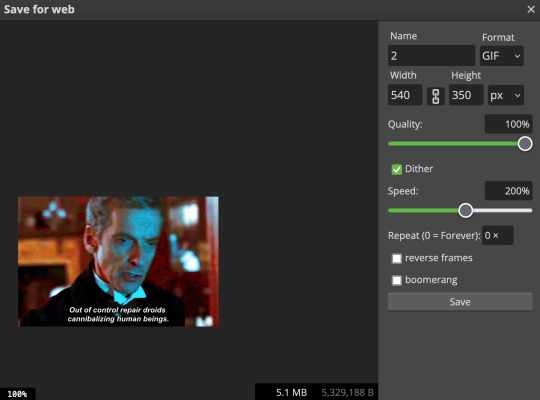
the only thing you should need to adjust is speed. this is the main difference between photopea and photoshop. the only way to specifically adjust the delay in photopea is to manually enter "_05" (or whatever amount of delay) at the end of every layer name. if you're like me you'll agree that is simply too much and settle for the speed slider.
i don't really know what logic governs the speed slider. it doesn't seem to be consistent across gifs, so play with it until it looks right. i've had it on 200% lately which seems insane but looks visually normal.
once the speed is adjusted, hit save and you're done! here's a final before and after of all the work:
BONUS: SAVING .PSD PRESETS
did you think manually creating and editing all those adjustment layers was a lot of work? here's how to streamline it for next time.
at the very bottom of your screen, below your layers, select the icon that looks like a folder (third from the right).
it will create another layer called folder 1. drag your adjustment layers into this folder, making sure they stay in the same order. your layers should look like this when you're done:
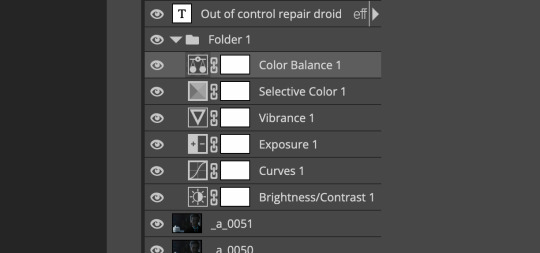
ONLY ONCE YOU HAVE SAVED YOUR GIF, delete all other layers that are not in the folder. then select file> save as PSD. save it somewhere convenient.
next time you're making gifs, after you've cropped and sharpened your frames, select file > open and choose your .psd file. it will open as another project. select the layer that says folder 1, and drag it to whatever project you're working on at the top bar. voila! your adjustment layers are applied to your new gif!
i still like to play with the settings, as coloring and brightness needs will differ from gif to gif.
thanks for reading! here's the gifset i made while making this tutorial :-)
#milk post#gif tutorial#doctor who#photopea#i can't tell if i went too detailed or not enough lol. tag me if you use this i want to see ppl's gifs!!
176 notes
·
View notes
Text

Poem about the Higher Beings of Hallownest. (Yes, I made up my mind.)
Oddly, this was rather challenging to write. Because some of the Gods' lore is just lacking, and rhyming can be simply stubborn at times. Nevertheless, I tried, and I'm somewhat proud of this.
I wasn't planning to write anything today, but music changed my mind, and I was painfully bored.
#poetry#hollow knight#young poets#photopea#pale king#hk radiance#shade lord#hk white lady#unn#nightmare heart#have a good day <3
367 notes
·
View notes
Text

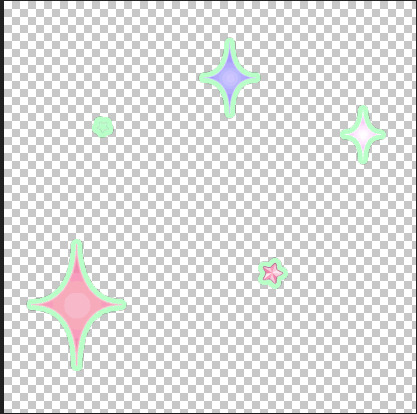
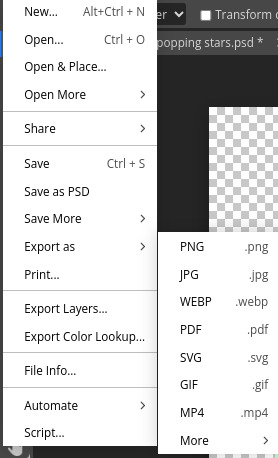
♡⃞ㅤㅤhow to add a stroke effect to transparent gifs in photopea!
✚𓈒 (explained by an IDIOT that's super duper bad an explaning things)
first, open up your gif! you can either open it by clicking the "open from computer" button and or the "drop any files here" button.
For this tutorial, I will be using this gif as an example!

now that you have opened up your gif, look over to the side pannel.

this is what I'm talking about!
now, click the "eff"/"effect" button, its next to the chain button!
after you click the effect button, you will see this pannel!
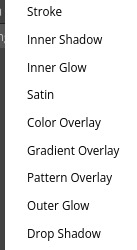
now, click the "stroke" button, after you click the stroke button, you will see this pannel!

you can change the color, size, and blend mode of your stroke! after you play around with your settings, just hit the "OK" button
after you press okay, you should get a little something like this:
if you like your results, then export your gif!
and tada!! your done! here's my result:


#𝒢𝜚 𝐦inty 𓈒✚ ˘ ˘ ⁾#photopea#photopeablr#photopea help#tutorials#photopea tutorial#editing help#editing tutorial
127 notes
·
View notes
Text

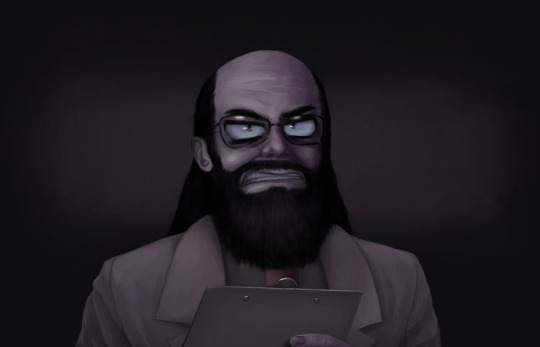
My most favorite, totally real quote from Dr. Christoff.
(Drawn in MS Paint, text added with Photopea)
Without the speechbubble:
#madness combat#madness project nexus#myart#full color#digital#mspaint#jebediah christoff#dr. christoff#photopea#humanize
124 notes
·
View notes
Text

— RANDOM, png pack
ENG.RULES: a. add to favorites and comment (please be kind) if you download; b. please contact us in case of errors/failures in the download; c. don't including in other packs or transfers. PT.REGRAS: a. adicione aos favoritos e comente (seja gentil) se baixar; b. entre em contato no caso de erros/falhas no download; c. não inclua em outros packs ou repasse — download ↺
#pngs#packs#png icon#resources#colorings#psds#psd coloring#resource#photoshop#photopea#aesthetic#random#messy
188 notes
·
View notes
Text
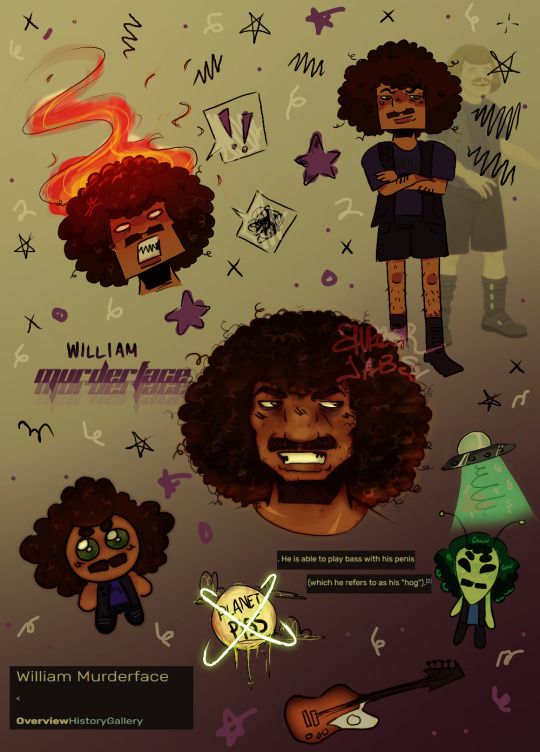
william murderface (x3)
87 notes
·
View notes
Text


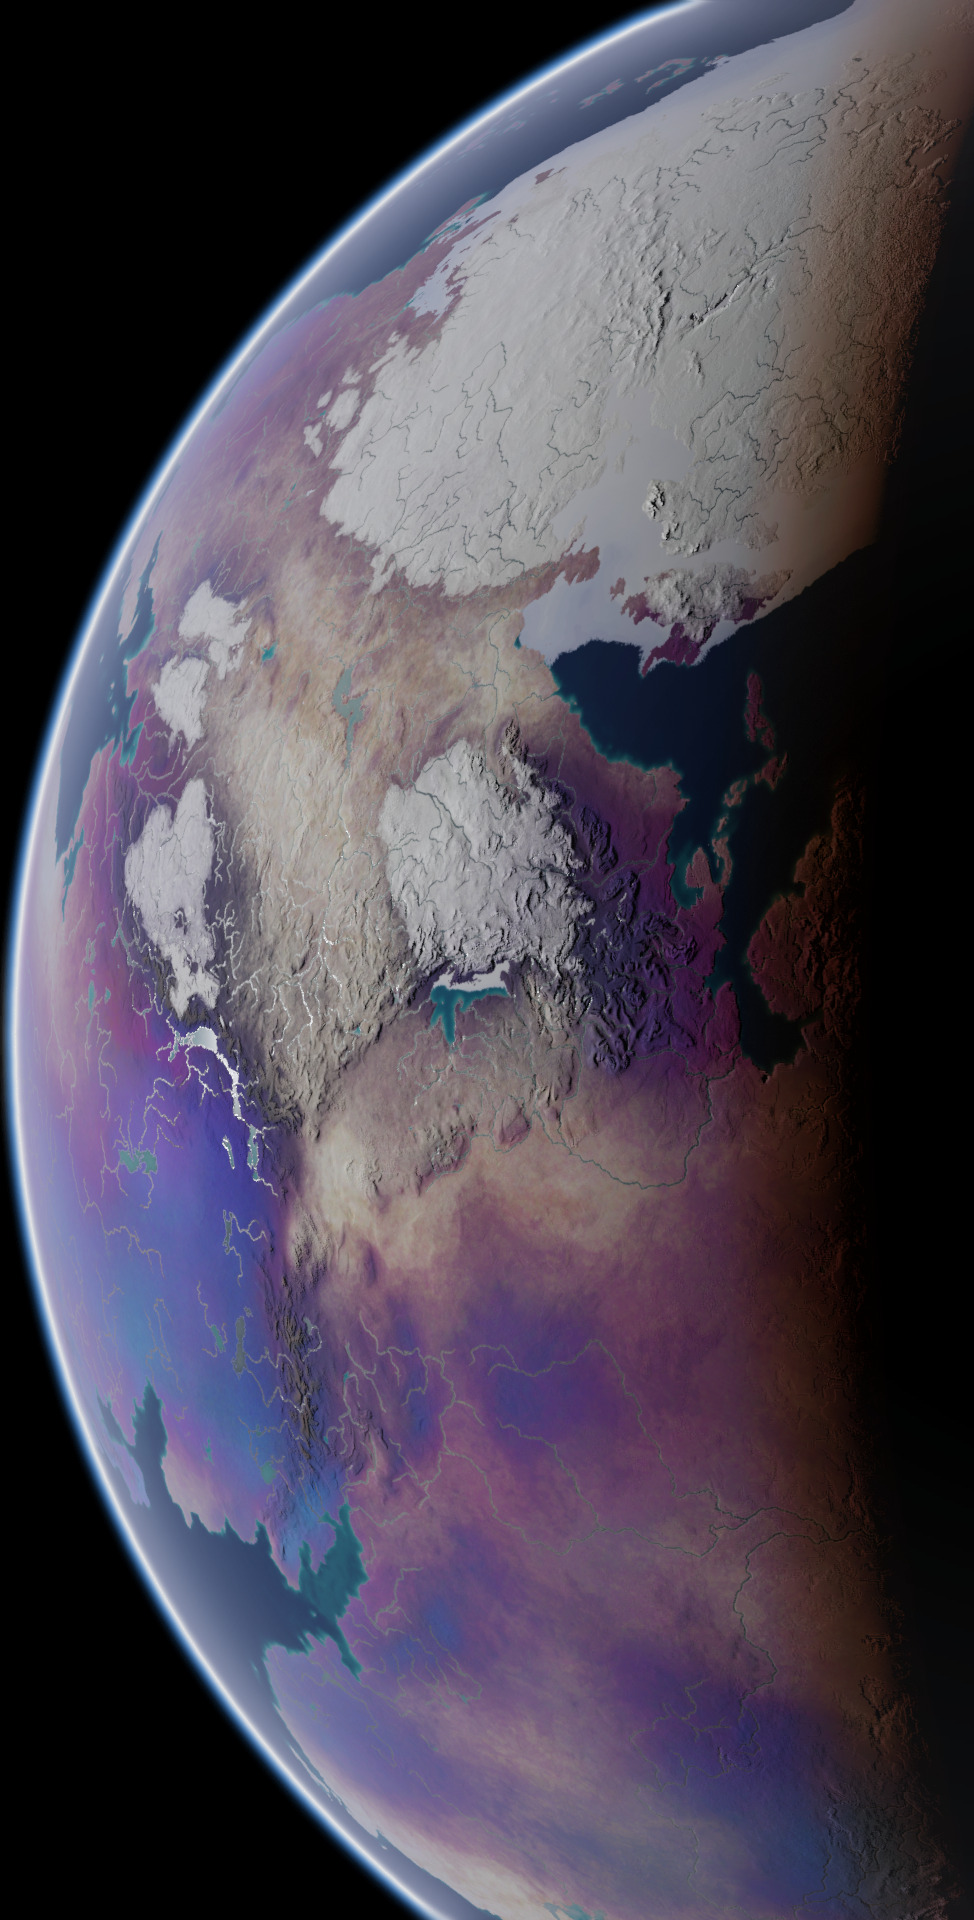


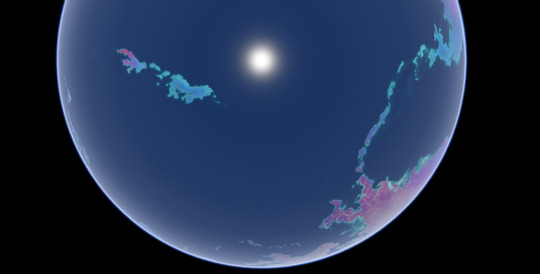
These screenshots I took in Blender are the final product of a commission I worked on for over a year, of my client's planet Ayrum. These represent the planet as it appears at the Northern Spring Equinox, at various angles and different times of day. This project had multiple phases and produced many maps and figures, so I'll be making multiple posts about it over the course of multiple days, working from the earliest results up to the images used in these screenshots.
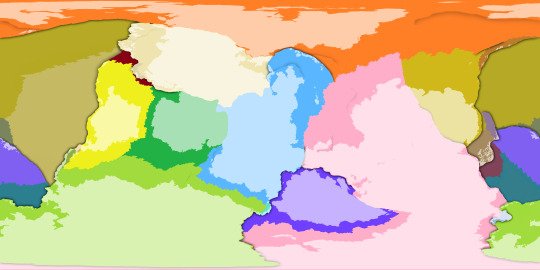
First, the tectonic history sequence, covering about 600 million years of activity. The colors of continental crust in the gif's top half represent which plate it will belong to in the end, and the colors used in the bottom half represent what plates they belong to at the time
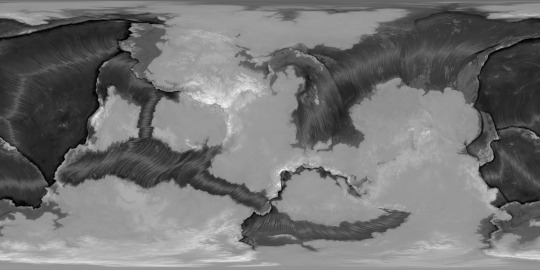
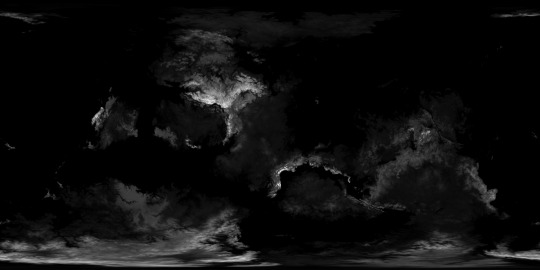
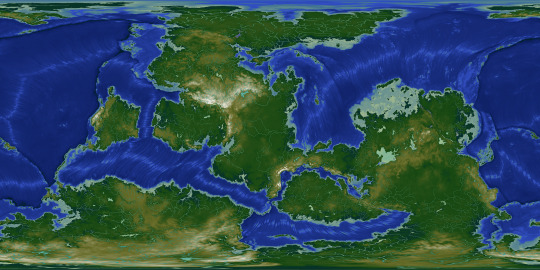
With the tectonic history settled, it's easier to determine what the topography should look like. The two greyscale elevation maps start from the lowest trench depth and from sea level respectively, and the color-graded elevation map has dry land differentiated from bodies of water.
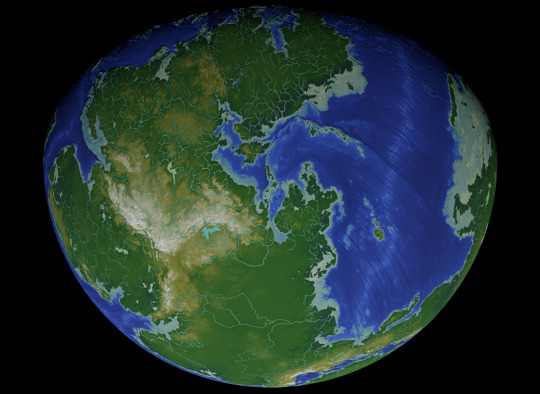


Dipping into Blender once again, with some screenshots where I used the color-graded elevation map as the image texture and the greyscale elevation map as the displacement texture, to emphasize the topography. This will be all for today, but there is much more to come.
These maps were made for the user @umbrace-ramble, to whom I am very thankful for this commission and all the experience it inspired me to gain.
Rendered in Photopea with the aid of Blender,
screenshots taken in Blender,
November 2022-January 2024
#mapmaking#worldbuilding#first posts of many#commission#Blender#digital painting#Photopea#plate tectonics#topography#elevation#bathymetry#imaginary tectonic timeline#imaginary geology#long term project#Christopher Maida Artwork
100 notes
·
View notes
Text


♡ ┈┈┈ #003 Viridescent Veil
𐙚 ︵ cr me when using . feel free to make some adjustments to some layers .
─ tysm @cherryshh for helping me name this !
#🌻 𓂃 psds.file◞#shiho hinomori#hinomori shiho#green#green psd#moodboard#cyan#pjsk#prsk#project sekai#prosekai#psd#psd coloring#photopea#coloring psd#psds#free psd#leo need#red#blue#teal#rp psd#green moodboard#cyan moodboard#teal moodboard
77 notes
·
View notes
Note
this blog is such a cool idea!! i'm fairly new to gifmaking and still learning how to get the best out of photopea. i was wondering if you knew of a way to get gif overlays to work seeing as there isn't a timeline function? like when one gif blends into another with like an ink effect? i was trying and failing yesterday 😅
hello!! thank you for the question <3 apologies for the wait on this tutorial, but follow the steps under the cut below to learn how to make a gif like this!
Before you do anything, make sure you know how many frames your gif is going to be. This is vital for this tutorial, as you are going to be blending gifs together and to do so, you need all of them to be the same length.
step one: the transition gif
Once you have found the gif overlay you want to use for your transition (I will be using the first one from this pack), open it in Photopea. Since you should know how many frames your gif is going to be, make sure you delete the unnecessary frames from the gif overlay. For example, my gif is going to be 36 frames, so I will make sure to delete any other frames I don’t want besides 36 frames. You will also probably need to rename the frames that you’re going to be keeping; with the gif overlay I’m using, all of the frames are titled something like “_a_frm0,30”. However, my gifs end with “,50”, so I need to change the names of the 36 frames of this overlay so they all say “_a_frm0,50” for all 36 frames. This is arguably the most tedious bit of the entire process, which is why I do it first before anything else.
Now you will need to save two different versions of this gif. The first version will be for the “first” gif, and the second version will be for the “second” gif that your gif will transition into. As you likely noticed, gif overlays are black and white; for this tutorial, the first version will be the gif as it comes, and the second version will be inverted. Below are what mine look like after having cropping and resizing the gifs to the size I need them to be for my finished product:


In order to do the inversion, while selecting the folder of your gif overlay on the “Layer” panel on your right, go to Layer… > New Adjustment Layer > Gradient Map…. With the pop up that shows up, check the “Reverse” button to invert your gif overlay. Save this version as well as the other version without the inversion.
step two: creating the transition
after creating both your gif overlay versions as well as the two gifs you’re going to transition between, open up all four of the completed gifs you have created thus far.
Copy over the gif overlays on top of their respective gifs (so, your first gif should have the first version of the gif overlay, and the second gif you want to transition to should have the inverted version of the gif overlay). To copy over the gifs, right click and select Duplicate Into… and select the gif that the overlay will be on. You will want the black of these overlays to show up on both of them, so make sure you set the blending mode on the gif overlay to “Multiply” (you don’t have to change anything about the actual gif that is going to be part of the transition).
Once you have completed this, go to Layer > Animation > Merge in order to combine the gifs with the overlay on them. These are what my gifs look like with the gif overlay transition over them:


step three: final gif
Create a new canvas by going to File > New and creating one with a black background and sized to the size you’ve cropped your other gifs. Duplicate your merged gifs into this canvas, first gif on the bottom above the Background layer and the second gif above that first gif.
You don’t have to do anything to the first gif, but for the second gif, you will need to change the blending mode to “Screen” for the transition to work properly.
From here, do anything else you would like to do to your finished product (add your watermark, do typography, etc). Once you’ve done what you wanted for your finished product, merge your gifs again using Layer > Animation > Merge and then save your gif.
And you’re done! You have successfully completed your gif overlay transition. :)
#photopea#photopea tutorial#gif tutorial#photopea gif tutorial#completeresources#usergif#tusergeo#userars#userpunk#lextag#userlace#*#*tutorials#*kai#answered#resources#tutorials#gif effect tutorials
97 notes
·
View notes
Last Seen Blogs
