#I don’t think sprinkling oregano around has the same effect
Text
Okay so I never explained the Things I was gonna explain but y’all will have to wait because A) it’s night and thus even less safe but also B) the vibes are absolutely not it rn and I did not survive growing up in my haunted ass house by ignoring my instincts
I will have the next food post out soon though! I’m going to save the planned red beans and rice post for Monday though because that’s How It Should Be
#if you’ll ignore me I’ll be sharpening my knives#because some people turn to blankets and pillows and stuffies for comfort and I turn to pointy metal don’t judge me#I still don’t have sage so what else am I to do#I don’t think sprinkling oregano around has the same effect#mod rambles
12 notes
·
View notes
Text
Not-So-Easy-Bake Oven, 2k
Established Dean/Cas, Toddler Jack, Fluff without Plot
day 3 of @thiscastielhasflown and i's follower celebration
prompt: baking
“Petzel, petzel, petzel!” Jack chanted, banging a tiny plastic whisk on the table. He wore a kid's apron decorated with bumblebees, dotted black lines twisting and curving to show the bees' crisscrossing flights.
“Alright, buddy, give me a sec,” Dean said, pouring a bag of dry pretzel mix into a bowl. Charlie had bought Jack an Easy-Bake Oven for his fourth birthday, and this was their first time using it and its soft pretzel making kit—much to Jack’s excitement.
Cas came over from the sink with the kit’s measuring cup filled with water. “Wanna pour?” he asked Jack. He steadied Jack’s hand as he took the cup and poured it into the bowl. “Now it’s time to mix.”
He lifted Jack up to kneel on the table, and, gripping his whisk in one fist, Jack began stirring the mix and water together—if jabbing the bowl could be called stirring.
Dean opened the oven, checking to see if it was working. Already pretty warm for a squat bright pink appliance. “Woulda killed for something like this when I was younger.” He looked at the inside of his wrist. “Used to have a pretty nasty scar from when I tried making Sam brownies in some janky motel oven.”
“You should’ve never been left unattended in the kitchen at such a young age,” Cas griped, grabbing the bowl before it careened over the table's edge from Jack’s vigorous stirring. “You could’ve seriously hurt yourself. If I ever meet John…”
Dean grinned. “He’s lucky he never met you.”
“Exactly.”
"Done," Jack announced, dropping the whisk. Dean raised an eyebrow at the bowl where the mix was only half-combined, dry powder still clinging to the bowl.
"Looks good, kid," he told him, and picked up the flimsy pink whisk to finish stirring.
Jack protested, though, grabbing his hand. "Done!"
"It just needs a little more," Dean told him. "Look, it's not totally mixed."
"Hey, Jack," Cas said. "Help me pick out stuff to put in our pretzels." Successfully distracted, Jack clambered over to him and Cas carried him to the pantry.
Dean finished stirring the mix quickly. "Good choice," he heard Cas say and looked over to see him grabbing a bottle of soy sauce. Oh boy.
The oven chimed, announcing it was pre-heated, and Dean stared at the lumpy excuse for dough in the bowl. Maybe it’d look more appetizing when cooked.
"Chocolate chips, pepper, raisins, oregano," Cas listed, coming over and setting various items down on the table.
"Uhh." Dean stared at the box of corn flakes Jack carried over to the table, nearly as big as his torso. He couldn't figure out which items were Cas’ choice and which were Jack's suggestions. "Not really sure all this goes together."
"You never know," Cas said, picking Jack up and standing him on a chair.
He might not've known for sure, but he was pretty sure he could guess. "Alright, well." He dumped the dough onto the table and divided it into small sections. "Time to experiment, I guess."
Cas sprinkled flour on the table so they could roll out the dough, but before he could even close the bag, Jack smacked his hand down on the table, sending a cloud of flour into the air.
Cas coughed, waving flour away from his face and Jack cackled, one palm dusted white. Dean laughed at Cas, until Jack leaned over and swiped at his t-shirt.
"Dude, seriously?" Dean asked him, brushing his shirt off. Jack only laughed, clapping his hands to send more flour floating in the air. "How ‘bout you put the flour to good use?" Placing a small ball of dough in front of Jack, he propped up the box that the mix had come in and studied the instructions for forming a pretzel shape.
"So first you roll the dough out into a rope," he said, following along with the pictures. "Then you form it into a u-shape." He glanced at Jack to see if he was paying any attention, but Jack seemed more interested in rolling the dough around the table and through the flour. Then he yelped, staring at his hands in bewilderment.
"I'm messy," he said, staring at the dough sticking to his fingers. He held them up to Cas, who told him.
"You have to get your hands dirty." Taking one of the balls of dough, he poured some chocolate chips on it and began rolling them into the dough. "Look at Daddy."
Jack looked over at Dean, just as his dough rope tore in two. "Dammit." He balled the dough back together. “Let’s try that again.”
Before he could try, though, Jack started clamoring for the corn flakes, so Dean set a handful of the cereal on the table. "I think this is gonna mess up the baking times," he said, skimming the back of the box. "Recipe doesn't say anything about adding extra shit."
"This is a child's baking oven. It's supposed to foster fun and creativity." Cas nodded at the box.
Dean turned the box around. Fun for the whole family! it read along with a photo of perfectly formed pretzels. At the bottom, it also read, "Ages 8 and up." Ah. So maybe a little advanced for a four year old.
Corn flakes went flying and Dean dodged one shooting towards his eye. Oblivious, Jack continued crushing the cereal with the flat of his hand, a gleeful smile on his face.
"Yup, uh, good enough," Dean said quickly, grabbing Jack's hands.
"No!" Jack yelled, trying to get out of his grip.
"Take the oregano," Dean said quickly, hoping for a distraction. It worked, except now he had to hand over the container and watch Jack sprinkle the herb all over the near vicinity. Maybe he could pass off clean-up duty to Cas, who was making his own mess, adding food dye to his dough to make a swirl of purple and pink.
He helped Jack combine the corn flakes and oregano into the dough, then roll it out into a rope. Cupping Jack's hands, he guided him through curving the rope of dough into a U-shape, crossing the two ends twice, then pulling them over to make a rough pretzel shape.
“Hey, not too bad.” Pulling out his phone, he took a photo. "Smile for Charlie, Jack."
Jack held up the pretzel, effectively warping the shape, and grinned at the camera. "I make one for Auntie," he declared when Dean lowered the phone, and grabbed more dough to form his own pretzel.
“How did you do that?” Cas asked, studying the box. Going to him, Dean did the same thing he’d did with Jack, standing behind him and holding his hands to help him form a pretzel shape. Cas' fingers were dusted with flour, and Dean got a bit distracted by the way Cas leaned back against him, letting him guide him into creating a pretty decent pretzel. Not as perfect as the ones on the box, but close enough.
“I think I’ve got it,” Cas said, grabbing more dough and forming another pretzel in two easy swoops. Okay, way better than the one before.
“Did you just trick me into helping you?” Dean asked, pulling away from him slightly.
Cas tilted his head into him. “Mhm.”
Dean rolled his eyes but kissed his neck anyway.
Several tries and several more mishaps later, and they had a few semi-recognizable pretzels. Some they dipped into a cinnamon sugar glaze that came with the kit, others they placed as is into small, pink, round dishes.
“They go in here and cook for ten minutes,” Cas instructed, helping Jack push the dishes inside the oven. Jack peered into the opening, then back at Cas and Dean.
“Done now?”
“Gonna be a long ten minutes,” Dean said, setting the timer.
They tried to clean up as the pretzels cooked, though Jack was covered in so much flour, food dye, and dough that he left a trail wherever he moved. And he would not stop moving. As Dean tried to wipe down the table, Jack ran loops around the island, and when Cas tried sweeping, Jack decided to start spinning around in the middle of the kitchen until he fell over. Then do it all over again.
“If he has this much energy now, what the hell’s he gonna be like when you give him a chocolate chip pretzel?” Dean asked Cas, putting the oregano and soy sauce back. He had no idea which pretzel Cas had slipped the sauce into and was not eager to find out.
“That may have been an oversight on my part,” Cas admitted. The oven beeped and Jack rushed to the table.
“Petzel!” he began chanting again.
"Don't touch," Dean warned, using a tool from the kit to pull the dishes out of the oven and place them on the table.
“Which one do you want to try first?” Cas asked Jack, who took a moment to study the pretzels before pointing to the purple and pink one—or what was once those colors but had now taken on a more bloody appearance.
"It's pretty," he said.
“Yes, it is,” Cas agreed, transferring the pretzels onto a plate. Dean turned off the oven, then startled when Jack began crying.
“Hot!” Jack cried, pointing at the dish Dean had told him not to touch. In hindsight, he should’ve realized the temptation would’ve been too much to resist.
“Let me see,” Cas said, taking Jack’s hand.
“No, it hurt,” Jack cried, trying to pull his hand away.
“Alright, alright.” Scooping Jack up, Dean carried him over to the sink and turned on the cold water. When he held Jack’s hand under the stream, Jack squirmed, trying to get away.
“Cold!” he yelled.
“I’m trying to help, dude,” Dean told him. “This’ll make it feel better.” More startled than hurt, it seemed, Jack calmed down after a few seconds. Turning off the water, Dean studied his finger. Not even a blister, but he nodded at Cas. “Think Dada can help?”
Jack nodded and held out his finger to Cas. "Booboo.” Cas took his tiny hand and kissed his finger.
“Are you too injured to eat a pretzel?” he asked.
“No!” Jack yelled, suddenly all energy again, squirming out of Dean’s grasp. Dean set him down and he ran to the table, clambering on a chair to grab the purple/pink monstrosity of a pretzel.
“Try one,” Cas told Dean, joining Jack and pushing over the plate.
Dean grimaced, but chose the cinnamon sugar and corn flake one. Why that was even a combination was beyond him. Bracing himself, he took a bite. Okay. Dry. Pretty bland. Crunchy which was just wrong, but not horrible—wait. He took that back. Oregano and cinnamon sugar did not go well together.
"Um. Well.” He choked down the rest of the bite and set the pretzel back on the plate. “These are, uh..."
"Not good," Cas finished. He squinted at his own pretzel, then took another hesitant bite. Instantly, his face screwed up, and he shook his head, dropping the pretzel onto the plate. “It seems you were right. Soy sauce, pepper, and raisins do not mix."
“Who would’ve thought?” Dean deadpanned. Jack munched happily on his pretzel, cinnamon sugar covering his chubby cheeks. “Someone’s enjoying them, at least.”
“For Charlie,” Jack announced, pointing at one of the pretzels on the plate.
“She’ll love a day-old pretzel,” Dean told him.
“Yes, she will,” Cas said, giving Dean a look. He pushed Jack’s hair back from his face. “It’s the thought that counts.”
Jack abandoned the colorful pretzel for the chocolate chip one, then the corn flake one. True to his word, he left one untouched on the plate for Charlie. She would get a kick out of it when she visited. I knew he'd love it!! she'd responded to the photo Dean had sent her of Jack holding up a pretzel.
“This was fun,” Cas said, a smile on his face, watching Jack.
“Yeah.” Dean looked over at the mess of bowls and dishes in the sink and back at the flour streaked table. Making a fist over his open palm, he said, “Loser has to clean.”
Cas straightened, a competitive gleam in his eye. “Agreed.”
“Rock, paper, scissors, shoot.” Cas threw scissors and Dean threw paper.
“Dammit,” he exclaimed. “You always do rock.”
Cas grinned. “And so I conditioned you to think I’d do it now.”
“Christ, when’d you get so conniving?” He got up and asked Jack, “You wanna help your old man clean?”
“No, tank you,” Jack replied.
“‘Least he was polite,” Cas said.
“Good luck getting him down for a nap later.”
“Why’s that my job now?”
“Sorry,” Dean turned on the water to start scrubbing the bowls. “Can’t hear you over all the cleaning I’m doing.”
Cas rolled his eyes. Dean grinned when Jack offered him a bite of his pretzel and Cas had to act like he enjoyed it. Turning back to the sink, he grabbed the sponge. This was a lot of fun.
#shameless fluff#baby jack#destiel fic#spncreatorsdaily#dean/cas#fluff without plot#domestic deancas#dadstiel#inspired by trixie mattel's easy bake oven series on youtube#and a job i had a few years ago working in a pretzel truck#good times#j&kcreatorfest#expectingtofly writes
58 notes
·
View notes
Text
There Goes The Bride
Let's wrap up our current tour of the attic. Don't worry, we'll be back.
Consider the following scenario:
A razzle-dazzle new ghost is installed at the DL HM attic, with high expectations, but the effect is basically pretty simple, achieved simply by clever manipulation of light projection. Alas, the figure is too close to the track for the effect to be truly convincing, and the Imagineers fiddle unsuccessfully with the new figure, trying to get it to look right...
Sounds like you-know-who, but of course I'm talking about Constance. The only thing missing is the part where they give up and take it out.
There isn't much to say about how the Constance effect works. It's the old "Leota effect," a projected movie on a white dummy. The problem for many fans is that it looks like what it is, a two-dimensional projection. The arms in particular are unconvincing. There's evidence that the Imagineers are aware of the problem and have experimented with ways to improve the look. Compare these two shots of the mannequin under regular lighting.

If anyone wants MY free advice, I'd say the secret is to go fuzzy. Her arms should be nothing more than white, blurry shapes, just thick cloudy hoses. You could sharpen up the hands and hatchet when the hatchet appears, but only for a second. Murk it up, boys, murk it up.
By all counts, the WDW version looks and sounds better than the DL version. Even in photos you can see the difference. Here's DL Connie:

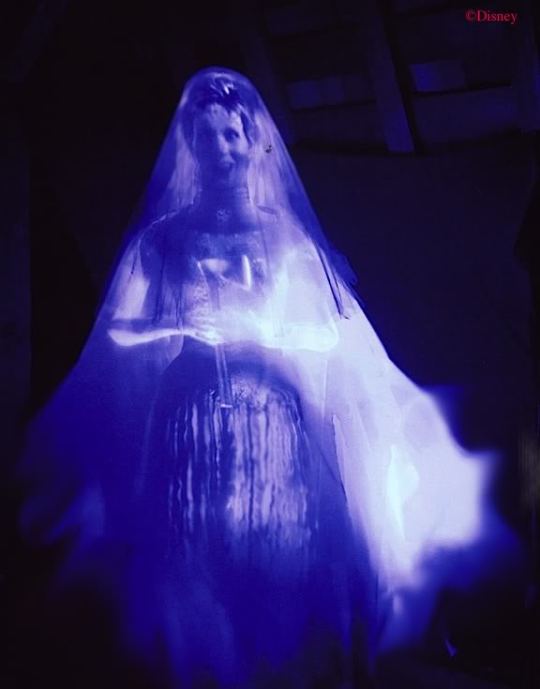
And here's WDW Connie:


(pic by Jeff Fillmore)
Definitely better, but we're still not at the "Gee whiz, how do they do that?" stage for anyone over 11. Hate to sound harsh, but there it is. Is she better than what she replaced? For ease of comparison, here are three nice 3D's, showing the three basic bride types over the years.


Let's talk about something else. Let's talk about the other razzle-dazzle effect that came into the attic with Connie: the wedding portraits. Here the verdict is much more positive. When they're working right, they are impressive, very much in the coveted "how do they do it?" category.
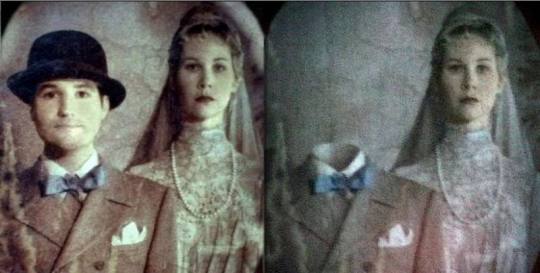
So how do they do it? You may have noticed that when people don't know how a Mansion effect is achieved, and they want to sound like they doknow, so as impress their friends, they mumble about "fiber optics" and "holograms" and sprinkle the word "digital" around like oregano on a pizza. Most of the time they overshoot, spinning out elaborate explanations when the reality is some ridiculously simple trick. Like so many other effects in the HM, this attic-portrait effect is essentially pretty simple. You have a painting on a thin, translucent fabric, and another painting underneath it. There's a spotlight on the front and a sort of light box behind. Actually, it's a little more technical than that, but I'm going to spare you the details. It's all digital fiber optics, and other things you wouldn't understand. Anyway, when the light box is dark and the frontal spotlight is on, you see the front painting with the guy's head on. When the spotlight goes out and the light box in back goes on, you see the headless version behind it. That's because when the back one is lit up, you see it through the translucent front painting, which is now unlit and essentially invisible. It's the old scrim trick, not different in principle from the ceiling in the stretching room.

You can most easily figure out how it works when it isn't working! It is extremely important that the spotlight fade in and out in such perfect coordination with the fading in and out of the back lighting that you don't notice any difference in overall luminosity. Sometimes they're out of whack, and you can notice the picture brightening and fading in synch with the disappearing head. The following two shots are grabs from the same continuous video. Note how the frame is illumined when Reginald's head is visible, but not when it isn't. It's not supposed to be like that.

The other reason the effect can be figured out is because it's been done before, more or less.
Sherman, set the Wayback machine for Paris in the 1890's.
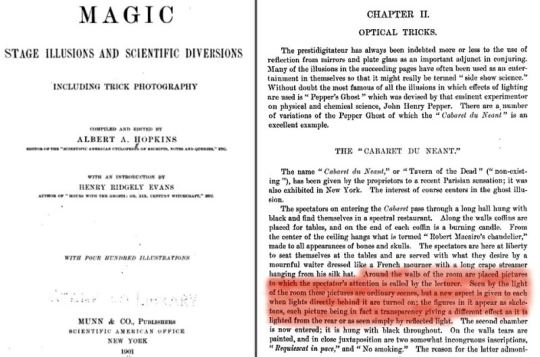
The Montmartre section of Paris saw the invention of the fully-themed nightclub during the late Victorian era, including costumed staff, elaborate decor, and theatrical floor shows. Some of them had otherworldly themes and put on ghost shows. One of the most successful was the Cabaret du Néant ("Tavern of Nothingness" or "Tavern of the Dead"), where the theme was death and decay. In the first room, the waiters dressed as undertakers and you sat at tables that looked like coffins. In the second room they had a first-rate magic stunt in which volunteers from the audience would stand in a coffin and turn into a skeleton (and back again; sorry, it's the law). In yet a third room the volunteers would sit onstage while ghosts that they could not see (but the audience could) made them look like perfect fools. By that point you were pretty drunk and thought this was the funniest thing you'd ever seen. And I dunno, maybe it was. We'll go back to the intriguing C du N sometime later, since it is undoubtedly a source of inspiration for the Haunted Mansion, but for now I want to point out a special effect in the first room, which room looked like this:

Like the chandelier? Anyway, the walls were covered with normal-looking paintings that changed before your eyes into gruesome scenes. Sounds familiar, doesn't it? You would think such a subtle effect would not be picked up under the harsh lighting necessary for 1890's photography, but not so. In the photo above, note the large painting on the left with a skeleton in it and another, smaller painting up in the right hand corner with nothing showing on it:
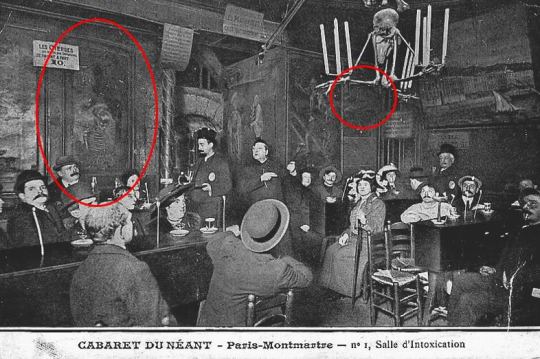
In other photos of the Cabaret, the skeleton in that left hand painting is halfway or nearly gone.

Conversely, in other photos the smaller painting has a skull in it. Here's a side-by-side:
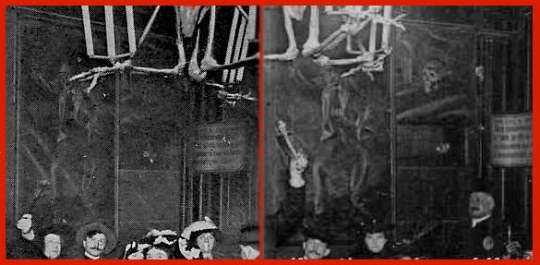
You're looking at the direct predecessors to the changing portraits in the Haunted Mansion, kids. But how did they do it back then? The gullible masses may have been baffled, but not Albert A. Hopkins. No, siree.
"Around the walls of the room are placed pictures to which the spectator's attention is called by the lecturer. Seen by the light of the room these pictures are ordinary scenes, but a new aspect is given to each when the lights directly behind it are turned on; the figures in it appear as skeletons, each picture being in fact a transparency giving a different effect as it is lighted from the rear or as seen simply by reflected light."
The main difference between this effect and the HM wedding portraits is that the Cabaret du Néant pictures were evidently paintings on both sides of the same thin cloth, while the Disney version uses two separate paintings on top of each other and more sophisticated lighting so as to make use of the scrim trick. Still and all, the similarities are greater than the differences. [Edit: I now think Hopkins got it wrong.]
There's an interesting footnote with regard to these changing attic portraits. They were installed in May 2006, but more than a year before that the pictures in the changing portrait hall were replaced with fancy new ones with a more impressive lightning-flash effect. These work the same way the attic portraits work, with two layers and backlighting. That was in January 2005. A few months before that, something very weird happened in the portrait hall that is little-remembered today because it didn't last long. One day in August 2004, the stretch room doors opened and guests found themselves in a noticeably lighter portrait hall, with out-of-place looking Art Nouveau-style light fixtures by the doors, a more lurid, bright green EXIT sign over the chicken exit, and a row of light fixtures along the wall under the portraits, illuminating them. As usual, Allen Huffmann at Disneyfans (an invaluable resource) got some photos.


Everyone thought these abominations had something to do with "safety" and muttered unkind things about Disney lawyers and OSHA inspectors. When the EXIT signs returned to sane levels and the goofy lights were gone, the whole business was quickly forgotten.
I don't think the mounted lights under the portraits had anything to do with safety. I mean, come on, were people bumping into the wall? What I think the Imagineers were doing was experimenting with frontal illumination for the hallway portraits. If the lighting could be successfully controlled so that the front could gradually come up while the backlighting went down, these paintings could have been as sophisticated as the wedding portraits. If this surmise is correct, the experiment must have failed. The changing portraits have no special frontal illumination. This means that in order for the back-side portrait to be visible, it has to be very light and the front portrait much darker, so that backlighting alone can do the job. It's a cruder effect. That's why the changing portraits in every case flash to a secondary image that is all white.


Originally Posted: Monday, June 7, 2010
Original Link: [x]
6 notes
·
View notes
Text
Spiritual House Cleaning
It’s always nice to start the New Year off with a clean, well-appointed home. In some traditions, this is not mere vanity or hygiene, but a spiritual necessity that must be done on New Year’s Eve to ensure that the home is clear and ready for the coming year. Today, I thought I’d look at a few of the magical methods for housecleaning, as well as some of the most common cleaning agents with a magical touch.
Sweeping & Vacuuming – It has to be done. There’s just no way of getting around it. The floors must be kept clean, at least within reason, and usually a broom or a vacuum is employed to that end. Workers in the conjure and hoodoo traditions tend to have specific techniques for sweeping, often going from the topmost floor of the house to the bottom and working from the back of each floor towards the front (though I’ve seen variations on that, often depending on specific needs—getting rid of a bad spirit might involve sweeping out the back door, for example). While floor washes are the go-to method for spiritually cleansing a house and adding specific magical vibes to the area (see Mopping & Floor Washes below), you can add a degree of magic to the sweeping and vacuuming process, too. Various powders can be sprinkled on floors and carpets and left there for a bit before sweeping. These will absorb some spellwork and leave other magic behind. Some good ones to try out (available at Lucky Mojo):
Fear Not to Walk Over Evil – A powerful anti-hex and anti-foottrack magic powder.
House Blessing – A simple, very peaceful powder.
Crown of Success or Fast Money – To encourage prosperity and abundance.
Chuparosa/Hummingbird – To create love and attraction between partners in the home.
Likewise, you might also opt for simple, household items to do some of your mojo work during sweeping and vacuuming. Many spices make great conjure sweeps (and smell wonderful when taken up by a vacuum and slightly warmed by the machine’s motor—an added aromatic energy). Some that I like to use:
Cinnamon – Creates a sense of prosperity and joviality. Some use it for business success, but I find it creates more of a personal confidence and comfortability than anything purely financial.
Allspice – Another success spice, but also good for stimulating conversation. I like to vacuum with cinnamon and allspice sprinkled on the carpets before guests come over to encourage a warm, friendly atmosphere.
Pine Needles – Good for uncrossing and refreshing a home. Not a kitchen spice, of course, but still easily accessible. Be careful though, as too many pine needles can gum up machinery (like vacuums) quickly!
Rosemary – Good for domestic bliss, as well as helping those who smell it focus and think clearly.
Oregano – Keeps meddlesome influences from interfering in your life. Makes a nice “law-keep-away” substitute, and discourages nosy neighbours.
Garlic Skins – Kills off evil, but it will leave a distinctive odour in the air.
Rose Petals – Encourages love and passion when crumbled around the home and left for a bit before sweeping/vacuuming.
Salt – Great for stopping any hexes put upon you and removing unwanted spiritual energies from your home. I use baking soda (a type of salt) sprinkled on carpets before vacuuming to both absorb odours and remove pesky curses. Jim Haskins records a method of preventing unwanted guests from returning which simply involves sweeping salt after them when they leave.
Sugar – A little of this will add a sweetness to your home, though make sure you get it all and don’t use too much—a little sweetness may be great, but a lot of ants aren’t.
The basic method here is to sprinkle everything, let it sit for a bit (if you can stand letting it sit for 24 hours, that is lovely, but probably a little excessive—30 minutes is often plenty of time, and even a 5-minute wait will give you a quick dose of magic).
Mopping & Floor Washes – This is probably one of the best known hoodoo methods of cleansing, blessing, and enchanting a home. Using a prepared magical floor wash to clean anything that can handle getting wet (including the walls) still makes for great spellwork. Some of the most famous floor washes are (again from Lucky Mojo):
Chinese Wash – An old school formula which reputedly came out of Chinatown (though which Chinatown is not particularly clear). It’s made from several powerful ingredients, many of which are found in Van Van (see below), with broom straws added for extra oomph. Good for knocking out any hexes and doing purification work.
Van Van – We’ve covered this in Blog Post 81, but briefly this is a blend of several Asian grass extracts, chiefly lemongrass and vetiver root. It, like Chinese Wash, cleanses and purifies.
Peace Water – When made in its most interesting form, peace water is beautiful to look at, with layers of blue and white/clear liquid on top of one another in a mesmerising stasis. When mixed up and sprinkled into a floor wash, this helps create feelings of calm, quiet, and tranquillity in even very turbulent homes.
Rose Water – This very basic addition to a floor wash can be found in many ethnic grocery markets. It’s not much more than a strong rose tea stabilised with alcohol, so you could easily make your own, but it’s also fairly cheap to buy. When used in a floor wash, it helps promote feelings of love and agreement.
In addition to these specialty formulas, there are lots of common household cleaners you can use with a magical bent:
Pine-Sol – This commercial floor cleaner basically evolved out of hoodoo floor washes. Cat Yronwode even suggests adding a little Van-Van to a bottle of Pine-Sol and using it as a simple substitute for Chinese Wash. Traditional pine scent is great, of course, or you can go with…
Lemon Pine-Sol – Or any lemon-scented cleanser like it. Lemons have a cut-and-clear effect on a space, and have long been associated with destroying curses and breaking hexes. Charles Leland’s Aradia records an anti-evil-eye charm which is fundamentally a pomander made of a lemon and pins. It leaves a lovely clean smell, too, though a fairly artificial one in most cleansers. Feel free to add some fresh squeezed lemons to your mop bucket for a rootsier version of lemon-cleanser.
Ammonia – Draja Mickaharic recommends a simple floor wash of ammonia and salt added to mop water, and it really makes a wonderful cleansing and protecting wash water. It can really neutralise almost anything thrown at you, magically speaking, and it disinfects beautifully. Mickaharic also recommends a little ammonia down every drain when you finish cleaning (just a teaspoon or so), to finish off your magical housecleaning.
Vinegar – Four Thieves Vinegar is popular as a counter-curse wash, and as a protective mix-in for a mop-water. But really, any vinegar will help get rid of unwanted energies and protect the home from invaders and malicious forces. If the scent is strong enough, it may protect you from visitors altogether.
Urine – This one is very traditional in hoodoo, though much frowned upon in modern use. It has, however, been long used as a cleaning agent, and a little urine diluted in some mop water can be very powerful for “marking your territory” and protecting the home. It can also instil a sense of good luck in the place, and ensure fidelity in your mate and passion from your lover. If they don’t catch you doing it, of course.
There are lots of other cleaning agents out there that you can use, of course. Almost anything scented probably has at least some tenuous connection to a magical formula, so a little homework can help you transform that bottle of Mop-N-Glo into a powerful apothecary’s potion.
Windows & Doors – You don’t do windows, you say? Well, you should at least open them up! Whenever you do a good house-cleansing, throwing up the windows and letting some fresh air circulate is vital to getting everything “right.” It helps balance out all the forces in the home, allows bad spirits to leave, and refreshes the air in the house. It’s cold to do this in winter, of course, but turning the heat off for 10 minutes and letting a little fresh air in can make all the difference in getting a home feeling good and happy again. Likewise, the doors should be opened for a bit to let the air circulate.
When it comes to washing doors and windows, you can really use any of the same washes I talked about above in the Mopping & Floor Washes section. You can also use a variety of other ingredients to get things right at all your entrances and exits. For example, many folks take a little olive oil (or holy oil, which is basically blessed and sometimes lightly scented olive oil) and make a little sigil in the corner of every window, to seal that entrance against evil intrusions. Some folks put blue bottles in the windows, or jars full of sand or marbles, in the hopes that any witches who might try to get in will be forced to count the contents of the container and be unable to do so before daybreak (when their power ends). You can make a wash water of red brick dust, urine, and salt in warm water and use it to scrub your door to add a powerful layer of protection. You can also sprinkle salt or brick dust lines down at the threshold and in the sills of every window to keep out unwanted spirits and spells.
Clearing the Air – Once the house has been aired out and all the windows and doors cleaned and opened for a while, some folks like to light some incense, use room sprays, or even just make a little something in the kitchen to add an element of magic to the home. I’ve covered some of the holiday scents and their uses in Blog Post 108, and I’ve already mentioned pine and citrus scents as powerful agents for spiritual and physical cleansing. Other odoriferous offerings to your home can include:
Fresh Bread – One of the best symbols of abundanace and prosperity. Bake a loaf in your oven and let the scent fill the home. Cookies are also good for this.
Floral Scents – Like jasmine, rose, or lavender. All of these have specific uses, and add specific magical “vibrations” to an area (rose fragrances inspire love to many, for example), so look into the flowers you like and figure out what note they will set in your newly cleaned domicile.
Sweeteners – I did mention this in Blog Post 108, but I also said it’s a bit strong when burned. If you are airing your house out, however, a little honey, brown sugar, molasses, or even table sugar might be a good thing to burn or warm on the stove, as it will provide a sublimely “sweet” feeling to the area. Draja Mickaharic highly recommends this, and I can’t say I’m against it either.
Nailing It Down – This is a practice particular to conjure and hoodoo, though there are likely variants or similar practices in other magical systems. The basic idea is that by pounding nails into your home’s corners (and the corners of your property), you fix it there and create a stable environment. You also assert your ownership of the place, and help to guarantee your continued residence there. The most commonly used nails for this are the “square-cut” kind, usually sold cheaply at hardware stores. For doing the corners of your property, you would want to use something bigger, like old railroad spikes. The basic idea is that you simply nail them into every corner of your home, particularly the ones along outside walls. You can bless them with oil or holy water or anything else you feel is appropriate, or simply nail them down while saying a little prayer that you remain safe, happy, and comfortable in your home as long as the nails remain in place. Remove them if you ever have to move away for any reason.
That’s a lot of cleaning! But it’s always good to have a clean home, for both practical and spiritual reasons, so give some of these a go and see how they work for you! And if you missed your New Year’s cleaning deadline, well, you can always do these things during your Spring cleaning, too.
I hope this has been useful! Thanks for reading!
-Cory
https://newworldwitchery.com/2011/01/04/blog-post-113-%E2%80%93-spiritual-house-cleaning/
1 note
·
View note
Text
Ribs 101: Everything you need to know to make THE BEST Ribs
Everything you need to know to make the best ribs this summer! Tips for making them in your slow cooker, instant pot, smoker , on the grill or in the oven!
Everything You Need to Know to Make the Best Ribs
Marrying Parker meant I was marrying a grill master! We have been dining on ribs and incredible grilled and smoked meats all summer long. If you’re like me, I was in the dark about cooking ribs. I wanted to know how to make the best ribs! So Parker taught me everything I need to know to make the best ribs! Here’s what he taught me…
How to Make the Best Ribs
Ribs are a classic summer barbecue food and they’re not as difficult as most people think. I’ll give you the in’s and out’s of ribs in this 101 tutorial so you can wow your family during your next backyard barbecue. You ready to learn everything you need to know to make the best ribs?
What Type of Ribs should I Buy?
Let’s start of simple. Where do you even buy a good rack of ribs? Some people may think you need to go to a fancy butcher, and you can! But we also find great ribs just at our local grocery stores! They cost anywhere from $7-$10 and can feed a whole family, so it’s actually a fairly cost effective dinner! The main types are Baby Back (these are very common and the smallest), St. Louis (which are larger and flatter than the rounded baby back), and the Spare Ribs (which have slightly less meat and are just the St. Louis with the rib tips and skirt meat). So which should you get? The Baby Back or the St. Louis would be my suggestion. Personally, I would go with the Baby Back only because they are smaller (plenty of meat though!) and are just easier to work with for beginners.
Here’s a photo comparing the large Spare Ribs with Baby Backs! The St. Louis ribs are between these sizes.
How to Prep a Rack of Ribs:
Everything you need to know to make the best ribs starts with prepping your meat. Remove the ribs from their packaging (preferably in the sink) and drain any of the extra fluids. Rinse the ribs under cold water briefly and pat dry with paper towels. Then set the ribs aside on a large cutting board. If you do not have a cutting board large enough to hold the ribs I recommend using a jelly roll pan or a baking sheet.
The next step is crucial for good ribs!
You will need to remove the membrane (sometimes called the membrane sheath, or the peritoneum if you want to be anatomically correct) which is located on the underside of the ribs. This is a thin layer of connective tissue that will not only act as a barrier preventing the rub from seasoning the meat but will make eating the ribs a more difficult and unpleasant experience. The membrane is easiest to remove from a rack of baby back ribs, but shouldn’t be too difficult on the St. Louis or spare ribs. Flip the ribs so they are bone side up and run the tip of a sharp knife down the middle of one of the bones towards the center of the rack. To separate the membrane from the meat you can use a butter knife or a flathead screwdriver to pull up enough to then grip with your fingers. The easiest method is to grab a paper towel and pinch the membrane and pull toward the end of the rack slowly, taking care not to rip it to early. It’s just like taking a sticker off of something. Repeat this process on the other half of the ribs so the entire membrane is removed.
The Secrets to the Best Rib Rub:
Depending on where in the country you are you will hear different opinions on the perfect dry rub. Some people swear by their mustard powder and others prefer to leave it out. Meanwhile, there are people who live by the simple salt and pepper rub. Either way, the rub makes all the difference! I’ll give you our secret rub recipe but also a run-down on the science behind making a rub in case you decide to venture off and create your own masterpiece.
Salts:
These make up the bulk of your rub and make a huge difference.
Table Salt – Fine grain, regular table salt. Pros: incorporates best into rub mix, great for smoother rubs. Cons:
Sea Salt – Usually very coarse but you can find fine grain as well. Pros: great for finishing dishes, gives added texture. Cons: hard to incorporate into a rub, likely will not stick to meat during the rubbing stage
Kosher – Coarse and flakey. Pros: great for seasoning meats, dissolves quickly. Cons: None that I have found
Seasoned Salt – Different flavors incorporated into the salt (ie celery salt, garlic salt, sugar etc.) Pros: quick and easy since it contains many of the other spices used in a rub. Cons: you don’t know the exact amounts of other ingredients making it difficult to use as the main source of salt.
My pick: Kosher salt. It is predictable and incorporates into the rub as well as table salt but seasons the meat better.
Runner-up: Table salt
Sugars:
White Sugar – From refined cane or beet sugar. Pros: gives the same sweet flavor needed in barbeque. Cons: burns at higher temperatures.
Brown Sugar – White sugar combined with molasses during the manufacturing process. Pros: gives you the classic BBQ flavor and a noticeable crust on the meat after cooking, blends well with spices Cons: none
My pick and the safe bet: Brown sugar
Spices:
There are spice snobs who know their stuff and can tell you exactly how to make a rub and guarantee success. Follow them or the rub recipe below and you’ll get a safe, great tasting rub. If you want to venture out of the ordinary and make your own, here’s a list of the most common ingredients and how each changes the rub.
Here are the essentials:
Black Pepper – A necessity in any rub. Can be coarse or fine, pre-ground, or freshly cracked. If you’re making a large batch of rub to keep and save for later you may want to give your arms a break and use the pre-ground pepper.
Cayenne Pepper – Whether you like it spicy or not, add this to the mix to accentuate the rest of the flavors in the rub. The more you add the more heat you’ll get. Cayenne provides a direct noticeable heat, but keep in mind it is one of many spices so you really have to add a lot if you’re trying to make it obvious.
Chili Powder – A blend of various spices and ground chile peppers. Gives your rub a more earthy and sophisticated flavor. You can find different varieties such as chipotle chili powder
Paprika – You can’t forget this one! It gives a distinct red color to your rub and meat and will help develop that gentle smokey flavor. If you like a noticeable smoke flavor then grab the smoked paprika.
The extras:
White Pepper – Light in color and offers a mild pepper flavor. Helps add a little heat but more as a background flavor.
Cumin – Common in Latin American foods but gives barbequed meats a flavorful earthiness with a light but noticeable warmth and aroma.
Onion Powder – Adds a subtle onion flavor without being overbearing.
Garlic Powder – Because everything needs garlic!
Mustard Powder – For a, well, mustard flavor. Complements the rest of the blend.
The Special Flavors:
If you want to get creative there are plenty of additional spices and seasonings you can add to give your meat that special secret flavor.
Ground Ginger – Tangy and fresh with a mild heat but noticeable sweetness.
Dried Oregano – Adds a pungent and sharp peppery flavor.
Coriander – Gives a roasted nutty flavor.
Thyme – Gives a slight mint flavor with a gently dry aroma
Keep in mind it is all about balance. The goal is to have a blend where all the components work together without having one overpower the other.
The Go-To Rib Rub:
Ingredients
1 C Brown Sugar
1/4 C Smoked Paprika
3 Tbs. Kosher Salt
2 Tbs. Black Pepper
2 Tbs. Garlic Powder'
2 Tbs. Onion Powder
2 Tbs. Cumin
2 Tbs. Mustard Powder
1 Tbs. White Pepper
1 Tbs. Chipotle Chili Powder
1 Tbs. Cayenne Pepper
Directions
Mix all of the ingredients in a medium bowl or shake in a large ziplock back. This rub will give you enough to season 3 regular size racks of ribs. If you are making less you can save it for later or halve the recipe.
3.1
Copyright © YourCupofCake
Now that the hard part is over it’s time to rub those ribs! Get out your pre-made Go-To Rib Rub and sprinkle it over the ribs evenly and then gently pat or rub it around so it has a nice even coat. Flip the ribs and coat the bottom. You don’t have to be as precise or thorough on the bottom since it is mostly bone but you definitely don’ want to miss it! It generally takes about 1/4 to 1/2 cup of rub to season a rack.
Let the ribs rest for anywhere from 1 hour to 72 hours. If you plan to let them rest for longer than an hour put them in the fridge to keep them fresh. I usually just do one hour but a lot of people recommend 24 hours as the perfect amount to let the flavors sink in deep. If you are in a bind and need to cheat the time, you can get away with 30 minutes and I won’t tell anyone.
The Ultimate Guide to Cooking Ribs:
Meat thermometers are incredible for cooking! We cook ours too 200 degrees to melt all the connective tissues… that makes them super tender! We could go on and on about meat thermometers but we’ll get back to everything you need to know to make the best ribs.
How to Smoke Ribs:
Smoking the ribs is my personal favorite because it gives that classic barbecue taste. You might even be able to convince your kids you picked them up from a nearby barbecue restaurant. Follow this simple procedure to guarantee yourself some tasty ribs that fool-proof:
1) Preheat your smoker to 275 degrees
2) Place the ribs bone side down for 90 minutes, spraying with apple juice or cider every 30 minutes. The juice will keep the ribs from drying out and add to the flavor of the rub.
3) Pull the ribs off and wrap them in foil. Brush 2 tablespoons of honey butter (equal parts honey and room temperature butter mixed) over the top of each rack before sealing the foil.
4) Place the ribs back on the smoker in the foil, bone side up, for an additional 90 minutes.
5) Pull the ribs off the smoker and place them in a cooler for 15-30 minutes to let the juices redistribute in the meat. Don’t worry the ribs will still be piping hot!
6) (Optional) Place the ribs on a baking sheet. Brush your favorite sauce over the top and put them under the broiler for 3-5 minutes or until the sauce tightens with the ribs and becomes nice crust.
Takeaways for Everything You Need to Know to Make the Best Ribs in a Smoker:
Smoking ribs (and any meat in general) is all about low and slow. Keep that heat low to ensure your ribs stay tender and full of flavor. I prefer to smoke with hickory because it is a versatile wood and works well with ribs. Just be sure not to over smoke the ribs because too much hickory can result in a slightly bitter flavor. Oak is another good option and is very easy to work with.
How to Grill Ribs:
The grill is the classic way to go and there’s no better place to be during the summer than out on the back porch grilling. Follow this guide for the perfect grilled ribs:
1) Preheat your grill to 325 degrees using an indirect heat method. If you are using a gas grill using only half of your burners leaving one side of the grill off. If you are using a charcoal grill, keep the coals on one side of the grill and add soaked, drained, hardwood chips to the charcoals.
2) Arrange the ribs on the grill away from the direct heat and fire.
3) Cook the ribs until you can easily insert a toothpick between the bones, or the internal temperature reads 200 degrees on a thermometer.
4) Brush the ribs with your favorite sauce and finish them over the direct heat for 3-5 minutes.
Takeaways for everything you need to know to make the best ribs on the grill:
Indirect heat is crucial. If your grill is too hot or the ribs are over direct heat your ribs will cook quickly and be tough. Or worse, your ribs will burn on the outside will the inside is not yet done. The last few minutes over direct heat will give you a great crisp texture on the outside with perfectly juicy, tender ribs.
How to Cook Ribs in a Slow Cooker:
This is the perfect solution to great ribs without having to babysit the smoker or the grill! Toss the ribs in before leaving the house and come back to great smelling delicious barbecue. It doesn’t get easier than this:
1) For one rack of ribs, cut the rack in half and put the first half in laying flat. Coat ribs with your favorite barbecue sauce and repeat with the other half laying on top of the first. For two racks of ribs, place the ribs standing up against the walls and brush with sauce (see picture).
2) Place the lid and set the slow cooker to low for 8 hours or high for 4 hours.
3) Spoon the sauce at the bottom of the pot over the ribs before removing and cutting.
How to Cook Ribs in an Instant Pot:
Craving ribs and you only have an hour? This is your solution. Break out your instant pot and follow this simple guide:
1) Pour 1 cup of water into the Instant Pot.
2) Place the trivet in the Instant Pot (the wire rack that should have come with it) so the ribs aren’t touching the bottom of the cooker.
3) Place the ribs on the trivet.
4) Place the lid on the cooker and cook for 25 minutes on Manual > High-Pressure Cooking.
5) Once finished, allow the steam to release naturally (about 10 minutes).
6) Finish the ribs on the grill or under the broiler for 5-10 minutes (optional).
How to Oven Bake Ribs:
Just as easy and convenient as the slow cooker, baking ribs a good alternative if you don’t feel like firing up the grill or smoker:
1) Preheat your oven to 275 degrees
2) Wrap the seasoned ribs in foil and bake for 2 hours
3) Remove the ribs from the foil, brush with sauce and rewrap
4) Continue baking the ribs for an additional 1 1/2 to 2 hours or until the meat falls off the bones
How to Cut Ribs:
I find it easiest to turn the ribs on their side so you can see the bones clearly, and then run a knife between each bone. Now your ribs are ready to devoure!
So there you have it, everything you need to know to make the best ribs this summer!
Other Recipes You'll Love!
Source: http://www.yourcupofcake.com/2018/06/ribs-101-everything-you-need-to-know-to-make-the-best-ribs.html
0 notes
Photo

The trouble with Greek food
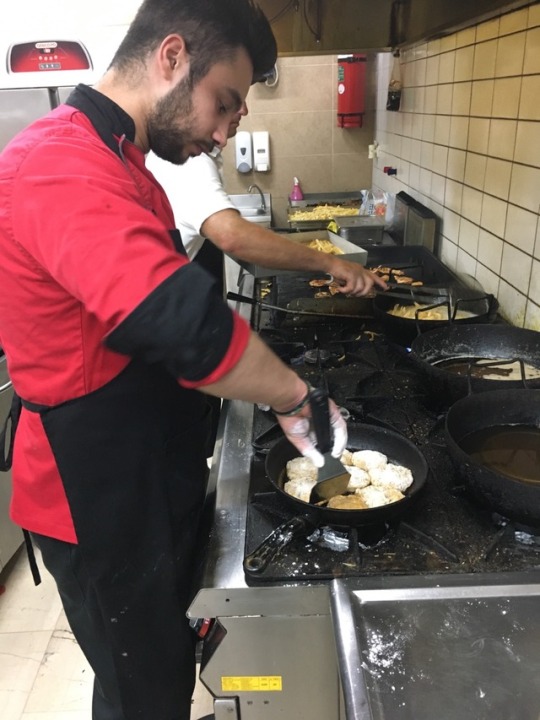
NO ONE could accuse me of unfairness to Greek culture: but popular Greek food does have a bit of a problem.
Blame my grumpiness on a few mediocre holiday meals in high season, perhaps. Yet taverna food has long been terribly standardised across Greece, flattening out regional variations and replacing them, all too often, with lazy sameness.
It's not all bad. Hey, I'll scarf down a tasty gyros/souvlaki plate as fast as the next man (probably faster, come to think of it - check out that big boy pictured!) And if the tourists still happily pack away their moussaka and chips, can we really blame the restauranteurs?
Well, ναι, I'm afraid we can. There is a book to be written on how Greece's once kaleidoscopic regional cultures ended up producing taverna menus that are virtually identical from Thessaloniki to Patras to Rhodes. Both the Hellenising effects of relentless political nationalism, and the appalling twentieth-century suffering of Greece, especially during occupation and civil war in the 1940s, must take some blame. But large parts of Italy, for example, emerged from fascism, war and decades of grinding poverty with prouder and more regionally varied cuisines than Greece.
In Athens, there's a big enough upper-middle class (around 30% of the nation lives in the capital) to support high-end, innovative restaurants like Funky Gourmet and Botrini's. Almost anywhere else in Greece: not so much.
It shouldn't have to be this way. True, nineteenth-century Greece never developed its own bourgeois cuisine - Escoffier in a fustanella? But neither did Spain, and look at their dominance of the world's top-50 restaurants today. Where's the Greek Celler de Can Roca, in the equivalent of Girona (Volos?) Where's the new Greek cool? We need it.
Good Greek food has always depended on freshness, simplicity and fabulous ingredients, of which it has an embarrassment of riches. If it sticks to that - with a relentless focus on quality - then it might effectively skip the whole French fine-dining faff-fest and go straight to a minimalist, terroir-driven cuisine for the early twentieth century. The hordes of well-heeled northern Europeans descending on it annually would surely appreciate it. But plenty of Greeks might too.
And it's not as though that need involve abandoning the classics. This month I enjoyed several meals at the Zoe Resort's very good Natura restaurant in Gialova (south-western Peloponnese). This family-run hotel grows most of its own vegetables: the quality shows, as does their care in sourcing other local ingredients (they make their own olive oil too.)
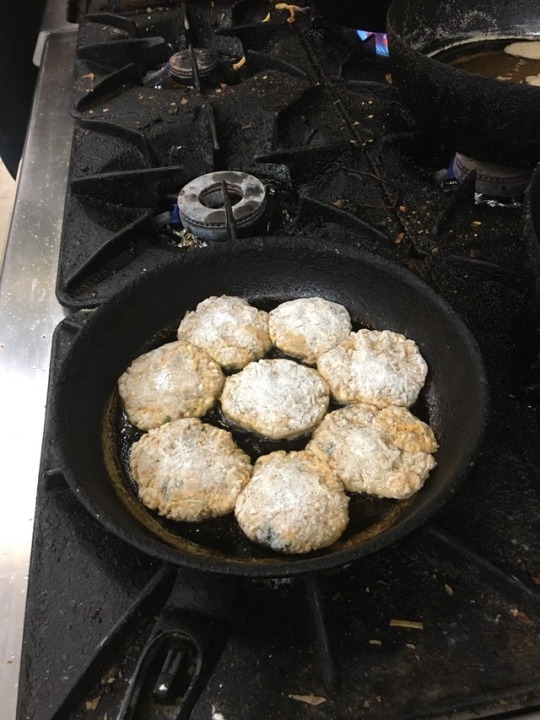
Here is their tasty recipe for kolokithokeftedhes (courgette fritters) - somewhat adapted through testing in my South London kitchen. Pictured above: fritters on the range in the Zoe’s kitchen, and being polished off by my friend Caren.
Kolokithokeftedhes (κολοκυθοκεφτέδες)
Makes about 15 fritters, so enough for 3-8 people depending on hunger/greed/other dishes.
500g courgettes, washed, trimmed and coarsely grated
200g feta cheese, finely chopped/crumbled
2 eggs, beaten
1 small onion, finely chopped
3 cloves garlic, crushed/finely chopped
100g breadcrumbs
50g plain flour
2 tbsp dried mint (or a mix of dried/fresh)
2 tbsp dried oregano (or a mix of dried/fresh. Or you could use basil)
Coarsely grated zest of one lemon
1 1/2 tsp sea salt
A good grind of black pepper
100ml olive oil
Flour for dusting
Oil for frying
Sprinkle the grated courgettes with a little salt and put to drain for 15 mins while you prepare the other ingredients. Then try to squeeze as much liquid out of the courgettes as you can, a handful at a time. Mix them and all the other ingredients together well, adding the oil last. You don't want the mixture to be too loose/gloopy, so if it seems the right consistency already, add less oil. Leave it to sit for 15 mins.
Make the fritters: take a ball of mixture about the size of a satsuma and flatten it in your hand into a patty about 2"/5cm across and 1/4"/1cm thick. Dust with flour. Make a couple to get the trick, then heat a couple of tablespoons of olive oil in a non-stick pan. Make more patties and fry them over a medium-high heat until they just start to brown, flipping and adding a little more oil as needed. Drain on kitchen towel (though they're really not very greasy) and serve.
These are good with yoghurt sauce: crush a clove of garlic with a tsp of salt and mix with 300g Greek yoghurt and a tsp dried mint.
0 notes
Last Seen Blogs

hirukadira
Hirukadira

r2y9s
Be Gay Do Crimes
musingsfortheday
I love to laugh.

alevelrevisionbiogeogpsy-blog
AS Revision

rubbearof
Unbetitelt