#Gleb Alexandrov

Note
How did you actually start making these models or how do you basically have the motivation to do so, i really wanna try modeling like yours but im so confused on where to start😵💫
My motivation originally came from wanting to animate, but to animate in 3d you also have to know how to model, texture, and shade... As of some resources to start, I've included what helped me the most under the cut!
Getting Started:
Im sure anybody new to learning blender has probably heard of blender guru, if not, ill be happy to introduce him!
youtube
He's honestly what helped me the most with getting familiar with all the in's and out's of creating a good render, as well as figuring out how to go about approaching certain things. He also has a few older videos (blender 2.79 my beloved and behated....) that walks you through the process of creating different renders. My only problem with them is that they're a bit long...
youtube
ok hear me out, this actually really helped me with learning how to model in general. This tutorial may be old but it honestly taught me things like using the mirror modifier (an actual lifesaver), and how to approach modeling more complex shapes. Yea i get that the entire tutorial is kinda hyper specific but sometimes you just gotta roll up your sleeves and say "today im going to learn how to model a lowpoly elephant"
Intermediate:
have you gotten bored of making lowpoly elephants? Time to expand onto more advanced things, like people! One of the absolute best tutorial makers i've ever seen with my own two peepers is daniel krueter
youtube
Again, a bit of an old tutorial, its what opened the door to creating characters for me. He expands upon more complex box modeling, as well as introduces you to edge modeling for more specific shapes like the face. I'm pretty sure he also goes a lil bit into topology, and edge flow, but in case he doesn't the general idea is: quads are amazing and beautiful, tris can stay but are on thin ice, and n-gons are the devils spawn. (you know its true because it rhymes)
youtube
youtube
Two other tutorials from him that utilize 2.8+ and a lil bit of sculpting/retopologizing. To be honest I haven't really gotten around to watching these, but I would recommend the second one if you want a more in-depth look on how he did certain things, whereas if you want a general view of his process you should take a look at the first one.
If you're looking for some ✨quick tips✨ a few recommendations I have are Gleb Alexandrov, Cgmatter/Default Cube, and Ian Hubert.
Gleb Alexandrov has a lot of tips on just how to make things look a lil bit better, rendering/material-wise
Cgmatter/Default Cube do more technical tutorials, like how you would go about making certain things, abstract or otherwise
Ian Hubert is kinda like Cgmatter but they do more tutorials on things you would find out in the wild such as buildings, fish, posters, and scary nightmare men! (They also do a lot of vfx/hard surface stuff which i think is super cool)
And finally, leaning on the more advanced side is Dikko
youtube
youtube
he does quite a few tutorial videos for things like Adobe Illustrator/Maya both of which i don't have because im broke but i mainly really like their rigging/hand modeling tutorials. I'm pretty sure he introduces drivers for the different controllers of rigs and ik constraints, but im not sure because i haven't really gotten around to watching the whole thing.
Advanced; Learning to Stylize:
From here it gets a lil bit more abstract because theres no "right" way to stylize, whereas with photorealistic rendering most of the time there is a very clear line between real-lookin and not real-lookin. A lot of it is just kinda what looks good.
My go-to person for stylized environments is Kristof Dedene, he makes some of the prettiest shaders ive ever seen. (im a huge fan of his water shader)
youtube
he has tutorials for clouds, waterfalls, buildings, rocks, and grass which all look so good i could cry
My absolute beloved, my blorbo, my favorite activity. Sam Bowman is like the godfather of all things procedural, words cannot describe how much this man has helped me make funny lil designs for my funny lil projects. Everyone should watch his videos (and subscribe while youre at it, my boy is criminally underrated)
A geometry nodes connoisseur (if theyre doing geo nodes you know they got the class that wont quit). Their renders are really cool to look at, but geo nodes scare me so i haven't really gotten around to doing their tutorials yet, still would definitely recommend them if youre interested!
ok so if im being completely honest i don't know what hes doing, but in my defense i don't think anyone else does either. His newest normal editing series is witchcraft to me but i think its funny how he casually dabbles in the dark arts so im including him in here. He's covered a lot from uvs, to masks, to drivers, to shaders, but again they are all kinda advanced so proceed with caution.
And because this post wasn't long enough heres some extra people to check out who do kinda tutorial stuff (but mostly i just like looking at their work)
Bobacupcakes - Who i reference the most whenever i wanna make something sparmkly (i know the link leads to twitter but theyre also on tumblr)
Rukikuri - prebbty models!! (some normal editing too!)
Niall Stenson - kinda a grab bag of stuff (i just think theyre neat)
Late as Usual - another wild geo node wizard!
Dillon Goo - suuuuper cool animator (i like their fight scenes)
Rui - neato burrito 3d character creator (their textures are godly)
Dyzi&liz - im pretty sure theyre actually making an entire show in blender and i am both scared and amazed
Yoolie - another 3d character creator <3
高部 - テクスチャが大好き~~~ ;0; いちばんすきなテクスチャアーティスト!!
Nugget - Yet another wizard that dabbles in the darkest of arts (im pretty sure ive mentioned them before but in case i haven't theyre the person who's node setup ive been using for raymarching textures)
かめ山 - モデルはとてもかわいい~~
Im sorry that most of these people are from the bird app, but trust me they are definitely worth checking out
Super Secret Bonus Channel For Those Like Me Who Are Constantly Frothing At The Mouth For More Bnpr Content. We Want It, Crave It. We Lurk In The Shadows Waiting With Slacked Jaws And Glazed Eyes, Waiting For The Next Model To Descend Down Upon In Droves:
85 notes
·
View notes
Text
E.L.A character names if they lived in Russia
I'm dead
Dream:
Lunin Daniil (Daniel)
Ink:
Rogozina / Lunina Dana
Hope:
Fyodorovna Nadezhda Mikhailovna
Cross:
Alexandrov Igor
Error:
Mogilin Nikita
Nightmare:
Vladimirov Vasiliy
Killer:
Zaitseva Bogdana
--------------------------🦊----------------------------
Lux:
Alexandrovna / Lunina Ada Danilovna / Igorevna
Pallete:
Lunin Oleg Daniilovich
Drop:
Mogilina / Lunina Alina Danilovna / Nikitina
Vivi:
Lunina Galina Danilovna
Angst:
Vladimirov Elisey Vasilievich
Crescent:
Vladimirov Yakov Vasilievich
Merciless:
Zaitsev Gleb Vasilievich
Artemis:
Vladimirovna Ekaterina Vasilievna
Kira:
Vladimirovna Kira Vasilievna
--------------------------🦊----------------------------
Meaning:
Names:
Daniel - Divine Judge
Dana - Moon Goddess
Nadezhda - hope
Igor - God's Defender
Nikita - to win (in common parlance Nikita = “fuck, he’s a fucker, I can tell it by his name” (every girl has that one ex-boyfriend who’s a moron and that’s Nikita))
Vasiliy - royal
Bogdana - given by God
Ada - decoration / pleasure / decorating life (consonant with the word "Hell")
Oleg - saint
Alina - stranger
Galina - calm
Elisey - saved by God
Yakov - imitator of God
Gleb - big, tall
Yekaterina - purity / spotlessness
Kira - mistress / Lord
Last names:
Lunin - Lightbringer / son of Luka / Light
Rogozina - quarrel / swear words
Fyodorovna - comes from the male name Fyodor - “giver of God”
Alexandrov - from the name Alexander - “defender of people”
Mogilin - a small hill (essentially a grave)
Vladimirov - comes from the male name Vladimir - “owning the world”
Zaitseva - from the name of the animal - hare / has a symbolic meaning, denoting agility, speed and liveliness (I will never stop laughing at the name "Rusak")
--------------------------🦊----------------------------
E. L. A. by @anotherrosesthatfell
E. L. A. Artemis by @abloomingsunflower / @itzcherrybonbon
10 notes
·
View notes
Text
Cinematic Lighting in Blender Information
Cinematic Lighting in Blender is a course that focuses on teaching students how to create cinematic lighting setups using Blender, a popular 3D software.
Level-up your 3D lighting skills by watching a premium 9+ hour course that offers a step-by-step guide for setting up cinematic lighting in Blender.
Now includes NIGHT LIGHTING Extension Pack
It’s all really simple: lighting is everything! After all in order to see ANYTHING we NEED light. As 3D artists we all know this obvious truth but we're still too often guilty of spending WAY more time on the modeling and barely a thought to the lighting when it's that which makes or breaks a scene.
The Secret of Lighting That is NOT FLAT
Does it sound familiar? "Sometimes a scene can just look so ‘meh’ or lack any feeling? No matter what I do, lighting just... looks 'too CG' and lifeless?"
It may look like some successful lighting artists just intuitively ‘know’ what to do and naturally have the ‘eye’. Whether it is conscious or not they will be using a kind of to-do list for where to place the lights, how to set the right levels and so on.
If you simply tick most or even some of the boxes from this list, it will instantly improve the result. Good news: it's not rocket science, lighting in Blender can be learned fairly easily if you know where to start.
NIGHT LIGHTING EXTENSION PACK
Introducing the New Night-Lighting Extension Pack
The new extension pack dives into three key areas:
Image-Based Lighting: This essential technique allows you to extract lighting information from any image on the internet and apply it to your 3D scene in Blender.
Fun fact: the character 3d model for this chapter was kindly donated by no other than William Landgren!
Universal Night Lighting Setup: This in-depth, step-by-step guide will walk you through the process of creating a complete night shot, utilizing multiple layers and tools to achieve evocative results.
Projectors: Discover the mysterious world of image projection in Blender, as we guide you through creating multi-colored light patterns, both static and animated.
What You’ll Learn In This Course?
A premium 9+ hour step-by-step guide for lighting in Blender
Learn to light character shots, still life (and object) shots and 3D environments
Get to know Cycles AND Eevee lighting workflows
Project Files: get all environments shown in the course and useful assets such as node groups, textures and models
Closed Captions (English) manually edited for all videos
A full explanation of all the qualities of lighting that help any render feel more alive and cinematic
About Author
[caption id="" align="alignright" width="197"] Gleb Alexandrov[/caption]
My name is Gleb Alexandrov, I’m a coffee maniac who makes a living, creating digital art and training for people who love 3D graphics.
I feel super grateful to folks around me, including the vibrant Blender community. Together with Aidy Burrows we have successfully built Creative Shrimp from the ground up over the last years. Our tutorials have a massive following on Youtube, the recent courses became best-sellers and we’re thrilled to carry on.
I was introduced to computer graphics when I was 14 and after having a glimpse of 3ds Max, I was very eager to dive into this stuff. Unsurprisingly my first teapot renders were so unimpressive that I thought it’ll take an eternity for me to make a career in computer graphics.
When I watched my first 3ds Max tutorial from some crazy CD compilation of tutorials (we barely had internet back then in Belarus), I got part of my optimism back. If they can do it, I can do it too.
A realization that you don’t need to be super talented right away and can slowly work your way towards better version of you by watching tutorials, was a turning point in my life.
When I was 22, I got a 3D modeler job in a game development studio in Brest. In my free time I was learning Blender (right after I saw the first signs of this free open source software taking over the world of computer graphics).
Thanks to Jonathan Williamson at CG Cookie and Andrew Price the Blenderguru getting into it wasn’t a complete blackhole of mystery.
I knew blender would become big soon just by watching how active its community had become, it was one of those smart crowd miracles of the 21st century apparently.
A few years later, when a CG competition called Her Majesty’s Zeppelins was about to start, I jumped in this boat and won the first place using Blender.
Over the next few years my art and tutorials were featured in magazines, books and educational websites. That’s where it really blew up.
More courses from the same author: Gleb Alexandrov
0 notes
Photo

ART: “Her Majesty’s Zeppelins” by Gleb Alexandrov
130 notes
·
View notes
Photo
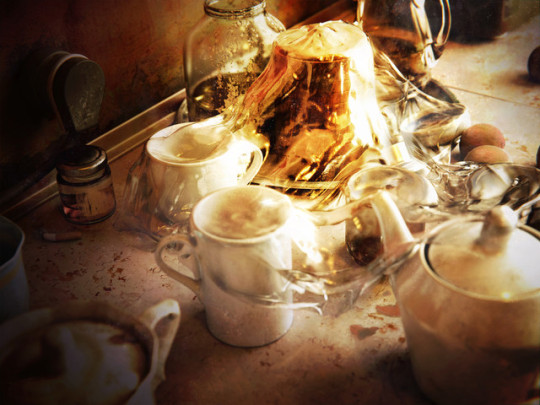
Artist: Gleb Alexandrov
Title: Kitchen - Still Life
“An impressionistic still life with over-the-top lighting, created in Blender and rendered in Cycles.
All textures - Poliigon.com https://www.poliigon.com/”
#Gleb Alexandrov#kitchen - still life#kitchen#still#life#impressionistic#impressionism#lighting#blender#cycles#teapot#design#illlustration#cup#table#breakfast#textures#materials#sun#sunlight#surreal#photo#realistic#environment
48 notes
·
View notes
Photo

Made a planet this evening. It’s got clouds and stuff. Pretty neat.
1 note
·
View note
Photo

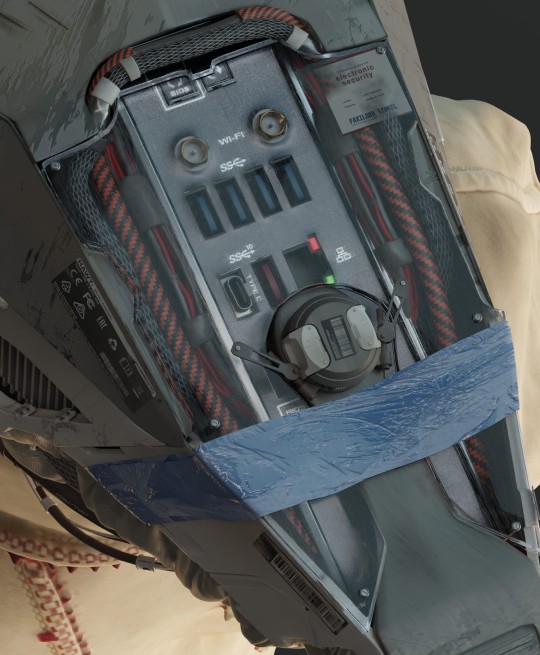
The Robo - from the Mechanical Rigging course by Gleb Alexandrov https://www.artstation.com/artwork/nY0lXo
23 notes
·
View notes
Photo

Steampunk World: Station 45 by Gleb Alexandrov
6 notes
·
View notes
Photo

Artist interview: Gleb Alexandrov
“Don't be afraid to show your personality. You are your own brand, so start building the narrative using your blog and social media.”
We speak to Gleb Alexandrov -- the Blender pro and artist behind Creative Shrimp -- about his inspirations, 3D workflow, and the importance of blogging and social media.
8 notes
·
View notes
Photo
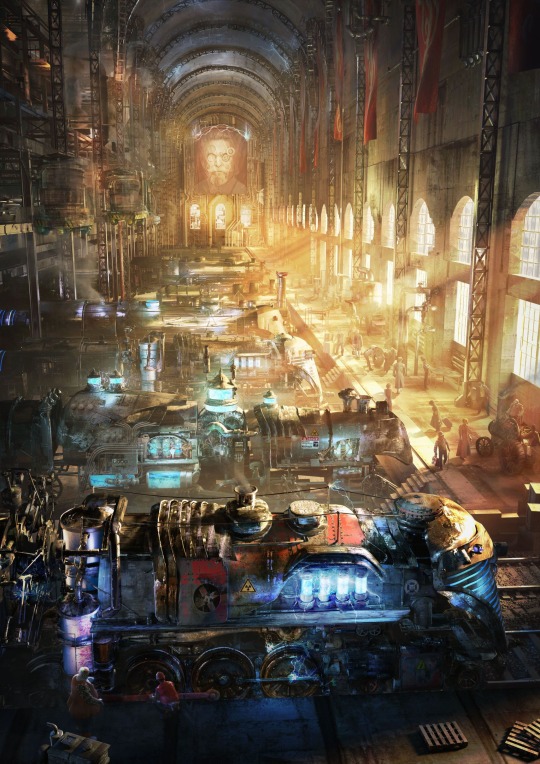
Here's a very well rendered steampunk train station. Illustration by Gleb Alexandrov, https://www.artstation.com/artwork/14yVe
61 notes
·
View notes
Photo

by Gleb Alexandrov
199 notes
·
View notes
Text
Render Burst – Free Batch Rendering Add-on for Blender 2.8
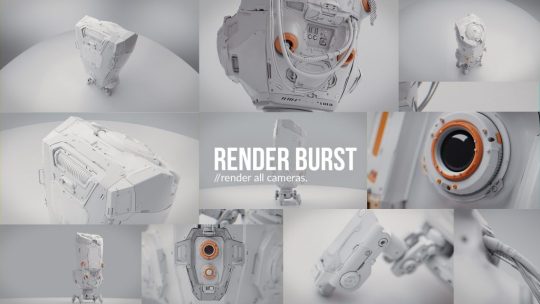
Gleb Alexandrov writes: Render Burst is a 100% free batch rendering add-on for Blender 2.8 and 2.79 that allows to render all cameras and store the results. Simple and fast.
The post Render Burst – Free Batch Rendering Add-on for Blender 2.8 appeared first on BlenderNation.
Continue reading on BlenderNation »
3 notes
·
View notes
Video
vimeo
Existence from Siddhartha Valluri on Vimeo.
Welcome to the world of Existence ! This short film is by far the biggest task I have undertaken and also marks my directorial debut. Something I hope will lead to many more such creations. Around 1 and a half years back I realised that just painting cool concepts was not going to be enough to satisfy my creative ambitions and so I started working on an idea to create my debut short film. This film would draw a lot of inspiration from the ideas I had as a student of architecture. Back then these ideas were still raw and lacked a clear focus and vision but those ideas served as a great starting point for me to develop this film.
I was able to use that as an inspiration and push it as far as I could to create a visual narrative encapsulating the journey of creation. The creation of an idea, right from its inception to its final manifestation as a monumental structure. A testament to the lifelong pursuit of creation.
That would not have been possible without the help of some amazing friends who have contributed immensely with their expertise and brought skills to the table that only they uniquely had the ability to execute. All the collaborators on the film are friends of mine whom I know and it makes me very happy to see them all collaborate and come together on this project and grow their own skills while contributing to a larger vision.
Credits
Director, CGI, Edit : Siddhartha Valluri
Score and Sound Design : Ken Seng Thoumoung & Ranit Kumar Mandal
Sound Mixing and Mastering : Ranit Kumar Mandal
Motion Design (Interface Design) : Akshay Tiwari
3D Artist (Interiors and Lookdev) : Luis Lisandro Alves
3D Artist (Facade Design) : Cephas Bhaskar
-
Special Thanks
Tadao Ando, Ash Thorp, Maciej Kuciara, Erik Egerup, Chris Do, Ian Hubert, Andrew Price, Gleb Alexandrov, Learnsquared, HDRI Haven, Quixel Megascans, Lens Distortions
Tools
Blender, DaVinci Resolve, Zbrush, After Effects, Premiere Pro, Marvelous Designer, Fusion 360
0 notes
Photo
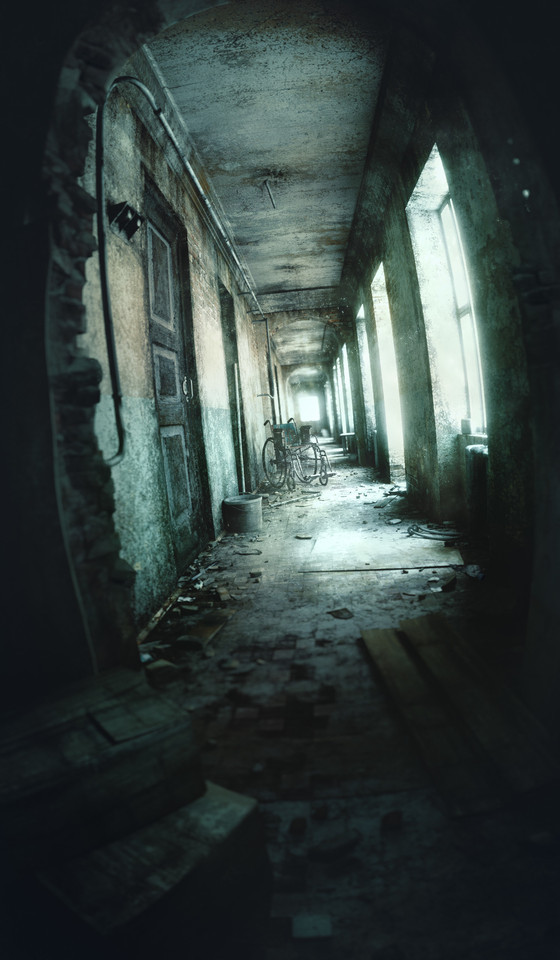
The Hallway by Gleb Alexandrov https://www.artstation.com/artwork/oqzYL
4 notes
·
View notes
Last Seen Blogs
altfeldediavoli-blog
Altfel de Diavoli
daily-johnnyjoestar-sc
Daily Crying Emoji

curayjuriya-blog
FXM Male
Enhancement

newsdeeplyanalysis
News Deeply Analysis
lionartedsblog-blog
The Lion-Art-ed