#Garlic Mashed Potatoes Secret Recipe
Note
Brit I absolutely love love love the detail you put into the food & cooking in your fics! I was wondering if Baby Girl and Bird have favorite dishes to cook, and/or if Andy and Ari have favorites as well? xx
Hi friend! It makes me so happy to know that you enjoy those little details. Both Baby Girl and Bird have a passion for cooking and baking, just like I do. And I often research different recipes when writing about the meals they create to help people visualize. So thank you for that lovely compliment!
And as for your question about their favorite dishes, here you go:
Baby Girl:
Favorite Dessert: This girl will happily whip up a glazed lemon pound cake from scratch any day of the week. It's her specialty. The secret is adding fresh squeezed lemon juice as well as a package of instant lemon pudding to the batter. And if she's feeling frisky, she might even throw together a blueberry compote to go with it.

Favorite Meal: Smothered pork chops, with garlic red skin mashed potatoes and southern style green beans. Now this is a Barber Family Favorite that actually takes a bit of time to prepare. Which means that this is more of a Sunday dinner type of occasion.
She typically puts the beans on simmer around noon. In case people are curious, Baby Girl prefers using smoked turkey over ham hocks, simply because that's how she grew up.

Bird:
Favorite Dessert: As many of you know, our sweet Bird does not play when it comes to baking. Ari almost got hurt when he insulted her legendary Peach Cobbler. That splash of bourbon really takes the recipe to the next level. She also loves making her award-winning Brambleberry Pie. Lately she's been busy perfecting her Brown Butter Pecan Chocolate Chip Cookies. And her Beast is more than happy to be her guinea pig anytime.

Favorite Meal: Bird is not quite as accomplished a cook as BG, but she is pretty darn good when she sets her mind to it. Her favorite thing to make for both herself and Ari is probably a slow simmered Pot Roast, complete with potatoes, carrots, and mushrooms. Our girl also likes to add a healthy glass of red wine to the mix as well. Which truly makes for a delicious meal.
As for Andy and Ari, they will happily devour anything their girls set in front of them. They always appreciate the effort, even if things don't quite turn out like they hoped. Neither man likes seeing their lady upset when a dish doesn't work out.
So in the event that occurs, they're quick to order takeout of some sort and then go straight for the snuggles. Because those men are usually pretty attention-starved on a good day. It works for both couples and that's all that matters.
Thanks for the ask!
#cevansbrat0007 asks#cevansbrat0007growing pains series#cevansbrat0007 sweet renegade series#chris evans#andy barber#ari levinson#chris evans imagines#ari levinson imagines#andy barber imagines#chris evans fanfiction#andy barber fanfiction#ari levinson fanfiction#chris evans x reader#ari levinson x reader#andy barber x reader#chris evans x black!reader#ari levinson x black!reader#andy barber x black!reader#chris evans x woc!reader#andy barber x woc!reader#ari levinson x woc!reader#chris evans x female!reader#ari levinson x female!reader#andy barber x female!reader#chris evans x girlfriend!reader#andy barber x girlfriend!reader#ari levinson x girlfriend!reader#cooking and baking#food prompts
37 notes
·
View notes
Text
Hi my name is Gemini ♊ and this is GemEats. Today we are going to be making Garlic Butter Lamb chops with Asparagus and Mashed potatoes... First things first you need your ingredients...
Ingredient list 📃

Lamp Chops 🥩(of course) - You can substitute the lamb with whatever meat you like ie pork chops, or sirloin. You could also make this vegetarian by replacing the meat entirely with a veggie substitute like impossible meat or even grilled eggplant. It's so many ways you can make this dish. Just remember whatever you choose, make sure you season, season, season.
Asparagus 🥬
Russet Potatoes 🥔
Butter 🧈
And Milk 🐮
2. Prep
Now it's prep time 🔪 ... Swing that butcher's knife... show that cutting board who's boss💪🏾


3. Cook it up
Now that you have everything prepared the food should magically pop into a pan... Remember y'all don't be afraid to Flip, stir and toss that food into the air


Lets get a close up of that flipping technique

Imma just add some of my secret sauce to the lamb

Let's see the finished product👩🏾🍳

Mmm looks delicious... Lets see what Evan thinks


He loves it😊

Hope everybody enjoyed my first Simtube video.. More to come (since I got fired🪓 ).. Big shout out to @insimniacreations for making this custom recipe (go check out their tumblr). Like, Subscribe, and Share and let me know what y'all want me to make next... Bye
Gemini got fired from her job so she's trying something new... She's trying her hand at making cooking videos on Simtube ( Really I just didn't know what else to do with her. I figured she likes cooking so why not try it out )
Thank you @insimniacreations your custom foods are the best💖
#my gameplay#my sims#Gemini#She got fired yall#lmao it was funny though#insimniacreations#custom recipes
17 notes
·
View notes
Text
Party Pork Chops (1 spoon)
This is a very old recipe, and its origins are a little obscure. I know it’s been passed down for like three generations on my mother’s side, but I’m not entirely sure where it came from originally. Either the side of a soup can or one of those recipe books that’s a walking advert for some food item or other; I’m not entirely sure. All I know is that my grandmother taught it to my mother, and my mother taught it to me, and while I am never going to actually have kids, I did teach it to my brother (okay, he’s not really my brother, but I get tired of referring to him as brother-from-another-mother and most of my half- and step-brothers are dickwaffles so screw ‘em all - I have THAT ONE) and he’s been teaching it to everyone who doesn’t run away fast enough, and now I’m passing it on to the wider world, so it will live on past ... well, wherever my grandmother got it.
As you can guess from the name, it is a pork chop recipe, but it can be used with anything that’s not dark meat - apparently it works well not only with chicken, but with tofu as well, and I’d bet you could do it with those really big portobello mushrooms too. But we’ll stick with pork chops because it sets the baselines.
Here’s what you’ll need:
2-4 pork chops
1 can cream of tomato soup
1 onion, sliced
1 green pepper, sliced
Spices to taste
Not an ingredient, but another thing you’ll want to have for this is a fairly deep frying pan, preferably with a lid. You can get away with not covering this one from a culinary standpoint, but this stuff spatters when simmering and tomato soup is not one of the easiest things in the world to clean.
Here’s what you do:
Spice your pork chops according to taste (I like using seasoned salt, garlic granules, onion powder, and a bit of paprika) and brown on both sides
Add the can of soup and a half a can of water (plus whatever other additions you want to make; I generally throw in some of the same spices that were on the pork chops, plus some Worcestershire sauce, a drop of tabasco and, if I have it available, a splash of A1 sauce)
Add the sliced onion and green pepper; stir the sauce just enough to mix it all together and let it cover the vegetables a bit
Cover and simmer for about 20 minutes
On serving, plate your pork chop first, then cover it (and whatever accompaniments you have with the meal) with a couple of serving spoons’ worth of the sauce and top with a couple of slices of onion and green pepper
This one doesn’t come with a list of ways to make things easier because it really is very simple on its own. It’s a good low-pressure bit of cooking that way. The only notes I have are in terms of serving suggestions:
You’re going to want to accompany this one with things that will soak up the sauce well. Rice works well, but I prefer potatoes, and if you that route, go for baked or mashed. That way the sauce ends up like a kind of gravy. For vegetables, something like broccoli works very well for soaking up the sauce but if you’re in the right season for it, go for acorn squash. Similar reasons to potatoes, honestly; the flesh of an acorn squash soaks up liquid really well, and the flavours blend nicely.
Unless you’re doing the full four pork chops, you will have sauce left over at the end of it. Actually, even if you do use the full four pork chops, you will probably still have sauce left over. That’s fine; it keeps well and can actually be eaten as a soup later. Just you end up with a spiced tomato soup, possibly with leftover onion and green pepper, instead of regular cream of tomato soup.
The pork chops do also keep well, so even if you’re cooking for one, it’s worth doing two or even four of these at a go. The sauce will keep the meat moist on reheating.
Not exactly a secret family recipe, but one that’s served me well over the years. Like the name suggests, it feels more festive than just the average pork chop.
8 notes
·
View notes
Text
Elimination Diet tips
I’ve been on a strict elimination diet for several weeks now, in order to try and figure out what I’m reacting to. Here are a few tips and tricks I learned along the way, as someone who is also gluten intolerant and dairy intolerant, which further limited what I could eat.
1. Baby food.
I have to make nearly everything from scratch during this diet, because everything has additives in these days, even table salt (anti-caking agents). I was only allowed to eat one fruit at the most extreme stage of the diet -- pears. And they had to be both peeled and cooked. I was not allowed to eat tinned pears if they were in juice, only in syrup. Unfortunately, tinned fruit in syrup has gone out of fashion and I couldn’t get it anywhere. It meant I was prepping and stewing fruit every few days. Finally, I discovered that baby food has no additives, and there was a pear option. It meant that on days I was just too damn fed up, I could take at least one shortcut and not have to cook my own damn 2-serves-a-day of pears.
2. Lunch bowls.
Lunch was hard at first -- there was a such a weird mix of veges on the list of allowed foods, many of which didn’t obviously go together, and I had no condiments or sauces, and only sea salt as a spice. I also only had butter and ghee as a fat, which I didn’t want to overdo. Now if you can eat wheat and dairy, lunches even on an elimination diet probably aren’t that hard, but I struggled. I did make some rice-paper rolls, which were good. But my go-to ended up being warm-salad bowls. I’d chop up some iceberg lettuce, celery, and mung bean sprouts, and add a couple of spoons of warm rice. I’d pan fry or poach a protein with some salt, along with a couple of the alliums I was allowed to have (garlic powder, leeks, chives, or shallots). The warm food and a bit of the cooking liquid would become the salad dressing, and it was pretty tasty, while also filling my requirement for 2 cups of veg.
3. Celery as a cooked green.
Celery was one of the few greens on the allowed list. I ate it a lot in salads, and I used the leaves as well as the stalks. I was pretty desperate for leafy things, as my only other option was iceberg lettuce. However, I also started making a dish my nan taught me, and I’d forgotten about - celery in white sauce. Cook the celery in enough water to make a sauce. Once the celery is tender and while still hot, stir in a slurry of tapioca flour (or cornflour if you’re not GF), milk powder, and salt. Cook for another minute or two until the sauce is fully thickened. This is surprisingly delicious, and also provides a gravy, which I really needed for some meals. If you’re dairy intolerant, you may find a small amount of butter, milk powder, or sweetened condensed milk don’t trigger a reaction, so this recipe might be worth a try. Of course, don’t try if you’re actually allergic.
4. Potato and swede mash.
Instead of just plain mashed potatoes, I’d usually make potato and swede mash. My diet is so limited, I want to include as many of the very few options I had each day, to maximise the vitamins and minerals I was getting. The secret to this mash is to either cook the swede for a few minutes before adding the potato, or grating the swede so it’s very small and chopping the potato into small cubes, as the swede takes a bit longer to cook. Because I wanted to limit the amount of butter I was eating, I’d make this with just garlic powder, salt and soy milk, and maybe some chives and a sprinkle of parsley. It ended up creamy enough to be good. I often make a bit extra so I can pan fry the leftovers for a meal the next day, along with some celery, alliums and a protein.
5. Potato chips can be used as a breadcrumb replacement.
Plain potato chips are allowed on the diet (in moderation), and when I wanted to make crumbed chicken one night, I used crushed potato chips. I dipped the chicken into rice flour, then beaten egg, then the crushed chips, and it worked well. Not quite as nice as breadcrumbs, but acceptable.
6. Psyllium is a thickener.
I was instructed to eat psyllium to replace all the fibre that had been removed from my diet. I didn’t know this beforehand, but psyllium is a thickener. I mostly added it to things like stewed fruit, or porridge. I got into the habit of making these things with more water than usual, to account for the extra thickening the psyllium created. It actually has a very slightly spicy taste, like a pale echo of cinnamon or nutmeg, so it works well with fruit.
7. Vitamins are really important!
About halfway through the most restrictive stretch of the diet, I had a few days where I felt really, really bad -- foggy and slow and with no energy. I was already taking a multivitamin, but realised I was probably not getting enough, so I doubled what I was taking -- doing so was still within the safe dosage. I immediately felt much better. I would have contacted my dietician if that hadn’t worked, but if you experience this, it might be worth trying the same thing if the dosage is safe.
8. Desserts.
Even though I’m required to eat every two to three hours for this diet. I also do an hour or so of exercise a day, so there were days I was still hungry at supper time. Deserts are one of the easiest things to make on this diet, because sugar is allowed. Here are some that are easy and good.
soy custard (I make this by eye, but it’s about 3 cups milk, 1 egg, 2-3 tablespoons tapioca flour, vanilla, cooked on a low to moderate heat on the stove until thick, stirring throughout),
soy baked custard (4 eggs, 3 cups soy milk, pinch salt, vanilla, baked in a water bath for 1 hour at 170c),
soy rice pudding (1/3 cup rice and 1/3 cup sugar to 1 litre milk, and vanilla, baked for an hour at 170c, stirring every 15 mins), and
soy tapioca pudding (1/3 cup tapioca balls, 1/3 cup sugar to 3 cups milk, and vanilla, cooked on a low to moderate heat on the stove until thick, stirring regularly).
All of these are things I make occasionally anyway, and also work with cow and coconut milk. I also tried and enjoyed:
Buckwheat pancakes (1 cup buckwheat flour to around 1 cup soy milk, 1 teaspoon baking powder, and a pinch of salt). I usually use chickpea flour for this recipe, but that was off the menu, and buckwheat worked just the same.
Cashew nut brittle - I just did this once, and it’s not something I plan to make often, but it was nice when I was really desperate. Toast the cashews lightly in the oven or a pan on the stove. Cook toffee (look up a recipe online for this), and pour over the cashews on non-stick baking paper in a heatproof tray.
This is just a sample of things I’ve tried. A lot of the other things I’ve eaten on this diet are variations on my usual - roasted veges, roast chicken, stir fries, slow cooker soups and stews. There have been a few disasters along the way, but mostly it hasn’t been too bad. Better than I expected, to be honest.
The thing I miss most? Probably oil. I’m tired of butter and want a proper salad dressing.
4 notes
·
View notes
Text
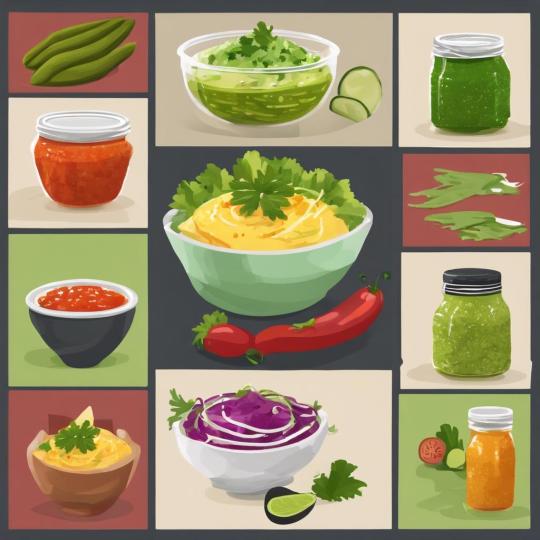
Elevate Your Culinary Skills with Homemade Salsas, Guacamole, Dressings, and Salad Creations

In the world of culinary delights, there are few things as versatile and satisfying as homemade salsas, guacamole, dressings, and salad creations. Whether you're a seasoned chef or a culinary enthusiast looking to impress your friends and family, mastering these recipes will undoubtedly take your dishes to new heights. In this comprehensive guide, we will explore the art of making these delectable accompaniments and reveal how they can seamlessly elevate any meal.
Section 1: Homemade Salsas - Bursting with Flavor
Salsas are not just for dipping your tortilla chips into; they add vibrant flavors and refreshing accents to numerous dishes. From the classic tomato-based pico de gallo to tangy fruit salsas and smoky chipotle variations, the possibilities are endless. Let's delve into the ingredients, techniques, and key tips for making sensational salsas at home.
To optimize your salsa's taste, start by ensuring you have ripe, flavorful tomatoes. Combine them with aromatic herbs like cilantro, onions, and garlic to create a balanced yet bold base. You can customize the heat level with hot peppers like jalapenos or serranos, but be sure to remove the seeds and membranes for milder flavors.
Experimenting with fruity salsas can be a delightful surprise. Mango, pineapple, or even strawberries can lend a sweet and tangy twist to your salsa. Consider adding some lime juice or vinegar to elevate the taste and balance the flavors. Remember, salsa-making is all about creativity and finding the perfect blend that tantalizes your taste buds.
Section 2: Guacamole - Creamy and Irresistible
Few things can compare to the silky smoothness of a well-made guacamole. This Mexican classic is exceptionally versatile, doubling as a dip, a condiment, or even a sandwich spread. Let's dive into the secrets of creating a velvety guacamole that will have people coming back for more.
The number one rule of making guacamole is using perfectly ripe avocados. They should yield slightly when gently squeezed, indicating their creaminess. Once you have avocados, mash them with a fork or potato masher until you reach your desired consistency. For a chunkier guacamole, leave some larger pieces, while a smoother texture can be achieved by thoroughly mashing the avocado.
To add complexity to your guacamole, incorporate fresh lime juice, minced garlic, diced onions, and finely chopped cilantro. A touch of salt will enhance the flavors and help bring out the natural creaminess of the avocado. If you're craving an extra kick, throw in some diced jalapenos or a pinch of cayenne pepper.
Section 3: Homemade Dressings - Elevating Your Greens
Salads become truly extraordinary when paired with the perfect homemade dressing. No more settling for store-bought bottles; customizing your dressings allows you to accentuate the flavors of your greens and add an artisanal touch. Let's explore the world of homemade dressings and discover the magic they can work on even the simplest salad.
A classic vinaigrette needs only a few pantry staples: extra-virgin olive oil, vinegar (such as apple cider or balsamic), Dijon mustard, minced garlic, salt, and pepper. Whisk them together, taste, and adjust the flavors accordingly. For a creamy twist, add a dollop of Greek yogurt or mayonnaise, creating a luscious and tangy dressing.
If you're a fan of Asian cuisine, consider making a ginger sesame dressing. Combine sesame oil, soy sauce, rice vinegar, grated ginger, garlic, and a touch of honey for a tantalizing blend of flavors that pairs exceptionally well with salads featuring hearty greens like kale or spinach.
Section 4: Salad Creations - Unleash Your Culinary Imagination
With salsas, guacamole, and dressings at your disposal, it's time to dive into creating mouthwatering and visually stunning salads. Don't limit yourself to the traditional greens and vegetables; expand your horizons by incorporating unique ingredients, textures, and flavors.
Create a Mexican-inspired salad with grilled corn, black beans, juicy tomatoes, and a zesty lime-cilantro dressing. Elevate a classic Caprese salad by drizzling it with a balsamic reduction or pesto dressing. Crumble some feta cheese over a Greek salad, and toss it with a tangy lemon-oregano dressing. The possibilities are endless, limited only by your imagination.
Conclusion:
Mastering the art of salsa making, guacamole, dressings, and salad creations will undoubtedly elevate your culinary skills. These homemade accompaniments are versatile, bursting with flavors, and capable of transforming even the simplest dishes into extraordinary culinary experiences. Whether you're preparing a quick meal at home or entertaining guests, these recipes offer endless possibilities that will impress and satisfy. So, roll up your sleeves and embark on a flavorful journey filled with vibrant salsas, creamy guacamole, tantalizing dressings, and stunning salad creations
Revitalize your diet with Puravive's Superfood Blend. Packed with essential nutrients, our blend is the perfect addition to your daily meals, supporting your diet and overall health. Experience the power of superfoods with Puravive. Check out the Puravive Superfood Blend Product Page.
Read the full article
0 notes
Photo

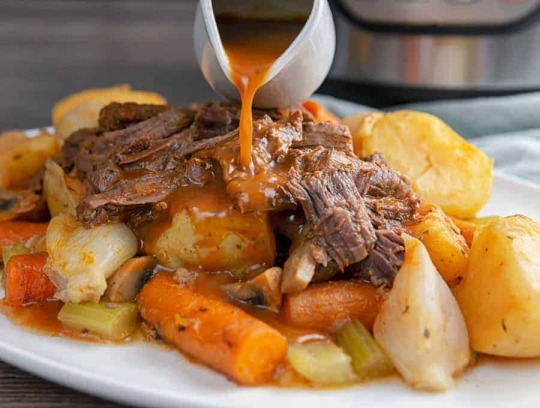
Garlic Mashed Potatoes Secret Recipe Recipe
Butter, Romano cheese, garlic, salt, and oregano are all added to mashed red potatoes. A fresh take on an old favorite!
0 notes
Text
Day 20
November 22 2023
Delicious Thanksgiving food
Vegan


Recipe 2
Mash Potatoes 🥔


Recipe 3
Mac and cheese?


Honorable mentions:
Roasted Veggies
(Carrots cabbage onions)
Stir fried rice and veggies
( broccoli rice garlic sauce)
Fruit Salad
(Nuts Berries avocado)
Sweet Tea or lemonade
1 note
·
View note
Text
Kings rotisserie chicken
Introduction: A Feast Fit for a King!
Are you ready to embark on a culinary adventure that will tantalize your taste buds and leave you craving for more? Well, look no further, because we've got kings rotisserie chicken the scoop on the delectable world of King's Rotisserie Chicken! If you're a fan of succulent, flavorful, and downright irresistible chicken, you're in for a treat.
In this article, we'll take you on a gastronomic journey through the kingdom of King's Rotisserie Chicken. From its humble beginnings to its mouthwatering menu, we'll uncover what makes this place a true haven for chicken lovers. Get ready to dive into the juicy details, savor the flavors, and satisfy your chicken cravings.
So, without further ado, let's embark on a flavorful adventure and explore the world of King's Rotisserie Chicken!
The King's Origins: A Humble Beginning
Every great empire has a humble origin story, and King's Rotisserie Chicken is no exception. Founded by a passionate chef, this chicken kingdom started as a small family-run business with a vision to serve the tastiest rotisserie chicken in town. The chef, known as "The Chicken King," poured his heart and soul into perfecting his recipes. His dedication paid off, and today, King's Rotisserie Chicken reigns supreme in the world of poultry.
The Menu: A Royal Feast
The King's Signature Rotisserie Chicken
Ah, the crown jewel of the menu – the King's Signature Rotisserie Chicken! This is where the magic happens. Each succulent piece of chicken is slow-cooked to perfection on the rotisserie, ensuring that every bite is bursting with flavor and juiciness. What sets it apart from the rest?
Marinated to Perfection: The chicken is marinated in a secret blend of herbs and spices, infusing it with an irresistible taste that's nothing short of regal.
Rotisserie Perfection: Slow-roasted on the rotisserie, the chicken's skin becomes crispy, while the meat remains tender, creating a delightful contrast.
Mouthwatering Aromas: As the chicken revolves, it releases tantalizing aromas that will make your mouth water even before your first bite.
Fit for a King Sides
Every monarch needs their loyal subjects, and the King's Rotisserie Chicken menu features a range of sides that complement the star of the show:
Crispy Golden Fries: Golden and crispy, these fries are the perfect sidekick to the juicy rotisserie chicken. Dip them in a variety of sauces for an explosion of flavor.
Garden-Fresh Salad: Need a break from all the richness? The fresh, crisp salad is there to refresh your palate and provide a delightful contrast.
Buttery Cornbread: The fluffiest, buttery cornbread you'll ever taste! It's the perfect comfort food to accompany your chicken feast.
Garlic Mashed Potatoes: Creamy, garlicky, and utterly irresistible, these mashed potatoes are a royal delight.
The Royals of Flavor: Sauces Galore
Dip, dunk, or slather your rotisserie chicken with a variety of mouthwatering sauces:
Zesty BBQ Sauce: For those who like a tangy kick to their chicken.
Honey Mustard Bliss: A sweet and savory combination that's perfect for dipping.
Spicy Buffalo Drizzle: If you're feeling adventurous and want a spicy twist, this sauce is your answer.
Classic Gravy: Can't resist the classics? The rich and savory gravy has your back!
Royal Combinations
Not sure what to choose? Opt for one of the King's Rotisserie Chicken Combos:
Regal Feast: A whole rotisserie chicken with your choice of sides and sauces. Perfect for sharing with friends and family!
Royal Platter: A half-chicken with a selection of sides and sauces. Ideal for an indulgent solo meal.
1 note
·
View note
Text
How To Make Ragda Pattice Recipe
Introducing our delicious and mouth-watering Ragda Pattice Recipe! If you're a fan of Indian street food or looking to try something new, then this recipe is a must-try.
Our step-by-step tutorial will guide you through the process of making authentic and flavorful Ragda Pattice right in the comfort of your own kitchen.
Ragda Pattice is a popular street food dish from Maharashtra, India. It consists of two main components - Ragda, a spicy curry made with white peas, and Pattice, which are crispy potato patties. The combination of these two elements creates an explosion of flavors and textures that will leave you craving for more.
In this video, we will show you how to make Ragda Pattice from scratch. We will start by preparing the Ragda, where we will cook the white peas with a blend of aromatic spices and herbs. The result is a thick and flavorful curry that will serve as the perfect base for our dish.
Next, we will move on to the Pattice. We will teach you the secret to making perfectly crispy and golden-brown potato patties. Our recipe includes a mix of mashed potatoes, bread crumbs, and spices, which are then shaped into patties and shallow-fried until they are beautifully crisp on the outside.
Once both the Ragda and Pattice are ready, we will show you how to assemble this delightful dish. We will plate the hot and crispy Pattice and generously pour the Ragda over them. To enhance the taste, we will top it off with an assortment of chutneys, finely chopped onions, and fresh coriander leaves.
Our Ragda Pattice Recipe is not only flavorful but also versatile. You can customize it to your liking by adding additional toppings such as grated cheese, sev (crunchy chickpea flour noodles), or even yogurt. The possibilities are endless!
So, whether you're hosting a gathering, looking for a delicious snack, or simply wanting to explore the world of Indian cuisine, our Ragda Pattice Recipe is the perfect choice. Follow along with our easy-to-follow instructions and discover the joy of preparing this authentic street food delicacy in the comfort of your own home.
Don't miss out on this amazing culinary experience! Watch our Ragda Pattice Recipe video now and get ready to indulge in a burst of flavors that will transport you straight to the streets of India.
Ingredients:
- 1 cup dried white peas
- 2 medium-sized potatoes, boiled and mashed
- 1 onion, finely chopped
- 1 tomato, finely chopped
- 2 green chilies, finely chopped
- 1 teaspoon ginger-garlic paste
- 1 teaspoon red chili powder
- 1 teaspoon cumin powder
- 1 teaspoon coriander powder
- 1/2 teaspoon turmeric powder
- Salt to taste
- Oil for frying
- Fresh coriander leaves, chopped for garnish
- Tamarind chutney and mint chutney for serving
For Patties:
- 2 medium-sized potatoes, boiled and mashed
- 1/2 teaspoon red chili powder
- 1/2 teaspoon cumin powder
- Salt to taste
- Bread crumbs for coating
Instructions:
1. Rinse the dried white peas and soak them overnight in water. Drain the water the next day.
2. In a pressure cooker, add the soaked peas along with enough water to cover them. Pressure cook for about 4-5 whistles or until the peas are soft and mushy.
3. Heat oil in a pan and add chopped onions. Sauté until they turn translucent.
4. Add ginger-garlic paste and sauté for a minute or until the raw smell disappears.
5. Add chopped tomatoes and cook until they become soft and mushy.
6. Add red chili powder, cumin powder, coriander powder, turmeric powder, and salt. Mix well.
7. Add the cooked peas to the pan and mix everything together. Mash the peas slightly while mixing.
8. Cook for a few minutes until the flavors blend well. If the mixture is too thick, add some water to adjust the consistency. Keep it aside.
9. In a separate bowl, combine the mashed potatoes, red chili powder, cumin powder, and salt. Mix well.
10. Divide the potato mixture into equal portions and shape them into flat round patties.
11. Coat each patty with bread crumbs and shallow fry them in a pan until golden brown on both sides.
12. Once the patties are ready, place them on a serving plate.
13. Pour the prepared ragda over the patties.
14. Garnish with chopped onions, green chilies, and fresh coriander leaves.
15. Serve hot with tamarind chutney and mint chutney.
Enjoy your homemade Ragda Pattice!
youtube
0 notes
Text
A Guacamole Revelation: The Best Homemade Guacamole Recipe Without Cilantro
Guacamole is an undisputed star among party dips, known for its creamy texture and refreshing flavors. However, for some, the taste of cilantro can be off-putting or even overpowering. If you're among those who aren't fans of cilantro, fear not. In this article, we will unveil the secrets of creating the best homemade guacamole recipe without cilantro, allowing you to savor this delicious dip without the herbaceous element. Click here for more info.

Cilantro's Controversy
Cilantro is a divisive herb. While some people adore its bright, citrusy flavor, others detect a soapy or pungent taste. This dichotomy has led to the search for alternative guacamole recipes that offer the same creaminess and freshness without the cilantro kick. The following recipe will demonstrate that you can have the best of both worlds: a guacamole that delights your taste buds while sidestepping cilantro altogether.
Ingredients You'll Need:
4 ripe avocados
1 medium red onion, finely diced
2-3 cloves of garlic, minced
2 ripe tomatoes, diced
1-2 jalapeño peppers, finely chopped (adjust to your spice preference)
Juice of 2 limes
1/2 cup fresh flat-leaf parsley leaves, chopped
Salt and freshly ground black pepper to taste
The Art of Making Guacamole Without Cilantro
Now, let's delve into the step-by-step process of creating an exquisite cilantro-free guacamole:
Avocado Excellence: Begin by selecting ripe avocados. They should be slightly soft but not mushy. Slice them in half, remove the pits, and scoop the flesh into a mixing bowl.
Mashing Method: Mash the avocados with a fork or potato masher, leaving some small chunks for a delightful, chunky texture. These chunks will add depth to your guacamole.
Onion Opulence: Add the finely diced red onion and minced garlic to the mashed avocados. These ingredients provide a subtle pungency and aromatic depth to the dip.
Tomato Temptation: Carefully fold in the diced tomatoes to evenly distribute them throughout the mixture. Tomatoes bring a refreshing and slightly acidic note.
Pepper Power: Incorporate the finely chopped jalapeño peppers. Adjust the quantity to your preferred spice level. This element provides a welcome kick to the guacamole.
Lime's Liveliness: Squeeze the juice of two fresh limes over the mixture. The lime juice adds zesty freshness and helps prevent the avocados from browning. Ensure the lime juice is well-mixed.
Parsley Perfection: This is the star cilantro substitute. Gently stir in the freshly chopped flat-leaf parsley leaves, introducing a fresh, herbaceous flavor without the cilantro controversy.
Seasoning Savvy: Season your guacamole with salt and freshly ground black pepper to taste. Start conservatively, as it's easier to add more later if needed.
Chill Time: Cover your guacamole with plastic wrap, pressing it against the surface to minimize oxidation. Refrigerate for at least 30 minutes to allow the flavors to meld and intensify.
Presentation and Serving
To ensure your cilantro-free guacamole stands out and entices your guests, consider these presentation and serving tips:
Garnish Grace: Elevate your guacamole's presentation by garnishing it with additional flat-leaf parsley leaves, a drizzle of high-quality olive oil, or a sprinkle of crumbled queso fresco.
Dipper Diversity: Offer an array of dippers, such as tortilla chips, vegetable sticks, cucumber slices, and red bell pepper strips to cater to diverse preferences.
Unique Containers: For a visually appealing twist, consider serving your guacamole in hollowed-out bell peppers or small tortilla cups. This not only adds visual charm but also provides a mess-free serving option.
Conclusion
For those who appreciate guacamole but aren't fans of cilantro's distinctive taste, this cilantro-free guacamole recipe is a revelation. By substituting cilantro with fresh flat-leaf parsley, you can enjoy a guacamole that is just as delicious and refreshing without the cilantro-induced controversy. Your guests will appreciate the effort and revel in the creamy, flavor-packed dip. So, prepare to delight your taste buds and those of your guests with this cilantro-free guacamole recipe at your next gathering.
0 notes
Text
World's Best Honey Garlic Pork Chops How Can I Make It?

Are you ready to embark on a culinary adventure that will tantalize your taste buds like never before? Get ready to learn the secrets of making the world's best honey garlic pork chops! This mouthwatering dish is a perfect blend of sweet and savory flavors, guaranteed to leave you craving for more.
When it comes to making the perfect honey garlic pork chops, choosing the right cut of pork is crucial. Opt for cuts that are tender and juicy, such as bone-in pork chops or pork loin chops. These cuts have just the right amount of fat to keep the meat moist and flavorful during cooking.
The key to achieving maximum flavor and tenderness lies in marinating the pork chops. Our honey garlic marinade is the secret ingredient that will take your pork chops to the next level. To prepare the marinade, gather the essential ingredients – honey, soy sauce, minced garlic, ginger, and a touch of brown sugar for a hint of sweetness. Combine these ingredients in a bowl and mix well to create a delectable marinade.
Now comes the important part – marinating the pork chops. Place the pork chops in a shallow dish or a resealable plastic bag, and pour the marinade over them. Make sure the marinade coats the chops evenly. For optimal flavor, marinate the pork chops for at least 30 minutes, but if you have the time, letting them marinate for a few hours or overnight will result in even more flavorful chops.
Once the pork chops are marinated to perfection, it's time to cook them. Heat a grill or a skillet over medium-high heat and cook the chops for about 4-5 minutes per side, or until they reach an internal temperature of 145°F (63°C). The honey in the marinade will create a beautiful caramelized crust on the outside, while keeping the inside juicy and tender.
Now that you've mastered the art of making the most delicious honey garlic pork chops, it's time to think about serving suggestions. These chops pair perfectly with a variety of side dishes, such as roasted vegetables or creamy mashed potatoes. You can also elevate the flavors with a tangy apple chutney or a zesty mustard sauce.
So, what are you waiting for? Get ready to wow your taste buds with the world's best honey garlic pork chops! Follow our easy-to-follow recipe, and you'll be enjoying a truly unforgettable meal in no time.
Choosing the Right Cut of Pork
When it comes to making the most delicious honey garlic pork chops, choosing the right cut of pork is essential. The right cut of pork can make all the difference in achieving tender and juicy pork chops that are bursting with flavor. So, which cuts of pork are best for this mouthwatering dish?
One of the top choices for honey garlic pork chops is the boneless pork loin chops. These chops are lean and tender, making them perfect for marinating and cooking to perfection. The boneless pork loin chops are thick and juicy, allowing them to absorb the flavors of the honey garlic marinade beautifully.
Another excellent option is the bone-in pork chops. The bone-in chops have a bit more fat and connective tissue, which adds extra flavor and moisture to the meat. This makes them incredibly succulent and flavorful when cooked with the honey garlic marinade.
If you prefer a leaner cut, pork tenderloin is an excellent choice. Tenderloin is a lean and tender cut of pork that is incredibly versatile. It can be sliced into medallions or cooked whole, making it a great option for honey garlic pork chops.
Ultimately, the choice of the cut of pork comes down to personal preference. Whether you opt for boneless pork loin chops, bone-in pork chops, or pork tenderloin, each cut has its own unique qualities that contribute to the overall taste and texture of the honey garlic pork chops.
Now that you know which cuts of pork are best for making tender and juicy honey garlic pork chops, it's time to move on to the next step: marinating the pork. The marinade is what infuses the pork with incredible flavor and tenderness, taking your honey garlic pork chops to the next level of deliciousness.

Marinating the Pork
Marinating the pork is a crucial step in creating the most flavorful and tender honey garlic pork chops. The right marinade can infuse the meat with incredible flavor, making each bite a burst of deliciousness. In this article, we will guide you through the process of creating the perfect honey garlic marinade that will elevate your pork chops to a whole new level.
When it comes to marinating the pork, the key is to strike the perfect balance between sweetness and savory flavors. The honey garlic marinade does just that, combining the natural sweetness of honey with the aromatic and pungent flavors of garlic. This dynamic duo creates a mouthwatering combination that will have your taste buds dancing with joy.
To create the honey garlic marinade, you will need a few essential ingredients. Start with a generous amount of honey, which will provide the sweetness and help to caramelize the pork chops as they cook. Next, add minced garlic to infuse the meat with its distinctive flavor. For an extra kick, you can also include some soy sauce or Worcestershire sauce to add depth and umami to the marinade.
Once you have gathered all the ingredients, it's time to prepare the marinade. In a bowl, mix together the honey, minced garlic, soy sauce, and any other optional ingredients you choose to include. Stir well to ensure that all the flavors are evenly distributed. You can also add some salt and pepper to taste, enhancing the overall seasoning of the marinade.
Now that your honey garlic marinade is ready, it's time to marinate the pork chops. Place the pork chops in a shallow dish or a resealable plastic bag and pour the marinade over them. Make sure that the pork chops are fully coated in the marinade, allowing the flavors to penetrate the meat. For optimal taste, refrigerate the marinated pork chops for at least 2 hours, or overnight if time allows. This will give the flavors ample time to develop and infuse the meat with their deliciousness.
When it's time to cook the pork chops, you can choose from various methods such as grilling, baking, or pan-frying. Whichever method you prefer, make sure to cook the pork chops until they reach the recommended internal temperature to ensure they are safe to eat. The honey garlic marinade will help to keep the pork chops juicy and flavorful throughout the cooking process.
Once the pork chops are cooked to perfection, serve them with your favorite side dishes and accompaniments. The honey garlic flavor pairs wonderfully with roasted vegetables, creamy mashed potatoes, or even a fresh salad. You can also experiment with different sauces and condiments to enhance the taste of your honey garlic pork chops, such as a tangy apple chutney or a zesty mustard sauce.
In conclusion, marinating the pork chops with a honey garlic marinade is the secret to achieving incredible flavor and tenderness. By following the steps outlined in this article, you will be able to create the most delicious honey garlic pork chops that will leave everyone craving for more. So, get ready to surprise and delight your taste buds with this mouthwatering dish!
Preparing the Marinade
Preparing the Marinade
Creating a mouthwatering honey garlic marinade for your pork chops is easier than you think. Follow these simple steps to infuse your pork with incredible flavor and tenderness.
1. Gather the ingredients: To create the perfect balance of sweet and savory flavors, you'll need the following ingredients:
- 1/4 cup honey
- 3 cloves of garlic, minced
- 2 tablespoons soy sauce
- 1 tablespoon olive oil
- 1 tablespoon brown sugar
- 1 teaspoon Worcestershire sauce
- 1/2 teaspoon ground black pepper
2. Mix the marinade: In a bowl, combine the honey, minced garlic, soy sauce, olive oil, brown sugar, Worcestershire sauce, and ground black pepper. Stir well to ensure all the ingredients are thoroughly combined.
3. Marinating the pork chops: Place the pork chops in a resealable plastic bag or a shallow dish. Pour the marinade over the pork chops, ensuring they are completely coated. Massage the marinade into the meat to ensure it penetrates the pork chops for maximum flavor.
4. Refrigerate and marinate: Seal the bag or cover the dish with plastic wrap and refrigerate for at least 2 hours, or preferably overnight. Marinating the pork chops for a longer period allows the flavors to fully develop and tenderize the meat.
5. Remove from the marinade: Before cooking the pork chops, remove them from the marinade and let any excess marinade drip off. Discard the remaining marinade.
Now that you've learned the step-by-step process of preparing a mouthwatering honey garlic marinade, you're ready to take your pork chops to the next level of deliciousness. The flavors will infuse the meat, resulting in tender, juicy, and flavorful honey garlic pork chops that will leave your taste buds craving for more.
Choosing the Ingredients
When it comes to creating the perfect honey garlic marinade for your pork chops, choosing the right ingredients is key. You want to achieve a delicate balance of sweet and savory flavors that will tantalize your taste buds. Here are the essential ingredients you'll need:
- Honey: This natural sweetener will add a touch of sweetness to the marinade. Opt for a high-quality honey for the best flavor.
- Soy sauce: The salty and umami flavors of soy sauce will help to enhance the savory profile of the marinade.
- Garlic: As the star ingredient, garlic will infuse the marinade with its aromatic and pungent flavors. Be generous with the amount of garlic you use.
- Ginger: Fresh ginger adds a subtle warmth and depth to the marinade. Grate or mince the ginger for the best results.
- Sesame oil: A small amount of sesame oil can add a nutty and fragrant note to the marinade.
- Black pepper: Freshly ground black pepper will give the marinade a hint of spiciness and complexity.
These ingredients work together harmoniously to create a marinade that will elevate the flavor of your pork chops. The sweetness of the honey balances out the savory notes from the soy sauce, while the garlic and ginger add depth and complexity. The sesame oil and black pepper provide additional layers of flavor that will make your taste buds sing.
Remember, the quality of your ingredients will greatly impact the final result. Use fresh garlic and ginger for the best flavor, and opt for high-quality honey and soy sauce. Experiment with the ratios of these ingredients to find your perfect balance of flavors. Whether you're cooking for a special occasion or simply craving a delicious meal, these carefully chosen ingredients will ensure that your honey garlic pork chops are bursting with flavor.
Marinating Time and Techniques
Marinating Time and Techniques
When it comes to marinating pork chops for the most optimal taste, there are a variety of techniques and marinating times to consider. Each method offers its own unique flavor profile, allowing you to customize your honey garlic pork chops to your personal preference. Let's explore some of the different marinating methods and learn how long to marinate the pork chops for the best results.
1. Quick Marination:
If you're short on time but still want to infuse your pork chops with flavor, a quick marination method is the way to go. Simply combine the honey garlic marinade with the pork chops in a resealable bag and let them marinate for at least 30 minutes. This will allow the flavors to penetrate the meat and give it a delicious taste.
2. Overnight Marination:
For a more intense flavor, consider marinating the pork chops overnight. This method involves preparing the marinade and placing the pork chops in a container or a resealable bag. Allow the pork chops to marinate in the refrigerator for a minimum of 8 hours or overnight. The longer marinating time allows the flavors to fully develop and results in incredibly tender and flavorful pork chops.
3. Vacuum Marination:
If you want to take your marinating game to the next level, consider using a vacuum sealer. This technique involves placing the pork chops and marinade in a vacuum-sealed bag and removing all the air. The vacuum seal ensures that the marinade penetrates every inch of the meat, resulting in maximum flavor absorption. Depending on the thickness of the pork chops, you can marinate them for 2-4 hours for optimal taste.
4. Injection Marination:
For a more unique and intense flavor experience, try injection marination. This method involves using a marinade injector to inject the honey garlic marinade directly into the pork chops. By injecting the marinade, you ensure that the flavors are distributed evenly throughout the meat. This technique is especially effective for thicker cuts of pork chops. After injecting, let the pork chops rest for about 1 hour before cooking to allow the flavors to settle.
Remember, the marinating time and technique you choose will greatly impact the taste and tenderness of your honey garlic pork chops. Experiment with different methods to find your favorite and enjoy the explosion of flavors that await!

Cooking the Pork Chops
When it comes to cooking honey garlic pork chops, mastering the art of cooking them to perfection is essential. You want your pork chops to be juicy and flavorful every time, and with the right techniques, you can achieve just that.
First and foremost, it's important to choose the right cooking method for your pork chops. Whether you prefer grilling, pan-frying, or baking, each method can yield delicious results. Grilling gives the pork chops a smoky flavor and beautiful grill marks, while pan-frying creates a crispy exterior. Baking is a great option if you want a more hands-off approach.
Once you've decided on the cooking method, it's time to season your pork chops. A simple salt and pepper seasoning is a good starting point, but to take your honey garlic pork chops to the next level, consider adding additional spices and herbs. For example, a combination of paprika, garlic powder, and thyme can add depth of flavor.
Now, let's talk about the cooking process itself. If you're grilling or pan-frying, preheat your grill or pan to medium-high heat. This will ensure that your pork chops cook evenly and develop a nice crust. If you're baking, preheat your oven to the desired temperature specified in your recipe.
When cooking the pork chops, be mindful of the cooking time. Overcooking can result in dry and tough pork chops, while undercooking can be unsafe to consume. The internal temperature of cooked pork should reach 145°F (63°C) for optimal safety and juiciness. Use a meat thermometer to accurately gauge the temperature.
While cooking, baste the pork chops with the honey garlic marinade to infuse them with even more flavor. This will also help keep the pork chops moist throughout the cooking process. Be careful not to overdo it, as too much marinade can cause the exterior to become sticky or burnt.
Once the pork chops are cooked to perfection, remove them from the heat and let them rest for a few minutes before serving. This allows the juices to redistribute and ensures that the pork chops remain juicy.
Now that you've mastered the art of cooking honey garlic pork chops, you can enjoy them anytime you want. Whether you're hosting a dinner party or simply cooking for yourself, these juicy and flavorful pork chops are sure to impress.
Serving Suggestions
Serving Suggestions
When it comes to serving honey garlic pork chops, the possibilities are endless. Whether you're hosting a dinner party or simply cooking for your family, there are plenty of creative ideas for side dishes and accompaniments that will perfectly complement the flavors of this delicious dish.
One popular option is to serve the pork chops with a side of roasted vegetables. The caramelized flavors of the vegetables pair beautifully with the sweet and savory taste of the honey garlic marinade. You can roast a medley of colorful vegetables such as carrots, bell peppers, and zucchini, or choose your favorites to create a unique combination.
If you're looking for something a bit more indulgent, creamy mashed potatoes are always a crowd-pleaser. The smooth and velvety texture of the potatoes provides a comforting contrast to the tender pork chops. To take it up a notch, you can add some garlic or herbs to the mashed potatoes for an extra burst of flavor.
For those who enjoy a bit of tanginess, consider serving the pork chops with a side of apple chutney. The sweet and tart flavors of the chutney complement the richness of the pork and add a refreshing element to the dish. You can make your own apple chutney by simmering diced apples with sugar, vinegar, and spices until they are soft and jam-like.
If you prefer a sauce or condiment to accompany your pork chops, there are plenty of options to choose from. A zesty mustard sauce can add a tangy kick to the dish, while a creamy mushroom sauce can provide a luxurious touch. You can also serve the pork chops with a side of tangy coleslaw or a fresh green salad for a lighter option.
Remember, the key is to experiment and have fun with your serving suggestions. Don't be afraid to get creative and try new flavors and combinations. With honey garlic pork chops as the star of the show, you're sure to impress your guests or satisfy your family's taste buds with these delicious side dishes and accompaniments.
Side Dishes
When it comes to serving honey garlic pork chops, the right side dishes can take your meal to the next level. These flavorful chops pair perfectly with a variety of accompaniments that enhance their savory and sweet flavors. From roasted vegetables to creamy mashed potatoes, there are plenty of options to choose from.
Roasted Vegetables: One popular side dish to serve with honey garlic pork chops is a medley of roasted vegetables. The combination of tender, caramelized vegetables with the juicy chops creates a delicious contrast of flavors and textures. You can roast a mix of your favorite vegetables, such as carrots, bell peppers, zucchini, and Brussels sprouts, with some olive oil, salt, and pepper for a simple yet satisfying side dish.
Creamy Mashed Potatoes: Another classic side dish that pairs well with honey garlic pork chops is creamy mashed potatoes. The smooth and buttery texture of the mashed potatoes complements the rich flavors of the pork chops.
Read the full article
0 notes
Text
Discover Zurich’s Best Kept Secret: An Indian Food Lover’s Paradise
Have you been craving those spicy, flavorful flavors of Indian cuisine lately? As an Indian food lover living in or visiting Zurich, you may have struggled to find an authentic spot that hits the spot. The good news is, there’s a hidden gem of an Indian restaurant right in the heart of Zurich that will satisfy your craving and then some. Nestled on a quiet cobblestone street, Masala Mantra serves up traditional Indian fare with a modern twist that will make your taste buds sing. Run by a husband-and-wife team passionate about showcasing the regional diversity of Indian cuisine, Masala Mantra offers an array of curries, tandooris, naans and more made from the freshest local ingredients. Here’s your insider tip — check out Masala Mantra the next time your Indian food craving strikes for an unforgettable culinary adventure that’s sure to become your best kept secret. You can thank us later!
What Makes Restaurant Swaad Zurich's Best Indian Restaurant
When it comes to Indian food in Zurich, Swaad is in a league of its own. What makes this unassuming restaurant the city's best kept secret?
Authenticity
We serve up authentic Indian fare made from scratch using fresh ingredients and traditional recipes. We have brought real deal Indian home cooking to Switzerland. Forget the greasy, westernized versions of Indian food you'll find elsewhere - this is the real McCoy.
Variety
The menu has a wide range of northern and southern Indian specialties to suit every taste. From rich butter chicken and tender lamb vindaloo to crispy dosas and cooling raita, there are lots of options to sample. And the daily specials mean there's always something new to try.
Value
While Zurich isn't known for being budget-friendly, Swaad offers amazing value. For the quality and quantity of food you get, the prices are a steal. Where else can you get a feast for two with appetizers, mains, rice, naan and dessert for under 50 CHF?
Service
We also stand out for its warm, welcoming service. The owners treat every customer like an honored guest in their home. They're happy to guide you through the menu, provide recommendations tailored to your tastes and ensure your every need is met.
For an authentic taste of India in an unbeatable setting, Swaad can't be topped. This cozy, unpretentious gem should be at the top of any Indian food lover's list in Zurich.
Signature Dishes You Must Try at Swaad
Once you get a taste of the signature dishes at Swaad, Zurich’s best Indian restaurant, you’ll be hooked. Here are a few must-tries:
Butter Chicken
Swaad’s butter chicken is legendary. Tender chicken marinated in yogurt and spices, then simmered in a creamy tomato sauce. The chicken is so tender it melts in your mouth, and the rich sauce is perfect for dipping garlic naan or rice.
Lamb Vindaloo: A spicy curry dish with succulent lamb, potatoes, and a tangy vinegar sauce. The intense, complex flavors will delight any spice lover. Ask for extra chili if you dare!
Saag Paneer: Soft cubes of homemade cheese in a creamy spinach sauce. Mild but full of flavor, this vegetarian dish is comfort food at its best.
Masala Dosa: A crispy rice and lentil crepe stuffed with spiced mashed potatoes. Light yet satisfying, dosas are a popular South Indian snack.
Mango Lassi: A frosty mango smoothie, perfect for cooling down from those spicy curries. Fresh mango and yogurt blended into a sweet, fruity drink you won’t be able to stop sipping.
With authentic recipes, high-quality ingredients, and friendly service, it’s no wonder Swaad has become a Zurich institution. For an unforgettable culinary experience, make your way to this hidden gem - but go hungry, because one meal will never be enough! You’ll be dreaming about these dishes until your next visit.

Swaad's Vibrant, Modern Ambiance
Swaad's modern yet cozy decor provides the perfect backdrop for an evening of inspired Indian cuisine. With colorful textiles, ambient lighting, and contemporary art featured throughout the space, you'll feel transported to a hip lounge in Mumbai or Delhi.
An Eclectic, Sophisticated Space
The moment you step inside Swaad, you're enveloped in its chic yet welcoming ambiance. Mismatched chairs, cushions, and benches surround sturdy wooden tables, while jewel-toned fabrics decorate the walls. Pops of turquoise, fuchsia and gold enliven the neutral color palette. Contemporary mixed media art, including collages incorporating Indian spices and textiles, reflects India's rich culture.
The focal point is an open kitchen where chefs prepare fragrant curries, dals and naan over an open flame. You can watch as they toss dough, stir aromatic masalas, and fry crispy starters. An island bar offers counter seating where you can casually observe the culinary show. On warmer days, dine al fresco on the spacious patio beneath twinkling lights.
Swaad's hip vibe attracts a stylish, worldly crowd. Whether you're on a date, hosting an intimate dinner, or enjoying after-work drinks with colleagues, Swaad's chic yet cozy ambiance sets the perfect mood. You'll feel like one of the in-the-know locals who have discovered Zurich's best kept secret. An evening at Swaad is a vibrant, sensory experience where sophisticated decor meets flavorful, soul-stirring food. Escape everyday and lose yourself in Swaad's modern magic.
Restaurant Swaad Attentive Yet Discreet Service
We yet discreet service is yet another reason to make it your go-to for Indian cuisine in Zurich. The staff provide seamless service without being intrusive, allowing you to focus on enjoying your meal with friends and family.
As soon as you walk through the carved wooden doors, you'll be greeted warmly and shown to your table. The servers are very knowledgeable about the menu and can offer recommendations to suit any dietary needs or restrictions. Don't hesitate to ask for their input, as they're happy to guide you to hidden gems on the menu or suggest the perfect wine pairing for your dishes.
Your server will check in periodically to top up your water glass or see if you need anything else, but they never make you feel rushed. Meals at Swaad are meant to be savored, so take your time exploring the variety of flavors and aromas. The staff understand that a memorable dining experience is as much about the overall ambiance as it is the food itself.
When you've finished your meal and are lingering over dessert or another glass of wine, your server will politely inquire if there's anything else they can bring you before settling the check. But there's no need to hurry - you're welcome to sit back, relax, and enjoy the atmosphere at Swaad for as long as you like. Their goal is for you to leave feeling satisfied in every sense, eager to return again soon.
Swaad's staff provide a level of service that is rarely found at other restaurants. Their attentiveness and discretion, combined with the vibrant yet cozy ambiance, transform a meal into a true culinary journey you won't soon forget. A hidden gem with hidden delights, Swaad deserves to be experienced by every Indian food lover in Zurich.
How to Get a Reservation at Swaad, Zurich's Hottest Indian Restaurant
Scoring a reservation at Zurich’s hottest Indian restaurant, Swaad, is no easy feat. As the city’s best-kept culinary secret,Swaad is always booked out weeks in advance. But with some strategic planning, you can land a coveted spot at this foodie paradise.
Book in Advance
Swaad only releases reservations one month ahead, so mark your calendar and set a reminder to book as soon as the next month’s reservations open up. Be flexible with your date—opting for a weekday or earlier time slot will increase your chances. Their online reservation system opens at midnight, so staying up late or waking up early may reward you with a reservation.
Check Frequently for Cancellations
Even if Swaad is fully booked for your desired date, keep checking back on their website or give them a call. Cancellations are common and they release the newly opened tables on a first-come, first-served basis. An open spot may appear at any time, so persistence and frequent checks pay off.
Dine at the Chef’s Counter
If a traditional table reservation continues to elude you, consider securing spots at Swaad’s chef’s counter. This coveted 10-seat bar offers a front-row view of the kitchen and a unique tasting menu curated by the chef. Reservations for the chef’s counter open up 4 weeks in advance and also tend to fill up quickly.
Be Flexible and Open-Minded
Rather than being dead-set on a particular cuisine like North Indian or Nepali, go in with an open mind regarding the menu and experience. Swaad is known for fusing flavors from all over India, so you may discover a new regional delicacy or ingredient. A willingness to experiment will make your meal at Swaad that much more memorable.
With some patience and persistence, you'll soon be enjoying Swaad's delectable dishes made from the freshest Indian spices and ingredients. The extra effort required to score a reservation will make your dining experience at Zurich's hottest Indian eatery that much more rewarding. Save room for the homemade chocolates and kulfis—you won't regret it!
Conclusion
So next time you find yourself in Zurich with an Indian food craving, skip the tourist traps and head straight to Haldi. You won’t regret discovering this hidden gem in the heart of the city. With delicious curries, fresh naan, and chai as good as you’ll find anywhere, Haldi will transport you to India with every bite. The friendly owners and staff provide an authentic experience you simply can’t get anywhere else in Zurich. Make sure to go with an appetite - you’ll want to sample as many of the mouthwatering dishes as possible. Just don’t tell too many people about this secret spot, we want to keep Haldi all to ourselves! But for you, dear reader, we’ll make an exception. You’re welcome! Now go fill up on samosas, butter chicken, and mango cream. Our little secret will be waiting.
0 notes
Photo

Garlic Mashed Potatoes Secret Recipe Recipe
Red potatoes mashed with butter, Romano cheese, garlic, salt and oregano. A new twist on a familiar favorite!
0 notes
Text
Crockpot Bison and Coffee Roast
New Post has been published on https://eazywellness.net/crockpot-bison-and-coffee-roast/
Crockpot Bison and Coffee Roast
Last Modified: Aug 6, 2023 by Katie Hale · This post may contain affiliate links · Leave a Comment
Today we’re going to explore the delicious world of slow-cooked bison and coffee roast. If you’re following a paleo or keto diet, you know that finding flavorful and satisfying recipes can be a challenge. But fear not, because I have a recipe that will make your taste buds sing!
<![CDATA[#feast-advanced-jump-to z-index: 999; border: none; opacity: 0.97; background: #FCFCFC; border-left:4px solid #CCC; padding:5px 0 10px 20px; margin-bottom: 57px; #feast-advanced-jump-to summary, #feast-advanced-jump-to ul margin-left:0;min-height:50px; #feast-advanced-jump-to li list-style-type:none; #feast-advanced-jump-to li a text-decoration: none; #feast-advanced-jump-to max-height: 300px !important; overflow-y: auto; ::-webkit-scrollbar -webkit-appearance: none; width: 7px; ::-webkit-scrollbar-thumb border-radius: 4px; background-color: rgba(0,0,0,.5); -webkit-box-shadow: 0 0 1px rgba(255,255,255,.5); ]]> Jump to:
Bison and Coffee Roast
One of the best things about bison is that it’s lean and packed with protein, making it a great addition to any paleo menu. Plus, it’s a sustainable choice that’s lower in fat and calories than beef, but still offers that hearty, meaty flavor we all crave. When you slow-cook a bison and coffee roast, you’re able to really let those flavors develop and infuse the meat with all sorts of deliciousness.
But why slow-cook? Well, there are a few reasons. For one, it allows the meat to cook low and slow, which breaks down the tougher fibers and makes it incredibly tender. Plus, it gives all the flavors time to meld together and create a rich, savory taste. And let’s be real, who doesn’t love coming home to a house that smells like a cozy, delicious meal?
So there you have it, folks: a Crock-Pot bison and coffee roast that’s paleo and keto-friendly, sustainable, and delicious. What’s not to love? Serve this with a side of paleo mashed potatoes and you’ll have a comfort food meal that everyone will beg you to make!
Ingredients
Now, let’s talk about the secret ingredient: coffee! That’s right, adding coffee to your bison roast might seem unusual, but trust me, it’s a game-changer. Not only does it add a depth of flavor and richness to the meat, but it also helps to tenderize it even more.
Serves: 4 Prep Time: 15 minutes Cook Time: 8 to 10 hours
2 lb bison roast
8 mushrooms, sliced
3 green onions, sliced
2 garlic cloves, minced
1 ½ cups strong coffee, brewed
½ teaspoon chili powder
2 tablespoon cooking fat, beef tallow, lard, or bacon grease
Sea salt and freshly ground black pepper, to taste
How to Make Crockpot Bison and Coffee Roast
In a large skillet, over medium heat, melt the cooking fat. Brown the bison roast on all sides.
Remove the roast from the skillet, and add in the green onions, mushrooms, and garlic. Cook for 3 minutes, stirring regularly. Then, add the coffee, chili powder, salt, and black pepper.
Stir and simmer, scraping the cooked bits of food off the bottom of the skillet. Bring this to a boil, then pour the liquid into your slow cooker.
Add the browned bison roast to the liquid in the slow cooker, seal with a lid, and let cook on low for 8 to 10 hours, or until the meat is fork-tender.
More Bison Recipes
Add bison to the menu soon with one of these tasty recipes. If you don’t want the bison and coffee roast, check out some of the other dishes below for unique flavors and rich gamey meat! Take a moment to bookmark your favorites, print out the recipes, or pin them to Pinterest to make soon.
📖 Recipe
Crockpot Bison and Coffee Roast
Try this paleo and keto-friendly crockpot bison and coffee roast recipe! It’s a delicious and easy way to prepare a lean and flavorful roast.
<![CDATA[#wprm-recipe-user-rating-0 .wprm-rating-star.wprm-rating-star-full svg * fill: #5A822B; #wprm-recipe-user-rating-0 .wprm-rating-star.wprm-rating-star-33 svg * fill: url(#wprm-recipe-user-rating-0-33); #wprm-recipe-user-rating-0 .wprm-rating-star.wprm-rating-star-50 svg * fill: url(#wprm-recipe-user-rating-0-50); #wprm-recipe-user-rating-0 .wprm-rating-star.wprm-rating-star-66 svg * fill: url(#wprm-recipe-user-rating-0-66); linearGradient#wprm-recipe-user-rating-0-33 stop stop-color: #5A822B; linearGradient#wprm-recipe-user-rating-0-50 stop stop-color: #5A822B; linearGradient#wprm-recipe-user-rating-0-66 stop stop-color: #5A822B; ]]>
Prep Time 15 minutes mins
Cook Time 8 hours hrs
Total Time 8 hours hrs 15 minutes mins
Course Main Course
Cuisine American
Servings 4
Calories 322 kcal
Instructions
To start, heat a large skillet over medium heat and melt some cooking fat.
2 tablespoon cooking fat
Brown the bison roast on all sides and set it aside.
2 lb bison roast
In the same skillet, add green onions, mushrooms, and garlic, and cook for about 3 minutes.
8 mushrooms, 3 green onions, 2 garlic cloves
Then, add coffee, chili powder, and season with sea salt and black pepper. Scrape off all the browned bits in the skillet and mix them into the sauce for added flavor. Bring to a boil and pour the sauce into your crockpot.
1 ½ cups strong coffee, ½ teaspoon chili powder, Sea salt and freshly ground black pepper
Add the browned bison roast to the crockpot and cook on low for 8 to 10 hours until the meat is fork-tender.
Notes
Bison should be cooked to a minimum of 145°F internally for safety. However, for a fork-tender roast, as you want with this recipe, you will be cooking to 160 °F or higher.
If you do not have a full 8 hours to cook the roast, you can cook on high heat setting for 4 to 5 hours instead. A slow longer cook time will keep the meat moist and tender, but you can get similar results with a higher cooking heat and shorter time.
Nutrition
Serving: 4gCalories: 322kcalCarbohydrates: 3gProtein: 50gFat: 11gSaturated Fat: 3gPolyunsaturated Fat: 4gMonounsaturated Fat: 3gTrans Fat: 0.04gCholesterol: 141mgSodium: 135mgPotassium: 963mgFiber: 1gSugar: 0.4gVitamin A: 164IUVitamin C: 2mgCalcium: 37mgIron: 9mg
Keyword bison, Crockpot Bison, keto, paleo
Source link
0 notes
Text
youtube
Strong Bad shares secret recipes with everyone.
By the way, here's a recipe for Strong Bad's fried chicken
Ingredients:
For the fried chicken:
8 pieces of chicken (legs, thighs, wings, or a mix)
2 cups buttermilk
2 cups all-purpose flour
2 teaspoons paprika
1 teaspoon garlic powder
1 teaspoon onion powder
1 teaspoon salt
1/2 teaspoon black pepper
Vegetable oil, for frying
For the Strong Sauce (optional):
1/2 cup mayonnaise
2 tablespoons ketchup
1 tablespoon Dijon mustard
1 teaspoon hot sauce (adjust to taste)
1/2 teaspoon garlic powder
Salt and pepper to taste
Instructions:
In a large bowl, place the chicken pieces and cover them with buttermilk. Make sure all the chicken is coated. Let it marinate for at least 1 hour or overnight in the refrigerator.
In a separate large bowl, mix the flour, paprika, garlic powder, onion powder, salt, and black pepper.
Take each piece of chicken from the buttermilk and let any excess liquid drip off.
Dredge the chicken in the flour mixture, making sure to coat it thoroughly.
Heat about 1 inch of vegetable oil in a large skillet or frying pan over medium-high heat.
Carefully add the coated chicken pieces to the hot oil, making sure not to overcrowd the pan. Fry the chicken in batches if necessary.
Fry the chicken until it's golden brown and crispy on all sides. The internal temperature of the chicken should reach 165°F (74°C).
Remove the fried chicken from the oil and place it on a wire rack or paper towels to drain any excess oil.
Optional: While the chicken is frying, you can prepare Strong Sauce for some added flair. In a small bowl, mix together mayonnaise, ketchup, Dijon mustard, hot sauce, garlic powder, salt, and pepper until well combined.
Serve the delicious fried chicken with Strong Sauce on the side or your favorite dipping sauce, along with some sides like mashed potatoes, coleslaw, or cornbread. This quirky fried chicken recipe is sure to bring a smile to everyone's face!
#strong bad#sbemail#strong bad email#secret recipes#new jersey not nigeria#the cheat#shave the cheat#the chekt#Great Uncle Pawdabber's Pre-tend Ice Cream Showdown#coach z#the king of town#Crazy Aunt Eulatherm's Deodorant Doppelganger#marzipan#homestar runner#pinecone#Youtube
1 note
·
View note
Text
Elevate Your Culinary Skills with Homemade Salsas, Guacamole, Dressings, and Salad Creations
Introduction:
In the world of culinary delights, there are few things as versatile and satisfying as homemade salsas, guacamole, dressings, and salad creations. Whether you're a seasoned chef or a culinary enthusiast looking to impress your friends and family, mastering these recipes will undoubtedly take your dishes to new heights. In this comprehensive guide, we will explore the art of making these delectable accompaniments and reveal how they can seamlessly elevate any meal.
Section 1: Homemade Salsas - Bursting with Flavor
Salsas are not just for dipping your tortilla chips into; they add vibrant flavors and refreshing accents to numerous dishes. From the classic tomato-based pico de gallo to tangy fruit salsas and smoky chipotle variations, the possibilities are endless. Let's delve into the ingredients, techniques, and key tips for making sensational salsas at home.
To optimize your salsa's taste, start by ensuring you have ripe, flavorful tomatoes. Combine them with aromatic herbs like cilantro, onions, and garlic to create a balanced yet bold base. You can customize the heat level with hot peppers like jalapenos or serranos, but be sure to remove the seeds and membranes for milder flavors.
Experimenting with fruity salsas can be a delightful surprise. Mango, pineapple, or even strawberries can lend a sweet and tangy twist to your salsa. Consider adding some lime juice or vinegar to elevate the taste and balance the flavors. Remember, salsa-making is all about creativity and finding the perfect blend that tantalizes your taste buds.
Section 2: Guacamole - Creamy and Irresistible
Few things can compare to the silky smoothness of a well-made guacamole. This Mexican classic is exceptionally versatile, doubling as a dip, a condiment, or even a sandwich spread. Let's dive into the secrets of creating a velvety guacamole that will have people coming back for more.
The number one rule of making guacamole is using perfectly ripe avocados. They should yield slightly when gently squeezed, indicating their creaminess. Once you have avocados, mash them with a fork or potato masher until you reach your desired consistency. For a chunkier guacamole, leave some larger pieces, while a smoother texture can be achieved by thoroughly mashing the avocado.
To add complexity to your guacamole, incorporate fresh lime juice, minced garlic, diced onions, and finely chopped cilantro. A touch of salt will enhance the flavors and help bring out the natural creaminess of the avocado. If you're craving an extra kick, throw in some diced jalapenos or a pinch of cayenne pepper.
Section 3: Homemade Dressings - Elevating Your Greens
Salads become truly extraordinary when paired with the perfect homemade dressing. No more settling for store-bought bottles; customizing your dressings allows you to accentuate the flavors of your greens and add an artisanal touch. Let's explore the world of homemade dressings and discover the magic they can work on even the simplest salad.
A classic vinaigrette needs only a few pantry staples: extra-virgin olive oil, vinegar (such as apple cider or balsamic), Dijon mustard, minced garlic, salt, and pepper. Whisk them together, taste, and adjust the flavors accordingly. For a creamy twist, add a dollop of Greek yogurt or mayonnaise, creating a luscious and tangy dressing.
If you're a fan of Asian cuisine, consider making a ginger sesame dressing. Combine sesame oil, soy sauce, rice vinegar, grated ginger, garlic, and a touch of honey for a tantalizing blend of flavors that pairs exceptionally well with salads featuring hearty greens like kale or spinach.
Section 4: Salad Creations - Unleash Your Culinary Imagination
With salsas, guacamole, and dressings at your disposal, it's time to dive into creating mouthwatering and visually stunning salads. Don't limit yourself to the traditional greens and vegetables; expand your horizons by incorporating unique ingredients, textures, and flavors.
Create a Mexican-inspired salad with grilled corn, black beans, juicy tomatoes, and a zesty lime-cilantro dressing. Elevate a classic Caprese salad by drizzling it with a balsamic reduction or pesto dressing. Crumble some feta cheese over a Greek salad, and toss it with a tangy lemon-oregano dressing. The possibilities are endless, limited only by your imagination.
Tags suitable for WordPress: salsa making, guacamole recipes, homemade dressings, salad creations.
Conclusion:
Mastering the art of salsa making, guacamole, dressings, and salad creations will undoubtedly elevate your culinary skills. These homemade accompaniments are versatile, bursting with flavors, and capable of transforming even the simplest dishes into extraordinary culinary experiences. Whether you're preparing a quick meal at home or entertaining guests, these recipes offer endless possibilities that will impress and satisfy. So, roll up your sleeves and embark on a flavorful journey filled with vibrant salsas, creamy guacamole, tantalizing dressings, and stunning salad creations
Revitalize your diet with Puravive's Superfood Blend. Packed with essential nutrients, our blend is the perfect addition to your daily meals, supporting your diet and overall health. Experience the power of superfoods with Puravive. Check out the Puravive Superfood Blend Product Page.
Read the full article
0 notes
Last Seen Blogs

davahilakufe
Untitled

ferguswords-blog
Word Vomit

staticart
How dare you assume I breathe

gzabu
Gzabu

forgottenflower
Forgotten Flowers