#Color Efex Pro
Video

flickr
The Bow River and Mountain Peaks of the Sawback Range (Banff National Park) by Mark Stevens
Via Flickr:
It was definitely a beautiful day in May looking down the Bow River with the blue skies above and hillsides a tree stretching on the horizon...
#Ball Range#Banff National Park#Banff-Lake Louise Core Area#Blue Skies with Clouds#Bow River#Canadian Rockies#Capture NX2 Edited#Central Front Ranges#Color Efex Pro#Copper Mountain#Day 2#Evergreens#Grassy Area#Grassy Meadow#Hillside#Hillside of Trees#Looking NW#Meadow#Mount Ishbel#Mountain#Mountains in Distance#Mountains off in Distance#Nature#Nikon D800E#Project365#River#Sawback Range#Sawback-Slate Ranges#Southern Continental Ranges#Trees
11 notes
·
View notes
Text

Summer classic
xt4+af 33 mm 1.4 - nik xollection
color efex pro
These are the words of your grandmother.
But the baby is hungry, let's have a light snack.
#food#ice cream#milk#chocolate#fujifilm#viltrox#teaspoon#glass#sweet#snack#hungry#light snack#maybe not#nik collection#dxo#color efex pro
5 notes
·
View notes
Text
Nik collection manual pdf
#http://vk.cc/c7jKeU#nofollow#_blank#Menu#Filtre#<p> </p><p> </p><center>NIK COLLECTION MANUAL PDF >> <strong><u><a href= rel= target=>DOWN#<br> désinstaller nik collection#<br> nik collection tutorial français#<br> nik collection 4 mise à jour#<br> nik collection gratuit#<br> dxonik collection mise à jour#<br> nik collection gratuit ou payant#<br>#<br> </p><p> </p><p> </p><p>Retrouvez la notice de l'appareil NIK SOFTWARE COLOR EFEX PRO 3.0 categorie NIK SOFTWARE au format PD#Depuis Photoshop Elements#"Nik Collection. Manuel Google (en anglais) : naturescapes.net/retail/nik-dfine-user-guide.pdf#User Guide · Mode d'emploi · Besoin d'aide? · Spécifications du Color Efex Pro 3.0 de la marque Nik Software · Manuels de produits associés#La Nik Collection par Google : dans notre tutoriel Photoshop#nous vous montrons quelles sont les fonctionnalités et comment elles peuvent faciliter#Consultez gratuitement le manuel de Complete Collection de Nik Software ou posez votre question à d'autres Type de fichier#Mode d'emploi (PDF)#Summary of Contents of user manual for Nik Software Color Efex Pro 4.0 Complete Edition NIK-1419. Page 1Getting Started COLOR EFEX PRO 4 ™#</p><br>#.
2 notes
·
View notes
Text
My ON1 Photo Workflow for Landscape Photos
These are my step-by-step choices and reasoning behind making very realistic photos that make the viewer feel like they are looking at a real scene and actually there, not looking at a photo, using ON1 photo software.
Continue reading My ON1 Photo Workflow for Landscape Photos

View On WordPress
1 note
·
View note
Video

flickr
Unwrapped wrapping stuff by Pascal Volk
#Macro Mondays#Wrapping#Macro#Makro#100mm#Close up#Nahaufnahme#Macro Dreams#bokeh#DoF#depth of field#Invierno#Winter#Canon EOS 5D Mark IV#5DMkIV#Canon EF 100mm f/2.8L Macro IS USM#Manfrotto#MT055xPro3#468MGRC2#DxO Color Efex Pro#Nik Collection#DxO PhotoLab#flickr
0 notes
Text
Video2brain color efex pro 4 workshop

#VIDEO2BRAIN COLOR EFEX PRO 4 WORKSHOP HOW TO#
#VIDEO2BRAIN COLOR EFEX PRO 4 WORKSHOP PRO#
#VIDEO2BRAIN COLOR EFEX PRO 4 WORKSHOP PRO#
Nik Software HDR Efex Pro 2.
#VIDEO2BRAIN COLOR EFEX PRO 4 WORKSHOP HOW TO#
Dramatic Black & White Photography Using Nik Silver Efex Pro 2 (The Lightweight Photographer Books) In his new video2brain workshop, experienced trainer and product specialist Richard West shows how to achieve groundbreaking effects in Color Efex Pro 3.0 Co.
Video2Brain-FR Nik Software HDR Efex Pro.
Video2brain – Nik HDR Efex Pro 2.0 Workshop.
Video2brain - Nik HDR Efex Pro 2.0 Workshop.
video2brain - Nik HDR Efex Pro 2.0 Workshop.
Video2Brain - Nik HDR Efex Pro 2.0 Workshop (2012).
Video2brain Nik Hdr Efex Pro v2.0 Workshop.
Video2brain - Nik HDR Efex Pro 2.0 Workshop.pdf This chapter will show you some of the finishing touches you can apply to your image as you complete the process of tone mapping. If you’re looking for a plugin to help take your photography to the next level, I highly recommend getting the entire Nik Software Collection for only 149. Bleach Bypass, Brilliance/Warmth, Cross Processing, Foliage, Pro Contrast and Tonal Contrast are my main filters I use. In this chapter you’ll learn how to take advantage of the very powerful capability to apply adjustments in HDR Efex Pro that only affect a specific portion of your image. I mainly use a handful of the filters that Color Efex Pro 4 offers. This chapter will focus on the various adjustments you can apply to your HDR images during the tone mapping process. This chapter will guide you through some of the basics of working with HDR Efex Pro, including adjusting overall settings, working with presets, and evaluating your image. In this chapter we’ll walk through the process of creating a basic high dynamic range (HDR) image using HDR Efex Pro. In this workshop you’ll learn how to create great HDR images with Nik Software’s HDR Efex Pro 2.0. This Photoshop and Lightroom plug in contains a wide variety. You’ll also get tips on applying finishing touches to your images and saving the final processed image. This is a video review of the interface and how to use Nik, which is now DxO, Color Efex Pro 4. You’ll learn how to make overall tonal and color adjustments, use control points to apply selective adjustments, and reset adjustments or go back in the history. After showing you the basics of HDR Efex Pro – including configuring the interface and settings, using presets, and evaluating your image – Tim introduces you to the various adjustment options. Project files used in the lessons are included on the disc so students can practice what they have learned, and interactive review questions help reinforce freshly gained knowledge.Author: Tim Grey | Category: Video (tutorials, how-to, etc.) | Language: English | Page: 1 | ISBN: d77d2dca7fff4b07bc6ae4378a797711 |ĭescription: In this workshop Tim Grey teaches you how to use Nik Software’s HDR Efex Pro 2.0 to create great high-dynamic-range images. The unique Watch-and-Work mode shrinks the video into a small window to allow the student to work alongside in Premiere Elements. 2 in the Preset drop down Specify the values for File Format, Color Space. The video is wrapped in a unique interface that allows the student to jump to any topic and also bookmark individual sections for later review. VIVEZA 2 Introduction Workshop Viveza 2 from Nik Software December 2012. Chad presents three hours of high-quality video tutorials, complete with lesson files, assessment quizzes, and review materials. video2brain Experts (LinkedIn Learning Japan, Japan) Graphic. Finally, students will learn how to share theirr movies with friends and family on DVDs or the Web. Chad will also show them some of the new features in Premiere Elements 11, such as viewing their videos and photos on a map based on where they were taken. Next, they'll learn how to assemble their video clips into great-looking movies complete with titles, transitions, and special effects. Trainer Chad Perkins starts by introducing students to the Premiere Elements workspace and explaining how to bring video files into the program. This focused workshop provides over 3 hours of high-quality video training on editing videos in Adobe® Premiere Elements® 11.
0 notes
Note
What do you use to edit your photos?!!
For many of my black and white photos I shoot JPEGs and don't edit, except to slightly crop in iPhotos. I have been pleased with the JPEGs my Sony makes, especially the high-contrast black and white.
If I am taking photos at night, indoors, or with poor lighting conditions, I will shoot the photo in RAW format, with the JPEG produced by the camera for reference. I pre-process the photo using DXO PureRAW. This sharpens the image and gets rid of noise. It is a pretty amazing tool and I highly recommend it for anyone shooting in RAW. I then use Adobe Lightroom to edit the photo. If I decide I want to process the RAW image as black and white I use DXO NIK Silver Efex Pro 3, as it emulates film much better than Lightroom. I also sometimes use DXO NIK Analog Efex for a vintage look.
I am colorblind, so I rely a lot on Lightroom's presets for color photos. I usually make several different versions of a color photo and run them past my wife to select the best-looking image. If not for my wife, I probably would never make color photos
54 notes
·
View notes
Note
hi I hope you have great holidays (if you celebrate!) I love how your screenshots look, could you describe your editing progress in any chance? <3
definitely! my editing progress usually depends on the general feel of each photoset/screenshot so this is just a composed list of steps i generally take whenever i edit them.
the screenshot is taken with gshade (personal preset) and edited with ☠ photoshop CC 2019!
today we're working with this screenshot:
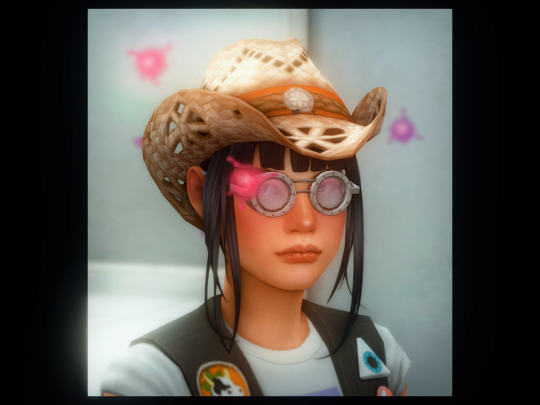
yes i took it with the border shader in gshade. less things for me to do in photoshop and i can angle the frame how i see fit!
since i've planned to crop this into a square (based on how the border is set) so we'd do that. after cropping i'd run an action (that i called "base") composed of:

in which the ☠ topaz clean and smart sharpen settings are taken from avonlea's actions. the camera raw filter is just there to add +5 clarity points. ☠ topaz denoise setting varies because unlike topaz clean, denoise pop up window will show up and let you edit it right at the moment. here's a before and after:

here i'd use the liquify tool to smooth out the rough edges, or export it as .psd to procreate if i wanted some extensive edit and draw on, etc.. then import it back again in pts for the next step.
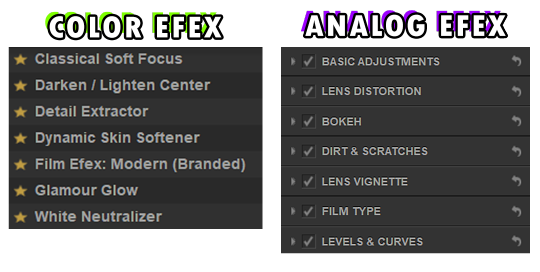
next i basically throw the screenshot into ☠ color efex & analog efex pro where i play around with the filters and spam the compare button until i'm satisfied.
the settings get changed every time so it'd be kind of useless for me to share them but these are the ones i mess with the most:
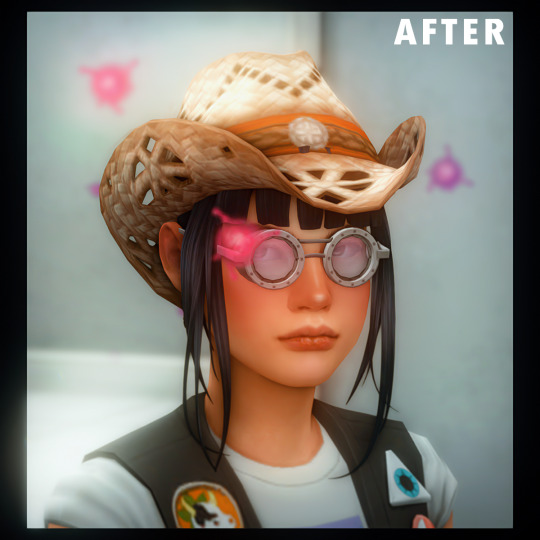
then i'll use the camera raw filter again to hot-fix the screenshot (mostly saturation, hue, highlight, white points, clarity and texture), resizing the image to 1280px wide*, run an action (that i called "noise") and we'll end up with something like this:

fyi: sharpen the screenshot after adding noise is a personal choice btw. sometimes i'd double sharpen the screenshot if i want it to be more sharp - run the unsharp mask option before the noise action itself.
*if the current width is lesser than 1280px i'd downsize it to 540px since upsizing a lower resolution image will make the details blurrier (there's rarely a case where my original screenshot after cropped is lesser 540px wide).
*if i use swre to hotsample my screenshots i'd resize the photo to 2160px wide instead. most of the 2160px width cases are fullbody shots in cas.
last step is to save/export the edited screenshot as PNG. the grand reveal:

unfortunately the site for these ☠ programs was not in english, i downloaded them a long time ago i forgot which site i got them from so i couldn't send/link them here :(
— anyway i hope this editing process helps with what you're looking for!! (someway somehow)
#hope your holiday was great if you celebrated!!#i cannot proofread#answering this while watching twd#ask#nː
24 notes
·
View notes
Photo
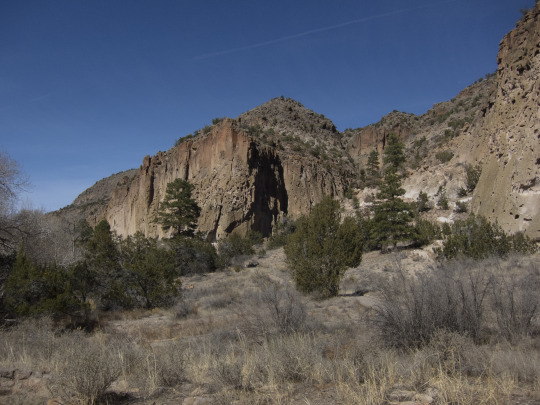
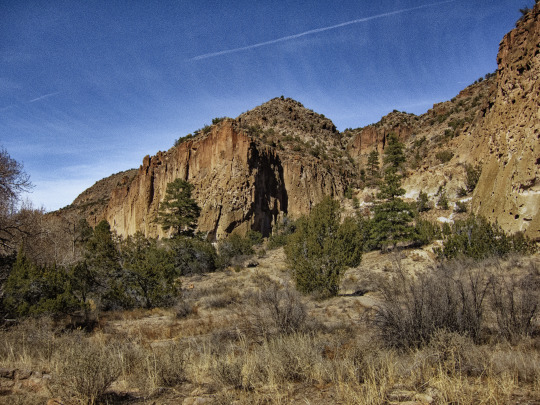
Demonstration of before and after editing using NIK Color Efex Pro 5 now equipped with DXO’s ClearView tool which really opens up the image... When using Color Efex Pro 5 on an M1 MacBook, it’s a bit awkward as you have to export into Photoshop and then activate the NIK software, but it appears to be worth the effort. This was an old Canon S95 image taken in the desert of New Mexico about 4 years ago...
7 notes
·
View notes
Video
flickr
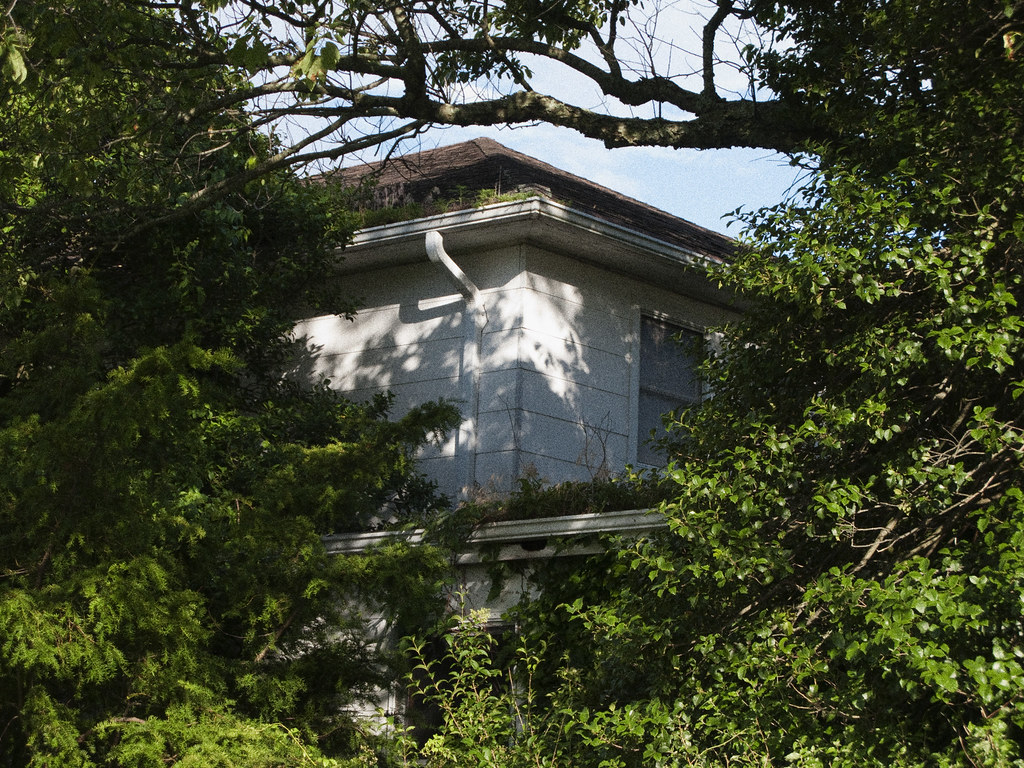
Natural Privacy by Scott Gitlin
Via Flickr:
Color eFex Pro: film grain. Floyd Bennett Field, Brooklyn, New York
#Brooklyn#Canon G9#Floyd Bennett Field#New York#foliage#gatewaynationalrecreationarea#ny#tourist#travel#EssGee#flickr#photography
2 notes
·
View notes
Video
Pastel, vinyl Nurse and Harley Quinn by James H.
Via Flickr:
Harley is what is known as OTTC (over-the-top-cute) with her color choices and the nurse said that his was something original she put together with the vinyl uniform and make-up (the crystals glued to her nose and upper lip were cute add-ons). I think their vinyl outfits were more for grabbing on-lookers' attention and fun costuming that fetish purposes. I used Nik Software's Color Efex Pro - Pro Contrast / Dynamic Skin Softener (for the make-up on the nurse's arms), and Dfine filters.
3 notes
·
View notes
Video

flickr
Sunwapta Falls (Jasper National Park) by Mark Stevens
Via Flickr:
Here I was able to bring out more vibrant colors to not just the trees and but also to the river with that green-turquoise color.
#Capture NX2 Edited#Color Efex Pro#Day 5#Highway 93#Icefields Parkway#Jasper National Park#Looking East#Nature#Nikon D800E#Project365#River#Sunwapta Falls#Sunwapta River#Trees#Waterfalls#Jasper#Alberta#Canada#flickr
20 notes
·
View notes
Text
Analog efex pro
Color efex pro
0 notes
Video

flickr
Reigersbroek. by Wim Jacobs
Via Flickr:
Wandeling Montfort, Reigersbroek. NIK Color Efex Pro 4 bewerking.
#Nikon D7200#Nikon#D7200#AF-S DX 16-80mm f/2.8-4E ED VR#Montfort#Reigersbroek#Roerdalen#LImburg#Nederland#natuur#natuurgebied#Limburgs Landschap#landschap#NIK Collection#NIK Software#Color Efex Pro4#flickr
0 notes
Video

flickr
Baum by Pascal Volk
#Europe#Germany#Berlin#Berlin Lichtenberg#Alt-Hohenschönhausen#Sportforum Hohenschönhausen#Wide Angle#Weitwinkel#gran angular#super wide angle#wa#ww#Spring#Frühling#Primavera#Canon EOS R#Canon RF 28-70mm F2L USM#35mm#DxO PhotoLab#DxO Color Efex Pro#Nik Collection
0 notes
Text

"Autumn Leaves Ablaze."
In actuality a heavily edited photomanipulation of still mostly green leaves run through Camera RAW, Color Efex Pro, and Adobe PS's oil paint filter to finish it off.
0 notes
Last Seen Blogs

renewyoursoul
RPG Backup

disimizdakiirlandali
Socrates

mium-novel
미엄의 소설 블로그

dipannita05
Untitled

sodjehdhdhh
¯\_(ツ)_/¯