#Best Youtube Video Downloader And Converter
Text
Just a bunch of Useful websites - Updated for 2023
Removed/checked all links to make sure everything is working (03/03/23). Hope they help!
Sejda - Free online PDF editor.
Supercook - Have ingredients but no idea what to make? Put them in here and it'll give you recipe ideas.
Still Tasty - Trying the above but unsure about whether that sauce in the fridge is still edible? Check here first.
Archive.ph - Paywall bypass. Like 12ft below but appears to work far better and across more sites in my testing. I'd recommend trying this one first as I had more success with it.
12ft – Hate paywalls? Try this site out.
Where Is This - Want to know where a picture was taken, this site can help.
TOS/DR - Terms of service, didn't read. Gives you a summary of terms of service plus gives each site a privacy rating.
OneLook - Reverse dictionary for when you know the description of the word but can't for the life of you remember the actual word.
My Abandonware - Brilliant site for free, legal games. Has games from 1978 up to present day across pc and console. You'll be surprised by some of the games on there, some absolute gems.
Project Gutenberg – Always ends up on these type of lists and for very good reason. All works that are copyright free in one place.
Ninite – New PC? Install all of your programs in one go with no bloat or unnecessary crap.
PatchMyPC - Alternative to ninite with over 300 app options to keep upto date. Free for home users.
Unchecky – Tired of software trying to install additional unwanted programs? This will stop it completely by unchecking the necessary boxes when you install.
Sci-Hub – Research papers galore! Check here before shelling out money. And if it’s not here, try the next link in our list.
LibGen – Lots of free PDFs relate primarily to the sciences.
Zotero – A free and easy to use program to collect, organize, cite and share research.
Car Complaints – Buying a used car? Check out what other owners of the same model have to say about it first.
CamelCamelCamel – Check the historical prices of items on Amazon and set alerts for when prices drop.
Have I Been Pawned – Still the king when it comes to checking if your online accounts have been released in a data breach. Also able to sign up for email alerts if you’ve ever a victim of a breach.
I Have No TV - A collection of documentaries for you to while away the time. Completely free.
Radio Garden – Think Google Earth but wherever you zoom, you get the radio station of that place.
Just The Recipe – Paste in the url and get just the recipe as a result. No life story or adverts.
Tineye – An Amazing reverse image search tool.
My 90s TV – Simulates 90’s TV using YouTube videos. Also has My80sTV, My70sTV, My60sTV and for the younger ones out there, My00sTV. Lose yourself in nostalgia.
Foto Forensics – Free image analysis tools.
Old Games Download – A repository of games from the 90’s and early 2000’s. Get your fix of nostalgia here.
Online OCR – Convert pictures of text into actual text and output it in the format you need.
Remove Background – An amazingly quick and accurate way to remove backgrounds from your pictures.
Twoseven – Allows you to sync videos from providers such as Netflix, Youtube, Disney+ etc and watch them with your friends. Ad free and also has the ability to do real time video and text chat.
Terms of Service, Didn’t Read – Get a quick summary of Terms of service plus a privacy rating.
Coolors – Struggling to get a good combination of colors? This site will generate color palettes for you.
This To That – Need to glue two things together? This’ll help.
Photopea – A free online alternative to Adobe Photoshop. Does everything in your browser.
BitWarden – Free open source password manager.
Just Beam It - Peer to peer file transfer. Drop the file in on one end, click create link and send to whoever. Leave your pc on that page while they download. Because of how it works there are no file limits. It's genuinely amazing. Best file transfer system I have ever used.
Atlas Obscura – Travelling to a new place? Find out the hidden treasures you should go to with Atlas Obscura.
ID Ransomware – Ever get ransomware on your computer? Use this to see if the virus infecting your pc has been cracked yet or not. Potentially saving you money. You can also sign up for email notifications if your particular problem hasn’t been cracked yet.
Way Back Machine – The Internet Archive is a non-profit library of millions of free books, movies, software, music, websites and loads more.
Rome2Rio – Directions from anywhere to anywhere by bus, train, plane, car and ferry.
Splitter – Seperate different audio tracks audio. Allowing you to split out music from the words for example.
myNoise – Gives you beautiful noises to match your mood. Increase your productivity, calm down and need help sleeping? All here for you.
DeepL – Best language translation tool on the web.
Forvo – Alternatively, if you need to hear a local speaking a word, this is the site for you.
For even more useful sites, there is an expanded list that can be found here.
76K notes
·
View notes
Text

0 notes
Text
How To Convert YouTube Videos to MP3 In 2022/2023
How To Convert YouTube Videos to MP3 In 2022/2023
If you’re like us and love listening to music, podcasts, or audiobooks on YouTube but don’t like the fact that the streaming platform doesn’t allow offline and off-platform usage, you’ve arrived at the right place!
Using a YouTube converter for mac allows YouTube lovers to extract audio from their favorite videos and store them on multiple devices to listen to, edit, or, in some cases, set them…

View On WordPress
1 note
·
View note
Text
Obsidian Resources Masterpost
This is a masterpost of all the useful resources I’ve collected for using Obsidian. Hopefully some of them will also be useful to you, and I’ll try to keep this post updated whenever I find new and exciting stuff!

[ID - purple decorative divider]
General Obsidian
Download and install Obsidian
Obsidian Help
Obsidian Glossary
Beginners Guide to Obsidian
How to get started with Obsidian: a guide for Autistics & ADHDers
Youtube
My personal playlist of Obsidian-related videos
Danny Talks Tech
Nicole van der Hoeven
FromSergio
Jonathan Pritchard Obsidian Tutorials
Josh Plunkett Obsidian for TTRPG Videos
Vault Showcases & Use Examples
The best way to get an idea of what you can do in Obsidian is to look at what other people have done. This is a collection of articles, videos, and Obsidian Publish Vaults showing various setups and processes so you can get inspired!
Writing a novel in Markdown - PD Workman
(2024) Obsidian For TTRPG - Template Vault | Campaign Manager
How I Plan and Write Fiction in Obsidian – Vanessa Glau
SlRvb - Obsidian Publish
Obsidian TTRPG Tutorials
SoRobby/ObsidianStarterVault: Organize your Universe
How I structure my Obsidian vault (Obsidian tour 2023) - Nicole va der Hoeven
Obsidian - 2024 Intro for TTRPG and Worldbuilders
Form, Function, & Fun! - My Obsidian Vault Tour [2024] - CyanVoxel
Markdown
Obsidian uses markdown to format text, so these are some resources to help you out with that.
Markdown Syntax - Obsidian Hub
Basic Syntax | Markdown Guide
Markdown Reference
Basic formatting syntax - Obsidian Help
CSS & Styling
You can just use Obsidian as-is, but it’s so much fun to customise it and waste all the time you should be doing work on making it look pretty. These resources cover various plugins and ways of prettifying your vault, as well as some CSS resources, since Obsidian uses CSS for styling.
How to Style Obsidian
Default Obsidian Theme Colors
CSS reference
CSS Tutorial
CSS-Tricks
CSS Gradient — Generator, Maker, and Background
MarkSheet: a free HTML and CSS tutorial
ITS Theme: Image Adjustment Snippets + ITS Theme - SlRvb's Documentation
Banners: add banners to your notes
colored tags: Colorizes tags in different colors.
MySnippets Plugin: adds a status bar menu allowing the user to quickly manage their snippets within the comfort of their workspace
style settings: A dynamic user interface for adjusting theme, plugin, and snippet CSS variables
Plugins
A highly opinionated collection of plugins—all of these are ones I either currently use or have used. Organised loosely from simple to complex. Links go to the github pages, which have install instructions, but the easiest way is to install them directly from the plugins manager inside Obsidian.
smart typography: Converts quotes to curly quotes, dashes to em dashes, and periods to ellipses
url into selection: Paste URLs into selected text
better word count: Counts the words of selected text in the editor.
short links: plugin to display short internal links.
editing toolbar
omnisearch: A search engine that "just works" for Obsidian. Supports OCR and PDF indexing.
outliner: Work with your lists like in Workflowy or RoamResearch
Advanced tables: Improved table navigation, formatting, and manipulation
longform: A plugin that helps you write and edit novels, screenplays, and other long projects.
periodic notes: Create/manage your daily, weekly, and monthly notes in Obsidian
workspaces plus: Quickly switch and manage Obsidian workspaces
hover editor: Transform the Page Preview hover into a working editor instance
advanced uri: Advanced modes for Obsidian URI
dataview: A high-performance data index and query language over Markdown files + Dataview
Commander | Add Commands to every part of Obsidian's user interface
QuickAdd for Obsidian + Getting Started | QuickAdd
[ID - purple decorative divider]
check out my obsidian tag for more posts / got questions? want to say hi?
#obsidian.md#obsidian resources#obsidian md#writing#writing apps#resources masterpost#writing resources#notes app#writing tools#behold! a collection of links!#anyway i hope this is useful to at least one person
108 notes
·
View notes
Note
How do you make your gifs?
Hello hello! I love talking about gifmaking, so thank you for giving me the chance to ramble.
Instead of a detailed step-by-step walkthrough, I will link tutorials and resources written by the wonderful Tumblr creators on here along the way. Everyone has their method and preferences, and there’s no right or wrong way to make gifs. I’m going to share techniques and resources I picked up along the way that work best for me—they may or may not be suited to your preferences, but I hope you’ll find some helpful things here.
(Warning: screenshot/image heavy)
USEFUL TUTORIALS AND RESOURCES
Here are some tutorials and resources that I found very useful when I got back into gifmaking:
Gifmaking tutorial using video timeline by @hope-mikaelson is identical to my own process
Gifmaking and coloring tutorial by @kitty-forman, whose process is very similar to my own
Giffing 101 by @cillianmurphy, an incredibly detailed tutorial that covers everything you need, including a step-by-step guide to using HandBrake
Gifmaking and coloring tutorial with 4K HDR footage by @sith-maul, another incredibly detailed tutorial with many useful tips
Gifmaking tutorial by @jeonwonwoo, incredibly comprehensive and covers so many aspects of gifmaking from basics, sharpening, captioning, and text effects
Gifmaking/PS tips and tricks by @payidaresque
Action pack by @anyataylorjoy, the Save action is especially a true life-saver
@usergif and @clubgif are amazing source blogs with many tutorials on gifmaking, color grading, and gif effects, can’t be thankful enough for the members for their work curating and creating for these blog!
TOOLS
Adobe Photoshop CS6 or higher, any version that supports video timeline. @completeresources has many links to download Photoshop, have a look!
Photopea is a free alternative to Photoshop, but it has a slightly different UI, check out these tutorials for gifmaking with Photopea
HandBrake or any other video encoder, especially if you’re working with .MKV formats
4Kvideodownloader for downloading from YouTube, Vimeo, Instagram, etc.
OBS Studio or any other similar screen capturing software. To prevent duplicate frames in gifs that prevents your gifs from looking smooth, try to match the recording frame rate (FPS) with the source.
IMPORTING FOOTAGE AND WORKING IN VIDEO TIMELINE
I work exclusively in video timeline instead of importing video frames to layers or loading files into stack. For videos that don’t require converting/encoding using HandBrake, especially ones that are already in .MP4 format, I tend to open the video directly on Photoshop, and trim the videos around directly.
As mentioned above, this gifmaking tutorial using video timeline is exactly how I make gifs. I find it more efficient, especially if you’re making multiple gifs from the same video/the same scene with little to no change in lighting conditions You can simply slide around sections of gifs you want to save, and they will all be the same length.
Another thing also covered in the tutorial linked is the ability to change video speed in video timeline mode. Right click on the video and set the speed before proceeding with cropping/resizing. This is also very useful when you’re making blended gifs where you need the footage to have the same length.
Slowing footage down.
As mentioned in this post, changing the FPS before slowing down the gif results in smoother gifs. Doubling the frame rate before slowing down your gifs usually yields the best result.
Speeding footage up.
I love using this to speed up slow motion B-rolls to make the speed slightly more natural. It will result in nice, smooth gifs:

(B-roll footage, normal broadcast speed)
(200% speed)
Subject won’t stay in frame?
Another feature of the video timeline mode. Keyframes are your best friend. This tutorial by @kangyeosaang covers everything you need to know about panning gifs. I use this technique regularly, it’s a life-saver.
COLORING
Here are some coloring tutorials I found very useful:
Coloring tutorial by @brawn-gp beloved, their coloring style is second to none
Mega coloring tutorial by @yenvengerberg, for stylized /vibrant coloring
Understanding Channel Mixer by @zoyanazyalensky
Coloring rainbow gifs by @steveroger, which delves deep into Channel Mixer
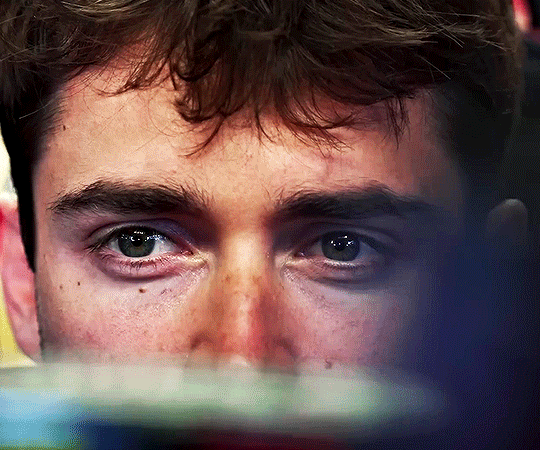
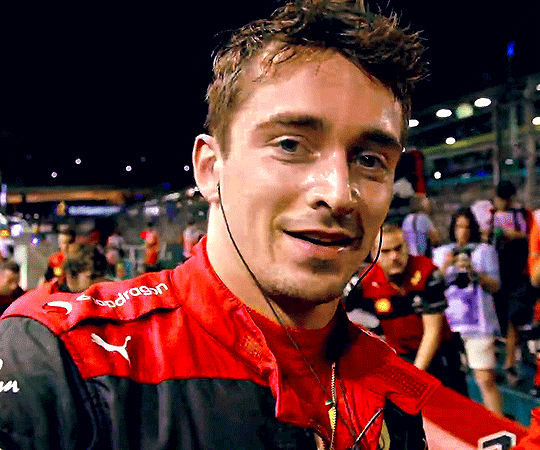
I tend to go for neutral-saturated coloring in general, especially for minimalist gifsets with no effects (blending/isolated coloring/overlays etc.), but the possibility is endless for stylized coloring. Here’s what my adjustment layers look like for the example gifs above.
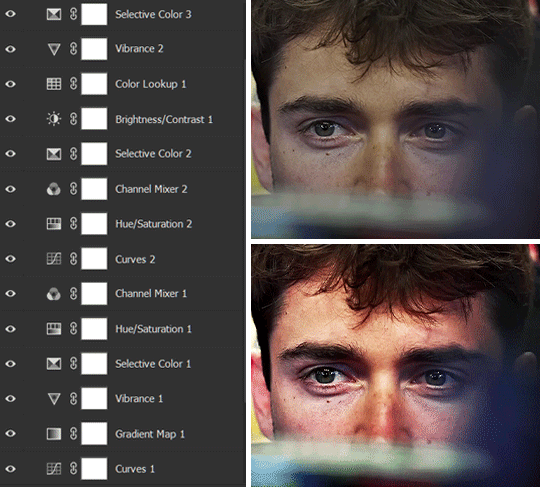
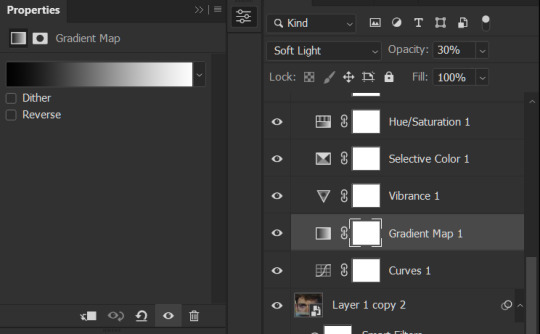
The base footage for this Charles gifset is incredibly desaturated. I started with a Curves layer to bring contrast to the gif, as well as do some color-correcting to bring the base footage to a more neutral tone. To bump contrast, I also like to add a black and white Gradient Map layer with a Soft Light blending mode at 10%-30% opacity:
The Vibrance layer is then used to lift the saturation of the base footage, with the Selective Color, Hue/Saturation, and Channel Mixer layers to help remove the green/yellow tint to his skintone.
An underrated adjustment layer/preset in my opinion is the Color Lookup. You can layer in pre-loaded .LUT color grading presets to help speed up your process. For this gif, it’s simply a base preset Soft Warming Look to achieve a warm, pink-tinted tone.
In hindsight I feel like this gifset is too saturated, his skintone is skewing very red/pink, I could’ve bumped down the lightness of the reds with a Selective Color layer or a Hue/Saturation layer. Try to err on the side of neutral for skintones. Experiment with layer orders—there’s no right or wrong! Remember that each layer build up on the one before it.
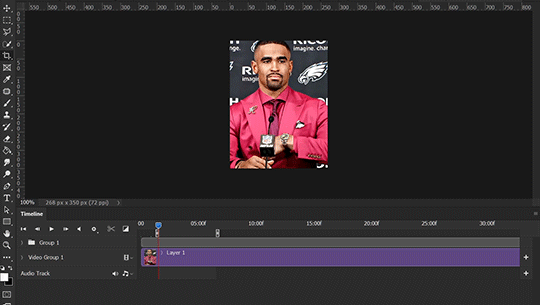
The base footage of the Jalen gif is already quite nicely color-graded, but it’s still muddy and underexposed. As with the Charles gif, I started with a Curves layer to bring the gif to a better baseline contrast. Then I focus on brightening the gif with the Brightness/Contrast and Exposure layers.
The Hue/Saturation and Selective Color layers are to color-correct Jalen’s skin tone—it’s something I spend most of my time coloring gifs and focus a lot on, especially when color grading BIPOC skintones. Putting a Vibrance layer, upping the Vibrance and Saturation, and calling it a day would make his skintone skew very, very yellow/orange.
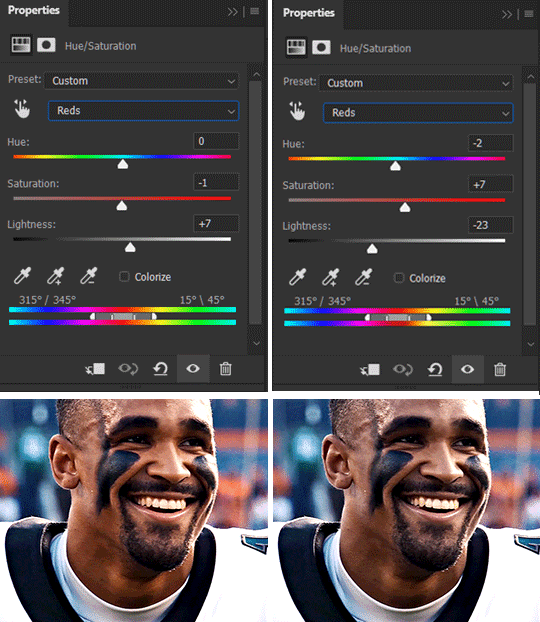
Focus on the reds and yellow for skintone, play around with the Saturation and Lightness sliders, use the Hue slider with caution.
It can be tricky to achieve the right skin tone when working with sports footage vs the higher quality, higher dynamic range footage of films or TV shows, but I try to keep it as close to the subject’s natural skintone as possible.
Here are some of tutorials with tips and tricks on coloring BIPOC:
How to fix orange-washed characters by @zoyanazyalensky
How to prevent pink-washing and yellow-washing by @jeonwonwoo
Coloring tutorial by @captain-hen
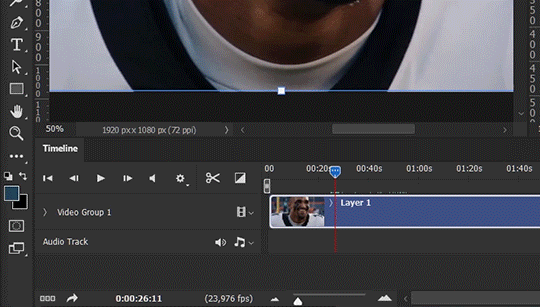
Changing lighting conditions?
Fret not—this is why I love working in video timeline. I’ll take this gifset as an example: it’s a deceptively difficult one to color. The footage is 720p and the sunlight shifts throughout the video, so matching across gifs was tricky.
My solution was to split the clips in sections with consistent lighting, and apply adjustment layers to the individual sections before applying general color grading layers on top of everything.
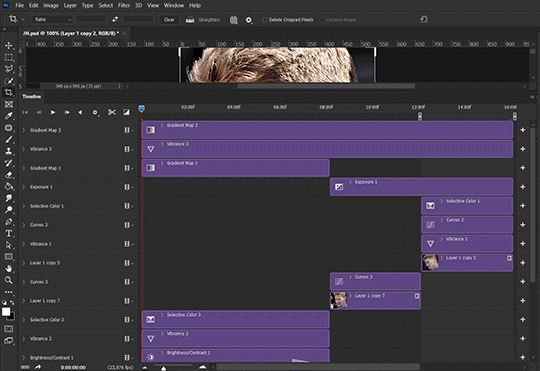
We can make use of the Fade Transition effect for sections where the lighting changes within the gif section we want to color.
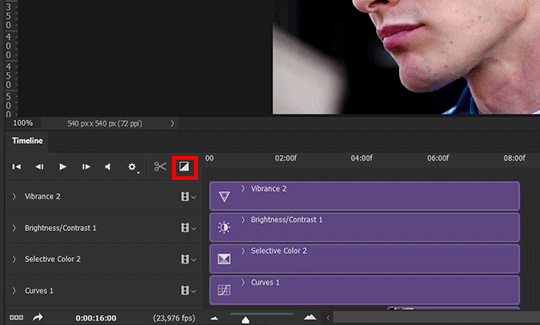

(without vs with Fade on the Brightness/Contrast layer)
The difference is subtle in this example, but the brightness in the right gif is noticeably more consistent throughout. You can also add the Fade Transition effect to the beginning for a fade in, of course.
SHARPENING AND OPTIMIZING GIF QUALITY
This tutorial by @anya-chalotra covers everything you need to know about optimizing gifs for Tumblr.
Sharpening.
Sharpening is essential to making crisp gif images. Here’s another ask I answered re: my own sharpening settings and maximizing gif quality.
(base footage, unsharpened)

(color graded, unsharpened)
(color graded, sharpened)
The final gif is sharpened with Smart Sharpen, 500% at 0.3px and 10% at 10px (my standard sharpening settings).
Here are some tutorials and resources on sharpening:
Sharpening process by @anya-chalotra
Sharpening tutorial with added gaussian blur by @haleths
Sharpening action by @daenerys-stormborn
Size your gifs for Tumblr correctly.
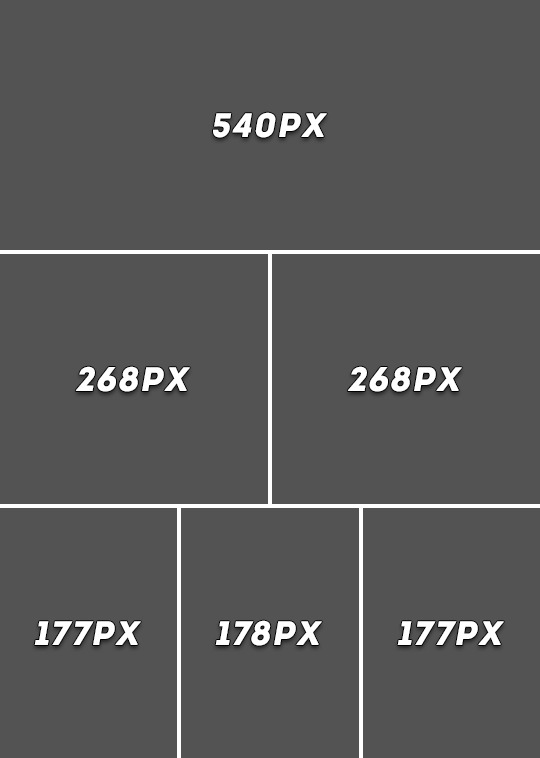
This is essential: full width gifs are 540px wide.Two side-by-side gifs should be 268px wide. Here’s a handy post on gif size guide for Tumblr.
Incorrectly sizing your gifs will take away the quality of your gifs: undersizing your gifs will especially make them grainy, blurry, and /or pixelated, and won’t display correctly on many people’s desktop theme. Oversizing usually isn't as dramatic as undersizing, but it will make the gifset glitch when displayed, and the file size will be unnecessarily bloated.
Work with HD footage if possible.
Media fandoms (films/TV shows) are luckier than us in the sports trenches—we have to work with what we have. Broadcast footage is usually subpar: lacks contrast, pixelated, very desaturated, the list goes on. But it’s possible to still make high quality gifs from subpar footage. Here are a couple of tutorials to mask low source footage quality:
low quality video ➜ “HD” gifs tutorial by @nickoffermen
Sharpening low quality footage by @everglow-ing
(This gifset I made is from a 480p footage with horrendous lighting conditions and colors, and the end result is decent I’d say)
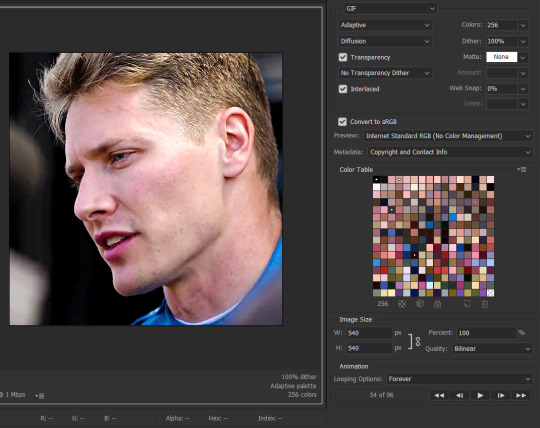
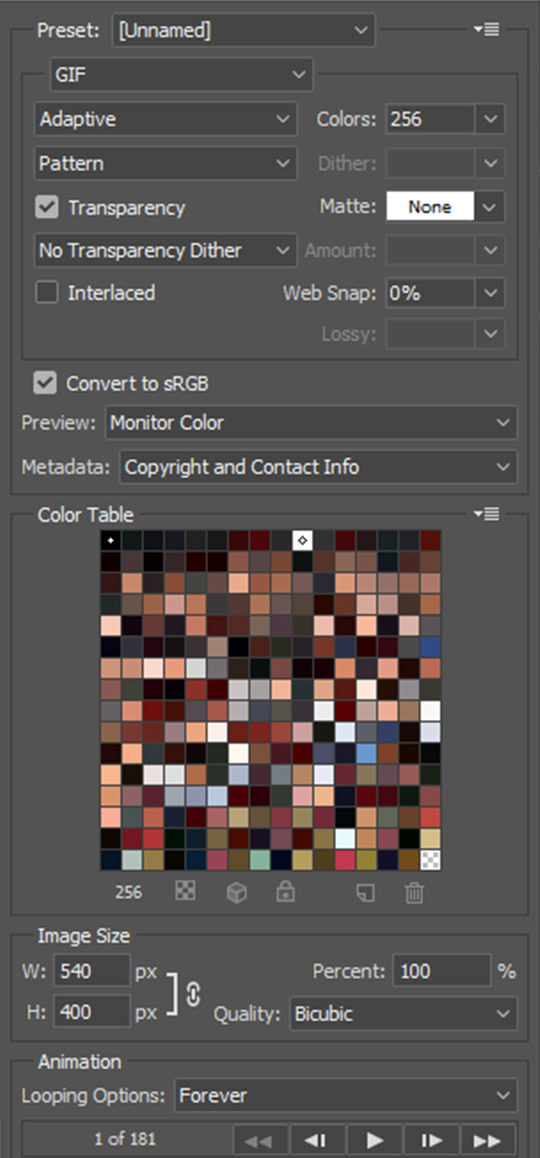
Save for Web (File > Export > Save for Web (Legacy) or Ctrl + Alt + Shift + S) settings.
I default to Adaptive + Diffusion but also use Adaptive + Pattern from time to time. Any combination of Adaptive or Selective + Diffusion or Pattern will give you a good result. In my experience some gifs will need the Selective color table for the colors to display correctly.
Here are my default settings:
SAVING AND EXPORTING FOR TUMBLR
Converting to frames and adjusting the gif speed.
If possible, avoid exporting your gif and reopening it to adjust the frame speed. I used to do this sometimes when I’m lazy, I have to admit, but this is where this Action as mentioned at the beginning comes in very handy. It converts all visible layer into smart object, then converts it back to frame animation.
Step-by-step:
1. Select all layers
2. Right click > Convert to Smart Object
3. Go to the Timeline menu (≡) > Convert Frames > Flatten Frames into Clips
4. Go to the Timeline menu again (≡) > Convert Frames > Convert to Frame Animation
5. In the same menu (≡), select Make Frames from Layers
6. Delete the first frame (it’s a duplicate) then set your frame speed

Now you can adjust the frame speed before exporting it (Save for Web).
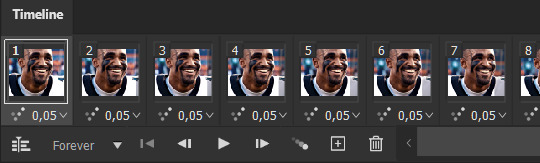
Pay attention to the source framerate.
The frame delay of 0.05 s is usually the default to make gifs for TV shows and films, and it is preferred by most gifmakers. This stems from the fact that most movies and TV shows are 24 or 25 FPS. This may not be the case for all source videos: you might get 30 FPS footage, and sports or gaming footage can be 50 or 60 FPS. Gif speed also depends on the FPS of your original file. Play around with gif speed and see what feels most natural to you.
My rule of thumb is the frame delay Photoshop gives you + 0.01 s. For example, 50 FPS footage will give you 0.02 s frame delay (25 FPS gives you 0.04, 30 FPS gives you 0.03, etc.), so set it to 0.03 s. I usually err on the side of a faster frame delay for smoothness in in-game sports footage, anything else (interviews, press conferences, B-rolls) can get away with being slowed down. Again, experiment and see what you think looks best!
Keep gifs under the Tumblr file size limit (10 MB).
Cut down the number of frames. My gifs are usually around 60-70 frames for 540px full-width gifs, but depending on the coloring, sometimes you can get away with more. 268px gifs can go up to 200+ frames.
Crop your gifs. Remember to keep full-width gifs at 540px wide, but if necessary, you can crop the height. My go-to sizes are 540x540, 540x500, 540x450, and 540x400.
Amp up the contrast of your gifs. Flat colors like black cut down gif size.
The Grain filter or Noise filter, though beautiful for aesthetics or simply necessary sometimes to mask low source footage quality/pixelating, may bloat your gif size.
Play your gifs back before exporting.
Pay attention to duplicate frames or glitches, you might need to get rid of them!
Hope this is helpful! Don’t hesitate to send an Ask or DM if you need any help, I will happily answer all your questions and send over PSDs. (I’m also on Discord—just shoot me a message if you need my tag!) Happy creating :]
#tutorial#PS asks#gif tutorial#Photoshop tutorial#I guess this is more of a resource link dump than tutorial but. Hey. Why reinvent the wheel...#Sorry for the late answer I hope you see this Anon :]#completeresources#allresources#userxoames#userbarbi#usernrzr
1K notes
·
View notes
Text

g1 season is upon us! i'm too lazy to gif every match myself! the world needs gifmakers like you! yes you!
this guide includes: basic gifmaking, actions, how to blur on-screen graphics, coloring tips catered specifically to wrestling footage (mainly aew and njpw), how to add subtitles, what tags to use
what you will need:
photoshop (i currently use cc 2017 for windows which you can grab from this post by birdysources)
kmplayer (for extracting frames)
what you might need depending on what you're looking to gif:
4k video downloader (for downloading videos off youtube)
vkopt (browser extension that lets you download videos off vk)
step 1: getting the footage
if you're directly downloading from a site this step is super easy. just make sure to always go for the highest quality of footage available (for njpw this is nowhere near 1080p, and even aew's 1080p footage is pixelated in places—but don't let this deter you!)
if you plan on giffing something off a ppv, chances are you might need to torrent the event. if you can, look for versions off fite with either web or webrip in the title for the best quality. this applies to weekly television too (fite doesn't have picture-in-picture). always seed your torrents. yes, even that one match from 2012. especially that one
you can also get recent shows off watchprowrestling dot co (previously org) which includes njpw tour shows and indie events as well. check out indy★wrestling★group on vk for smaller promotions and japanese promotions outside of njpw (tjpw, stardom, noah...)
step 2: choosing a clip
wrestling footage quality is not consistent. entrances with too many flashing lights or small particles will have huge quality drops, so unless it's something really special, don't put yourself through that. close-ups are generally your best friend but don't shy away from clips with lots of movement (you do sometimes want to gif the wrestling parts of wrestling too)
step 3: extracting frames
open your video in kmplayer. go to the part that you want to gif (though, i suggest leaving a bit of fodder before and after the actual clip. you can always trim the frames down later and it's better to start off with more). then, press ctrl + g
this should bring up this window:

your settings might be different if it's your first time downloading the app so just copy what you see here
kmplayer automatically captures into its own folder, which you can change if you want, but i just left it as is. i recommend pinning the folder you regularly use to the quick access menu in your file explorer
hit start, start the video, let it capture frames for however long, and then hit stop on both the extractor and the video itself. and now you have a bunch of frames in a folder. cool!
step four: converting frames to layers
open photoshop. this will take ages but open it. go to file -> scripts -> load files into stack...
this will bring up this window:
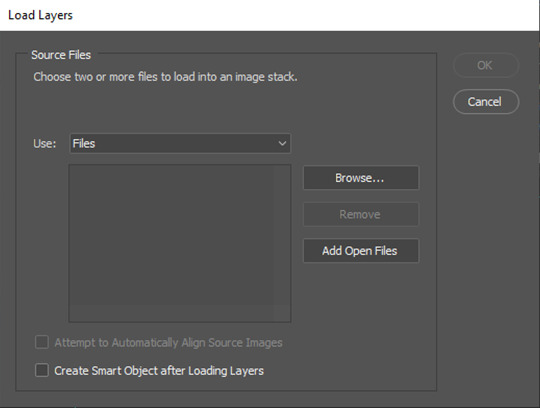
click browse... and select all the frames you just extracted. depending on the number of frames, this might take you a bit. then hit ok and let your layers load into photoshop. this will take a long time (saying this as someone whose laptop tends to heat up to the temperature of an egg pan at this point in the process)
step five: actions
i use actions (user-built series of recorded commands, meaning you don't have to click everything manually) for everything except coloring. i use a mishmash of like three different actions that i never bothered to organize. these are the two most important ones:
actionpack #1 by giulia (i use the setup and save portions from this one)
squishmoon actions by lildohnut (i use the hd sharpening from here, first layer on 0.3 for close-ups and 0.2 otherwise, and the second layer at the suggested 50%)*
*most sharpening settings you'll find are made for current films and tv shows so you do have to make some adjustment to fit your crunchy wrestling footage
step six: sizing
pick a size for your gif! here is a handy chart:
as for height, it can range anywhere from 300px-540px and beyond. most people go for 350px-450px. 400px is the sweet spot
personal preference: adjust canvas size not image size and fit your footage accordingly. some footage (looking at you aew) can have an odd black bar at the bottom, and manual resizing can help getting rid of it. if you just resize the whole image that will stay there and bother you
additional tip: guidelines
9/10 times you will leave your footage centered. however, there are times when this can look a bit awkward, depending on the framing, in which case i like bringing in a few guidelines. go to view -> new guide layout...

rule of thirds is generally good for drawing the eye to certain places. these settings will divide your canvas into nine squares that help you reposition your main gif layer
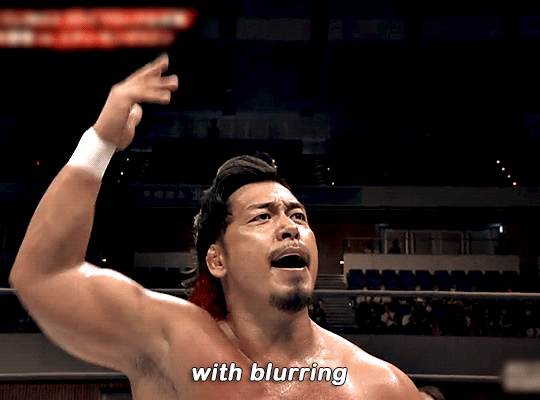
optional step: blurring pop-up graphics and banners
so, you have your sharpened, resized gif... but the sharpening made the small text and other unwanted elements on your screen shrivel up like raisins. you can leave it as is, people won't mind, it's a wrestling gif, who cares. but, if you want, you can just blur it out
i'm at least a little bit certain that i'm personally the guy who brought this over from k-pop tumblr (not saying i invented the concept, i just love being a trendsetter) and so i can give you a few reasons as to why people do this. such as:
adding subtitles over pre-existing, burnt subtitles (example: njpw post-match comments off njpwworld and not youtube)
getting rid of elements that might distract people from the focal point of the gif (the hotties... and the moves. mostly the hotties)
it makes your otherwise milquetoast sharpening look a little better in contrast
it's gonna be ugly either way so it's a pick your poison type of situation. if you do want to try the blurring method, you will need a basic knowledge of filters and layer masks
step-by-step blurring process:
duplicate your gif layer
blur the layer on top (i typically go for a 4.0 gaussian blur; for this, go to filter -> blur -> gaussian blur...)
apply a layer mask to the blurred layer and make the layer mask black (this will remove the blur effect, don't be scared). to access the layer mask just click on it. you can press alt before clicking to "enter" the layer mask (though you won't see your gif this way)
go in with a soft round brush (or any brush) with white and draw over the bits you want blurred. this is the tedious part
profit?
here's a comparison:

it's really down to personal preference ٩(ˊᗜˋ*)و
i convert my base gif layer and the blurred layer into a smart object before moving on with my process because sometimes photoshop likes to do this thing where it only applies the blur to the frame you're on. you can avoid this by combining the layers manually
if you're working with njpw footage and your clip plus coloring combination allows you to, you can also just go over the banner with black and blend it into the background. it's by far the best option but there's so rarely an opportunity to utilize it (i did it in the little header i made... go back and look at how beautiful she is)
step six: coloring
the big one. oh boy. prefacing this with: you can just skip coloring if you want. the sharpening settings i recommended earlier give a nice contrast to the gifs as is, so if it looks fine like that, you don't need any fancy colors. that being said...
my thought process going into coloring is to focus on skin tones and adjust everything around them. i don't tend to use psds, i always just manually color correct based on the actual footage i'm working with (venues differ, lighting differs, hues differ... incredibly hard to plan for all of it in advance). if i plan on making multiple gifsets of the same event/match, i do re-use settings, but sometimes minor adjustments are still needed
to begin coloring, you will need to use adjustment layers. you will pretty much need a basic knowledge of all of them (to the extent of knowing what the sliders and values do)
[1] i always begin with an exposure layer. this will remain above all of your layers (unless you plan on adding subtitles). here are my settings:
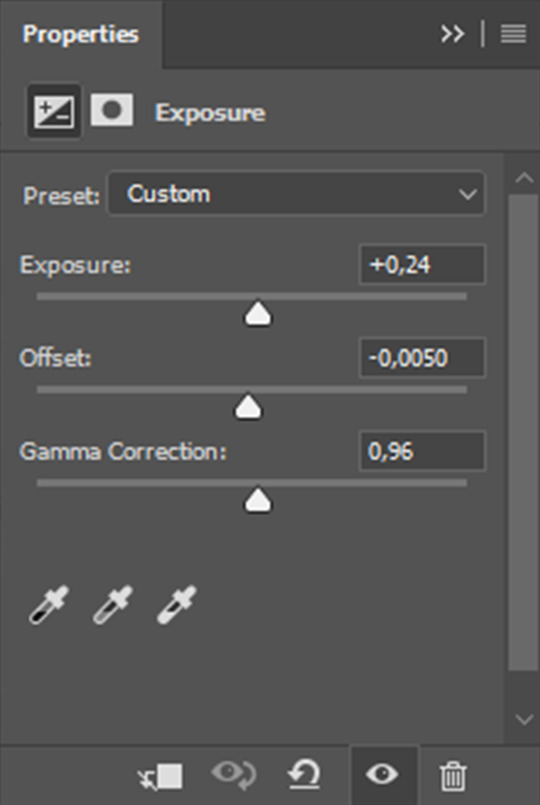
again, every layer you add after this will go below your exposure layer
[2] i add a selective color layer to further adjust the blacks. this will vary gif to gif but keep your adjustments small
[3] i add a vibrance layer. wrestling footage has major saturation problems that you can manage early on to make your life easier. take back a tiny bit (usually from -3 to -5) of vibrance before you begin your other color adjustments
[4] this is the big skin tone adjustment step using a curves layer. it does most of the heavy-lifting in my process. here is a video tutorial that explains the technique i use. it works the same with gifs as it does with images. the key differences are:
the image you are color picking off of shouldn't be a limited skin tone chart but rather an image of the wrestler(s) in natural (or as close to natural as you can find) lighting. i just go for renders used on the roster page. fan photography is way too edited to use here
try picking from a darker area of skin (shadows, midtones). it fits better with match lighting
this step will most likely correct color tints, but keep in mind that different promotions/shows/venues have different lighting. here are my personal observations:
aew dynamite and rampage have strong magenta tints
aew collision and roh honor club have strong red tints
njpw has a washed out blue tint
impact has a strong green tint
you can either lean into these (play around with making them really vibrant) or cancel them out using opposites on the color wheel (for example: to get rid of the magenta tint on dynamite, either decrease the magenta slider in your neutrals using selective color or add more green using color balance)
you will almost always have to add more cyan as well (either using color balance or channel mixer; channel mixer can also help you fine-tune skin tones with its blue tab—don't get rid of yellow undertones!)
[5] here is where i start fiddling around with manual adjustments that i seriously can't help you with... just add layers and change colors until you think it feels right. don't be afraid to start over if needed
[6] finishing touches! if you're like me you will have overcolored in the previous step. don't be afraid to add a saturation layer and decrease specifically the saturation of the reds (this will affect the skin tone; if you feel like you're on the right track but it's just too orange-looking, it's a saturation issue)
i also tend to add a black & white layer below the exposure layer up top set to soft light and lowered to 10% opacity. this gives you a bit of additional contrast that pulls the final gif together in my opinion
optional step: adding subtitles and watermarks
always add text layers above your coloring!
[1] subtitles
the font i use for subtitles is arial rounded mt bold, which you can download for free here. the point of subtitles is for them to be readable, so feel free to use any other font as long as it can be read with ease (nothing too thin or too blocky). if you plan on using the font i use, make sure to set it on faux bold and faux italics
font size differs based on the size of your gif, but it should normally be between 17pt and 23pt. i like to keep my tracking (letter-spacing) the same as my font size (so for 21pt subtitles i would have the tracking also at 21). i keep leading (the space between multiple lines of text) 3pt or 4pt
if there are two people speaking, i like setting the second speaker's text color to #ffd300. this is a generic yellow caption color that is still easy to read
after you have your basic text done, right click on your layer to add blending options. adding a stroke and a drop shadow can further help bring your text to the foreground. I keep my stroke (hah) at a simple 1px black. here are my drop shadow settings:

here is a more detailed guide about subtitles by clubgif
as for placement i add a horizontal guide at 95% and put my text on top of the line (while also keeping it centered vertically)
[2] watermarks
i personally don't use watermarks because i just don't care to, but if you want to add one, the same general ideas apply. just lower the opacity of your text layer at the end (if you want... again, a watermark is personalized)
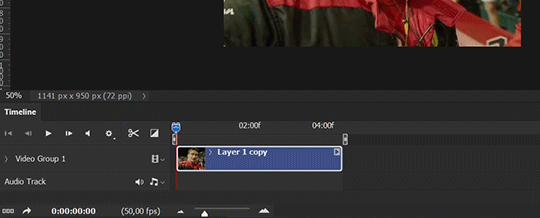
step seven: timing
this is where you'll have to convert your video timeline back to a frame animation!
delete the frames that you don't need and then set a consistent timing (click on your first frame and shift + click on your last one to select all of your frames before adjusting). i like my gifs at 0.04, but depending on the footage you can go for 0.03 (newer bte episodes) or 0.05 (this also works if you don't have enough frames and want your gif a bit slower)
step eight: exporting
go to file -> export -> save for web (legacy)...
here are my export settings:
make sure to keep your gif under 10mb! if your file exceeds 10mb, you can't upload it to tumblr. you either have to cut some more frames or add compression to your gif (something i would never do, i always just cut frames)
additional tip: tagging
you have your gif! but how do you get people to actually look at it?
i always tag wrestlers* (full name, for both searchability and tag filtering purposes), promotions (initialisms like #aew over #all elite wrestling; if it's a more generic promotion name i.e. impact, go for #impact wrestling), tracked edit tags (#aewedit, #njpwedit; this not only helps source blogs find your posts and give them a bigger reach but it lets you browse other people's works). if you want to go the extra mile you can also include which event/video the gifset is from somewhere in your tags (if it's not already in the caption)
*even if you feel like it personally hurts you to tag that one wrestler you can't stand who happens to be in a match with your fave: do try tagging all wrestlers involved for ease of filtering, especially if you don't add image descriptions to your gifsets (tumblr's post content filtering system picks up on those)
general tumblr etiquette but don't cross-tag (i.e. tag a wwe gifset as #aew). no one likes cross-taggers. crossover events are exempt from this rule of course (forbidden door, multiverse united...)
additional tip: accessibility
don't use gradient text in your captions. screen readers can't read them!
if you can, include an image description. no matter how basic. this not only helps people with screen readers but the alt text of your gif is what's going to be displayed in case the gif isn't loading properly. here's a guide on how to caption gifsets by shangs
and you're done! all that's left to do is get silly with it. once you have the basics down you can virtually do anything. you can make those pretty graphics with blending. you can gif every single match of your fave in chronological order. sky's the limit
don't be discouraged if your gifs are not "perfect" from the get-go. this is a hobby just like any other hobby, and with time you'll get better at it. don't compare yourself to others and don't put your efforts down. only you can make the exact gifs you want to see
190 notes
·
View notes
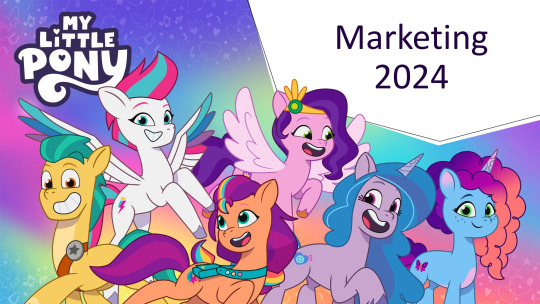
Text
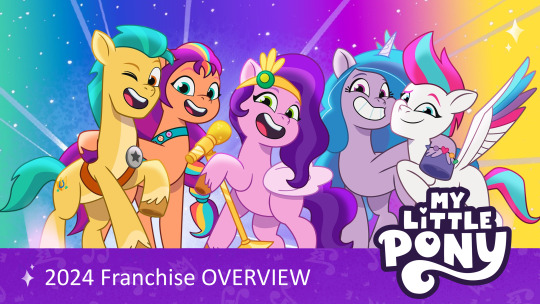
Here's the entire My Little Pony 2024 Franchise Overview presentation. This was originally distributed online in mid-June 2023, and we reported on it then, but there are a couple of details that didn't make it into the post.
Download links
2024 Franchise Overview
2023 Marketing Plans
Hasbro Brands Overview

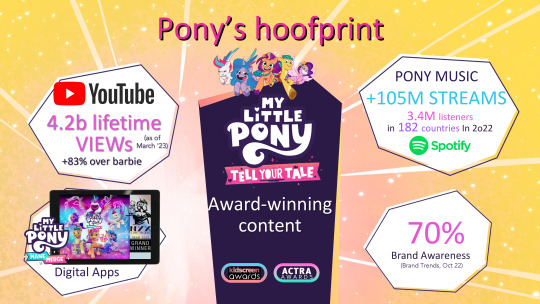
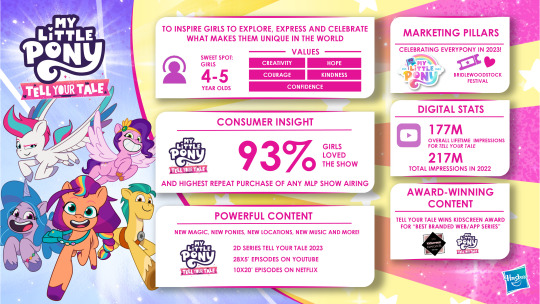
Slides 2–4. Various random stats which are mostly not important or not properly contextualized. I have just a slight feeling that the stat on slide 3 implying that MLP is bigger than Barbie at the moment is cherrypicked.

Slides 5–6. Slide 6 is the first slide with specific data about Tell Your Tale viewers. It tells us that Tell Your Tale outperformed Make Your Mark on audience approval and toy purchase basket size, and that it outperformed other franchises on repeat toy purchase rate. There are a few more of these stats on slide 20.
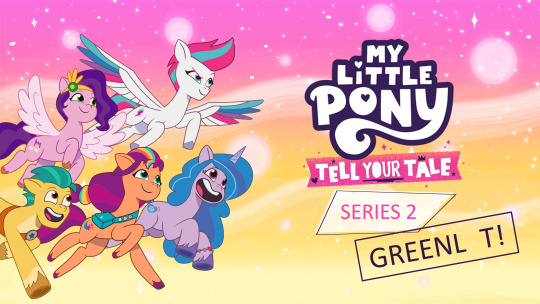

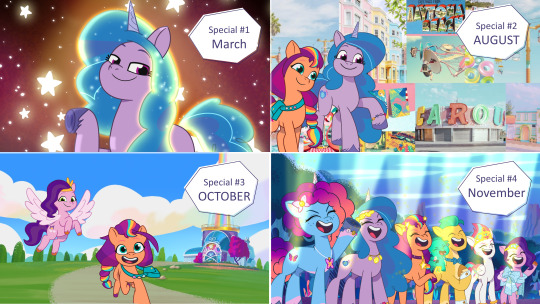
Slides 7–9. Tell Your Tale Season 2 will be real, and will have four specials (the accompanying visuals don't seem to be related, other than the beach stuff for special 2). They didn't really explain what "hair play in every episode" or "more magical moments" will mean, although maybe the former is intended to encourage the purchase of toys.
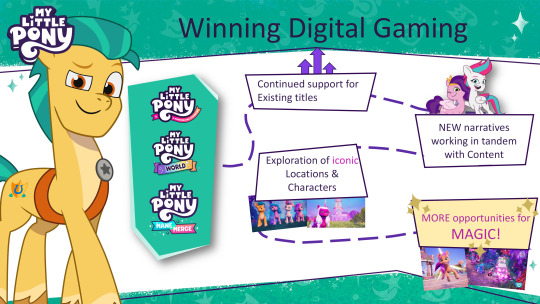
Slides 10–12. This is basically a summary of things that have already been done within the MLP brand over the last few years. "LBE" means "location-based entertainment".
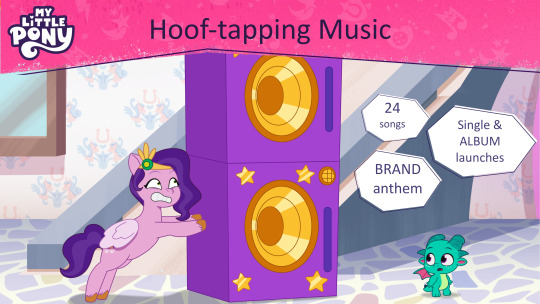
Slide 10 seems to indicate that there are about 7 songs left to be released in Tell Your Tale Season 1.
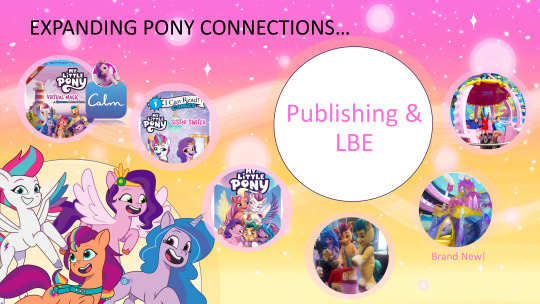
On slide 12, from left to right, the featured things are the VR book My Little Pony: Virtual Magic; the Sofia Carson-narrated Calm "sleep story"; the I Can Read Comics Level 1 book Sister Switch; the first issue of the G5 IDW comics; the MLP mascots at the Galaxyland theme park in Edmonton, Canada; a render of the lobby of the My Little Pony & Transformers Playlodge in Shanghai; and the "Flight to Equestria" ferris wheel at Galaxyland.
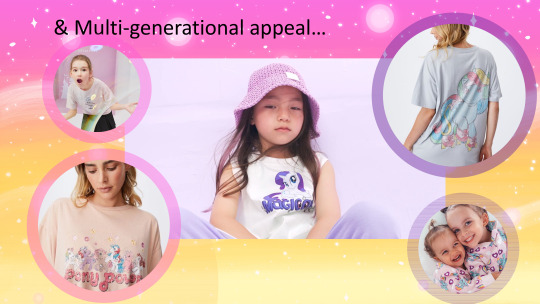

Slides 13–14. Mostly licensed merch, although the Izzy brushable on slide 14 still hasn't been seen anywhere other than this presentation.

Slide 15. Another indication that Make Your Mark won't get anything in 2024: the best they can say about it is that it will "live on Netflix" (i.e. won't be removed from Netflix), which was probably going to happen anyway.
Given the "new episodes weekly" statement, 328 minutes can be neatly divided into 4 22-minute episodes and 48 5-minute episodes, all for Tell Your Tale. Consistent episode lengths make sense for Hasbro, since they intend to license their shows out to TV networks with standard half-hour programming blocks.
"Linear and AVOD" probably refers to traditional TV channels and ad-supported free streaming sites. Some past MLP content is already available on "AVOD" sites such as Pluto TV.
It seems like G5 music will continue to have that generic pop sound.
It's implied that some of the video games shown will be updated in 2024. Maybe not all of them, though, since the MLP Roblox game (Visit Maretime Bay) was shut down in February 2023.

Slides 16–17. They want to grow viewership a lot and convert it to toy purchases. They call Tell Your Tale their "one & only ponable content series"; obviously, maintaining two ongoing animated shows would directly contradict this statement.
The Pipp, Misty, Sunny and Izzy brushables shown all seem to be new, as is the concept art for the accessories of the former three. The Izzy brushable is probably the same one as on slide 14.
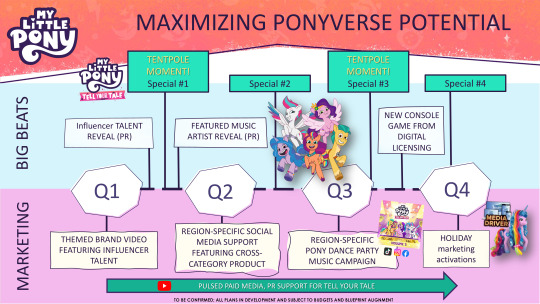
Slide 18. They will do a bunch of promo stuff, including releasing a licensed console video game in Q3 2024. The first and third Tell Your Tale specials are to be the tentpole moments (i.e. big marketing focal points) of 2024.

Slides 19–20. Slide 20 features some more new stats on how well Tell Your Tale is performing; it has 177 million cumulative YouTube views, good repeat viewership and better repeat purchase rate than Make Your Mark.
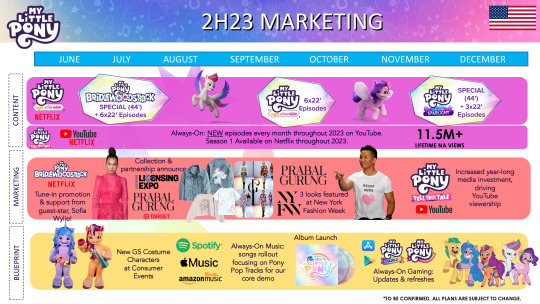
This image is from a different presentation, "2023 Marketing Plans". This slide reveals the Secrets of Starlight logo for the fourth and final My Little Pony: Make Your Mark special.
The "album launch" could be referring to the My Little Pony Theme Song (Sped Up + lofi remixes) EP that was released today. Or maybe something else?
This slide is from the other presentation that was revealed, "Hasbro Brands Overview". It doesn't really reveal anything that wasn't previously known, although it does suggest that Bridlewoodstock will feature in more marketing content through the rest of the year.
Notes
Almost all of the text in the 2024 Franchise Overview presentation is shown in the Calibri font. It doesn't seem like it was originally intended to be that way, and I think it might be due to custom fonts not being loaded properly by whoever converted the presentation to PDF. In spite of this issue, the presentation is likely genuine, evidenced by the high quality images embedded in it, including a shot from a future Tell Your Tale episode on slide 8.
Slides 15 and 18 both note that future plans are subject to change. However, it's probably somewhat unlikely that Hasbro could return to Make Your Mark in 2024. Even if they were to commission more Make Your Mark episodes right now, and could justify the budget for it, it would probably still take more than a year before the first episodes could be completed. I could be wrong about this, but there's nothing to suggest that it would be in the interest of Hasbro, Netflix, Atomic Cartoons or anyone else (except maybe the fans) for Make Your Mark to be renewed after 2023.
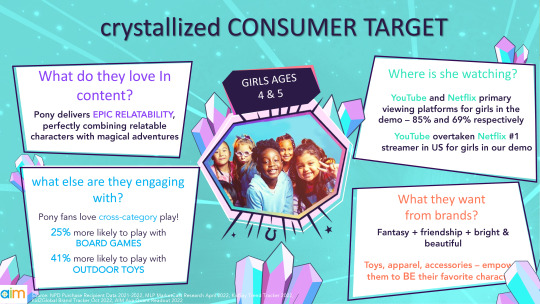
While the TYT Audience Report and MLP Shopper Analysis by AIM & We Are Family both seem to be focused on 2- to 8-year-old girls, it's not necessarily an indication that Hasbro is focused solely on this demographic – they might just be the most lucrative demographic, or the one whose analysis produced the best numbers to show to Hasbro's investors and partners.
78 notes
·
View notes
Text
♡ basic gif tutorial!

hiiiii!!! i've made a tutorial in the past but i thought i might update it with this tutorial (re an ask i got a few days ago)! please keep in mind that i'm far from an expert when it comes to giffing but i am open to clarification and further questions <33
DISCLAIMER! there are so many ways to make gifs! everyone has a different process, so don’t be afraid to deviate from this! also! feel free to send an ask for further clarification :)
1: converting !
one of the major issues when it comes to ensuring the best quality for your gifs is making sure that you’re using an application that maintains at least a 1080p quality of the video you use. it’s not a good idea to gif anything below 720p as the quality of the video and consequently, your gifs are not going to be the best!
i) choosing a video
if you’re going to gif, i’d recommend choosing videos that are hq!
✰ Stage Gifs
for stage gifs i use .ts files! it’s definitely easier to source a performance video from youtube, but they won’t provide you with the quality you desire. if anything, use youtube as a source for stage gifs as a last resort!
for ts files, you can use:
-> rosebay
-> twitter (search [group name] + [date of performance] + [ts])
i personally use rosebay for my seventeen performance gifs but other groups do have sites/blogs that are specific to them.
psa: kpop24hours are currently not taking in any applicants atm! best advice would be to follow them on twt and keep their notifs on in case they do
these sources (at least, rosebay) are easy and pretty self explanatory to download!
✰ Normal Gifs
for normal gifs (i.e. of interviews, behind the scenes, going seventeen, etc.) i use youtube <3 keep in mind that it’s always best to use the source most reputable to ensure quality. for example, if i were to gif an inside seventeen video, i would use the seventeen official channel’s post of that, not reposts or anything like that!
to download youtube videos, i use:
-> 4K Video Downloader!
ii) how do you download youtube videos via this application?
all you have to do is:
1) copy the link to the youtube video (PSA this application only works for converting youtube videos)
2) press the green plus button on the very lefthand corner at the top
3) a window that lists the options for the video quality you want will then come up.
4) if it offers 1080p, it is almost always best to choose that for optimum quality!
5) the video will then download and you’ll be able to access it via a folder labeled 4K Video Downloader in your files app.
2. resizing and sharpening !
personally, i don’t sharpen in ps unless absolutely necessary. for most of my sharpening, i leave it to vapoursynth.
now, vapoursynth is a massive pain to download and use but it’s worth it in the end (i promise!! i’ve cried over it a lot but i probably wouldn’t be happy with posting my gifs without it)
i personally found it a bit complicated to download vs so i’ll refer you to a tutorial i used (i also got help from some of my moots bc idk how to do anything so dw if it’s confusing :sob:)
i) how to use vapoursynth now that you’ve gotten it downloaded?
this is probably the hardest part of the tutorial (at least, in my opinion) :sob: for this example, i’ll be using my 4K Video Download instead of a vlive, so if you were using a vlive, you’d have your downloads folder open instead of the 4K Video one.
1) open your files folder twice, make sure that there are two windows open - one being the vapoursynth folder (for me, it’s called VapourSynth64Portable (200722) but it depends on which version of vs you download) and another being the 4K Video Downloader folder.
2) notice the different applications (?) within the vapoursynth folder. in particular, the vapourscript (drop video file on me) one. drag the video you want to gif from the 4K Video Downloader folder onto that app, and it’ll open up a new window. this window is the timestamp window.
3) in this new window, type in the length of the video you want to gif. i personally do this bit by bit (as in, i timestamp each gif instead of letting vapoursynth run through the whole video, which, in retrospect is probably smarter but i am a Fool). for example in the video i’m giffing, i want one of my gifs to run from 0:56-0:58 of the video. so i input the start timestamp. in my case, this would be 00:00:56. and then i press enter. this would direct me to put in the duration of the video i want to encode, which, in my case, would be 2 seconds (00:00:02).

4) press enter again! it’ll open up a window on whichever internet server you use (for me, this is chrome) with a bunch of options:

5) next, you want to alter all the options so that it becomes a gif of the size and sharpening you want.
psa: all of the things below are advised options! it’s completely up to you to choose what settings you use. don’t be afraid to experiment!
ii) resizing
-> to resize, you want to use the GIF Size option. keep in mind the acceptable sizes of gifs on tumblr! if you gif something of an incorrect size, tumblr will probably destroy the quality even more than it already does and make it incredibly blurry, and you don’t want that! to prevent this, make sure to refer to this helpful guide on gif sizes for ones you could use!
for this gif, i’ll be using a 540 x 450 size.
make sure to move your gif around so that everything you want people to see in the gif is there. you can even drag the gif out to zoom in, etc.
6) input the size you desire in the width x height sections next to the GIF Size option.
iii) preprocessing
-> this indicates how fast or slow vs will make your gif. for normal videos, i use qtgmc 30 slow and debilinear. however, i’ve seen in other tutorials that it should be different for performance gifs (i.e. qtgmc 60 slow and debilinear). however, this is all up to you and your preference! experiment, and see what works for you!!
for this gif, i’ll be using qtgmc 30 slow and debliniear.
7) select the speed and debiliniear options next to the processing title.
iv) denoise filters
-> this option basically acts to smoothen your gifs!i tend to use KNLM and have actually never used BM3D before, but feel free to choose the latter!
8) choose between KNLM and BM3D (next to the denoise heading), and select the tickbox that comes up underneath it.
v) sharpening
-> this is when you sharpen your gifs! and make them look less grainy than if you were using ps directly. i personally use finesharp, but again it’s up to you!
9) choose between finesharp and VCFreq, and check the tickbox that comes up underneath it.
this is what my settings are like for this gif:

10) next! you need to alter the values for sharpening and denoise! this can be done on the coded box in the upper right-hand corner:

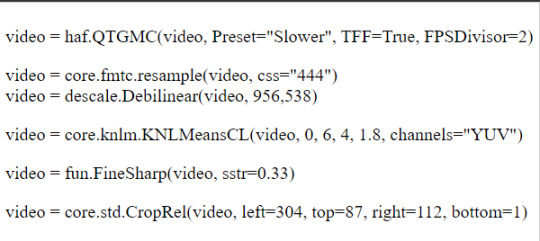
11) first, change the denoise filter value to whichever one you wish. for this gif, i will be using 1.8. this can be done by altering the “1.2” value in the row that has the text “video = core.knlm.KNLMeansCL(video, 0, 6, 4, 1.2, channels = "YUV”)
12) next change the sharpening value to whatever you want! for this gif, i will be using 0.33. this can be done by altering the “0.22” value in the row that has the text “video = fun.FineSharp(video, sstr=0.22).
the text box should now look like this with your altered values:
13) copy the text and you’ll notice that this window has opened on your taskbar. you will need to copy the text from here into this app - vapoursynth editor.
14) paste the text from that upper right-hand corner into the vapoursynth editor underneath the text #whatever you copied from the resizer goes here.
15) before continuing, depending on your laptop’s speed and ability to process things, i’d recommend lowering the RAM usage to something more bearable for your laptop to process without it overheating and getting damaged. i personally use 300 as the RAM usage but feel free to use whatever you want.
this is what your editor should look like now!

16) press f8 and it’ll open a new window. this will be where you get your edited video that will be good to put in ps and play around with. change the preset option to Export to MOV. and next to the header title, make sure to select Y4M in the dropdown menu. after this, you should be good to press start!
3. giffing !
now this is the part of the tutorial where you kind of get to do your own thing
i) importing
1) open photoshop and click on file, then import, and video frames to layers. it’ll open up your files.
2) what you want to do next is find the output folder. this folder can be found within your vapoursynth folder. that is:
vapoursynth64portable >> gifs >> output
3) click on the output folder and it’ll come up with another window:
make sure your settings are like this before clicking ok!
ii) actual gif making!
4) once you’ve clicked ok, it’ll direct you to the workspace. you will have the frames for your gif on the bottom and the layers on the right-hand side. i won’t go into the specifics for giffing since you asked for quality but if you’re looking for more specific instructions on how to actually gif, feel free to send in another ask or i can refer you to another tutorial!
i) timing
you can alter the timing by selecting all the frames and making it faster or slower - it depends on your preference!
ii) colouring
colouring is the foundation of your gif - it’s what makes it look good!! have fun with it, and try out different colouring! you could also look into using psds if you want! psds are basically pre-made colouring (filters, essentially) that you put over the top of your gif
5) once you’ve finished with the aesthetic steps of making your gif, it’s time to export! to export, you must click file >> export >> save for web (legacy). it’s up to you which export settings you use but make sure that your gif is under 10MB!
6) and voila <3 you’ve got a gif!

#not sure who wants this but this is re an ask i got a couple of days ago!#aria.gifs#aria.txt#userngocchi#tuserrose#hanatonin#isaishi#gif tutorials#tutorial
134 notes
·
View notes
Text
Free Apps/Assets that help me as an Indie Game Developer [Megapost]
Hi! I’m an indie gamedev who’s also in University, needless to say that I’m on a budget when it comes to my game creation. I’m making this post to organize my favourite free resources that helped me out.
Also, please note that I’m only commenting on the programs themselves, not the companies/individuals that run them.
For Pixel Art, I use/recommend Dotpict.It’s completely free, you can resize canvases and input custom sizes. It has the essential tools for pixel art creation, and is great to use on small screens with the default point-and-click system. It can also be used on larger touch screens with in “Pen mode”. It also supports animation! Alternatives include Pixquare and Resprite, which function similar to Aseprite for computer. (Resprite does have limited exports in the free version.)
I was recommended Notion by a fellow gamedev friend for organizing ideas/stories. It’s essentially a files-within-files organizer where you can make groups, add pages to the groups, and link other pages. I now use it for my concepts, and am really enjoying it so far.
My go-to for fonts is DaFont. The website allows you to sort and filter in order to only show 100% free fonts to use in your projects. I’ve been using this site for years, and from my experience each download was completely safe.
I’m an RPGMaker user, and rpgmakerweb is a great resource for finding free plugins. Yanfly is also one of the most popular picks for plugins as well. Galv and SRDude are amazing creators with some of the best plugins I've personally ever used.
Launchpad is a beat-mixer app with a literal labyrinth of samples. You can get a free trial to have access to all of them, and I’d recommend it for people looking to explore different genres for in—game music. It’s super fun to just mess around in. You can record and export as well.
FireAlpaca is my personal recommendation for a free digital art software for computer. I’ve used it in the past, and it’s truly a great free alternative to expensive art programs. Krita is also a great free option!
Cymatics is a great resource for free-to-use royalty-free samples/loops. I have a huge sound library thanks to them, and I haven’t paid a cent. Joining their email list also gets you more free packs & the occasional free giftcard.
YoutubeDL is a free and open-source program on Github that allows the safe (speaking on personal experience) download of Youtube videos, as well as audio format. I use this to download royalty-free samples/SFX that are posted on Youtube for anyone to use. You can also download a .exe from their website with the YTDL program directly in it (my personal choice).
Online-Convert is a free online file converter. I've personally relied on it to convert my music into OGG format, and I haven't had any problems with it so far. There are many other converters for lots of different needs and formats as well.
BFXR is a free downloadable program that is great for making digital sound effects for your games. I was actually recommend this program by my prof in first year. You can use all FX in any use for free!
Ibis Paint X is a free drawing app for Apple devices/other mobile devices that support pen pressure. You can upgrade to the full version, but the free version has a lot of options.
Fortelling is great for planning out stories and worldbuilding. It’s optimized for writers to keep track of their projects. You can make timelines, add characters with customizable traits & avatars, create locations, specify items/languages/species, and a lot more. There is a premium subscription version, but I’m perfectly content with the features that come with the default.
Design Cuts is a website for lots of artistic resources, including Procreate brushes, graphic design assets, and more. They give out weekly freebies, as well as an extended commercial license included with every purchase. There’s frequent sales too, and you get so support independent artists.
Feel free to reblog/add your own favourite free resources to share with other devs/artists! I’ll update this post as needed.
Website / Discord Server / Patreon
#game development#game developers#gaming#indie dev#game dev#indie games#indie developer#indie game#indie rpg#pixel art#rpgmaker mv#rpgmaker#art#free apps#game dev blog#artists on tumblr#pixel sprite#indie gamedev#pixel game#artist resources#artist help
459 notes
·
View notes
Note
I’m sorry if this is bothersome, but I am interested in learning how to make GIFs. Could you possibly nudge me in the right direction on how to do so? And, again, I’m sorry if this is an annoying ask, I’m just genuinely curious.
hello sweet friend! this isn't an annoying ask at all! i'm so happy you reached out and i'm more than happy to share some resources + tips that helped me start on my own gif making journey!
lots of info + babbling below the cut!
first, THIS is the initial tutorial i used to get started. you will need Photoshop (or an equivalent, though i will admit i'm not familiar with the other applications) and a computer - and that's pretty much it! i know it can seem overwhelming at first because it's so much information but i promise this tutorial has absolutely everything you'll need and is laid out in a really straightforward way!
second, if you're planning on using the video import method as opposed to screencapping, like i do, you'll need video files. i don't know how to use websites like MEGA or any other file downloader so i got all my videos from THIS youtube channel (which i feel most everyone in the gallavich fandom is already familiar with, lmao) - but the quality is still really really good! 1080p should be all you need. you can either download an application to your computer that converts the files via URL or you can use a website (THIS one is really good) OR you can do what i do sometimes when i realize i'm missing a scene (because some videos that are age restricted [see: dock scene] often won't be convertible via applications and websites) which is screen record on your computer or phone and then plop the file wherever you need it - whatever works best for you!
third, when it comes to adjustments, coloring, editing, etc. it's going to take a lot of trial and error but you WILL get there! my favorite adjustments are: curves, levels, hue/saturation, color balance, selective color, vibrance, and sometimes black & white. my favorite filters are the smart sharpen feature and noise.
for SMART SHARPEN my settings are:
amount: 500%, radius: 0.4px, reduce noise: 10%, remove: gaussian blur
THEN a second adjustment using:
amount: 10%, radius: 10px, reduce noise: 10%, remove: gaussian blur
then for NOISE i usually add 4% noise, uniform, monochromatic! admittedly i just recently started using this filter but i think i've found my sweet spot! feel free to play around with this one. for example, black & white with high level noise gives old movie vibes - experiment, experiment, experiment!
HERE is a link to the BBC coder for colored text for captions
HERE is a link to a website where you can get a ton of free PNG files for overlays and funky edits - just make sure you put "PNG" after your search terms!
i also have a bunch of bookmarked links to various gif maker's resource pages that have been helpful to me in the past - if you'd like them please just DM me and i can send you some links!
finally, do you know about the Shameless Creator's Network? we're a network of digital creators for shameless; all characters, all seasons, all experience levels! if you're on Discord, we have a server where we have channels dedicated to just this: learning, growing, inspiring! HERE is an invite link and HERE is our blog!
otherwise, if you have any other questions or need help along the way, PLEASE don't hesitate to reach out to me via asks or DM - i am MORE than happy to help! i love seeing people learn a new craft and if i can assist at all with that then i absolutely will!
#i hope this is helpful!#please please please don't hesitate to reach out if you need anything else!#putting this under#*macygifs#in case anyone is going through my tag and wants to learn to make them too#macy babbles#redwiccanrobin
36 notes
·
View notes
Text
Just a bunch of useful websites
12ft – Hate paywalls? Try this site out.
My Fridge Food – No idea what to make? Tell this site what ingredients you have on hand and it will give you recipes to cook.
Project Gutenberg – Always ends up on these type of lists and for very good reason. All works that are copyright free in one place.
Ninite – New PC? Install all of your programs in one go with no bloat or unnecessary crap.
Unchecky – Tired of software trying to install additional unwanted programs? This will stop it completely by unchecking the necessary boxes when you install.
Sci-Hub – Research papers galore! Check here before shelling out money. And if it’s not here, try the next link in our list.
LibGen – Lots of free PDFs relate primarily to the sciences.
Zotero – A free and easy to use program to collect, organize, cite and share research.
Car Complaints – Buying a used car? Check out what other owners of the same model have to say about it first.
CamelCamelCamel – Check the historical prices of items on Amazon and set alerts for when prices drop.
Have I Been Pawned – Still the king when it comes to checking if your online accounts have been released in a data breach. Also able to sign up for email alerts if you’ve ever a victim of a breach.
Radio Garden – Think Google Earth but wherever you zoom, you get the radio station of that place.
Just The Recipe – Paste in the url and get just the recipe as a result. No life story or adverts.
Tineye – An Amazing reverse image search tool.
My 90s TV – Simulates 90’s TV using YouTube videos. Also has My80sTV, My70sTV, My60sTV and for the younger ones out there, My00sTV. Lose yourself in nostalgia.
Foto Forensics – Free image analysis tools.
Old Games Download – A repository of games from the 90’s and early 2000’s. Get your fix of nostalgia here.
Online OCR – Convert pictures of text into actual text and output it in the format you need.
Remove Background – An amazingly quick and accurate way to remove backgrounds from your pictures.
Twoseven – Allows you to sync videos from providers such as Netflix, Youtube, Disney+ etc and watch them with your friends. Ad free and also has the ability to do real time video and text chat.
Terms of Service, Didn’t Read – Get a quick summary of Terms of service plus a privacy rating.
Coolors – Struggling to get a good combination of colors? This site will generate color palettes for you.
This To That – Need to glue two things together? This’ll help.
Photopea – A free online alternative to Adobe Photoshop. Does everything in your browser.
BitWarden – Free open source password manager.
Atlas Obscura – Travelling to a new place? Find out the hidden treasures you should go to with Atlas Obscura.
ID Ransomware – Ever get ransomware on your computer? Use this to see if the virus infecting your pc has been cracked yet or not. Potentially saving you money. You can also sign up for email notifications if your particular problem hasn’t been cracked yet.
Way Back Machine – The Internet Archive is a non-profit library of millions of free books, movies, software, music, websites and loads more.
Rome2Rio – Directions from anywhere to anywhere by bus, train, plane, car and ferry.
Splitter – Seperate different audio tracks audio. Allowing you to split out music from the words for example.
myNoise – Gives you beautiful noises to match your mood. Increase your productivity, calm down and need help sleeping? All here for you.
DeepL – Best language translation tool on the web.
Forvo – Alternatively, if you need to hear a local speaking a word, this is the site for you.
#lifehacks#life hacks#useful websites#websites#links#useful links 2022#2022#language learning#travel#useful programs#recipes#cooking#editing#free shit
84K notes
·
View notes
Text
My Favorite CAS Creators

Here’s a long overdue list of my absolute favorite CAS Creators - this will always be updated for my latest loves but as for now, here’s an organized list of some of the best. Enjoy!!
Always follow my Pinterest board as I’m updating that constantly / https://www.pinterest.com/plumbaleena/
Here’s my latest YouTube video of recent CAS favorites [make sure you subscribe to always get updated] /
youtube

GENETICS //
SKIN BLENDS
Lamatisse / https://www.patreon.com/lamatisse
Praline / https://www.patreon.com/pralinesims
Semplicesims / https://www.patreon.com/semplicesims
Mousysims / https://mousysims.tumblr.com/post/675291296035979264/mint-skinblend-forehead-skin-detail-enabled-for
Plumbheadsims / https://plumbheadsims.tumblr.com/post/648586481346248704/afterglow-skinblend
Meksims / https://meksims.tumblr.com/post/647367197225877504/the-wildflower-skinblend-im-a-total-sucker-for
Simbience / https://simbience.tumblr.com/post/646107805527457792/d-o-w-n-l-o-a-d-patreon-free-info-below
Glimersims / https://glimersims.tumblr.com/post/633497293567508480/the-harvest-a-simblreen-pack-happy-simblreen
Miko / https://miikocc.tumblr.com/post/635771764892401665/miikocc-underwear-by-bill-sims-body-preset
Grimcookies / https://href.li/?https://grimcookies.com/post/634844186775044096/lazarus-iii-a-default-non-defualt-skinblend-this
Soujateatime / https://sojuteatime.tumblr.com/post/634319702347366400/chamomile-skinblend
Jellymoo / https://jellymoo.tumblr.com/post/633910016676610048/jupiter-im-super-picky-when-it-comes-to-the
Lunar Daisies / https://lunar-daisiess.tumblr.com/post/633605970250104832/daisie-a-non-default-skinblend-so-basically-im
Squeamish Sims / https://squeamishsims.tumblr.com/post/632782158518501376/cicada-skinblend-by-squeamishsims-ps-thank-u
Flowermilk Sims / https://flowermilksims.tumblr.com/post/632034135084498944/fleur-skinblend-here-we-go-my-first-cc-piece
Arenetta / https://arenetta.tumblr.com/post/631593850887077888/daisy-skinblend-hi-everyone-here-is-a-non-default
SimsinWinter / https://simsinwinter.tumblr.com/post/625279953341218816/if-you-like-ultra-smooth-soft-skin-then-this-is
FRECKLES/EYEBAGS/NOSE MASKS ETC
Pyxis / https://pyxiidis.tumblr.com/post/171902140901/about-face-skin-details-by-pyxis-a-set-of-subtle
Miiko Face Kit / https://miikocc.tumblr.com/post/653369415716519936/face-kit-no1
Katverse Nose Mask / https://katverse.com/tag/sims-4-nose-mask/
Tamo Undereye / https://tamo-sim.tumblr.com/post/131942971200/basic-10-eye-bags-set-for-both-gender-child-to
HalfblobTwitch Moles / https://halfblobwitch.tumblr.com/post/667334870946676736/full-body-muggle-moles-i-worked-on-these-full
Sunflowercc Highlighter / https://sunflowerccworld.tumblr.com/post/667423006155571200/sunset-highlighter-hey-guys-im-back-with-another
Booboo Blush / https://squeamishsims.tumblr.com/post/185846308452/booboo-blush-by-squeamishsims-so-ive-tried-so
TwistedCat Quartz Highlighter / https://twisted-cat.tumblr.com/post/679185575188807680/quartz-highlighters
Cleavage Mask / https://www.thesimsresource.com/downloads/details/category/sims4-makeup-female-skindetails/title/cleavage-overlay-collection/id/1453639/
Body Highlight / https://sims3melancholic.tumblr.com/post/640319317231222784/download-ea-credits-obscurus-sims
Body Hairs / https://xldsims.tumblr.com/post/155480567079/new-years-2017-luumiasimslumialoversims-body
Emmibouquet Happy Lines / https://emmibouquet.tumblr.com/post/655855671096623104/happy-lines-i-created-some-subtle-ageing-signs
Semplicesims Occhi Eyes / https://www.patreon.com/posts/occhi-eyes-58091809
LuckyMix Eyes / https://softerhaze.tumblr.com/post/636677319340294144/lucky-mix-i-converted-mouseyblues-lucky-mix-set
Any and ALL Eyeshadow from @theblondesimmer / https://www.patreon.com/posts/66291263
Lighting in CAS / https://breezytrait.tumblr.com/post/686961779023265792/sims-4-cas-lighting-mods-free-download
Stand Still in CAS / https://modthesims.info/d/630172/stand-still-in-cas-shimrod101-amp-shooksims.html

HAIRS //
MALE /
Johnnysims / https://www.patreon.com/johnnysims/posts
Wistful Castle / https://www.patreon.com/wistfulcastle
FEMALE /
Simstrouble / https://www.patreon.com/simstrouble/posts
Okruee / https://www.patreon.com/okruee
Clumsy Alien / https://www.patreon.com/clumsyalien
A lot of the clothing creators listed below also make amazing hairs

CLOTHING //
Arethabee / https://arethabee.tumblr.com/post/683150002518999041/thebasics
ClumsyAlien / https://clumsyalienn.tumblr.com/tagged/downloads
Dart77 / https://www.patreon.com/darte77
Gorrilla x 3 / https://www.patreon.com/gorillax3/posts
Madlen / https://madlensims.tumblr.com
Jius-sims / https://www.patreon.com/jiussims/posts
Serenity / https://www.patreon.com/serenitycc/posts
CreamLatteDream / https://www.patreon.com/creamlattedream
Rimings / https://www.patreon.com/RIMINGs
SIFIX / https://www.thesimsresource.com/members/Sifix2/
185 notes
·
View notes
Text
how to make gifs for free*
*okay, for $5. which is far less than what you would pay for photoshop!
this is my tutorial for people who want to make gifs but do not want to pay the steep monthly fee for photoshop. i feel especially qualified to make this tutorial because i did pay for the monthly photoshop fee a few months ago and honestly, i hated the process of making gifs on photoshop. it was extremely onerous and also cost a lot of money? no thanks! now, are gifs made on photoshop typically better quality than gifs made through free services? yes, but only marginally. and, to me, the slightly-higher quality gifs do not make up for: (a) the cost of photoshop, and (b) the ease of the free-gif making process. it will seem like there are a lot of steps below, but i promise it will all become like second nature soon enough.
BEFORE WE PROCEED: this tutorial is tailored towards the apple ecosystem. however, i’m sure most of the steps in here also apply to windows computers; i’m just not totally sure since i don’t have one.
without further ado, click below to follow the tutorial!
STEP 1: purchase gif brewery 3
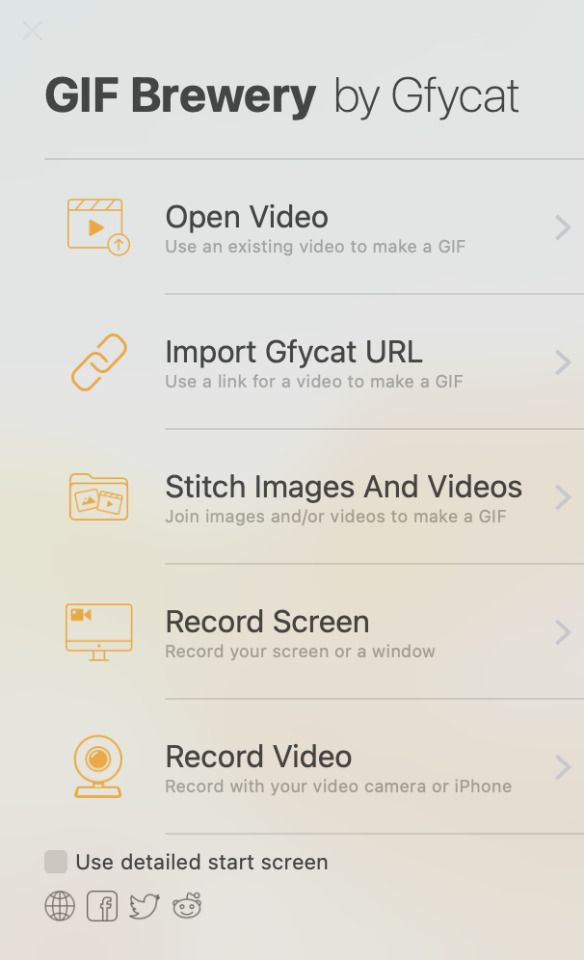
this is the only stage where you will need to spend money - this app is integral to the process of creating gifs for free. i have tried out many different giffing apps, and this one is by far the best. it’s called “gif brewery 3 by gyfcat” and you can get it on the app store:

STEP 2: download or screen record your video
now that you’ve got your giffing software downloaded, you’re going to download your video in an .mp4 format.
downloading: i typically download from youtube or vimeo. for youtube downloads, you simply copy the link and paste it into a “youtube to mp4″ converter, which you can find through a simple google search of “youtube to mp4″ (a lot of these sites often get taken down and new ones pop up, so don’t get attached to a specific site because it’ll probably be gone like, 4 days later lmfao). for vimeo, i typically google “vimeo video downloader” and a few websites will pop up.
screen recording: there are a few different screen recording extensions you can add to google chrome, and i’ve tinkered with those in the past. however, recently i’ve been using the built-in macbook screen record function, which can be brought up by pressing command + shift + 5. once that’s brought up, you can change the size of your recording area, click record, and then save the video to your desktop. note that there IS a screen record option built into gif brewery, but i have never used it so i can’t speak to its functionality.
STEP 3: add your video to gif brewery
now that you’ve either: (a) downloaded your video from youtube/vimeo or (b) screen recorded your video and saved it on your computer; you’re now going to add the video to gif brewery and get giffing! this is where the fun part starts.
1. open up gif brewery and select “open video”
2. head into your computer and find the video you have downloaded/recorded, and select “open”
3. drag the green and red bars to the areas of your video where you want your gif to start and end. i’m using a video i giffed last week as an example:

4. click on “settings” in the top righthand corner to bring up this panel:
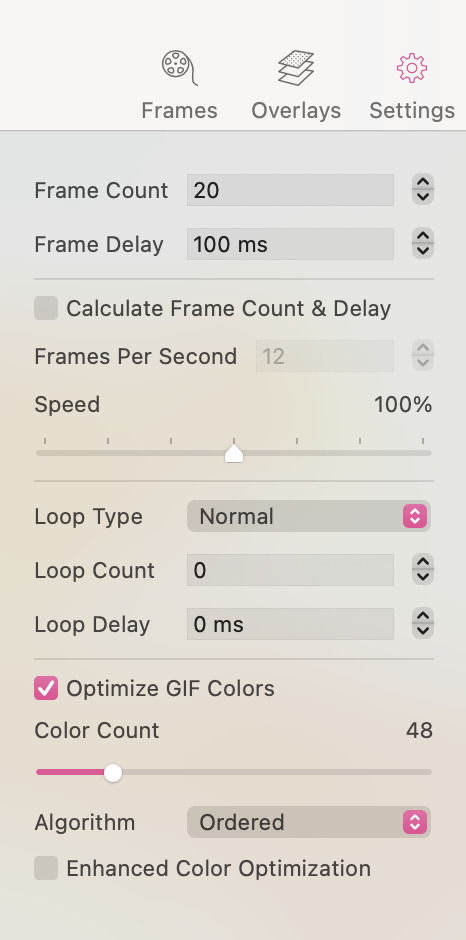
5. this is a VERY important step to ensure that your gifs turn out all right. you’ll want to change the settings in the above panel to something like this:

as you can see, i typically use 25 fps as this helps the gifs flow and not look choppy. some videos, though, work better with 20 fps (this is something you’ll get a sense for when you make a lot of gifs). i typically bring the speed down to between 70-90%, as 100% speed always feels too fast to me. and then i ALWAYS optimize the gif colours to 256. yes, even for black and white gifs.
an interlude about gif sizes: you’ll note that in the above picture, the frame count says “79″. if your gif is larger than say, 600px wide, 79 fps will probably have you producing a decently large gif. keep in mind that tumblr does not allow gifs to be over 10mb, so you’ll need to adjust accordingly. you can apply these settings and then go back and re-adjust those green and red lines from before to shorten your gif to ensure that it adheres to the size requirements of tumblr. also keep in mind that the editing process will add (sometimes significantly) to the size of your gif. so you want to aim for your gif to be well under 10mb at this stage. for small gifs, i don’t limit my fps too much, but for bigger gifs (i.e. ones that are over 600px wide), i will try to limit my fps to under 50. just keep that in mind as a barometer.
6. once you’re happy with your settings, click “create”

7. clicking “create” will bring up a window which will showcase your gif, as well as your gif size (see red circle):

at this stage, i’ll often click the “cancel” button in the lower lefthand corner and fiddle with the gif, as my gif sizes at this stage are typically enormous. this is actually a rare example where the gif is well under 10mb. however, for this gif i would crop the black edges out and probably re-size it down a bit to have it further below 5 mb (this video is far too low quality to produce a gif that’s as high as 5mb. this will vary, though, depending on the quality/size of the video).
8. so, clicking “cancel” above, i am going to crop and resize the gif:
- when you click on “crop”, this window will come up where you can adjust the size of your crop:

when you crop it to where you’re happy with it (if you need to crop your gif, that is), you’ll likely want to resize your gif:
when you click the “resize” button, the dimensions of your gif will pop up:
a second interlude about gif sizes: okay. here’s the thing about using a software that isn’t photoshop to make gifs. the quality of your gifs will likely suffer, compared to gifs processed through photoshop. through trial and error, i have learned that i have to make my gifs slightly bigger than the standard tumblr sizes in order for their quality to hold up. it has something to do with pixel compression, which i don’t need to go into right now. i have also learned that low resolution videos (like the one i’m using in this example, which frankly looks like it was filmed using a toaster) should almost never be used for full-sized gifs. instead, the quality of these gifs from a low-resolution video will look much better as half-sized, side-by-side gifs in a two, four, six, or eight-gif pattern (god, does that make sense? message me if it doesn’t). standard tumblr sizes are, i think, 540px wide for a full-sized gif, and 270px wide for a half-sized gif. AS SUCH, i typically make my full-sized gifs around 700px wide, to enhance the quality of them once they’re put into tumblr. yes, this means your gifs will have a higher MB output, which means your gifs will need to be shorter than those that could be made through photoshop. these are the struggles we face as Free Gif Makers, however it is worth it to me.
alright, as you can see above, after i’ve cropped the black edges out, this gif is 493x360px. so, it’s under the 540px requirement for a tumblr full-sized gif. the GOLDEN rule of gif-making is to NEVER use a gif that is under 540px wide as a full-sized gif. the gif will be stretched and will lose a lot of quality in the process. however, 493px wide is still well-above the 270px wide standard size for a side-by-side gif. i am going to size this down slightly to 350px wide (remember, we want to be well above the 270px wide standard size, as described above) so my total MBs will be smaller.
9. now that i’ve cropped and resized, my gif is now only 2.7mb:
i like this a lot better than the 5mb before, as it gives me more wiggle room in the editing process. i’m happy with it now, so i will click “save...” and save it to my desktop for editing now.
STEP 4: repeat step 3 for all the gifs you want to make for that specific gifset
i am going to make two gifs to demonstrate to you the side-by-side gif thing i was talking about above. these are the gifs at this stage, pre-editing:

STEP 5: add your gifs to photopea to begin the editing process
once you’ve created all your gifs in gif brewery 3, you can close the app. for editing the gifs, i use photopea desktop. photopea is basically a walmart photoshop, and i think it works really well considering it’s free.
1. click file > open
2. locate your gifs that you save from gif brewery
3. now is the actually fun part. this is where you can fiddle with the brightness, exposure, temperature, etc., and/or you can add a psd or two to your gif. i almost exclusively use PSDs and then will fiddle with the brightness/contrast/levels/curves/temperature/sharpening/grain on my own after i’ve applied the PSD. i’ve found all the PSDs i use here. that blog should also have tutorials on how to download a PSD. a PSD is basically a file folder with elements in it which will enhance the colouring/lighting of your gif. PSDs are EXTREMELY trial and error when it comes to working with a certain gif or not, so be patient as you try out PSDs on your gifs. when you download a PSD, you will add the file to photopea (file > open > find the PSD and add it), and then drag it on top of all the layers of your gif, like so:

a note on manually adding brightness/contrast/temperature/sharpening/grain, etc.: you must select all the layers in your gif for these edits to apply these changes, so they all must be highlighted like the below:

a note on sharpening/grain: adding sharpening/grain to a gif without being careful will HUGELY add to the size of the gif, and will often push it well over tumblr’s 10mb size limit. sharpening can also make your gifs look very bad if you go overboard. i often either don’t sharpen my gifs at all, or am very careful when i do. i always choose smart sharpen (as opposed to “sharpen”, which just adds a shitload of sharpening without you being able to adjust the amount), as i can adjust the sharpening elements with smart sharpen. to find the sharpen tool, go to filter > sharpen > smart sharpen:

these are the properties i sometimes choose for sharpening. however remember that most of the time i don’t even sharpen my gifs, OR i will do 50% instead of 100%. but i am going to use these properties for the gifs i’m making for this tutorial. you can typically be a bit more liberal with sharpening when you’re making smaller side-by-side gifs, as there is more room for the extra MBs added from sharpening:
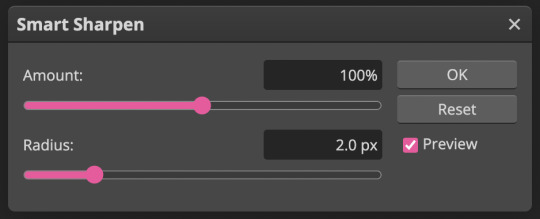
the properties you choose for sharpening will ultimately totally depend on the gifs you’re making, so don’t be afraid to fiddle around with them! i wouldn’t recommend going over 150%, though.
now, grain is something i hardly use in my gifs, as grain adds even MORE to the file size of a gif than sharpening does. however, sometimes it’s cool to have a bit of grain in your gif, so this is what i would do.
locate grain, which is found in filer > noise > add noise:
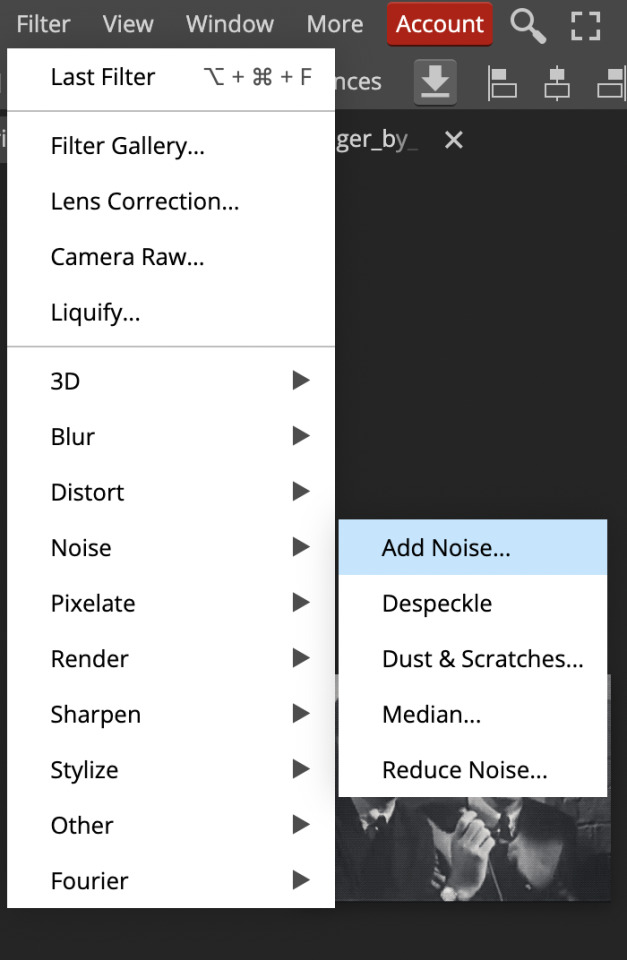
use this percentage:
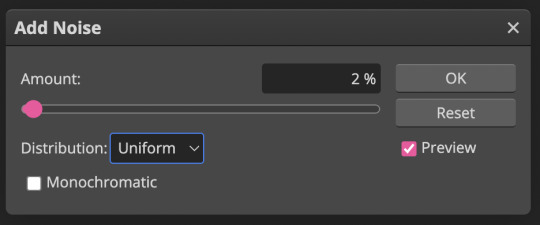
unless your gif is super tiny, anything above 2-3% grain will make your file size extremely massive. use grain with caution!
STEP 5.1: adding text to your gifs
if you want to add text to your gifs, read this step. if you don’t, skip to step 6.
the most common font used with gifs on tumblr is calibri bold italic. photopea does not have calibri built in, so you will need to download it from an external source like here and then add the font into photopea. you will likely have to add it in every single time you make a gif, which is mildly annoying, but yet another tribulation of making Gifs For Free:
1. select the “T” icon on the left sidebar:

2.select the font bar which will appear up top, and then click “load font”
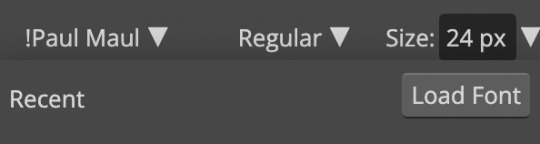
3. locate the calibri font file that you’ve downloaded in your computer and add it in. i suggest adding it in via zip file, because the zip file will include all of the different versions of calibri (i.e. bold/italic/bold italic, etc.). once you’ve loaded it in, search for it in the photopea font list and select it:

4. select bold italic

5. use these properties for the stroke (the outline of the font) and drop shadow (these are the only two elements i add to my fonts):

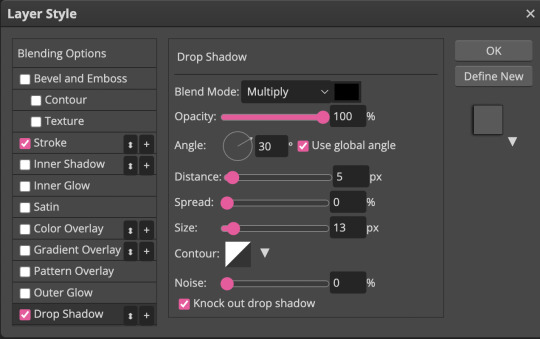
this is what your text should look like (sorry, it’s all pixelated because i had to zoom in):
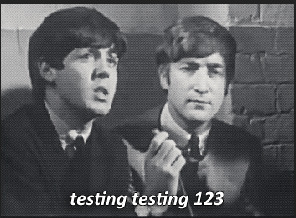
you can adjust the size of the font as necessary and drag the text around to make sure it aligns with the centre of your gif (i’m not actually going to be using text for these gifs, but i wanted to show you because it does add a handful of extra steps)
STEP 6: save your gifs
once you’re done adding your PSDs/manually editing your gifs, you’re going to save them by going file > export as > gif:
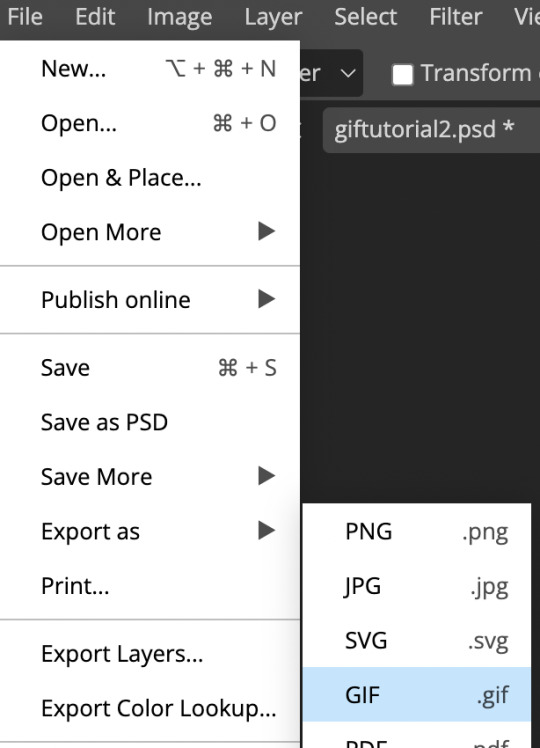
here, you will see a preview of your gif, as well as the MB total in the bottom right hand corner:
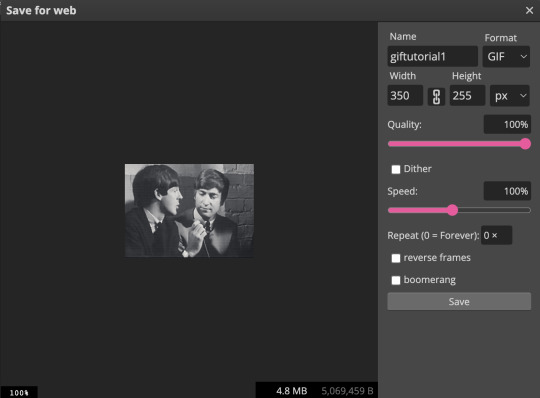
note how our gif went up to 4.8mb from 2.7mb after we originally saved it from gif brewery? that is almost entirely from the sharpening we added to the gif, and that is actually a pretty small increase; typically file size increases are much greater than that if you’ve sharpened your gif, especially with coloured gifs (black and white gifs inherently have smaller file sizes due to the lack of colour).
also note the “speed” bar - sometimes if i feel like my gif is still too fast, i’ll reduce that 100% to 80-90%.
if your file size limit is under 10mb and you’re pleased with your gif, click “save”
STEP 7: upload to tumblr
click photo > upload photos > and add your gifs. now, this is what i meant by the “half-size, side-by-side” gifs:

now, to add a caption with smaller font and smaller spaces between lines, you need to go into the HTML of your caption, which can be done by clicking the gear icon in the top right corner of your gifset and selecting HTML:

this is a sample HTML caption code. you can learn the principles of HTML by googling it, or just deducing it from the below:

and this is what that code looks like:

you can also add colour to your captions by adding a code into your HTML from this website
STEP 8: click post!
congrats! if you’ve made it to the end of this tutorial, you’ve successfully created a gif for *almost* free. i really do promise that this all becomes really fast and like second nature once you get the hang of it!
please feel free to shoot me a message if you have any questions at all! 🤍
- xoxo, caro, aka pennie
#holy mother this was a lot more work than anticipated#but it was fun!#please message me if you have any questions#i mean it!#i feel like this got very convoluted at times - especially discussing gif sizes - so plz message me if you need anything cleared up#gif tutorial#mine#giffing#gifs#tutorial
130 notes
·
View notes
Text
The Sim Tag 💚✨
i got tagged by @profesionalpartyguest and @cobycobsy2k! ty mm besties 💘
What’s your favourite sims death? -> death by cowplant. iconic.
Alpha CC or Maxis Match? -> rn i'm gravitating towards maxis match, but i've done both styles and they're both fun to play with!
Do you cheat when your sims gain weight? -> hell nah. let them live their pixel lives.
Do you use move objects? -> 24/7
Favorite mod? -> @bstu's edited gussy up. i just use it constantly, it's a must have. cba to actually send my sims to the store for clothing or wait for gussy up to go through every single menu when i just want to grab a wedding dress.
First expansion/game/stuff pack you got? -> ts3... on android. my granddad got it for me when i was ~5. ts4 pales in comparison to that grainy goodness.
Do you pronounce “live mode” like aLIVE or LIVing? -> aLIVE MODE
Who’s your favorite sim that you’ve made? -> my profile pic sim! her name's lili. rarely use her anymore now that i've switched to true mm but that whole gang of toddlers are just so cute to me.
Have you made a simself? -> gigantoborkodoggo and me are living the high life
What sim traits do you give yourself? -> bookworm, geek, dog lover, shy, socially awkward
Which is your favorite EA hair color? -> the maxis red in ts2 (especially on nina's default hair) is just superior
Favorite EA hair? -> it's hard to decide butttt i do love a lot of the mansions & gardens hairs. especially for men.
Favorite life stage? -> toddlers in ts2. they're chaotic but i love them sm.
Are you a builder or are you in it for the gameplay? -> im bothhh.
Are you a CC creator? -> (checks my 10-page-long downloads blog) maybe?
Do you have any simblr friends/a sim squad? -> a ton!! there's so many sweet people on here.
What’s your favorite game? -> ts2 foreva
Do you have any sims merch? -> i have one (1) shirt with a plumbbob that i'm too big for.
Do you have a YouTube for sims? -> i have an account for commenting on sims videos but otherwiseeee nope.
How has your “sim style” changed throughout your years of playing? -> i used to just throw in every single piece of cc i downloaded and hope for the best. at one point in my main pleasantview i had poppet, pooklet, remi, sunshine, and hard mm hairs... all thrown in at once. nowadays i stick to one style per game folder.
What’s your Origin ID? -> nonexistent
Who’s your favorite CC creator? -> there's too many to count aaaaaaa. love everyone on here and all my mutuals, you guys make HAWT cc 💖
How long have you had a simblr? -> a year and 3 months
How do you edit your pictures? -> most of the time i don't edit them at all! reshade is more than enough for me.
What expansion/game/stuff pack do you want next? -> i want a south-east asian inspired pack for ts4!! like i won't BUY it but my culture's rarely represented in the sims and i'd LOVE to convert that pack for ts2.

tagging my simscord besties @skittlesplays | @sunise | @oceansmotion | @makingformyonesimmer | @brattyful | @time-p1ays | @lunnaris-sims | @antoninko | @roxanna-moxie and everyone else who wants to do this! (pls don't feel too obliged to do it!! love u guys <3)
16 notes
·
View notes
Text
Gif tutorial by Alinelovelace
Alright, I'll be doing 3 things here today:
1.) Sharing the programs and websites I use
2.) Showing y'all a tutorial on how I make my gifs (this is my first tutorial, so if anything doesn't make sense, don't hesitate to message me, send me an ask, or comment on this post!!!!!)
3.) Sharing some resources by insanely talented gif makers (because I learned how to make gifs by following tutorials)
It's probably important(?) to mention that I use a Windows laptop
A.) Programs and websites:
ezgif: to make my gifs and do light editing
You can make gifs with video clips or screen caps. I'm not advanced enough to use screen caps, though they're supposed to make gorgeous gifs. I use ezgif to make the actual gif and edit the timing (which I end up having to tweak on Photoshop but...)
I also like ezgif because no watermarks!! I will do anything in my power to get rid of watermarks from websites and editing programs because they bother the hell out of me!
Photoshop: for the rest of my editing
This is where I recolor and add text.
A great alternative to Photoshop is Photopea, which I've used before I "obtained" Photoshop. It's FREE and online, so you don't have to download anything! I highly recommend it if you really want to get into gif coloring !!!!
Currently, I get my videos from torrents (bc I have a wide selection for my family to watch on our tv). But I used to use the Xbox game bar on Windows to record the clips I wanted on online streaming sites (unfortunately there's not a whole lot up and running anymore), then cropped and cut them. If anyone's interested in that, I could probably post a separate tutorial for that another time :)
There's also screen cap websites out there and YouTube. And probably dozens of other ways to get videos that I don't know about!
Video cutter
If you use full length episode videos and don't know how to crop them on your laptop (like me)
★★★★★★★★★★★★★★★★★★★★★
B.) Tutorial:
I'll be remaking the first gifset I ever made since I've learned A LOT since then! It should be pretty simple since there's only one set of subtitles.
Another time, I could do an edit tutorial like my That 70s Show ones. It's just taking the same concepts as this tutorial though, and playing around with colors, fonts, and font placement.
1.) Find your video/screen caps:
Since I no longer have the video from my first gifset, I just googled "Mulder throwing pencils season 10" on YouTube. After finding the video, I copied the link and pasted it into a YouTube to MP4 site ((this site has never given me popups or tried to get me to download something that isn't my video file)).
2.) If your downloaded video clip is short enough, you can just stick it into ezgif. If not, you may have to cut it using a website or a computer program.
Ezgif.com -> video to gif -> browse -> select your file -> upload video
3.) After clicking upload video, you should find yourself on this page:
If you need to do any kind of video editing (cropping, rotating, resizing, etc) this is the place to do it! This is also where you make your gifs.
For the first gif, I don't need to change the start time, since I'm starting at the beginning of the video. 0 seconds is fine. But for the stop time, I'm going to play the video, pause where I want my first gif to end, then press "use current position" by end time.
I don't usually touch the settings for size, FPS, or method. If the gif doesn't have a lot of movement, I check "optimize for static background"
Then press convert to gif.
Here's the product I got. Since it's such a short clip, it moves a little fast for me.
I'm going to click "speed" which is below the gif. You're brought to this page:
This is completely up to you for speed, but I find that between 60% and 85% end up looking good. If you don't like it, just change the number in the box and press "change speed".
I ended up with mine at 65% of current speed.

A little better, right?
The gifs that turn out best are 3 seconds to 10 seconds in my experience. This one is 1.5 seconds, so it's a little fast.
After that, rinse and repeat for every gif you need to make.
4.) Editing time! This is for Photoshop (if you use Photopea, I very much recommend this tutorial. It's very well explained!)
Go ahead and open all of your gifs once Photoshop is booted up. Then click window -> timeline
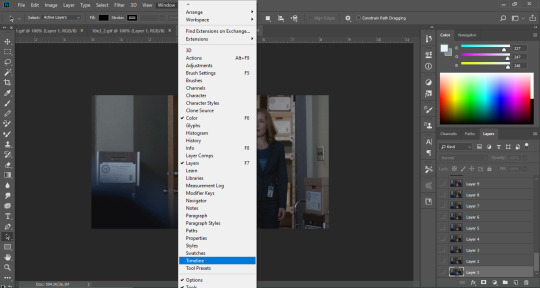
Now you have a handy dandy little timeline on the bottom.
The first thing you're going to do click play and decide whether or not your gifs are running at the speed you want. If yes, move on to next step.
If not: click on the three lines -> select all frames -> little drop down arrow. You should have a variety of times available to choose. Usually, I click other, then put somewhere between 0.04 and 0.08 seconds. Click play again. If you don't like it, try this step again.
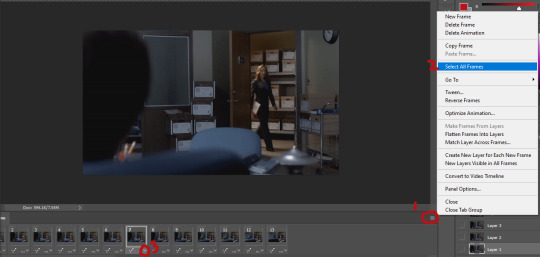
If you need to crop your gif, three lines -> select all frames. Press "c" on your keyboard and crop accordingly.
4a.) Color editing
This is where things get complicated. Just remember coloring is subjective and everyone does it differently. This is just an intro to the different tools most gif makers use to alter color.
You don't have to use all of these! I definitely pick and choose depending on how I want the coloring to look. When I'm making a gif set, my coloring isn't as adventurous as when I'm making an edit. It doesn't feel worth it to give away my settings for this gifset since it changes depending on the coloring and lighting of the scene.
All of these tools can be found under "create new filter adjustment layer"
• Brightness/Contrast
This one is the easiest in my opinion. It's pretty straightforward. The more you drag brightness the right, the brighter your gif gets. The more you drag contrast to the right, the higher the contrast is.

• Curves
This adjusts lighting with color values. It's another tool that's hard to explain. I just drag the little circles on the chart until it looks good

• Color Balance
Like every other setting, exactly what you do with this tool is up to you. Color Balance adjusts the overall tint of your gif. I recommend editing highlights, shadows, and midtones for the best results.
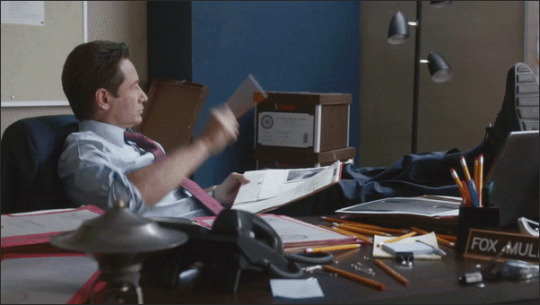
• Channel mixer
This one is one of the most complicated tools when making gifs in my opinion. It's best for getting rid of weird colored tints (think the blue coloring in Twilight). I'll just link a tutorial here for it. I don't make enough gifs to know how to explain it.
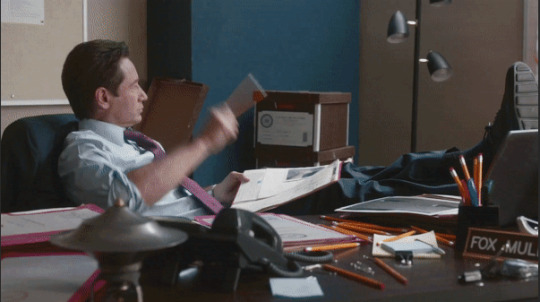
• Selective color
Hands down my favorite tool, though not only specifically for gif making. This tool allows you to select a color (reds, yellows, greens, cyans, blues, magentas, whites, neutrals, blacks) and edit each color group. For example: my skin in photos usually has a weird red tint. I can edit the reds in my photo using this tool to make it look less abrasive.
You just play around with the different colors and bars for each color until each color group looks good. I recommend hitting the highest value to see how the color changes/what parts of the gif are affected by the change.
In the instance below, I wanted to see how magenta affected the blue colors, so I dragged magenta to 100. Now, knowing what kind of color changes magenta will make to blue, I can adjust accordingly.
Messing around with the each color put me here:
• Vibrance
Another pretty self explanatory tool! Vibrance and saturation bars make the gif colors more colored and vibrant.
• Applying the filters to all frames
Shift click to select all the filters, and drag them above all the layers. They should now be applied to all the frames.
If not, select all frames with the three lines menu drop down like before -> click the little eye to turn off visibility, then click it again to turn it back on. You should be able to see everything now.
In order to carry the same colors from gif to gif, I take pictures of each setting and edit each filter adjustment layer accordingly. I side by side compare and make adjustments if the coloring doesn't match quite right. I'm sure there's a better way to do this, but I'm not experienced enough yet.


4b.) Subtitles
This part isn't too bad. For subtitle text, I use Calibri. Myriad pro bold italic and Arial are also really good options though!
• Text
Go to the sidebar and select text. Drag yourself out a box approximately where you want your subtitles. Type whatever you want. If you don't like where it is, click the move tool and drag it wherever you'd like.
Here are my text settings:

• Blending options
Right click your text layer and select "blending options" at the top. I edit stroke, which adds an outline. I also edit drop shadow, just because it adds a little depth to the text

• Applying to all frames
Drag the text layer to the top, just like you did with the adjustment filter layers when coloring. The same troubleshooting applies.
5.) Exporting
I know there's other ways to do this, but this is the way that makes the most sense to me.
Select all frames on the timeline -> file -> export -> save for web (legacy) -> save
With everything together, you go from:
To:

I had the subtitles in two parts because my first one had the subtitle in two parts (consistency).
Happy giffing!~~
★★★★★★★★★★★★★★★★★★★★★
C.) Resources:
This is a collection of resources both for Photopea and Photoshop
Photopea Resources:
Photopea giffing tutorial by @heroeddiemunson
Photopea gif coloring tutorial by @heroeddiemunson
Photopea removing yellow tint tutorial by @lacebird
Photopea gif making tutorial by @aragarna
Photopea gif making tutorial by @ashleyolsen
Photopea changing background color of gifs by @benoitblanc
Photoshop tutorials:
Giffing tutorial by @dqmeron
Subtitle tutorial by @itsphotoshop
Blurring gif backgrounds by @clubgif
Inverted colored text tutorial by @spaceslayer
Gradient text tutorial by @tawaifeddiediaz
Gif coloring tutorial by @logangarfield
Color consistency tutorial by @clubgif
Channel mixer tutorial by @zoyanazyalensky
11 notes
·
View notes
Text
Using Obsidian to organise existing Bullshit
The Alternative title of this entry should be "How the Church of Obsidian saved by dirty heathen soul".
Anyway, I have a (now on Hiatus) youtube channel that I had fucktonnes of notes, scripts and suchlike for that were sat on my overcrowded gDrive unorganised and doing nothing.
I had heard of Obsidian before but it all looked very overcomplicated and I didn't think I would have a use for it from watching all the how to videos where members of the Church of Obsidian showed people their simple (read: complex) note taking system that they had optimised.
However the one thing I will say about Obsidian is that there is no one system and because everyone works differently, everyone will do shit differently. Take ideas from those videos on how you can organise shit, but don't copy their system because their system might not work for you. However, I have been converted to the Church of Obsidian so I'm going to stand here and testify.
Anyway, as I said, I had a big fuck off load of Youtube Shit, and I decided the best way to do that was using Obsidian. Why? Well unlike other note apps, it's all text editor readable .md files. It's a personal wiki system and you can literally change .txt files to .md files by changing the file extension. Yes you heard me. Also, there is no server. If Notion or Evernote's servers got hacked or taken down, you're notes are gone. With obsidian, your notes are on your harddrive (I have my vaults, yes, plural, on a pendrive). You can put them on a cloud server or a home server or just on your PC and you can copy them and fuck around with them all you want, they're yours and if Obsidian decides "Obsidian Sync" (their optional paid web sync service) isn't enough and decide to paywall the app completely, you'll be fine because your notes are literally just a load of files readable on any text editor.
Anyway, how did I adapt all my files on gDrive to Obsidian. Well first I went to drive.google.com and downloaded all the relevant notes, scripts, files and shit relating to my Youtube Channel. They download as .doc files so I had to convert them to text. Most web "doc to txt" services limit you to two files per upload unless you pay, but I found a free (if slightly janky) app called MultiDoc Converter which is free and did the job well.
Next thing I did was mass rename the files from .txt to .md, which you can do with the shell. Yes the shell! It took me a while to figure out but here's how I did it.
Go to the folder where the .txt files are.
shift + right click > Open Powershell
Type ren *.txt *.md
This converted the txt files to markdown files. Yes, it's as simple as changing the friggin file extension. If you do not change the files to .md, you will not be able to Edit them.
Next is to open a new vault in Obsidian (if you don't already have one). In Obsidian, make a folder for all these new files (if you want) and in the file explorer, move all the files from the folder where they were into the folder in your vault.
Congratulations, they're now in Obsidian.
Now what?
Well the files (for me) were unlinked and unorganised. So I took the subjects the videos were on (I had a lot of videos about closed stations) and put relevant hashtags in them to link them all together, then when an article mentioned something else, I would link to the article using that.
This was a history channel, so I made a lot of Ghost notes to link references to years together (some I made into blank MOCs) and gave them the Hashtag #year. You can't make hashtags from numbers I'm afraid.
The Result?
Organised, but searchable and indexable chaos.
I'm now using Obsidian as a note app regularly, albeit on a different vault in a different method.
10 notes
·
View notes
Last Seen Blogs

school-of-scholars
School of Scholars Blog

coininfoexchange-blog
John Smith

sonyaspancakes-blog
Sonya's Pancake art creations

clearlysoavenue-be106a61-blog
İsimsiz
prismix-sims
PRISMIX