
pamitect
Architects Renovating
Two married Architects finally renovate their house...
44 posts
Don't wanna be here? Send us removal request.
Last Seen Blogs


Text
New Furniture
Since we have been planning to do a major renovation for about a decade, we have held off on purchasing new furniture for about a decade too. With about a week to go before we move back home, that meant it was time for us to finally get new furniture too!
Here's some of what we got:
Dining Room Table:
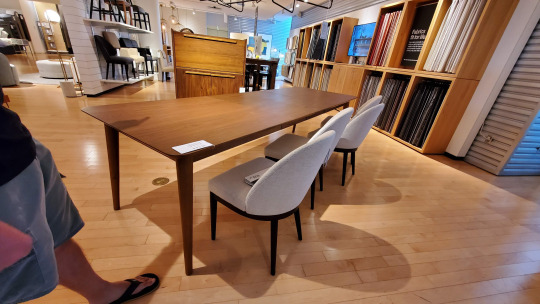
Tate Walnut table from Crate and Barrel (not those chairs)
Dining Room Chairs:
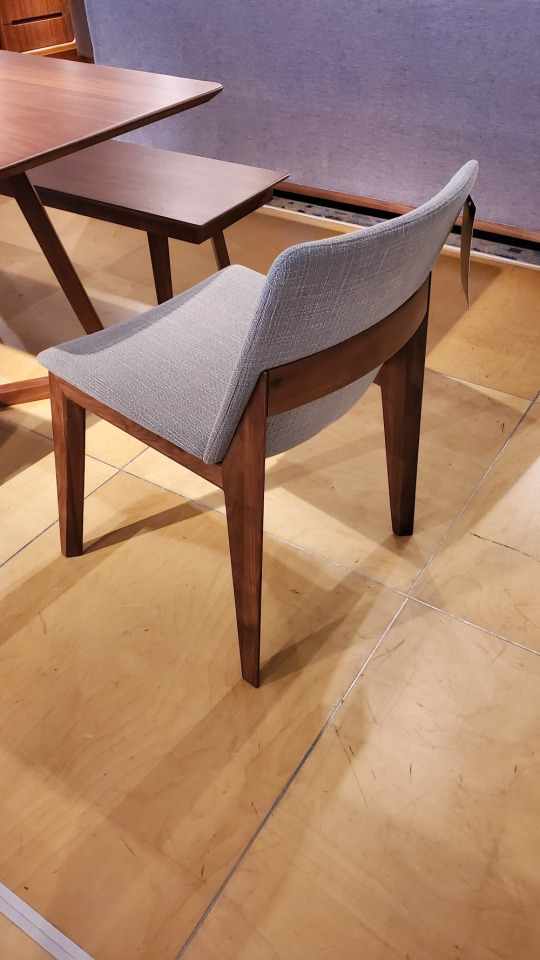
Fuchsia Dining Chairs from Scandinavian Designs
Living Room Couch:

Dinan Sectional Couch from Scandinavian Designs with matching ottoman
New Counter Seats:

Mid-Century Upholstered Swivel Counter Stool, Petrol Performance Velvet, Pecan from West Elm
New Bed frame:

Blue velvet upholstered bed from Wayfair
New Mattress:

Purple P4 Mattress
New Night Stands:

Blouin 3 - Drawer Nightstand from Wayfair
I can't wait to see it all come together!!
0 notes
Text
Punch List
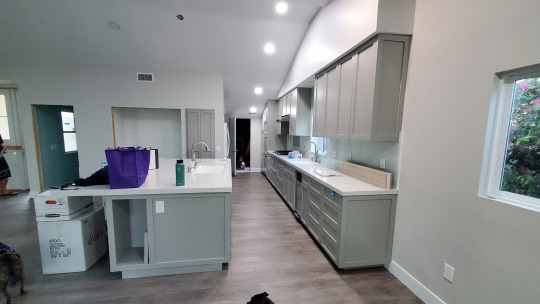
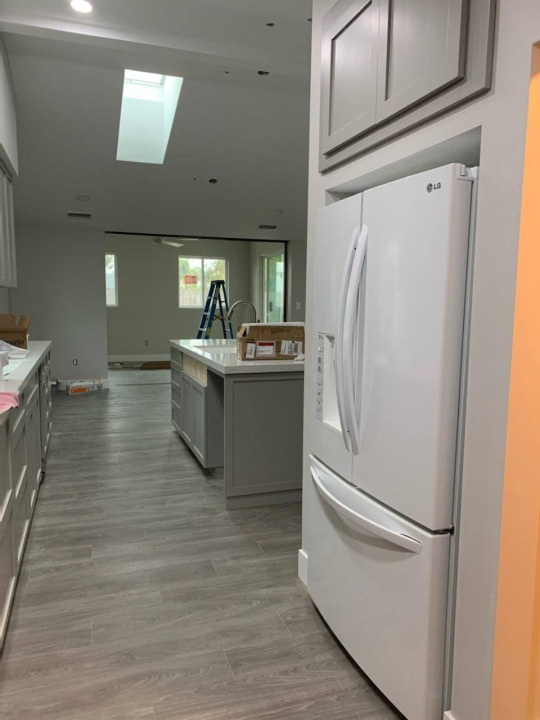
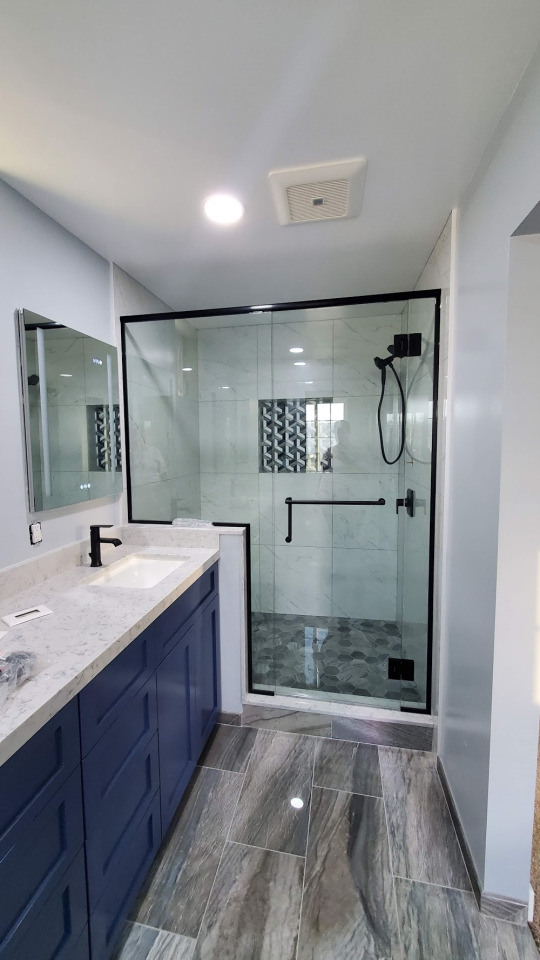
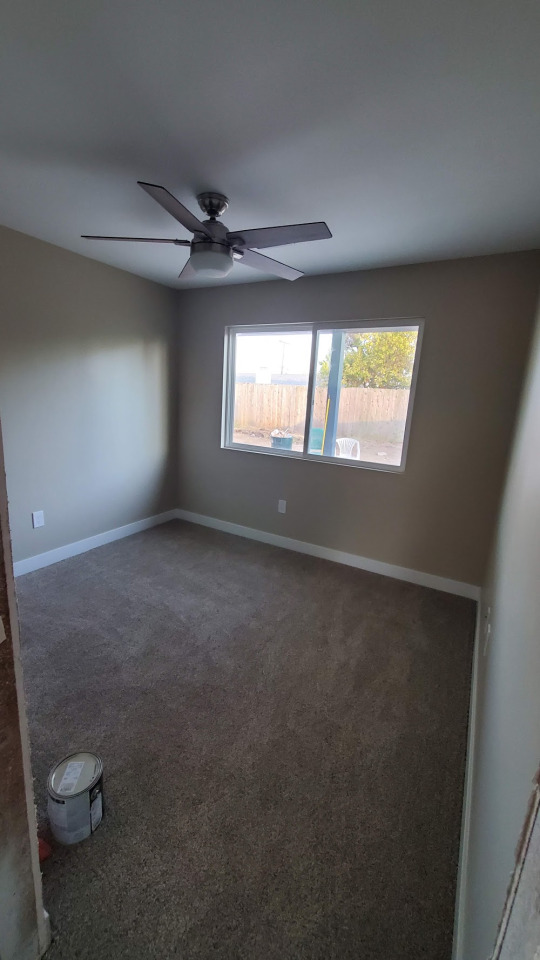
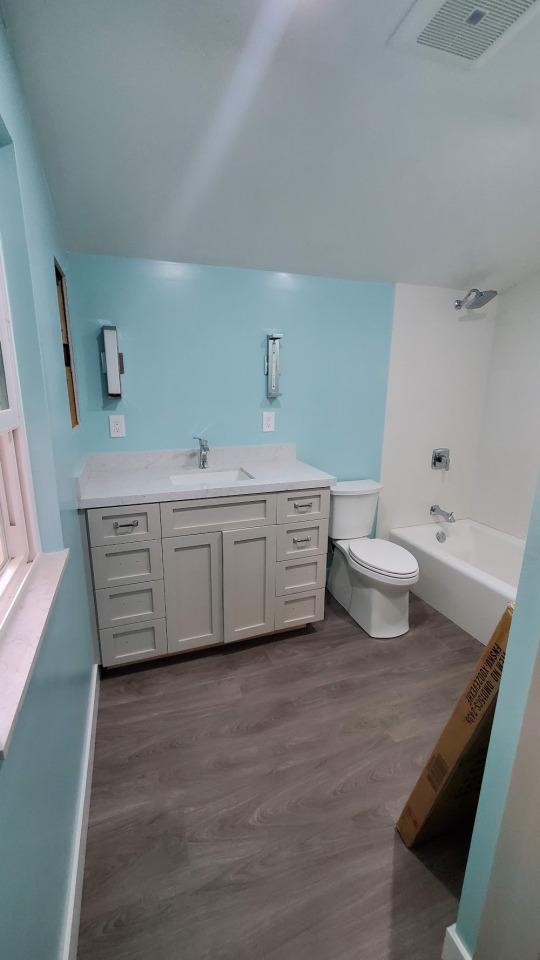
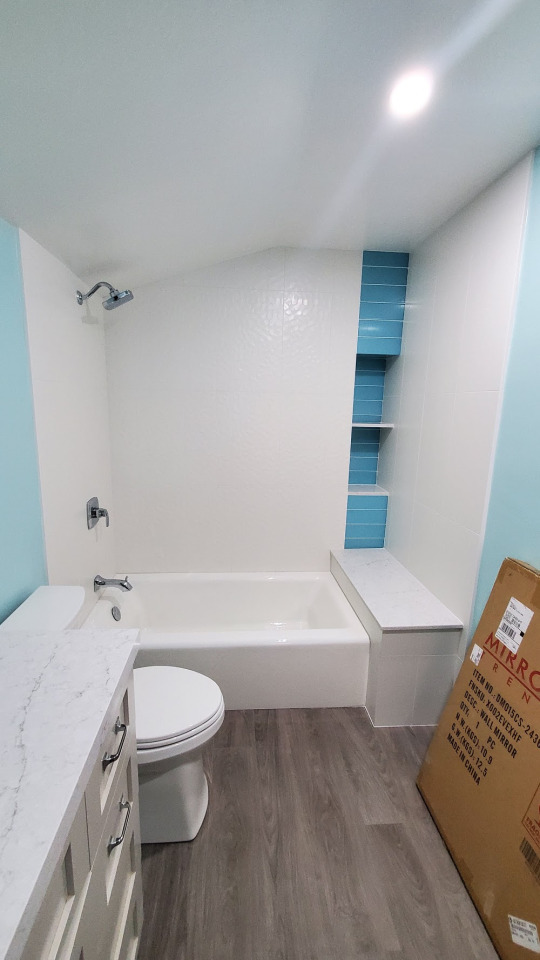
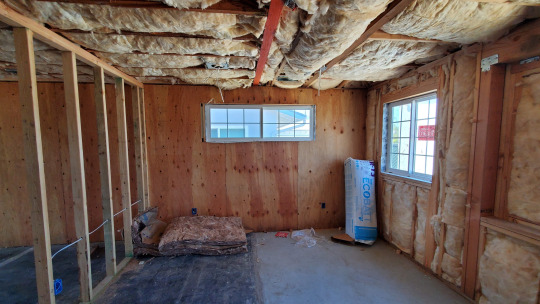
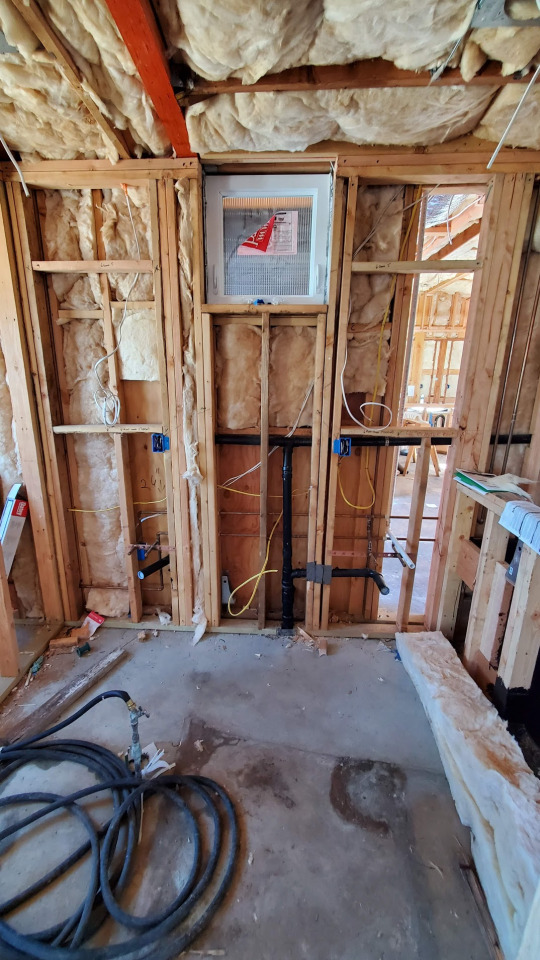
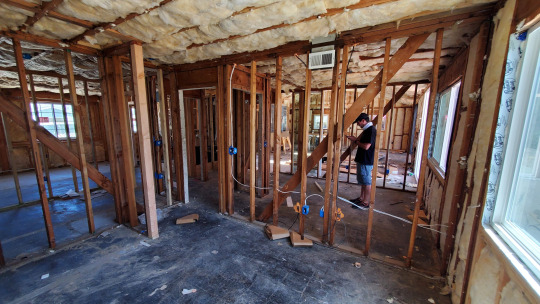
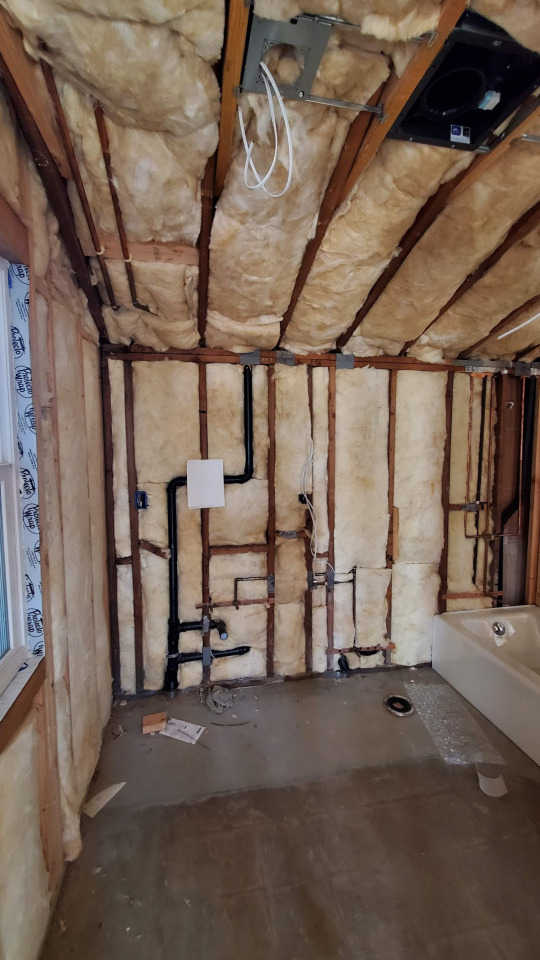
Well we are down the the final remaining details and things are looking great! We spent some time at the house yesterday documenting all the final remaining items to fix or finish... we call this a punch list. We documented 59 items on the list and we are sending that list to the contractor to finish up this week so we can move in next Monday!!
Here's some photos of things almost complete...
Kitchen:
Great Room / Living Room / Brett's Office

Bathroom 1

Bedroom 1

Bedroom 2

Bedroom 3
Bathroom 2
Just 7 more days to go! We move back home on Monday 6/28!!!
0 notes
Text
Site Concrete
About a month ago our contractor finally finished the sewer line connection to the street (you know... change order #3). Anyway he had to demo across our driveway to get that pipe in there. So he asked if we wanted a new driveway and sent us a text message that it would cost $15,600. Well I don't approve change orders for anything, let alone fifteen grand, via text message with ZERO detail of what's provided! What color, what finish, how thick, what rebar, what layout, how long, when??? Hello, you're dealing with architects who do this for a living man! So we told him that we wanted more than a just a new driveway, and we would provide a plan for him to prepare a proposal for.
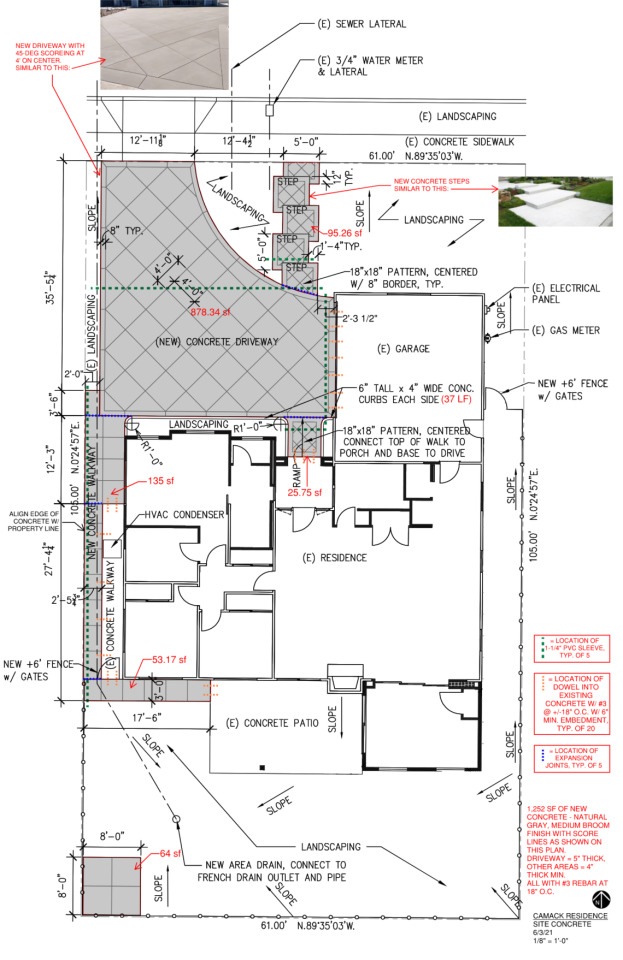
Above is basically the plan we gave him for bidding. A new driveway, a few steps to the sidewalk, ramp up to the front door, some curbs around the front planters, a walkway around to the back patio, and a pad for a new shed in the back corner. The original plan was about 1,350 square feet of new concrete (just the driveway alone was about 850 sf). A couple days later he mentioned to me in passing that he was getting "multiple bids for this site concrete" because he wanted to give us a good number - great! Then he sent the proposal... I guess he really did not wanted to do the site concrete because he provided a proposal for $41,000. He must have been smoking crack if he legitimately thought we were going to pay him almost 3 times his original bid for the driveway for about 1.5x the concrete! I think my friend Christine said it best when I told her this ludicrous bid amount... "for $41,000 there better be a new car sitting on that driveway!" Exactly!
So we did what any architects would do... got other bids from other contractors we know and work with. One came in around $18k, and the other was $15,500 ($100 less than the original bid for just the driveway). So of course we hired the low bidder because he came highly recommended from a great GC that I work with all the time (shout out to Bycor!). Not only did he do the concrete work, but he also added PVC pipes below the concrete for future irrigation (for free), and he cleared and removed all our remaining plants in the back and front yard for only an extra $500 (because he already had the skip loader there for the concrete anyway). He was amazing! He told us his plan was to start on Monday, pour on Saturday, and be done in a week or less.
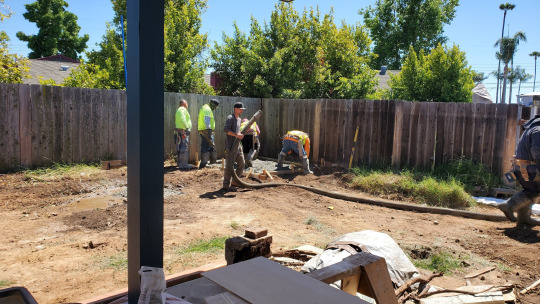
Day 1-2: Monday 6/7 - Tuesday 6/8
They dropped off the skip loader on Monday and proceeded to clear all the plants from the back yard and graded the remaining soil in prep for the concrete, and started to form up some areas. He said things were going so well they were going to move up the pour by a day to Friday! A day early!! Sorry folks I was so impressed I forgot to take photos.
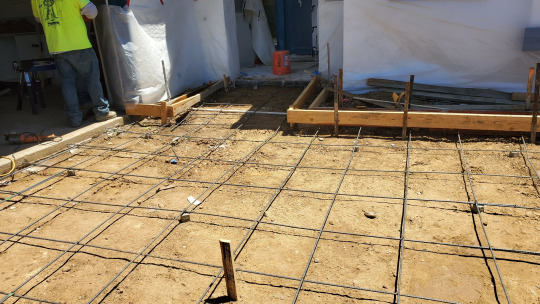
Day 3-4: Wednesday 6/9 - Thursday 6/10
We stopped back by on Thursday evening (just before our softball game) to check out the formwork and verify concrete was going in all the right places.
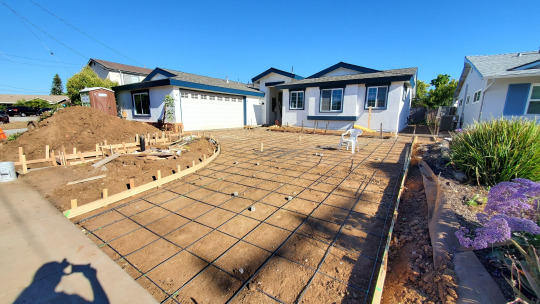
New driveway above with rebar - we had no comments! (Amazing right?)
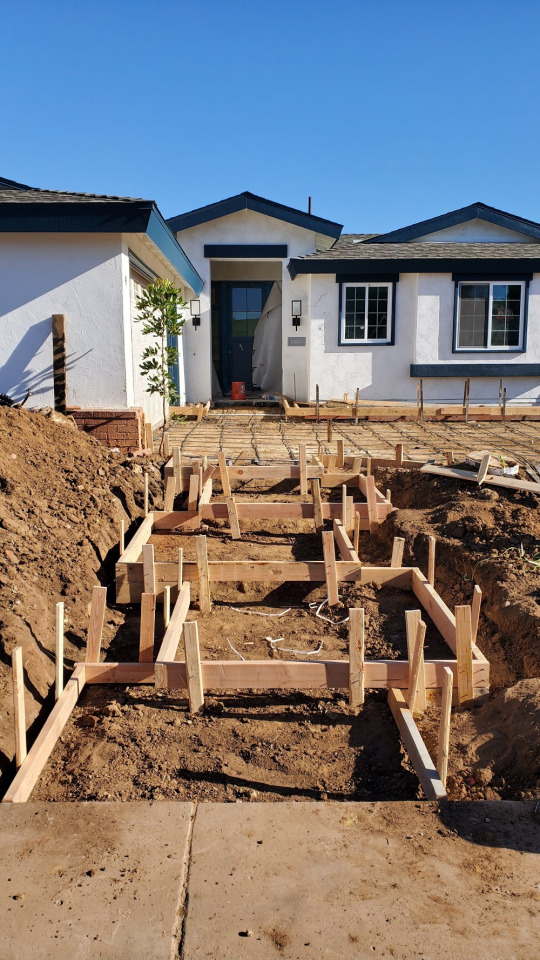
New staggering steps up to the driveway from the sidewalk
Above here you can see the new landscape curbs around the front planters and the ramp up to our front porch. You can also see where they doweled and epoxied the rebar into our garage slab so the driveway will never again sag below the driveway threshold and create a step we have to drive over!
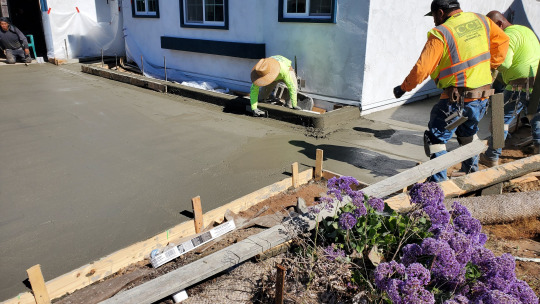
Day 5: Friday 6/11 = Pour Day
We stopped by the site to meet with a custom closet designer, but were delighted to see we finished our meeting right when the concrete started pumping!
Shed slab first in the back corner. Then the back path was next. (RIP back yard landscaping).
Here's a video of the driveway getting pumped from the truck and the large crew of concrete experts doing their thing playing in the "mud".
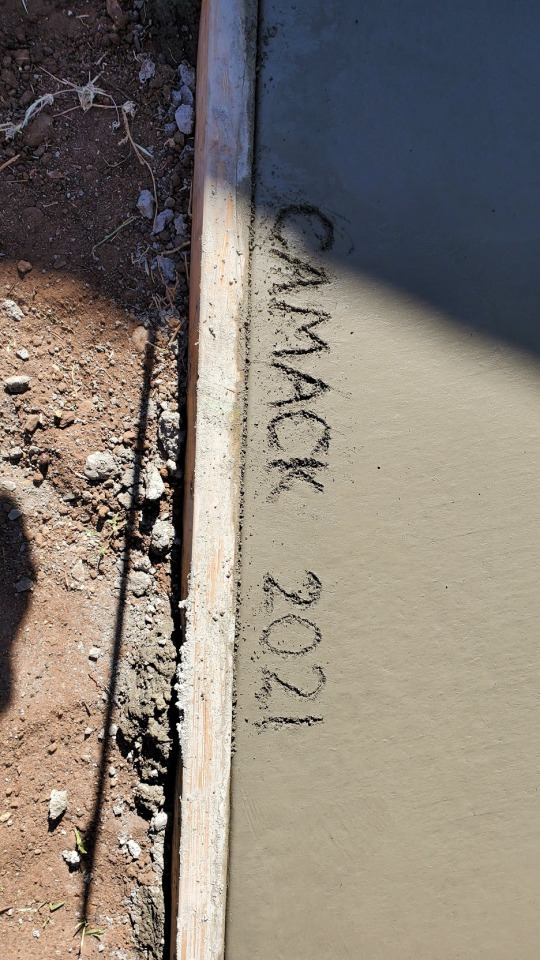
It was pretty cool to see how fast they pulled the forms off the curbs so they could trowel it all smooth. We were so impressed by their speed and skill we went and bought them a case of cold beer... I mean it was 5pm on Friday anyway. After we returned with the beer I asked the head guy when would a good time for me to write my name in the concrete... he replied "Now!"... OK!
The contractor returned on Saturday to saw cut the cross hatch pattern that I had designed, so we stopped by later to check it out.
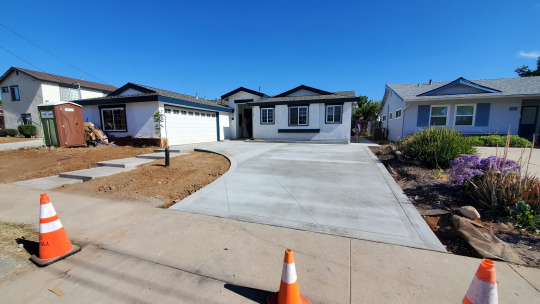
It looks great! The contractor mentioned we could do integral color for not much more money... but call me a purist... I like natural grey!

We have steps!! And a driveway too, that probably wont ever crack like it did before because the new driveway is twice as thick and has steel reinforcement. Next step is irrigation and landscape. We are going to do draught tolerant landscaping with rocks and pebbles out front and just a small grass area in the back. But first things first... the concrete looks awesome! It's probably a lot nicer than what I would have got for $41k, and it only cost me $16k!
The best part... now we have something for the movers to roll up on when we move in on the 28th!
13 days to go!!!
0 notes
Text
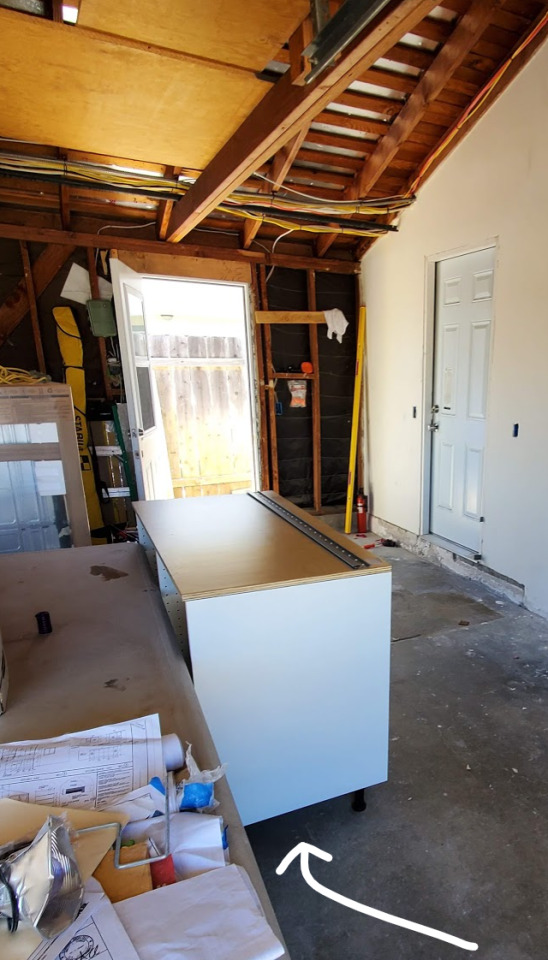
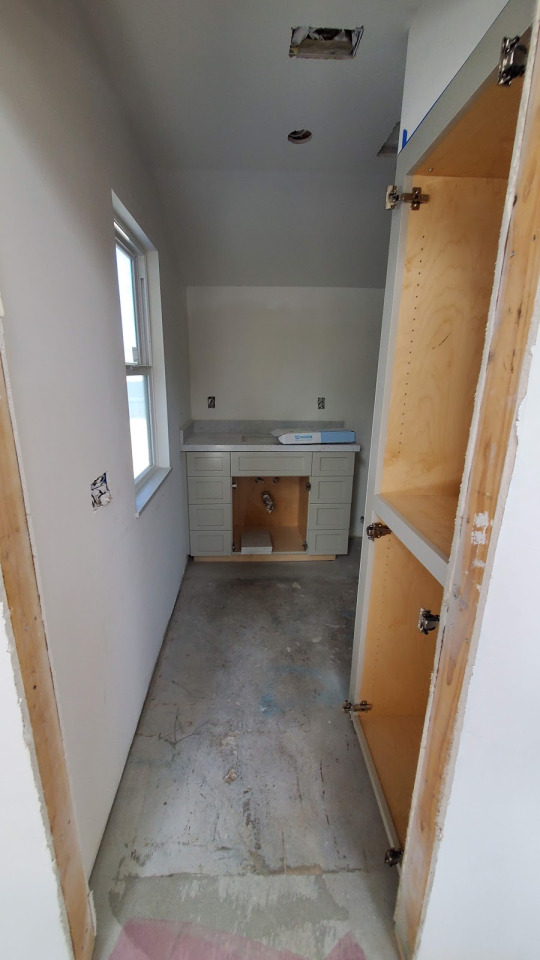
Garage Cabinets
A couple weeks ago I did a post about how we couldn't finish our garage cabinets due to holes in the walls... well those holes were finally filled and we were able to finish installing the cabinet bases. We needed to purchase sub-counter top plywood because the IKEA cabinets don't come with anything on top of them to support the counter. If you weren't aware the cost of plywood is outrageous right now. in late 2019 you could get a sheet of plywood for around $25 to $20... now I hear it's pushing $100 per sheet! I feel like we were lucky that we found a sheet for only $60 do to the garage counter sub-tops.
We focused on the base frames just enough to get the countertops installed. We will come back and install the doors and drawers once construction is complete (because the contractor keeps storing stuff in and on the cabinets). But this was enough for them to measure for the counters.
Then a week later we return to find this:
Yup - an even bigger hole in the garage fire wall! Apparently the plumber flipped our shower valves and installed the main shower valve in the guest bath and vise versa. Lovely....
We got a matching hole in our bedroom too, right behind the shower. This after both showers were already tiled.
I guess it was lucky for the plumber that we didn't have cabinets installed behind each valve... well not directly behind them anyway.
But the good news is that the counters were finally installed in the garage last week!
Check out that giant laundry sink!! Brett purchased that for his beer brewing activities. I'm just happy we have a laundry sink now... just need that drain and faucet connected. Also on the right side of the photo above you can see our new tankless water heater! ...and the giant hole the plumber made in the plywood to connect it... did I mention that plywood is insanely expensive right now?
Funny note about the plumber: on their work trucks this company has a slogan, "We do it right the first time."

(names removed to protect the guilty here...) We are at the point where this makes us laugh every time, because they have yet to do just about anything right the first time! It should say, "We don't do it right the first time." Not to mention the valve mishap mentioned above, they had to redo the drain line from the tankless water heater (in the photo above is the fixed version). They had to re-route freshly installed gas lines all over the place. They had to redo 3 cleanouts... I think there are only 5 total in the house! It really is to the point of laughing because what else can you do. At least they don't fight us when we point out all their install errors that they have to fix. I'm just hoping that we don't have major issues with anything they have installed below the slab or inside walls... keep your fingers crossed for us! I think we caught most of their mistakes right when they were installed.
14 days until we move in!!
0 notes
Text
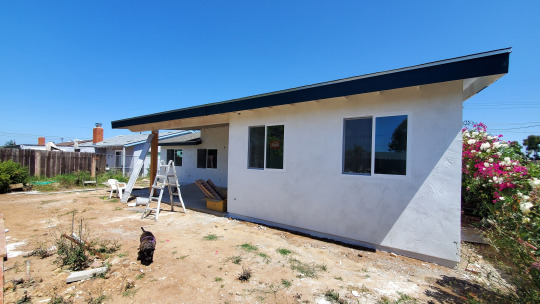
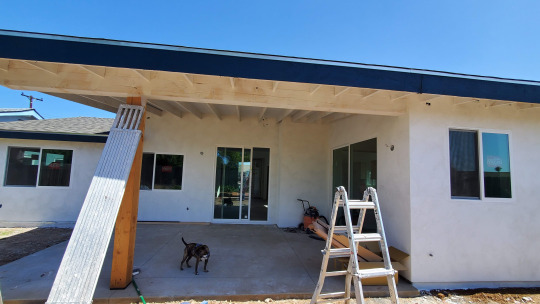
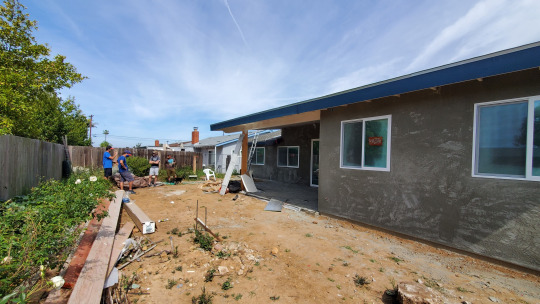
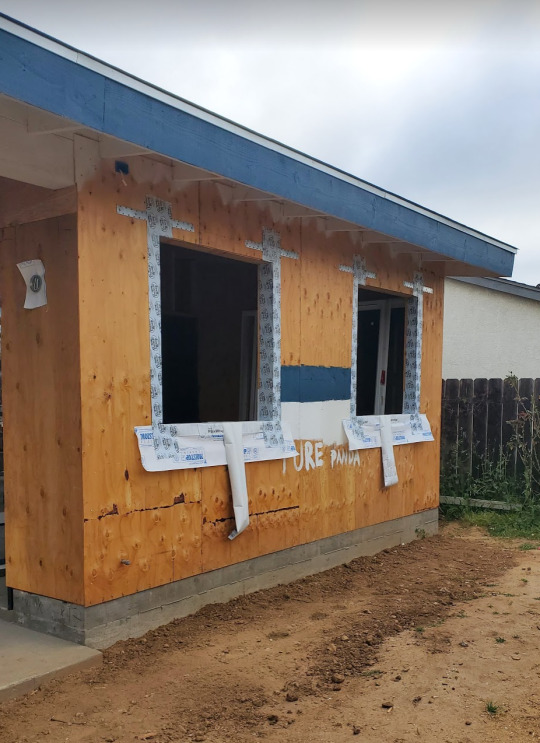
The Exterior is Painted
I stopped by the house last week and they were starting the exterior paint. Mostly they were painting our trim because the stucco color is integrally the pure white color we selected. Remember the paint samples on the back of Brett's office? "Pure Panda" LOL! Anyway the blue color we selected for the trim is called Rainstorm.

They sure had to do a lot of masking to spray the underside of the eaves, then the foam trim around the windows. I made sure to tell them I wanted all 3 sides of the foam trim painted blue... none of that painting just the face shenanigans.
I think it turned out pretty great!
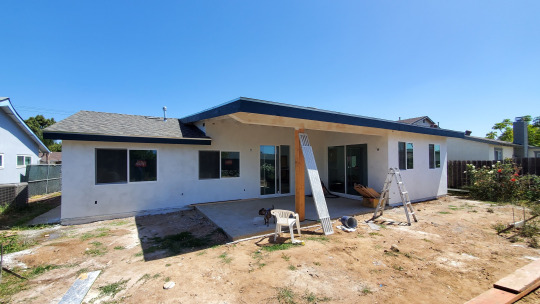
I had them paint the patio post and beam blue too so they stand out. Admittedly Brett upsized the members so they look more substantial, not because the patio or the cantilever required those large of members.
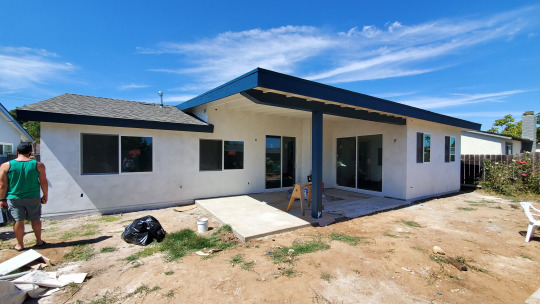
The post is an 8x8 and the beam is an 8x10. We had the framer taper the underside of the end of the beam at the cantilever to give it a little style.
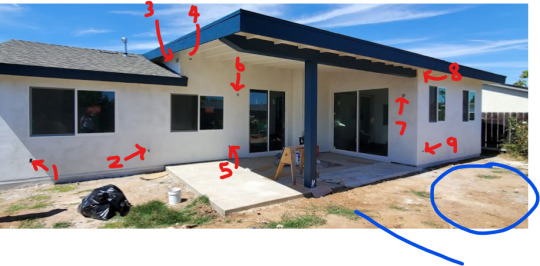
This photo made me notice how many things are poking through the stucco in the back.
1. Future outlet to connect power to a shed.
2. Hose bib.
3. Attic vent.
4 & 8. High outlet for string lights or security cameras.
5. Outlet.
6 & 7. Sconce Lights.
9. Gas Connection for BBQ
10... is where the pool goes...
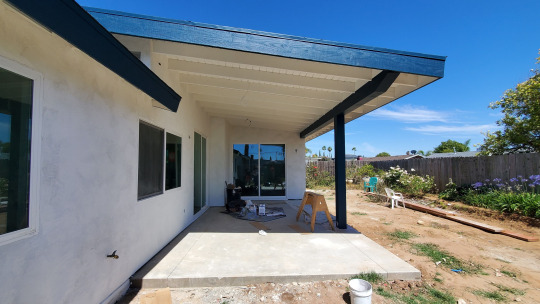
I can't wait to hang out on this patio!
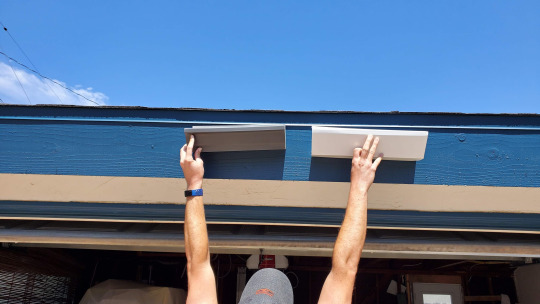
Next up gutters! We were trying to decide between the traditional profile (on the left), or the flat profile (on the right). We ended up going with the traditional because the flat one would probably oil-can over a long run.
The gutters come in powder coated metal colors. It's pretty awesome that the standard 'Tahoe Blue' color matched our front door so close!
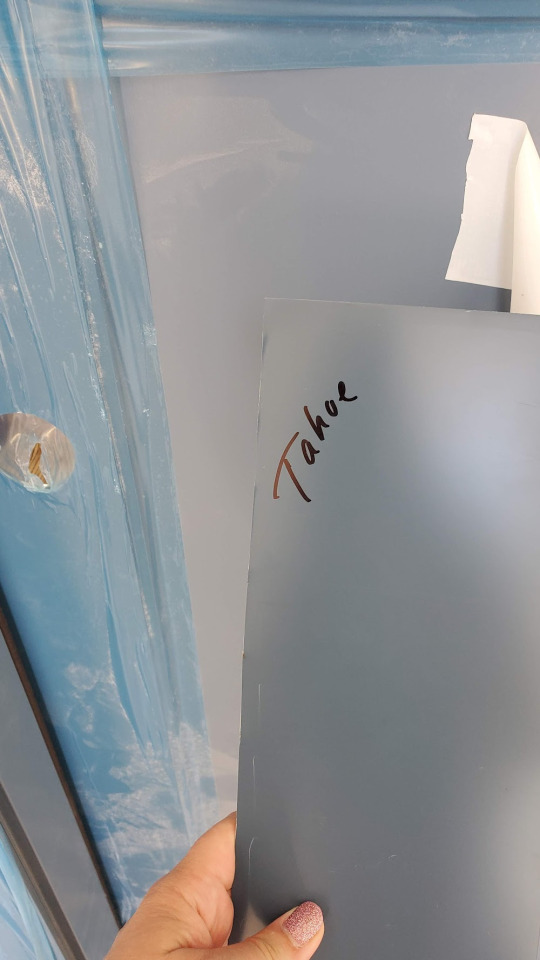
It also goes really well with the rainstorm color on the eaves.
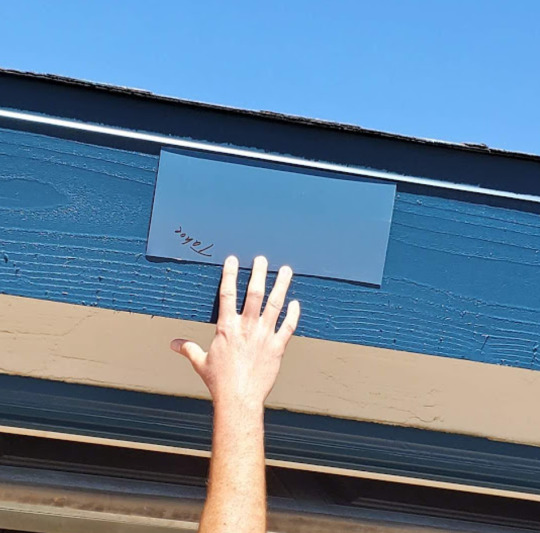
Brett makes a great hand model!
Oh and... ONLY 21 DAYS TO GO!!
0 notes
Text
Garage Cabinets Odyssey...
A couple months ago I realized that I bought enough countertop quartz material that we could put quartz counters in our garage too. We have our laundry in the garage and were planning to install some sort of laundry sink and storage out there. Once I realized we had the material to do quartz out there I decided to get some very reasonably priced base cabinets that we could install to create a base for the counter. IKEA to the rescue! The cabinet parts (and there were hundreds of parts) arrived on 5/5/21. So for these past few weeks we have been trying to install our garage cabinets. The problem is that the wall we are installing the cabinets against is the wall between our house and the garage. Per the building code this wall is required to be 1-hour rated (something about having vehicles with poisonous exhaust and flammable gasoline next to a habitable space makes fire marshal's nervous). Well as a licensed architect I can tell you that a wall with holes in it is not fire rated. So we asked our contractor to close up that wall so we could get the cabinets in. About 10 days later we find the wall we were told was closed up like this:
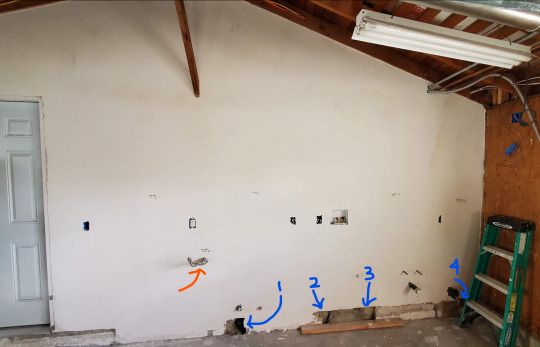
There are 1 holes at the base noted with blue arrows. This is where they hammered out the base of the wall to install the new sewer lines for the laundry and bathroom 2 on the back side of this wall. Not to mention the still connected old gas line from our old water heater that was demolished months ago (orange arrow). So alas, we could not finish what we came to do that Saturday.
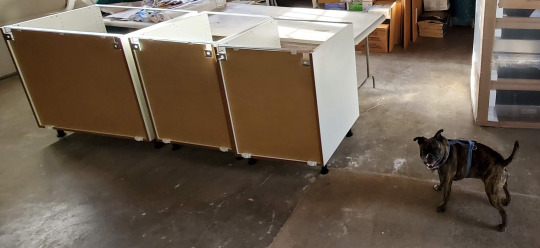
At least we got the 4 base cabinets built that day (the 4th one is not in the photo). Chilly approved of our hard work.
So we told the contractor that he needed to close the wall completely... his response; "why, your cabinets are going to cover those holes in the wall anyway?" [::Face-Palm::] Not to mention the code requirements for this wall to be fire rated, but what about rodents or insects coming in? Hello?!? We're paying for a basically brand new house, don't leave holes in it dude! It makes me a little glad they are as slow as they are, so I have time to monitor their work and keep them from covering huge mistakes (hopefully at least). We also asked him to remove the gas line and safe it off, then seal that hole in the wall too. We returned yesterday (a week later), and luckily the holes in the bottom of the wall were filled in with concrete, but the gas line...
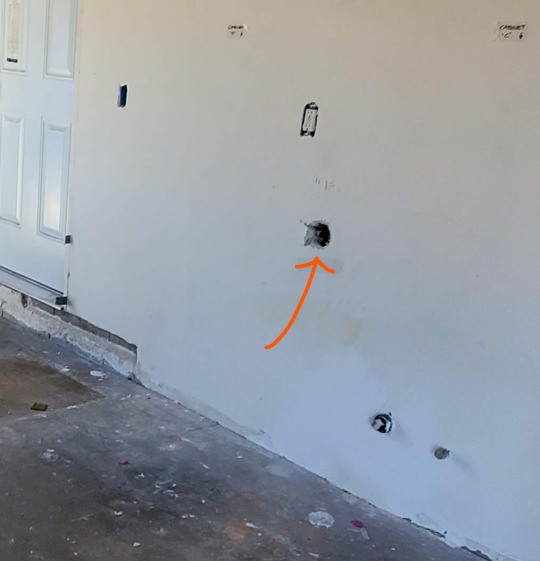
It was cut off and a big hole was in the fire rated wall now. Was the gas line capped? Of course not! Luckily the gas meter is still not even connected, but still? Why is that old pipe still in my wall? I paid for complete demo and replacement.
So alas... we were able to install the cabinets on the right side of the washer and dryer this weekend, but not the ones on the left.
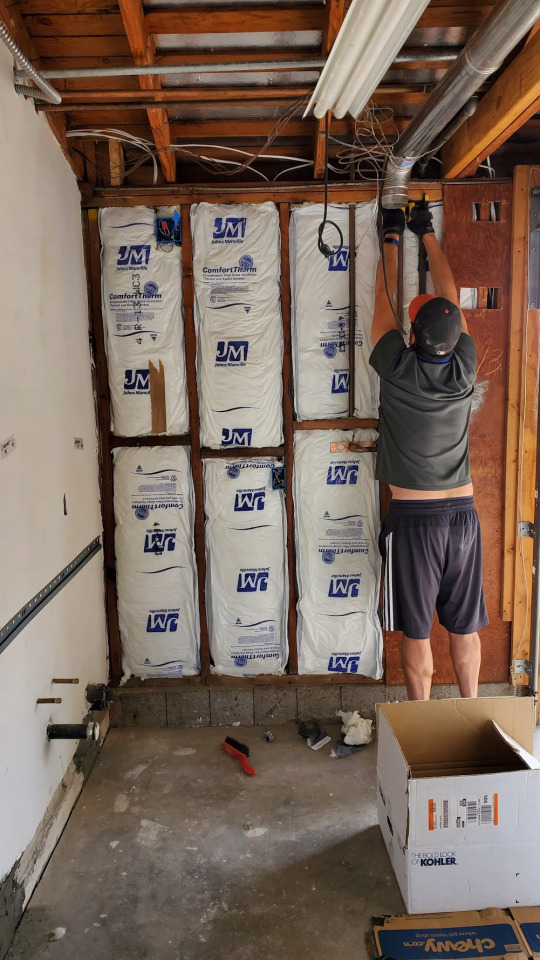
But first... we insulated the wall next to the cabinets. Maybe someday we will have a fully insulated garage, so we wanted to make sure we got this wall installed before we blocked it with a cabinet forever. After the pain we went through getting that cabinet installed, 2 trips to IKEA and one trip to Home Depot later, I do mean it will be there forever! Let this be a warning to all you DIYers out there... if installing IKEA cabinets was challenging for 2 architects (who are fairly handy), you better have infinite patience when you begin to install your own IKEA cabinets.

Here it is, in all it's glory! Not too impressive just yet I know. But soon it will have doors, drawers, a counter, sink and faucet added and it will be glorious!

Here's another view.
The other cabinet is also ready to be mounted on the wall and have the counter sub-top screwed on... but did I mention there's a big fucking hole in my wall? Yea that hole is where the cabinet needs to go... so we extend the garage cabinet schedule... yet another week...
That being said... the count down has begun! We are moving in on June 25th, 2021!! Come hell or high water, I'll sleep in a tent if I have to, we are moving home next month.
Let the count down begin 33 More Days!
0 notes
Text
Stucco Finish Coat is Done
This week the obligatory 14-day cure time was complete from the brown coat of stucco, so they were able to install the finish coat. We asked them to match the existing stucco finish, so we now have a hand troweled California / smooth style stucco.
Above is the east side where you can really see the texture in the morning light.
Above is the back, and a Pepper dog.
This back patio is Chilly approved.
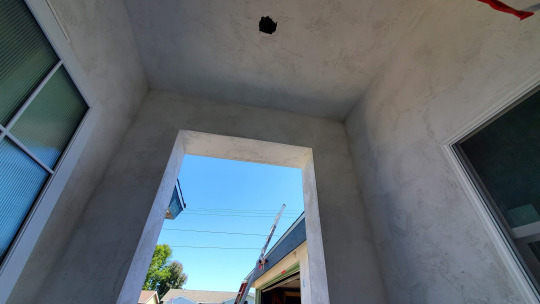
Above is the ceiling of our new front porch with a 10' ceiling. That hole at the top will be a light soon. The big window on the left is actually our front door. It arrived damaged so it's waiting to be removed by Sierra Pacific when they come to install the new door. They were supposed to install the new door this Wednesday 5/19 - then they realized that the new custom panel they received was prepped for the incorrect door hardware. So now we are waiting for front door #3... ugh.

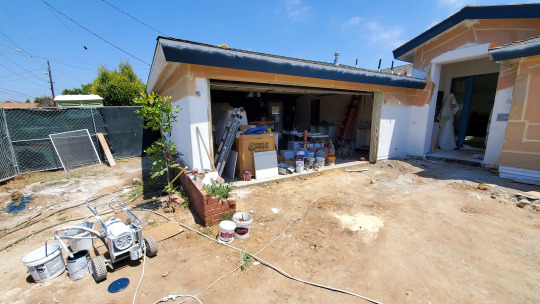
Here's the front, with half our driveway left and a garage full of items our contractor needs to install.
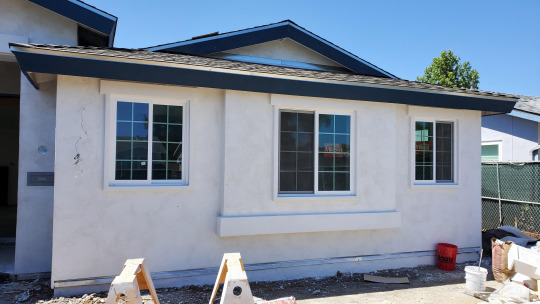
We paid a little extra to add this trim around the windows and the base of the window pop-out. The trim is a stiff polystyrene foam that is coated with the stucco finish coat to integrate it into the facade. It's a little hard to see now because it's all white, but once it's painted it will really make with windows and white walls pop.
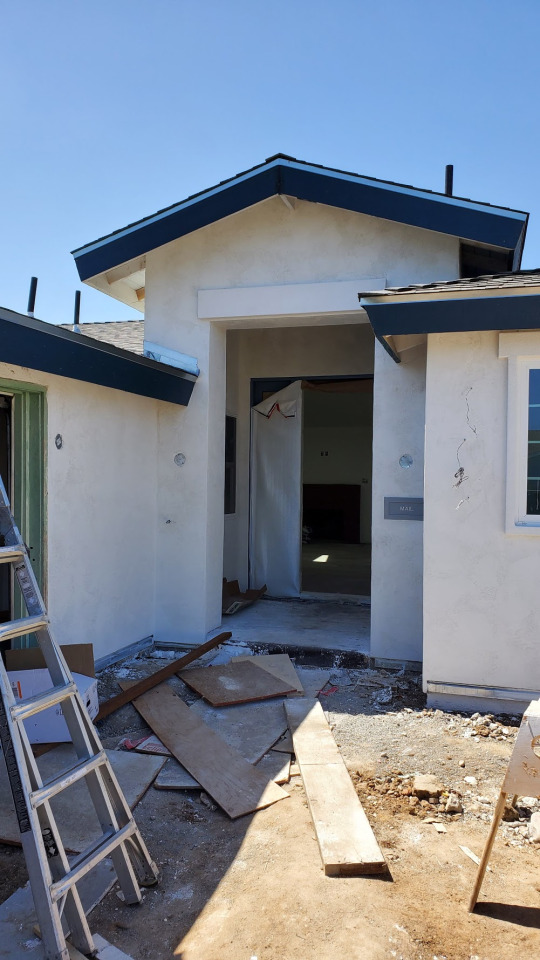
Here's the front of the porch. We have our new mailbox installed in the right column. This front slot drops into a box that has a door on the back side of the column.
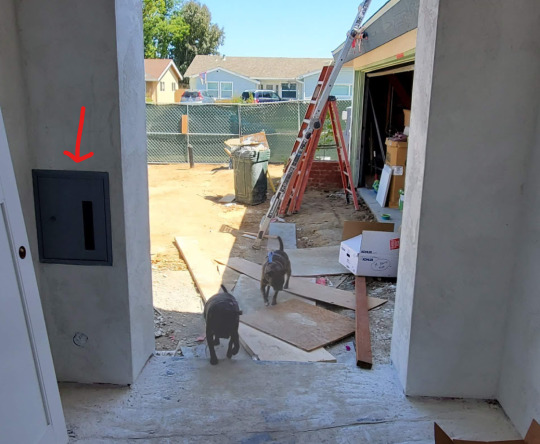
Here's the back side of the mailbox above with the arrow. We are eventually going to install a gate at the opening to this porch, to keep these 2 marmots you see in the photo above from running out into the front yard if we leave the front door open.
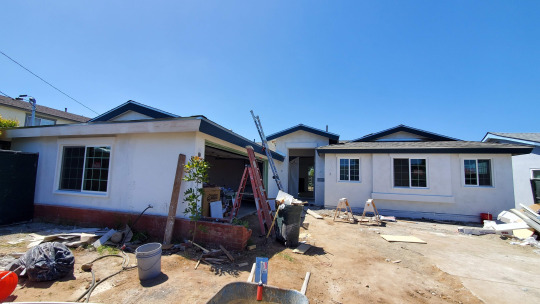
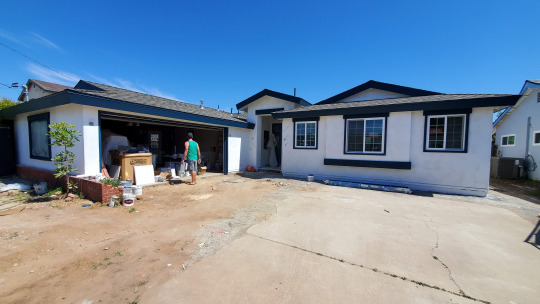
The exterior of the house is almost done. The roof is done and so is the stucco. All that's left is paint, and fixtures! Then we can start the landscape and hardscape phase to finish the site and add the curb appeal.
0 notes
Text
Cabinets are Painted and Counters are Installed!
On May 16th we stopped by the house to drop somethings off and saw that the painter had already masked all the cabinets off to get ready for painting them this week.
Pepper was pretty happy to see the progress - LOL. In this photo you can also see the floor prep for the new LVT flooring has started and they are going to start laying the flooring after the cabinets are painted.
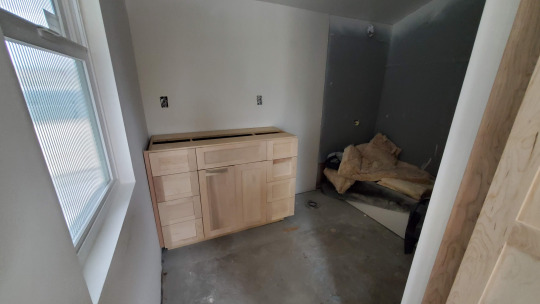
So you can imagine my happiness when I returned a few days later... not only are the cabinets painted, but the counters were installed on Friday too! Well the cabinet doors are back in the painter's shop still, but the parts attached to the house are done.
Here's the Kitchen:
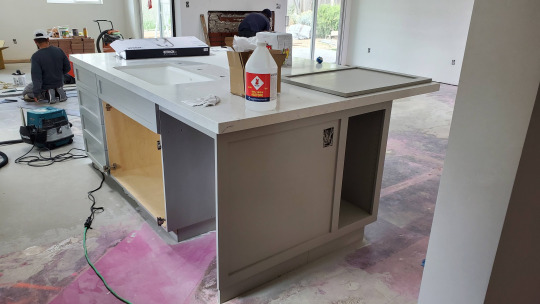
Originally Brett designed the kitchen to have a main sink and a "bar sink" and I have to admit I was skeptical at first. Who needs 2 sinks? After questioning the 2 sinks, the 2020 shutdown hit. During all that time spent at home there were numerous times where we either wanted to wash hands, dishes, or something and kept getting in each other's way at the former single kitchen sink. This started a thing where when we were in each other's way at the sink we would say, "2 sinks!" Well... now we have 2 SINKS!! Each are single compartment with a disposal. The one on the island is 32" wide, and the one under the window is 25" wide. The 3 holes are for the: 1. Faucet 2: Dish Soap Dispenser 3: Hand Soap Dispenser
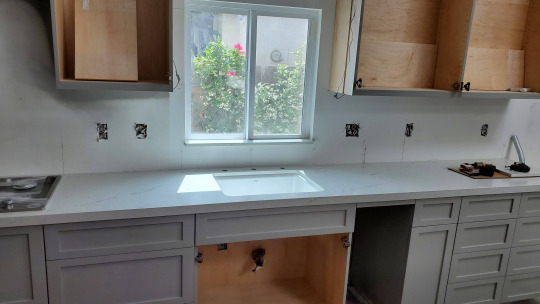
Also above you can see my new window sill - I had them make it out of scrap counter quartz material.
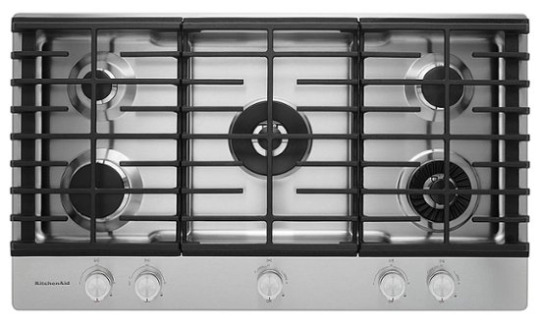
OMG! We have a big 36" gas cooktop now!
Bath 1:
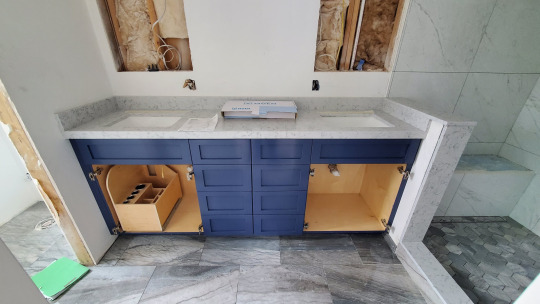
I am loving these newly blue cabinets!! That color is Indigo Batik (SW 7602). It's awesome to see the bathroom with the countertop quartz installed! We also used the quartz material as a 4" tall back splash, bench top (not yet installed), window sill, and trim for the pony wall / shower curb. Ohh you can see my custom hairdryer /hot tools drawer below my sink there on the left...

Above you can see that window sill, with a peek at the corner of the upper cabinet we installed over the future toilet location.
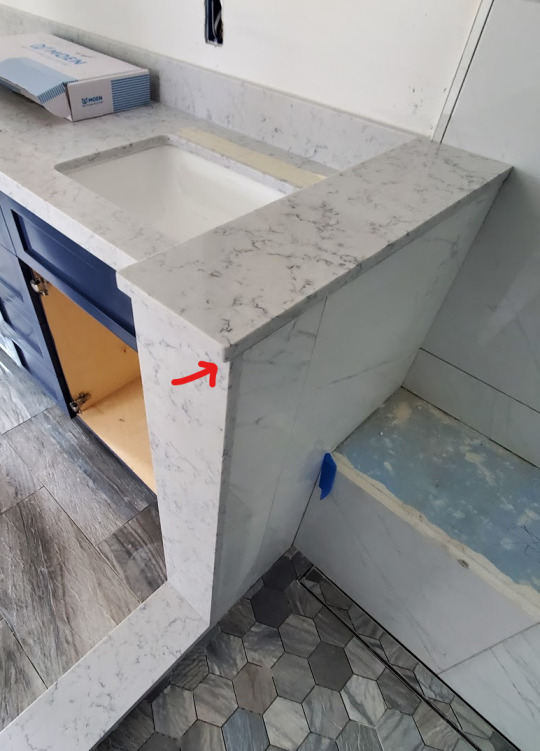
Inside the shower I noticed that the pony wall top piece was overhanging the vertical trim, so I mentioned this to the installers. It was important because we are going to be installing a glass partition here to make the shower water tight. I was really happy to see it fixed the next day.

Bath 2:
Our second bath is coming along nicely too. Here's the painted cabinets, counter and sink installed.
I'm very excited by all the storage in the house. We have this quite spacious linen cabinet in the bathroom and it only used about 4 square feet of space. Again in this bathroom we used the quarts for the counter, 4" backsplash, window sill, bench top, and niche shelves.

Here's how the tub/shower is coming in that room. We have the textured tile on the long wall with the flat tile at the ends of the tub and on the bench. We are using the blue glass tile to make a stipe up the right side corner and are using the deep recess for a shower niche to store shampoo and stuff. This area was a strange unused corner of the floor plan so we decided to make a deep shower niche out of it. Now that the bench top is in and the niche shelves are cut, they can finish tiling this shower.
0 notes
Text
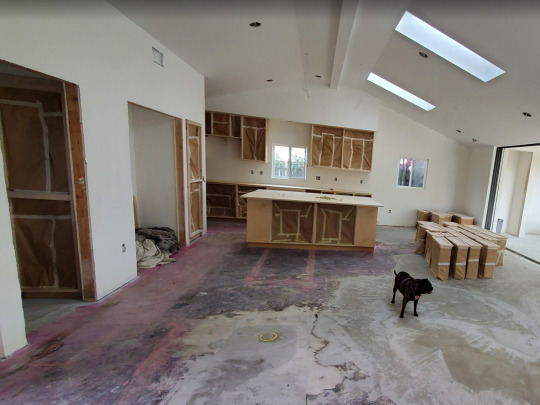
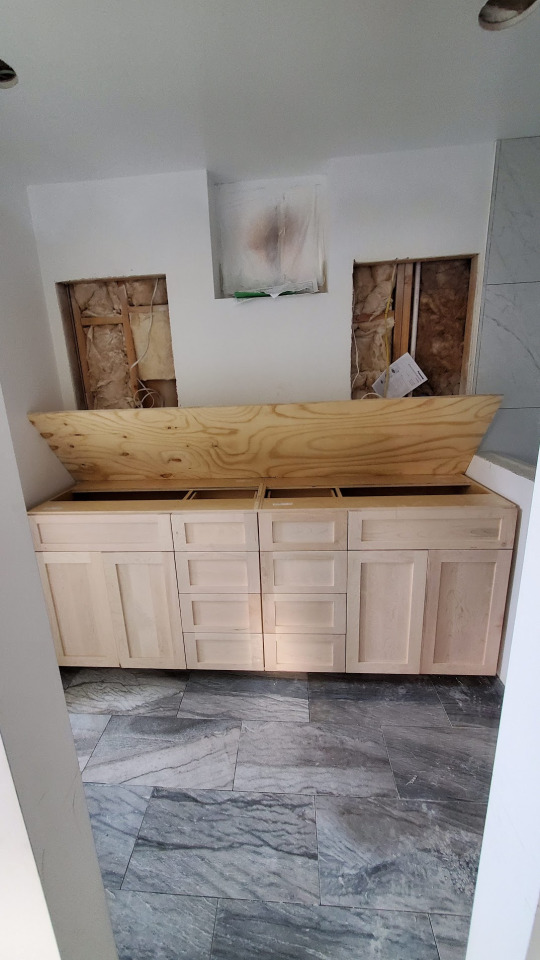
Cabinets = Installed!
The cabinet install took a week to install the kitchen and both bathrooms. Here's the kitchen:
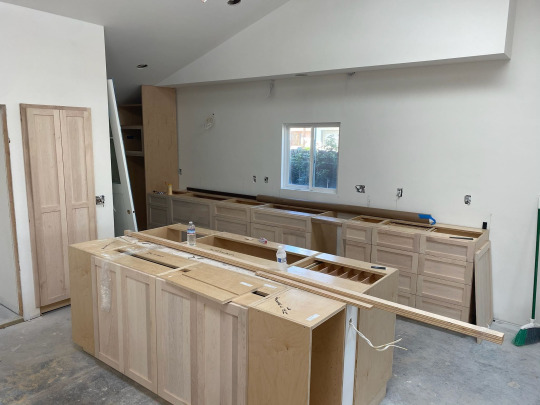
Halfway there...
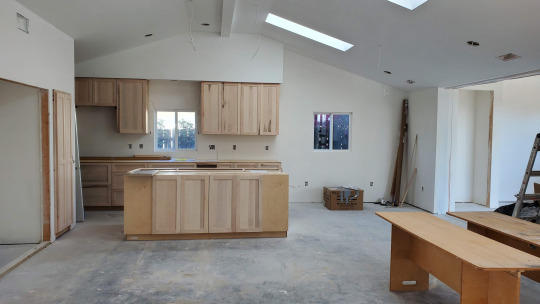
With the upper cabinets installed!
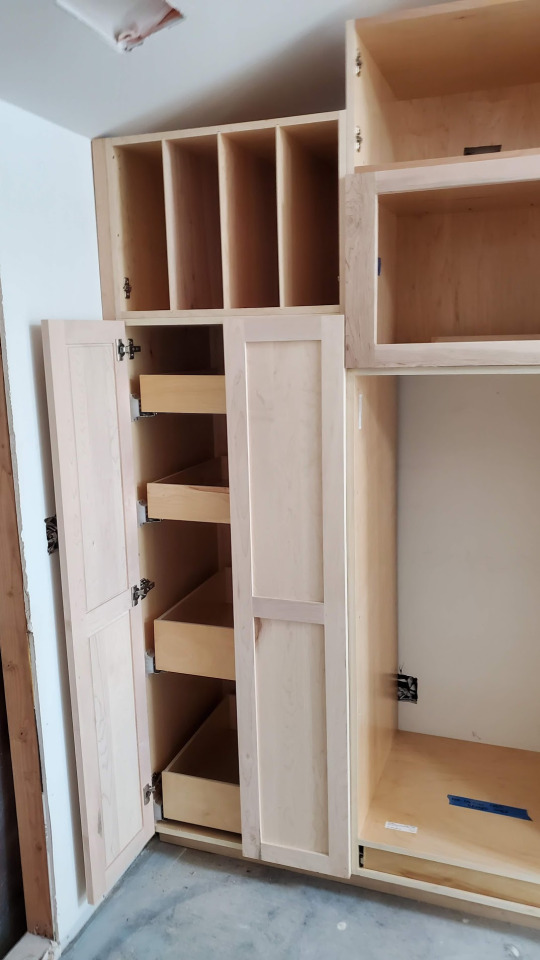
In the photo above you can see our appliance cabinet on the left. My Kitchenaid mixer, blender, crock pot, etc. will all get to live in drawers that pull out from behind those tall doors. Above that is where my cookie sheets will reside. On the right the large opening will be filled with the double oven. Above that will be the microwave which I had shipped directly to my cabinet maker's shop so he could custom fit the wood surround around it! Hell yea!
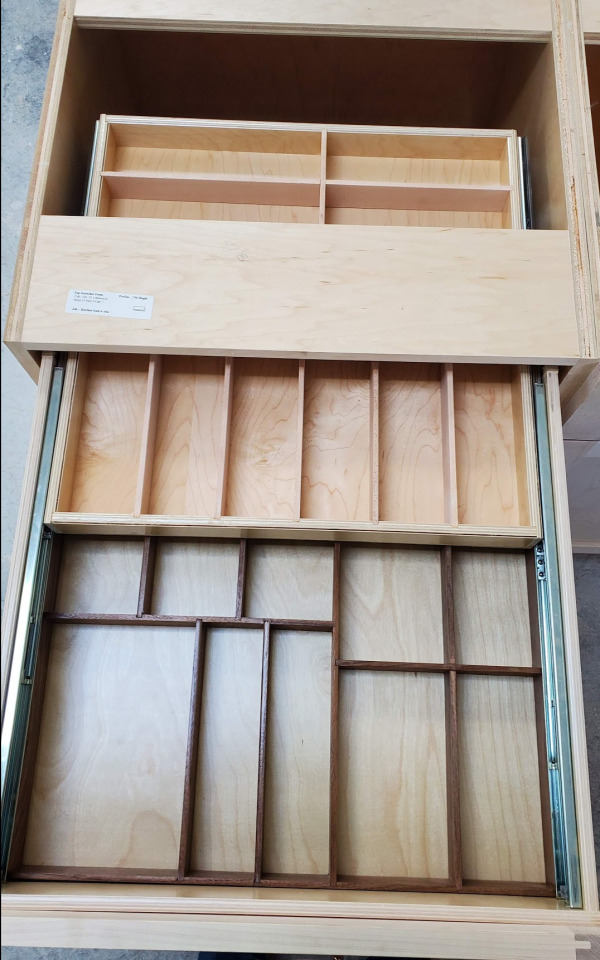
Did I mention that our awesome cabinet maker made us some custom drawers? Brett made fun of me that I worked on custom dimensioned drawer dividers to hold all our random assortment of kitchen gadgets. He will thank me when he sees how awesomely organized our kitchen will be. If he can't remember where things go I'm not above printing labels... LOL... OCD much?... perhaps. But it's things like these that make me very happy!
This one above is going to hold my k-cups for coffee!
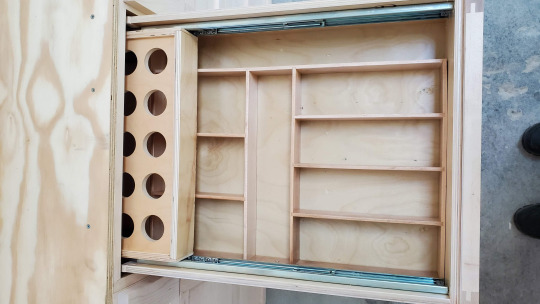
Above is the cabinet in our second bathroom. The cabinet you can barely see on the far right is a large linen closet that can store ample towels and bathroom supplies. One aspect of our design for the renovation was to incorporate storage into as many nooks and crannies as we could!
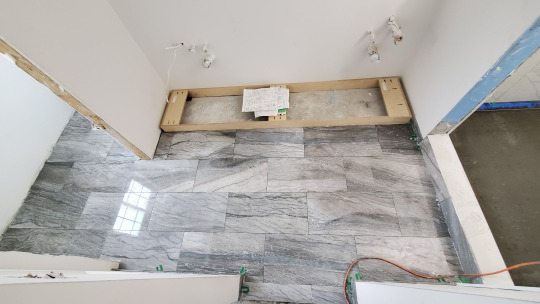
Here is the new bathroom floor in our main bathroom. I am loving these grey tiles with blue veining!! Our cabinet maker installed the toe kick base first so the tile setter could finish the floor right up to the cabinet. The tile setter is very talented... more on that in a minute.
This is what it looks like with the cabinet installed! The openings in the wall on either side are for his and hers recessed lighted medicine cabinets. In between those is an awning window. In my design that window was centered on the cabinet between the mirrors. However the structural plans that Brett prepared put a post right there so the window had to shift over a few inches off center... ugh... oh well. Nobody's perfect.
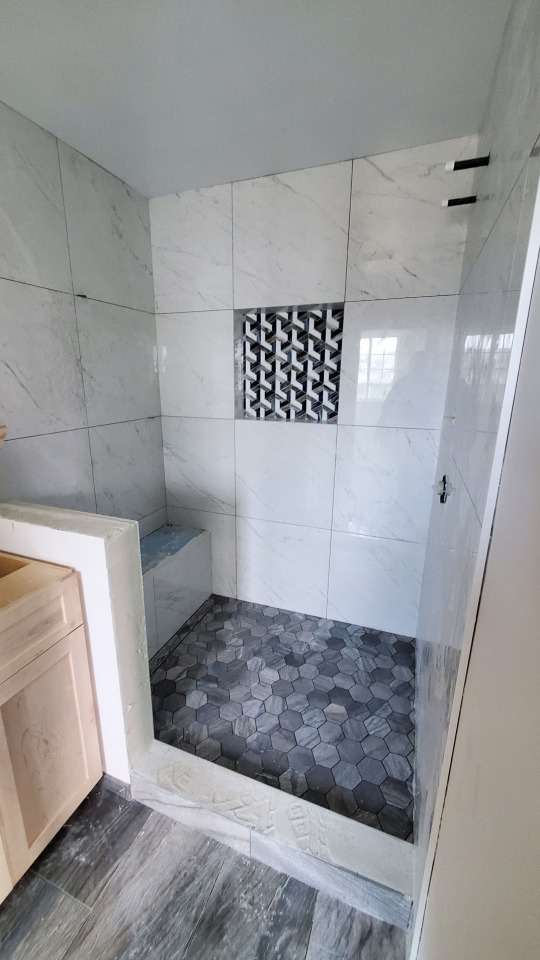
Did I mention that our tile setter was very talented? Well take a look at this shower!!! He did an amazing job! The 24"x24" wall tiles are all perfectly aligned. At the edges of the recessed niche he mitered the edges of the tile for a super clean edge with no trim necessary! You might notice that it looks like there is no drain in the floor of that shower? Well it's a linear drain right at the base of the bench, and the drain cover has tile in it so it blends in with the floor and all you see is the thin line around it where the water drains through. We decided that we didn't like standing on drains, so we opted for the tile-in drain and pushed it all the way to one side. Now we are just waiting on the counter fabricator to make the counter, the bench top, and the pony wall trim pieces (that wall on the end of the cabinet is a "pony wall"). Above that wall will be a glass panel and glass door.
0 notes
Text
Stucco Scratch Coat
For those of you that didn't know, Stucco (or as we architects call it "exterior cement plaster") is installed in 3 layers:
1. Scratch Coat
2. Brown Coat
3. Finish Coat
Well these three layers go on top of the 2 layers of building paper and metal lath. Anyway, we stopped by the site on Saturday, May 1st and got to see the scratch coat installed.
Here's a closeup:
Notice how all those lines are scratched into the surface? Well the scratch coat encapsulates all the metal lath and you want the surface to be rough so the brown coat can stick to it well.

Here's the back side.
Shout out to the volunteer helpers that came by that Saturday to help us unload all our new cabinets from a large truck into the garage! Matt, Travis, and Kino we for sure owe you guys a favor!! Thank you very much!

Luckily the cabinet moving went really quick and we were able to get them all in the garage in less than an hour... I cannot begin to tell you how excited I was to finally get to touch and look at our new cabinets!!!
0 notes
Text
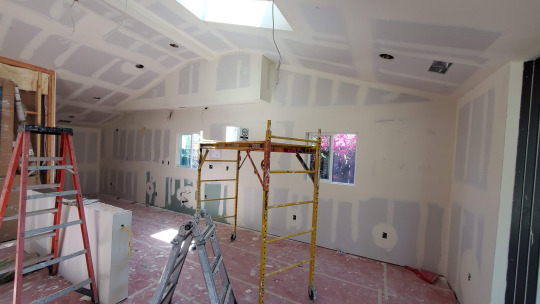
Drywall!
I have to admit that I was impressed by how fast they were able to install the drywall in the house... just about a couple days and the boards were up. After a few more days of taping and mudding and our walls are starting to look like a real house!
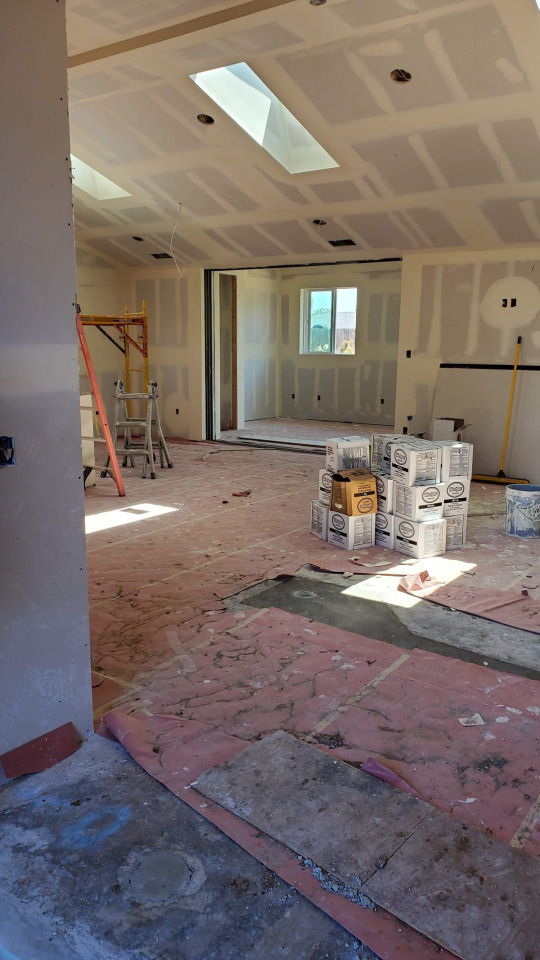
Above is the view from our front door into the great room and bedroom 4/office beyond.
Here's our kitchen. The little wall on the left is the kitchen island.
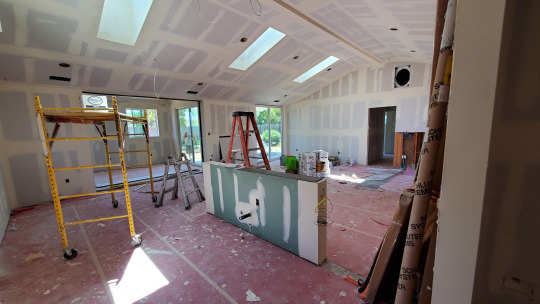
Above is a view from the other side of the island wall.
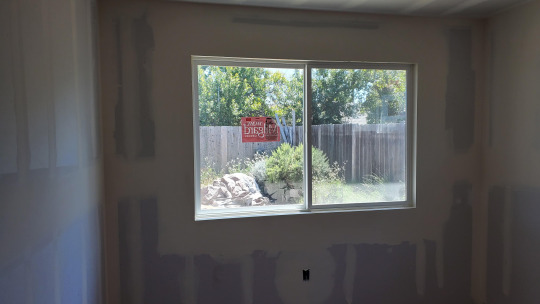
Here's the new view out of newly enlarged window in bedroom 2 (southwest corner of the house). Aka Mike's room, then Ben's room, then gray guest room. You may recall that this window used to be only about 24" tall. Well now it's 4' tall - it sure makes that room brighter.
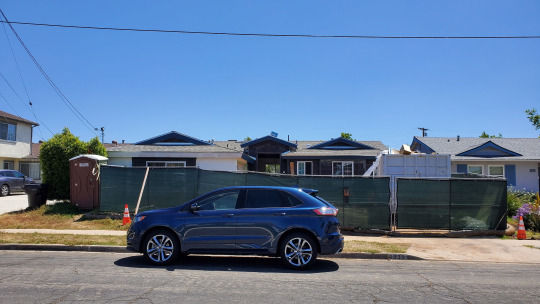
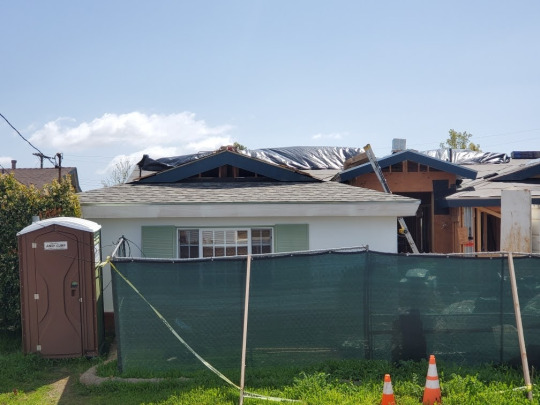
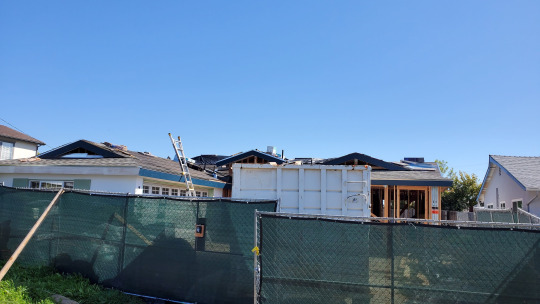
From across the street, the house still looks like a construction site. Complete with green fence, large dumpster, and porta-potty. Sorry again to our neighbors. Although luckily none of them have complained about the construction. In fact the other day one neighbor thanked me for giving her a real life HGTV project on her court. I'm happy to hear others are as excited about the project as we are!!
0 notes
Text
Sewer Line Replacement
Well we finally came full circle on Change Order #3. You know the one where our contractor tried to double charge us for the sewer replacement. He finally admitted that he had bid the replacement pipe but not the excavation to dig the hole for the sewer. He agreed to knock $150 off the change order for the mistake, I asked him to knock off his entire profit on that item ($620), but I guess I'll take what I can get. And away we go with a big trench for the new sewer line:
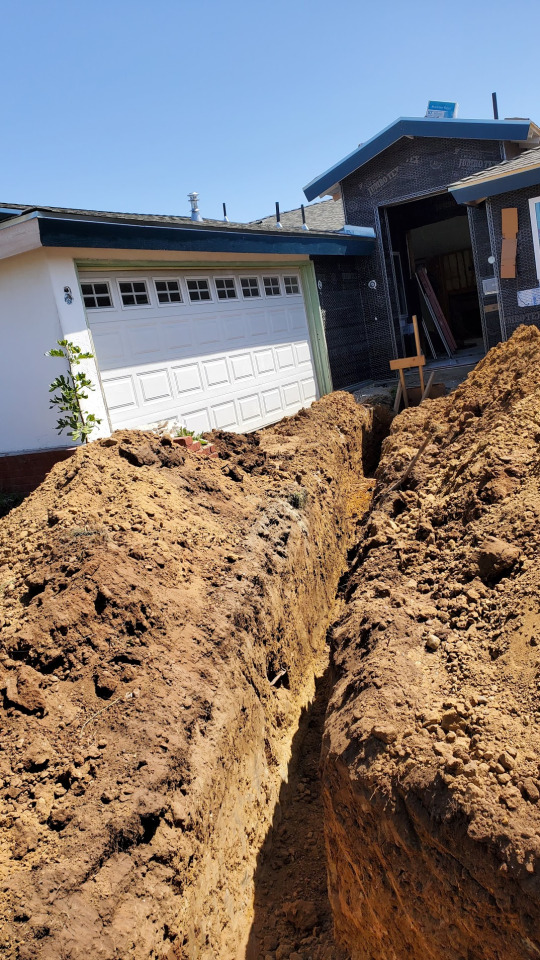
In order to install the new sewer line they had to demolish part of our driveway. It's pretty crazy that the thing was only 2.5" thick concrete with no rebar... no wonder the thing was more cracked than dropped smart phone. Plopping about 5 humungous dumpsters on it didn't help that situation any...

Here's a photo from the contractor showing a chunk of the driveway with his tape measure on it. I guess that made it a lot easier to remove. For reference typical driveways are 4-5" thick and have at least #3 rebar or welded wire fabric. But I guess 60 years ago nobody paid attention to this. I gotta admit it makes me a little nervous about our foundation, but with the additions we have nice heavily reinforced areas at each corner holding everything in there.

Here's the old sewer line at the end of the lateral to the street.
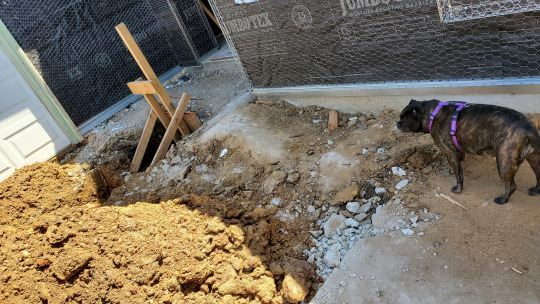
Pepper was pretty interested...
Ultimately we got what we wanted = a whole new sewer system!!

Here it is all backfilled. Yay for no huge hole in front of our main entrance anymore! Oh hey is that a Camack on the roof?... I guess he just can't help himself. :-)
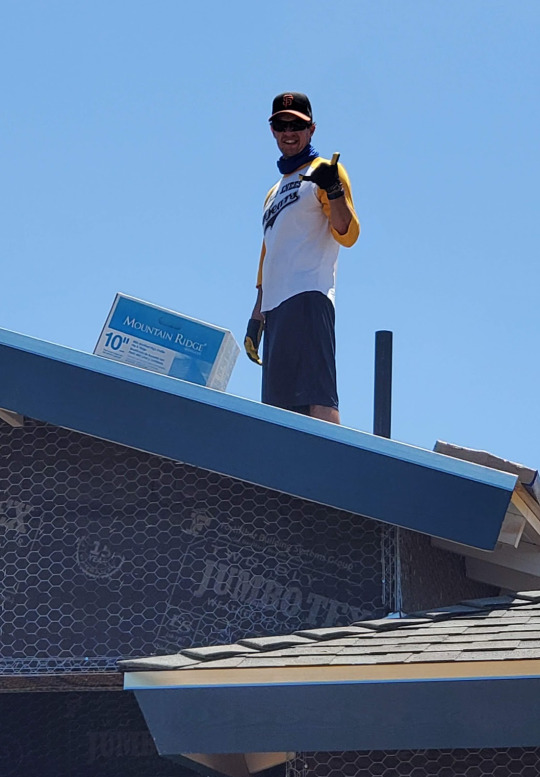
Just a little post-softball roof walk... NBD.
0 notes
Text
Insulation - The Cheapest Bestest Thing you can do for your house
Hey Everyone, sorry it has been so long since the last post, things have been really busy. But do not worry I'll catch you up without missing anything. Here goes...
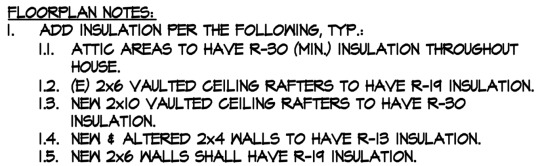
Back on April 10th we visited the house and were really happy to see that the whole house had been insulated in about 2 days! Of all the components of the house the batt insulation is relatively low cost, but the benefits to the thermal comfort and noise reduction are immediate and insanely good! The plans called for insulation in all walls and ceilings:
This is not only a requirement of the Title-24 Energy Code but is highly recommended by architects like us to keep your house at a comfortable temperature. It was pretty amazing to walk into the house after it had the insulation installed because even though some windows and doors were open you could immediately feel how much cooler it was in the house and quieter too!

In the photo above you can see the insulated vaulted ceiling of Brett’s new office and the walls too. The wall straight ahead has plywood covering the insulation because it’s a shear wall.
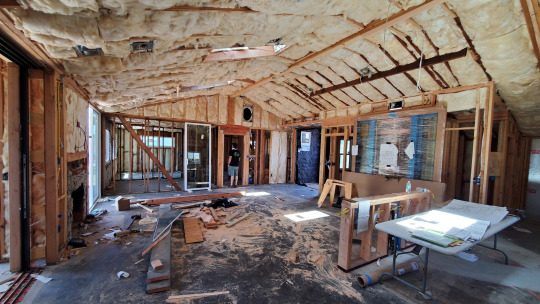
Here’s the great room with more insulation in the vaulted ceiling and exterior walls. Oh and you can get an idea of how slobby our contractor is… what a mess to leave over the weekend… don’t you boys have a broom?!? Geez… This after we made a stink that the inside of the house was a pigsty and asked them to clean up before closing up all our walls with a bunch of construction debris inside.
One thing we realized was that we needed to add insulation between the living room and bedroom 3. Since we like to watch TV and blast the stereo we wanted to provide a little acoustical dampening so if anyone is trying to sleep in bedroom 3 they should not hear (as much of) the noise. You’re welcome future guests and unborn children. Of course, this needed to become a change order with the contractor… $75? Sure Mr. Contractor – please do it! Cheapest change order to date.
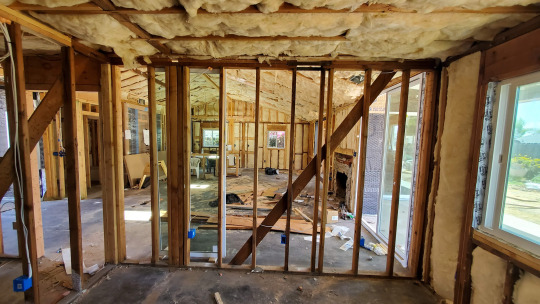
Here’s our bedroom. Did we almost just open this extra package of insulation and put it in the wall next to the living room? OK we talked about it, but decided the one package wasn’t enough to do the whole wall and left it alone.
Here’s our main bathroom off our bedroom. It’s funny how the main water service to the house is still coming up right through the slab. This was formerly the north wall of our house with the water outside, but since we added on this water line is coming up through the floor right in the middle of the bathroom. Is this staying here – hell no. I guess they have no cut this off yet because the plumber still has not installed the primary water service line to the new location at the corner of our garage. More on that in a future post.
It’s pretty crazy to be able to see through your whole house like this… It was also a good chance to double check that they put every outlet, pipe, HVAC register, etc. in the correct location. We noticed a lot of incorrect things so here’s Brett making a list on his phone for us to email the contractor. Like hey, why is that old HVAC register at the top of the wall still there, when the new one is already installed in the ceiling??
We decided this was a good opportunity to photograph all our walls before they start closing everything in with drywall. This way we know where all the studs, blocking, wires, pipes, and other hidden gems are located for future reference.
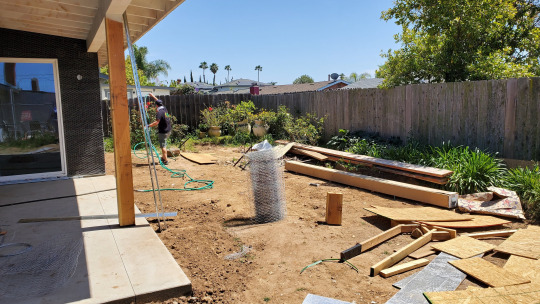
We also took this opportunity to water the few plants in the back yard that we still care about. It sure was fun stringing that hose from the middle of our bathroom floor out to the back yard. Did I mention that our contractor NEVER cleans anything up? Look at this dump of a back yard! We noticed a bunch of large wood scraps (like that chunk of the 8x8 patio column just to the right of that roll of chicken wire), and we asked our contractor what they planned to do with all those large member scraps… dumpster. So we asked if we could have them, I mean we paid for that wood anyway right… they said that was fine. Here’s what we did with the scraps:
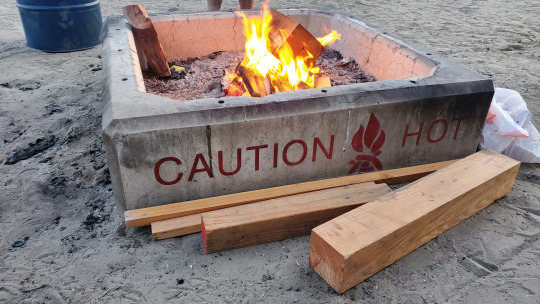
San Diego beach bonfire! It was glorious. We were fortunate enough to get a firepit in Mission Bay that had a fantastic view of the Sea World fireworks. A few s’mores and beers later it was a very nice evening. That 8x8 burned for about 3 hours… proving that heavy timber does have natural fire resistance.
0 notes
Text
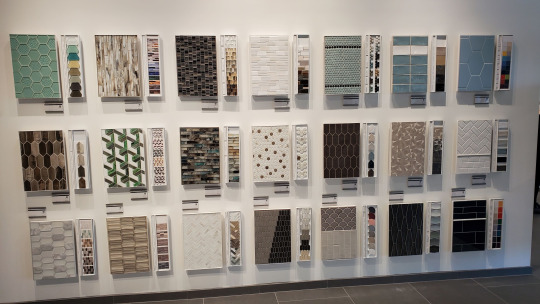
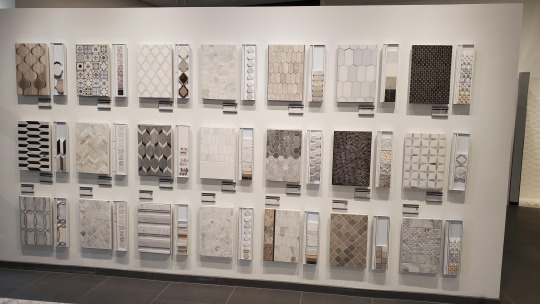
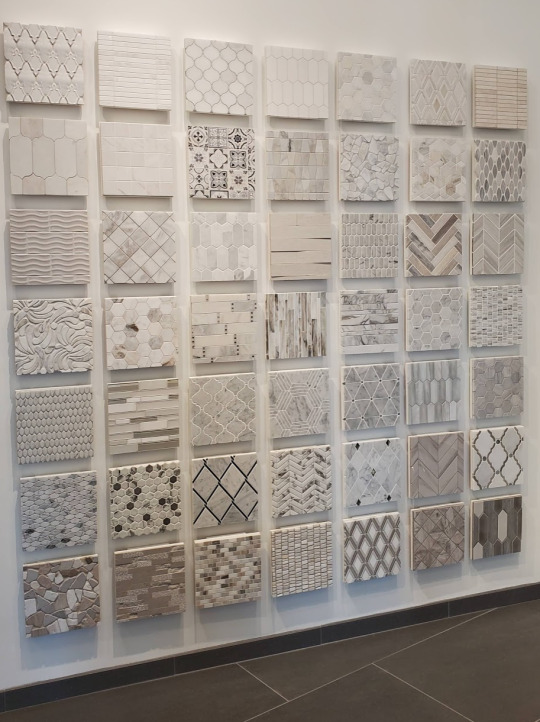
Tile, Countertops, and Interior Materials
Tile selections are never as easy as you think. For me the indecision was real... and knowing that I had to pick something that I would love for a long time AND is readily available was a challenge. Here's a preview of some of the things I selected.
Kitchen:

I know that the palate here pretty neutral, but since we have not selected our furniture or overall interior design scheme for the great room I didn't want to lock into anything too crazy that would be hard to match later. Ultimately I decided to keep the build-in elements neutral and then my furniture and artwork can provide the pops of color we need to keep this from looking bland. If I need more color later, I can always repaint the island cabinets... I'm thinking some shade of emerald green would look fabulous, but didn't want to go that bold off the bat.
The backsplash tile is a white glass tile that is 4"x12", and we are using the 2-tone arabesque mosaic tile above the cooktop for a fun accent.
Fireplace Surround:

For the Fireplace surround I wanted to play off the arabesque cooktop mosaic glass tile, but at the fireplace, this tile is actually marble. The hearth below the fireplace will also be marble that matches this tile, but in 24" square tiles for minimal grout. I wanted natural stone here so I can have my tile setter chamfer the edges so there will not be an abrupt change in elevation from the thickness of the floor to the thickness of the hearth.
Bathroom 1:
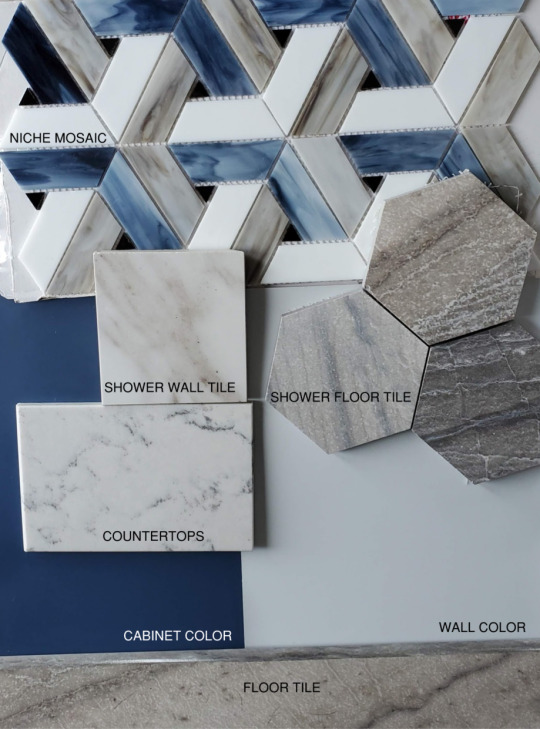
In this bathroom I loved the idea of dark blue cabinets, so I used that as my base idea. Then selected matte black plumbing fixtures and accessories. I fell in love with this grey floor tile that has blue veins to go with the cabinet color. Then I found a counter that looked like marble, but had darker veins to go with the dark cabinets and fixtures. The shower wall tile sample above really doesn't do that tile justice - the real tile will be 24" square tiles and it looks like marble. But instead of actually being marble (which is never a good idea for a shower) it's porcelain tile. Then when I saw the mosaic tile that brings all my colors together (not to mention plays well with my hexagonal tile floor) I knew it was meant to be! This tile is actually stained glass, so that's pretty cool!
Bathroom 2:
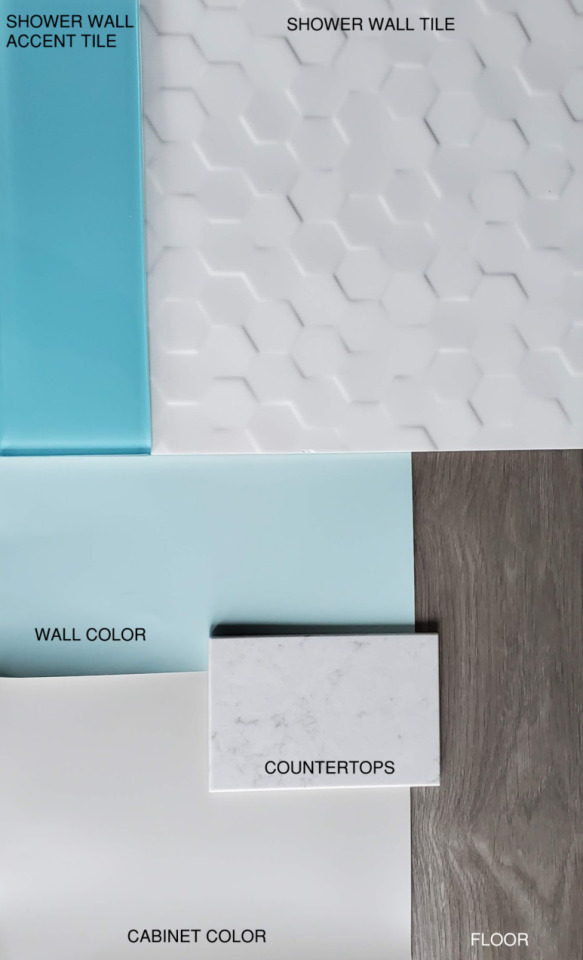
Funny enough this bathroom was the hardest room to select things for. It didn't help that someone kept vetoing my initial selections... omitting names to protect the guilty... But I actually love what we ended up with much better than anything that I was looking at initially so I'm happy that this painful process resulted in something we both like! In this bathroom the shower wall tile is mostly the white textured porcelain tile, with one vertical strip of the blue glass accent tile that goes through the niche.
The countertops are all quartz. Shout out to Kelsy Bergeson of Daltile for helping me select everything! From the 1/2 slabs of quartz for the bathrooms so I didn't have to pay for huge slabs I didn't need, to the multiple rounds of tile for bath 2, numerous samples shipped to my rental, and for overall getting me just about all my tile and counter materials for about 50% off!! Gotta use that Architect's Discount where I can right!!?!! Thanks Kelsy for all your help!
Speaking of discounts... I gotta give another shout out to Nicole Holloway of Mohawk flooring for getting me such an insanely good deal on our LVT flooring I probably need to name my first born child Nicole... Not to mention the multiple rounds of samples that she shipped to me, and the fact that she got me the commercial grade flooring that comes with a pad already applied to the back. Thank you is not enough to express my sincere gratitude!!
For those of you that didn't know this already, LVT is Luxury Vinyl Tile. A product that looks like real wood, but provides many more practical benefits such as; being waterproof, zero maintenance, easy to install, and practically indestructible! This flooring clicks together with joints at all 4 sides so there will never be any lifting of individual pieces or even any need for glue below the tiles. All that and it's only 1/4" thick!
Did I mention it was really hard to decide on all of these tiles... That Daltile showroom has so many beautiful options I don't know how anyone can decide! Check these out:

and
and
and

and
and still more
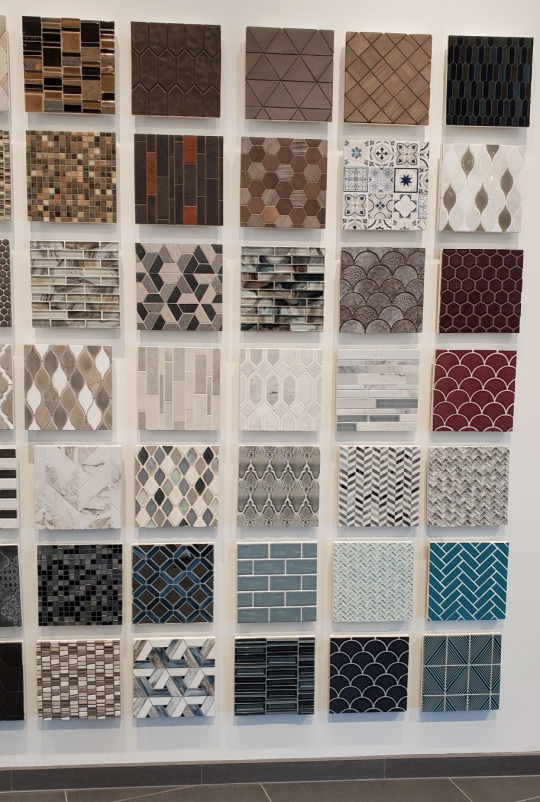
See anything you like for your house???
Honestly these are just a few of the walls and walls and racks and shelves and drawers... of tile samples they have at Daltile. I didn't even get any pictures of their massive counter slab warehouse in back! Everything was beautiful so it was so hard to pick. The comment from Brett that I got was, "I'm just here to make sure you don't pick anything pink, or gold, or hard to clean." HA, as if he cleans tile! Now I can't wait to see this stuff installed in my house!!!
0 notes
Text
Windows and Lath
We stopped by the site this week and it was exciting to see the windows getting installed. They were working on the building paper & lath being installed to get ready for the stucco next week.
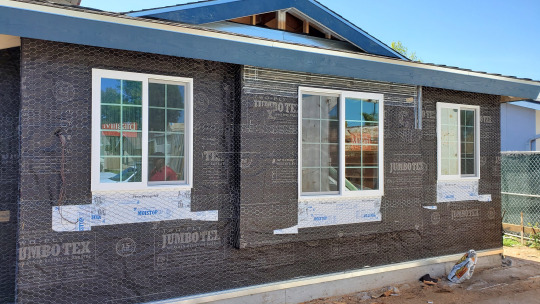
Here's our bedroom and bathroom 1 on the left. Prior to installing the windows they added some peel and stick waterproof membrane underlayment.
Above and below here you can see the window underlayment (white) being installed.
Above you can see the underlayment. Below you can see how they are lapping the black layers of building paper over the plywood and the window underlayment. Then on top of 2 layers of building paper is the lath (chicken wire). It makes me cringe a little to see them using chicken wire for the lath since my company standard is to use expanded metal lath that comes in large flat sheets instead of rolls. But this is only residential construction, not a shopping center that is going to take a beating from shopping carts and general public use - so the chicken wire lath is going to be just fine. The stucco is basically like a 1" thick concrete coating; it contains the same ingredients as concrete, plus the addition of lime (that's limestone not the citrus).
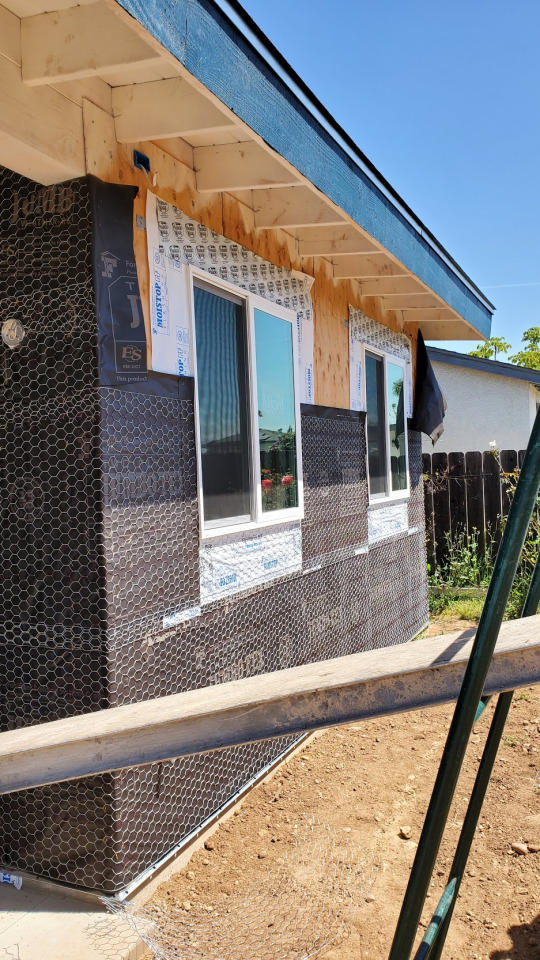
Did I mention that we have windows now?!!!!
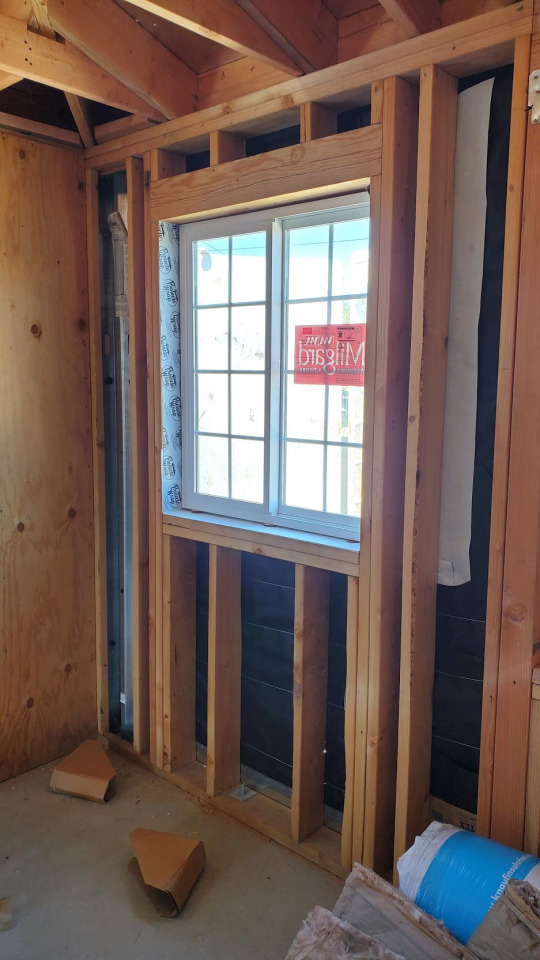
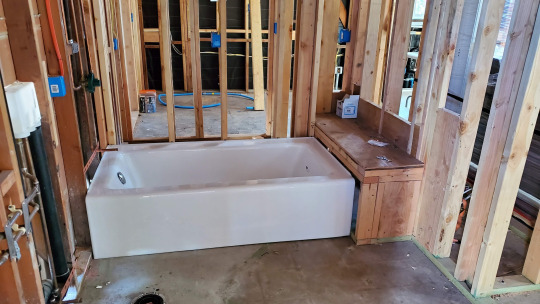
Oh and we have a tub now too!!! (This is bath 2)
The shower in bath 1 was hot mopped with tar this week to make it completely waterproof at the bottom. It sure did stink in there!
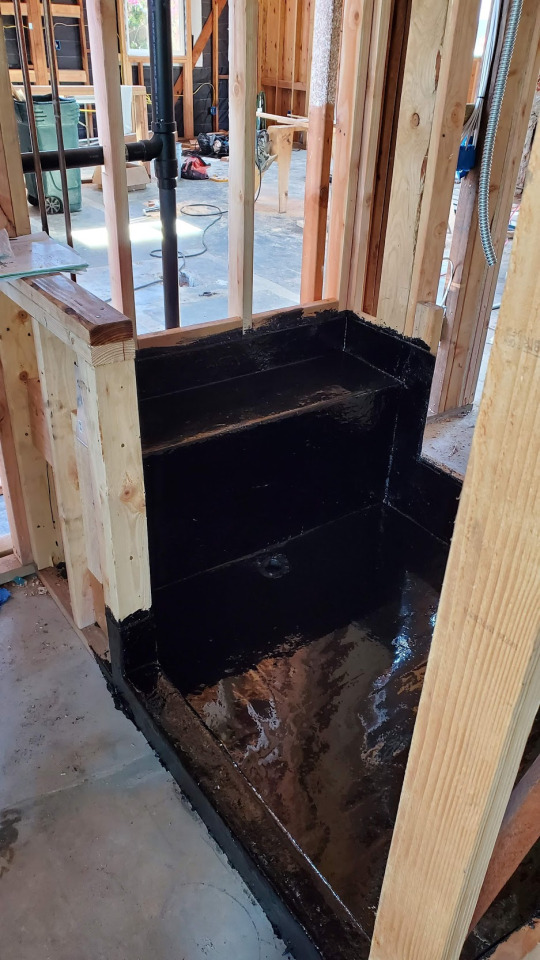
In the photo above you can see the tar is running up the sides all around the shower and the bench too. This allows it to function like a mini-bath tub without the water leaking into the walls (just don't let it fill more than an inch). We purchased a linear drain that will be located right at the base of the bench, this way we don't have to stand on a drain when we're showering.
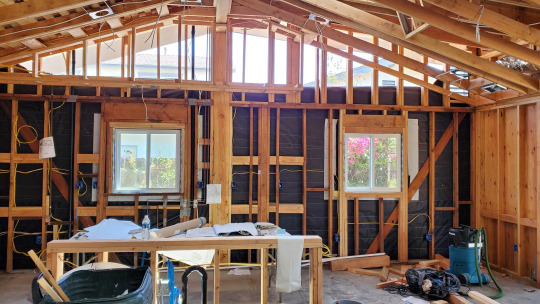
Here's a view of the great room. The kitchen island wall is in the foreground, and our new windows are in the background!
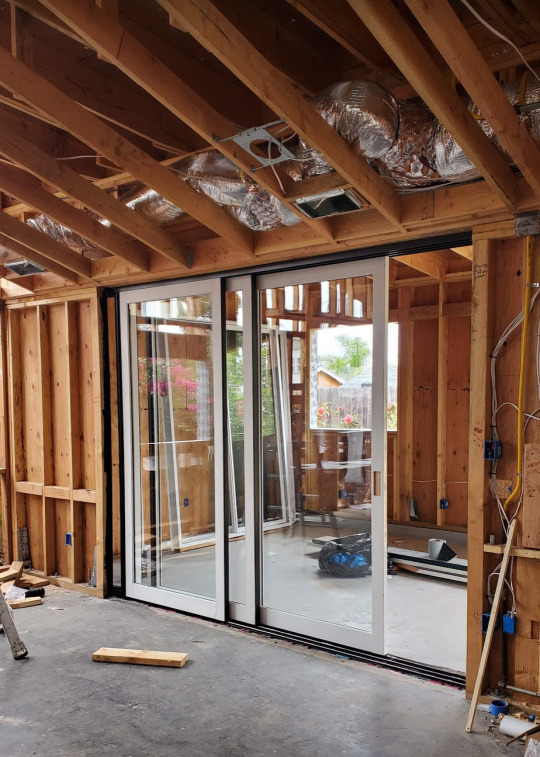
The Sierra Pacific pocketing multi-slide door was installed as well. This door will separate Brett's office from the great room. All three panels can be slid into the pocket on the left so there's a 10' wide by 8' tall opening between Brett's office and the dining area of the great room. Oh hey, the mechanical is all installed too. Shout out to the mechanical contractor - he gave us clear options, his guys worked cleanly and efficiently, and their install looks good!
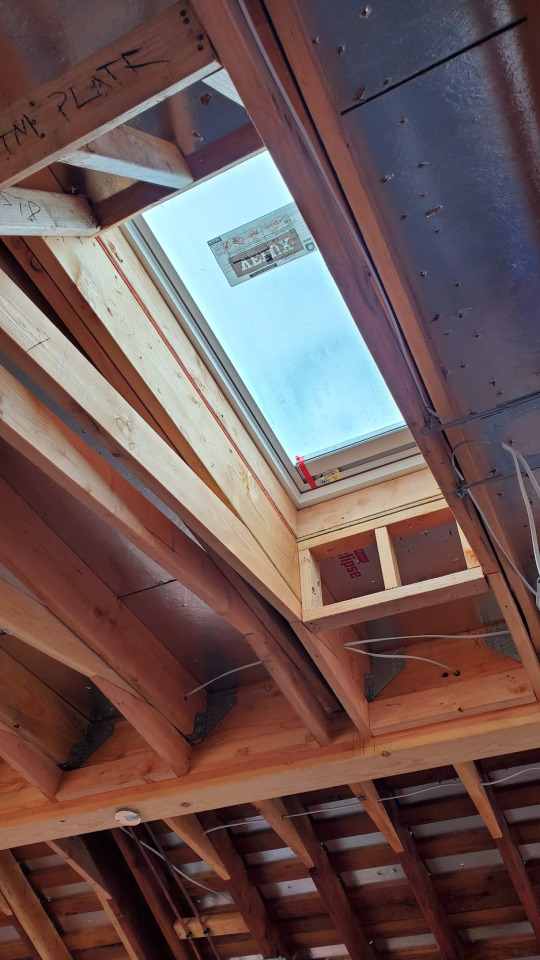
And above here is one of those Velux skylights that was installed last week.
Exciting times!! Drywall starts next week, then it will really start to look like a home once we get some of the interior finishes going. Can't wait to see it!!
0 notes
Text
Kitchen Appliances
With the whole world stuck at home, it seems like everyone is using the money they would have spent on vacations and dinners out on renovating their kitchens! Same! But on a global scale, and during a pandemic this is causing major supply chain issues. I've been monitoring appliance availability and have been trying to time my purchases to arrive around the end of April / beginning of May - just after the casework is installed.
For our Fridge - we are keeping ole' faithful (it's hiding under tarps in the garage): LG French Door Refrigerator

The oven: KitchenAid 30" Double Wall Oven with Even-Heat™ True Convection

Microwave: KitchenAid 24" Countertop Microwave Oven - being custom designed to fit above the oven in our cabinet.

Cooktop: KitchenAid - 36" Built-In Gas Cooktop
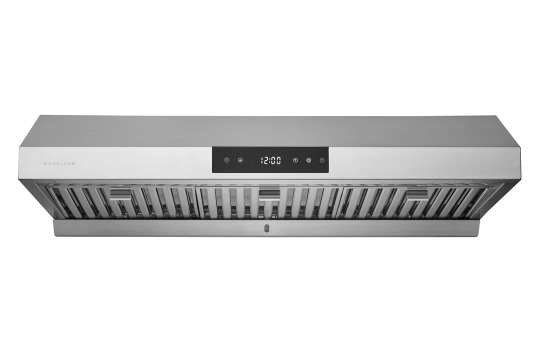
Hood: Hauslane 36" Under cabinet hood
Dishwasher: KitchenAid 24 in. Panel Ready 3 level dishwasher with ProScrub™ Option (ours will get a custom panel front to match our cabinets)

Trash Compactor: KitchenAid 15 in. Built-In Trash Compactor in Panel-Ready (this will also get a custom panel front to match our cabinets)

Everything has been ordered except the trash compactor... no one seems to have this baby in stock. It must be stuck in the Suez Canal... Luckily this is not a critical appliance for us to have prior to moving back in, but will be really nice to have. I'll never have to hear a #rant about not pushing the trash down again! LOL
0 notes
Text
Roofing Complete(ish)
The sun finally came out... but then it got hot, and roofing is not fun when it's hot. 85 degrees on the ground can be closer to 100 when you're on a roof covered in black felt! So there were a couple days that they had to end work early because it was just too dang hot.
Here's some roofing progress shots:
In photo above you can see some of the first shingles around the Dutch gable over the garage.

This is the east side of our house and the garage is almost done on this side! I need to shed a tear for the loss of the bougainvillea bush that used to live behind where that black trash can is in this photo {sigh}. I guess the contractor decided to chop it down to install the new eave boards... why couldn't they take the big one on the corner too? The big one is blocking our electrical panel and I bet SDG&E wont be happy to install the new electrical service behind that bad boy.
The roof over our patio and Brett's office addition is a very low slope, about 1.5/12. Meaning that for every 12" horizontal it rises 1.5". Code minimum is 1/8" per foot, so this is not a flat roof, but it's too flat for traditional shingles. So they installed a special 4-ply system that was installed with a heavy roller that you use to adhere the roof plys to the underlayment. Here's what that looks like now:
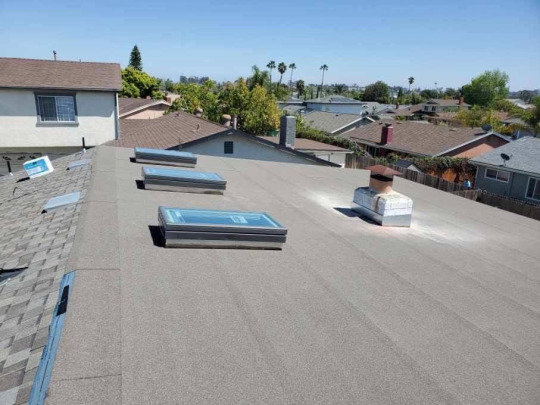
In this photo above you can see our 3 new skylights are installed!! They are Velux, operable skylights that have built in shades so we can darken them when needed. You can also see the custom flashing boot around the chimney base that was made to keep the chimney to roof connection waterproof. A lot of times this is done with step flashing (layers of smaller pieces stacked in a stepped fashion up the slope), but this custom soldered single seamless piece is the best option. On the left side of the ridge where the shingles are you can see 2 of our O'Hagin roof vents - those low gray boxes.
By April 3rd the roof was complete... well... complete-ish. There were a few areas that they held off on completely shingling because the stucco still needs to be installed on some small wall areas above the roof. And when the stucco guys get up there to do that work we don't want them to damage the shingles. So Chuck very graciously offered to come back down in a few weeks to finish things off properly after the stucco is complete. And that way he can also fix any additional areas they might damage. When you put a new roof on a house, you really don't want anyone walking on it, so we are being extra cautious.
1 note
·
View note