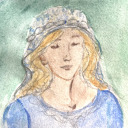
lady-merian
Following the light unflinchingly
I am in fact a hobbit, in all but size. Pro-life Christian. Not Catholic, but Catholic-friendly. Keeper of herb lore. Lots of Tolkien. Lots of random stuff that inspires me. Sometimes I write and make art. Quote above is by Tolkien and is a goal rather than a reality at this point
21624 posts
Don't wanna be here? Send us removal request.
Last Seen Blogs


fruityracoons
chaos in a cup
fruityracoons
chaos in a cup

sophiaemilia
Sophia Emilia

thefiery-phoenix
THE FIERY PHOENIX
Note
boopity
you BOOP Meri? You boop Meri with the cat paws? Oh! Super Boops for Your Most Serene Highness! Super Boops for Your Most Serene Highness for One! Thousand! Boops!
3 notes
·
View notes
Text
HALT!✋😐
did you remember to express gratitude for not having to subsistence farm today?
14K notes
·
View notes
Text
Fictional Horse Tournament
Group Linus - Round 1
23 notes
·
View notes

Text
Indubitably 🧐
46K notes
·
View notes
Text
this may or may not be a fantasy writing exercise for me. please reblog
5K notes
·
View notes
Text
Just had to talk a friend down from a two cakes crisis. Her cakes - meaning her fic - are absolutely fine, but she felt a little down and checked out the rest of the dessert table. She got caught up in the whole comparison thing. "Oh man, this fic is way better than mine 😞."
And hoo boy, have I ever been there. When I was writing prolifically, I just wouldn't read. I couldn't because I knew I'd go into that fic measuring mindset and declare myself the loser, have to step away from the keyboard and stare out the window a while. And if I had an exchange deadline? Absolute worst timing.
Not everyone goes through that of course, but it's more common than you think, even with so-called established writers. I've seen people delete wips or even their whole account over that burden of doubt. So here are some possible tips to crawl out from under that burden:
Table it. You're done for the day. You've been staring at that cursor for too long. You have no perspective on your work anymore. Go do something else: play with your dog/cat/fish, go for a walk, eat something, go to bed if it's late.
Re-engage with the source material. Watch an episode, read a chapter, listen to that podcast, whatever it is. Find that voice in your head that sings in harmony with the source.
Read positive comments left on your previous work. Trust what they've told you. Because the liar here is your doubt, not your readers.
Hit up that friend you trust and ask them to tell you your strengths. Even if you don't believe it right now, you have strengths as a writer. Maybe it's worldbuilding, maybe it's dialogue; your friend will give you concrete examples. You don't need a beta right now, that will come later.
You're not alone. This is a community. Even if it's a rarepair or gen fic in a niche fandom - and especially then! - someone will be so happy that you brought that cake to the table.
3K notes
·
View notes
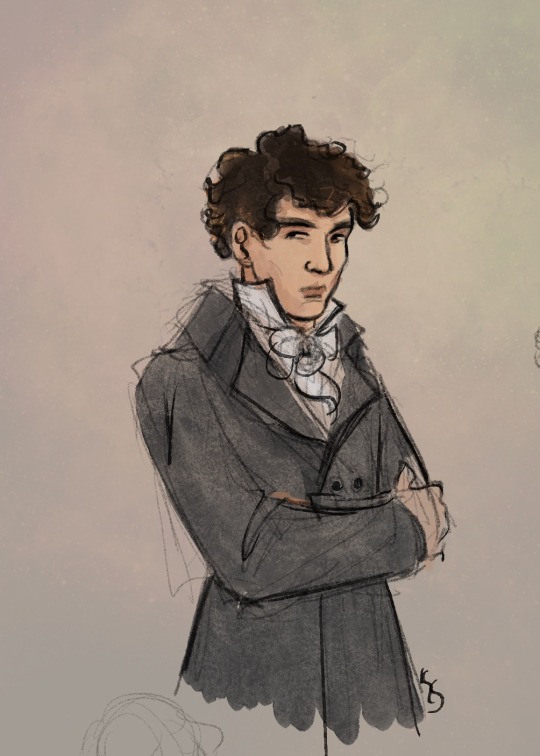
Text
A slightly later-era Kiro.
37 notes
·
View notes
Note
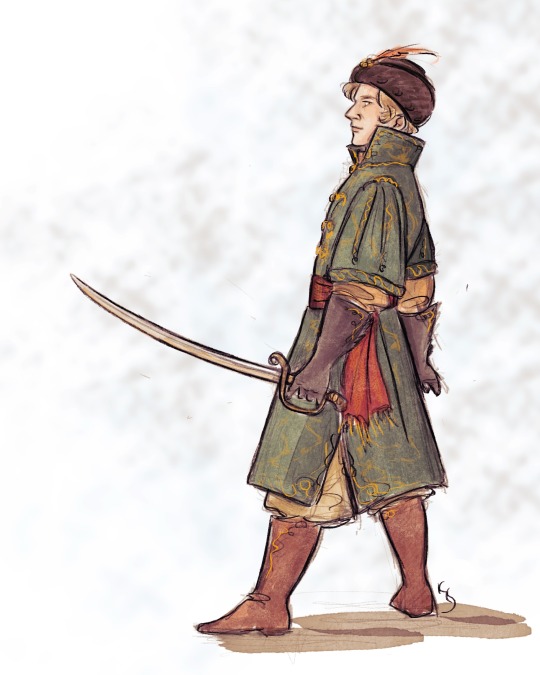
🖍
Here’s an attempt at a character design for Treljerin’s son, when he’s maybe 18-ish? (This is bit of a cheat though, because I found the sketch when I was looking for something else, and decided to finish it.)
24 notes
·
View notes
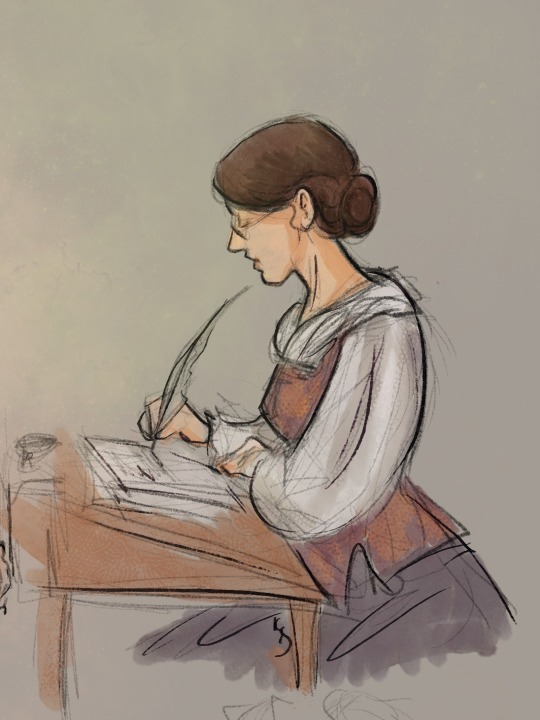
Note
🖍 Esterlina
Esterlina writing letters. 😊
38 notes
·
View notes
Text
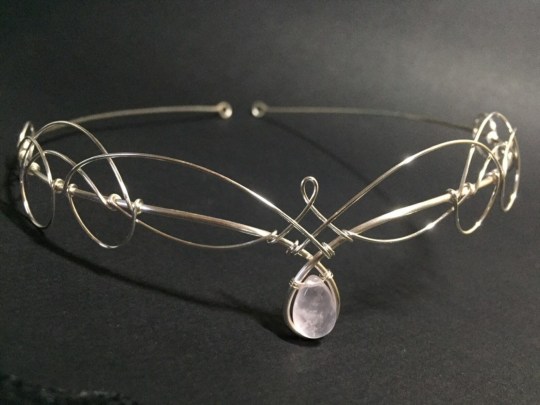
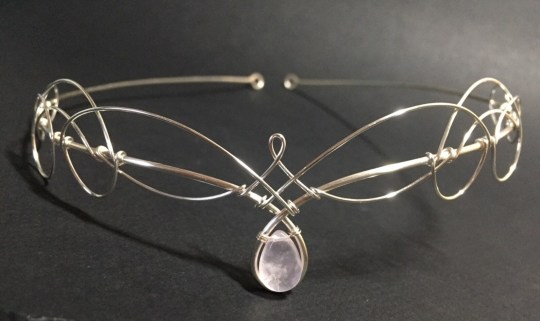
elven circlet, by sweetelvenchestnut on etsy.
5K notes
·
View notes
Text


yellow silk evening dress with oak leaf design
c.1902
House of Worth
Fashion Museum of Bath
#<Forgot to factor in the respective ages and who’d be out oops#But yeah the style does seem more Bethira than Ayra but the color did seem like an Ayra-ish color#I’m now amused at the thought of Delclis pondering the stylization of the oak leaves
1K notes
·
View notes
Text
Tutorial: Sew a Keyhole Neckline with a Facing
Since I keep trying to explain facings to friends (and keep feeling like I’m failing miserably), I decided to do a longer tutorial, after all, about how to I use a facing to sew keyhole necklines on simple medieval-style tunics. This is an attractive and sturdy neckline for LARP/Dagorhir/SCA garb. I’ve used it on literally hundreds of tunics.
This tutorial ended up getting pretty long and scary, but don’t worry: this is not a complicated process. It’s just hard to explain over the internet. So– let’s go!
What is a facing, anyway?
A facing is just an extra bit of fabric that you sew to the edge of your garment and fold down to conceal a raw edge. I use them on necklines, instead of folding the edge down in a traditional hem. If you don’t get the concept, @vintage-aerith has a great tutorial here. Facings produce very sturdy, flat, and non-bulky edges.
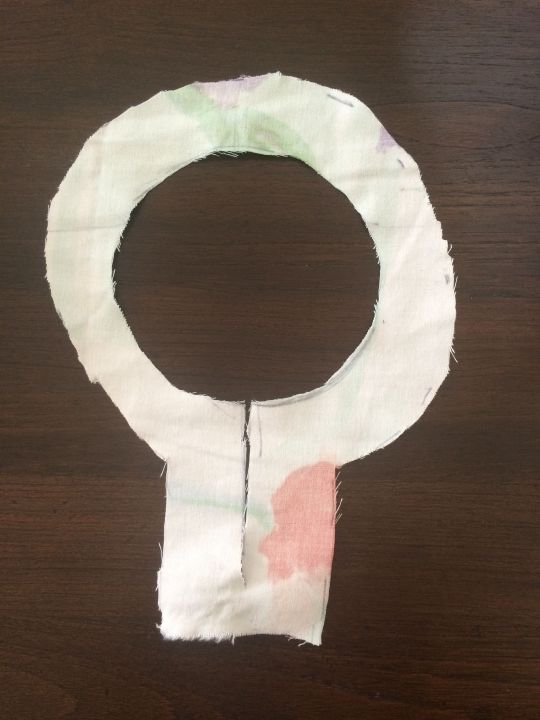
For example, this tunic has a keyhole neckline finished with a self-colored green facing. The edge of the neckline is NOT folded over and hemmed: the facing is an extra piece of fabric that was stitched on to the edge and then folded to the inside. You can see the ‘lower’ edge of the facing– it’s the darker green line about 1.5″ in from the edge. I then tacked the facing down with embroidery. It’s a very clean, unobtrusive finish.

This tunic has a very fancy external orange facing, combined with a collar! The process is very similar to above, but the facing is flipped to the outside. This is an easy way to add color to a garment. (Forgive my dork-face and overlarge tunic– this was for a customer who’s about a foot taller than me!)

You should use facings because:
Hemming necklines is a pain. The curve will not want to fold down flat. Facings, on the other hand, are exactly the same size and shape as the neckline, so they automatically lay flat.
The point at the bottom of a keyhole is a nightmare to hem, and if you hem it badly, it will fray and rip, fast.
When you fold down a neckline to hem it, your neck-hole gets bigger. When we’re talking LARP/SCA/Dagorhir garb, a bigger neck-hole always means more sunburn. If you use a facing, you’ll get a neckhole exactly the size you planned.
Hemming stretches your neckline out. The more you handle a cut piece of fabric, the more it will stretch. A stretched out neckline = more sunburn, again. This facing method minimizes handling of cut edges, so the neckline stays nice and tight.
Facings are fast and easy once you understand what you’re doing and why. I can knock one out, start to finish, in about ten minutes. No lie.
Now that I’ve convinced you that facings rock, onward!
1. Make Your Facing Pattern
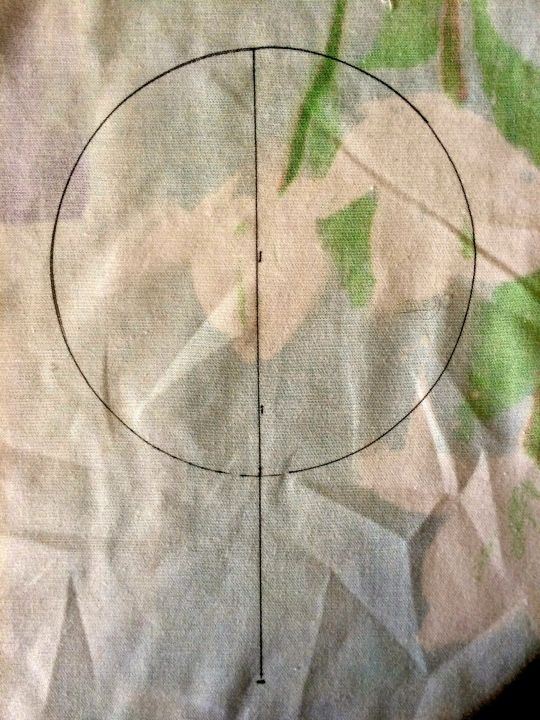
You’ll first need a pattern for your facing, and to make that, you need to know what size you’d like your finished neckline to be. I recommend a neckline that’s made of a circle that’s about 5.5″ in diameter and a 3″ slit, like this. This is juuust big enough that it will pull over most heads.

Draw your 5.5″ circle on a bit of scrap fabric. (I traced a saucer onto a sheet from a charity shop. Pure class, me.) This will be the hole your head goes through.
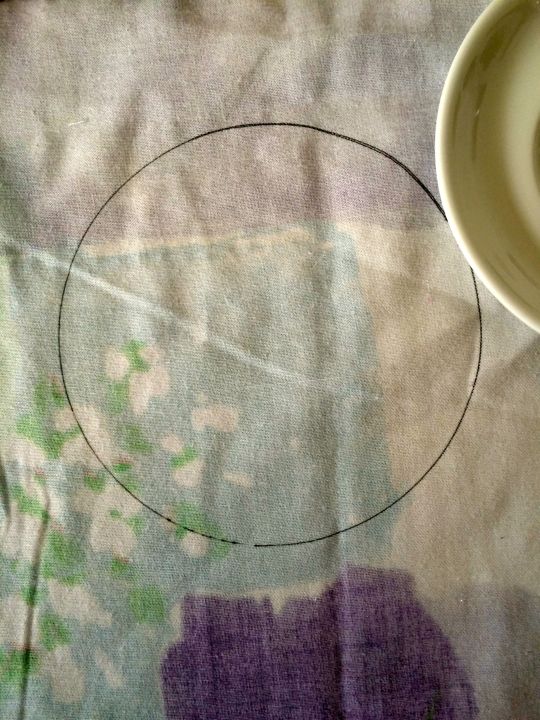
But, you protest, a 5.5″ circle only has a 17.25″ circumference! That’s way too small for anyone’s head! Well spotted: we’ll add a 3″ long slash down the center line so you can fit your head through.
Now we’ll mark the center and shoulder line. Since your tunic has a front half and a back half, you’ll be sorely tempted to put half your neck-circle on the front and half on the back.
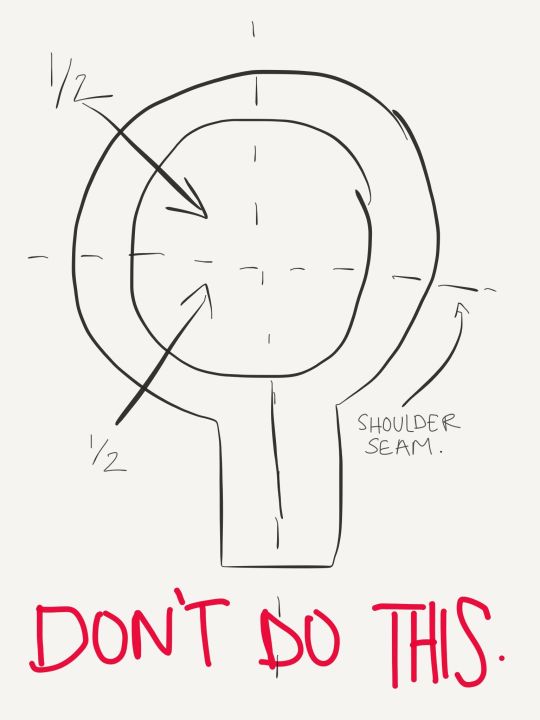
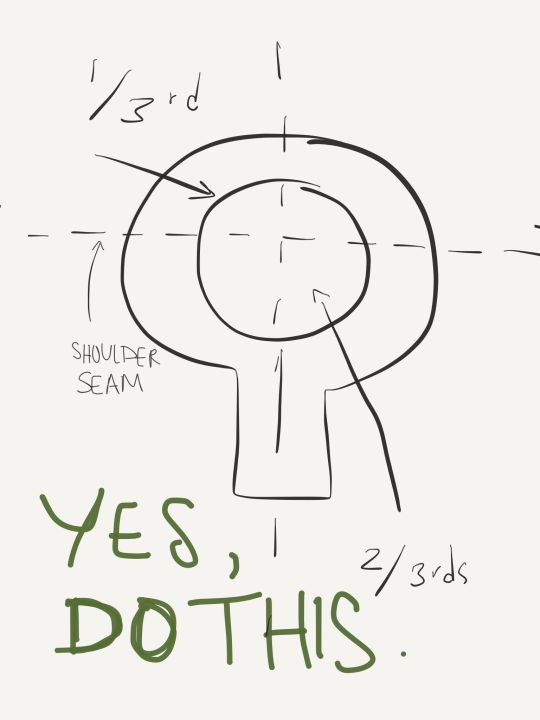
But if you do this, your tunic will be really uncomfortable! Your neckline will constantly creep forward around your shoulders. This is because most of your neck is actually in front of the shoulder seam, so 2/3rds of your circle– about 3.66″ on a 5.5″ circle– should go in front of your shoulder.
Add 1.5″ around the edge of the hole and and around the slash.
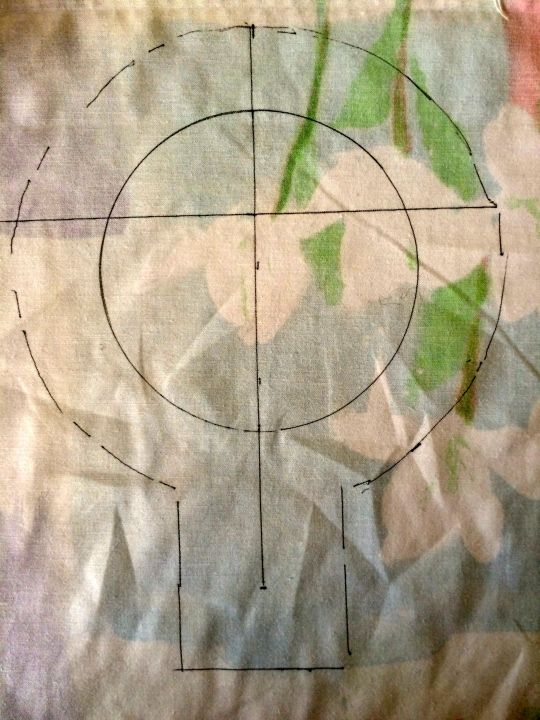
Cut the fabric out along the outer line.
Cut out the center hole, and cut down the slash. Note that you’re just cutting the slash open with one pass of your scissors– you’re not trimming anything away.
Now you have a mock-up for your facing. It should look something like this. (Mine is super ugly because I’m traveling and only have terrible blunt scissors with me.)
Pull it on. Can you fit this over your head? Does it lie comfortably? If you can’t get this over your head, cut the slash a tiny bit longer and try again. If that doesn’t work, make the hole a tiiiiny bit larger. Remember that a smaller neckhole is better (sunburn!).

Don’t be fooled by my weird face– I am happy, because mine fits okay! I’ll now trace my mock-up onto a bit of sturdy poster board, making sure to mark the center front, back, length of the slit, and shoulder seams with notches.

The front white piece is my facing pattern, which I use to trace out the facing piece on fabric, ie, the background piece in olive green. Note that the fabric facing does NOT have the hole cut out. This is important!
Next, we’ll…
2. Cut Out Your Facing
Lay your new pattern on a bit of your fabric. Using chalk or a fabric-marking pencil, trace it all the edges and mark all the notches. Cut along the outer line until your facing piece looks like the dark shape in the photo above.

Here’s where it gets tricky, though: you won’t cut the interior circle, yet. This is because that inner edge isn’t really an edge at all: it’s your stitching line. When you’re stitching your facing onto your tunic, your needle will follow that inner line that you’ve chalked onto your fabric. See how in the photo above there’s a line marked in yellow chalk on the dark olive green facing? That’s the stitching line, so DO NOT CUT THE CENTER HOLE OUT IN YOUR FACING.
Similarly, DO NOT CUT A HOLE IN YOUR TUNIC YET. We won’t cut either hole until the facing is stitched to the tunic. That’s right– it will look and feel really weird, but trust me, there’s a good reason for it.
3. Finish the Edge of Your Facing
The outer edge of your facing will fray if you don’t do something to prevent that, so take a moment to serge or zigzag around the edge of your facing piece. It’s way easier to do this before you stitch the facing onto your tunic.
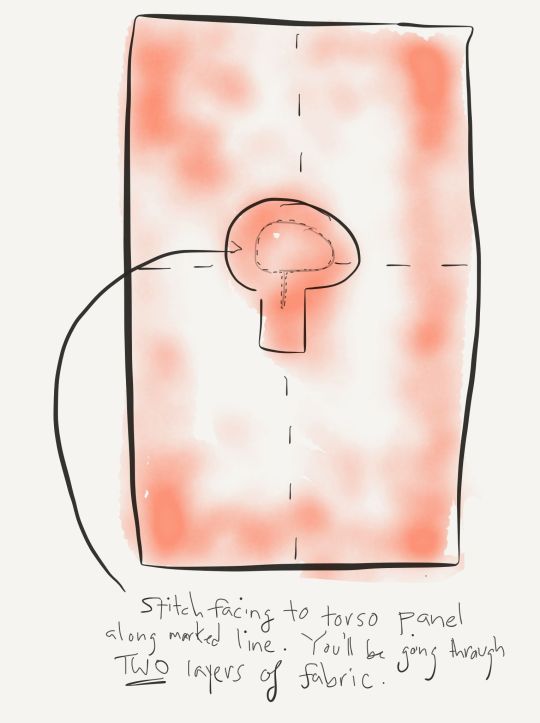
4. Stitch Your Facing Onto Your Tunic

Okay, so. I like to start by sew the neckline on my tunic before I do anything else. That way, if I screw it up, I haven’t wasted time (or fabric) by adding sleeves and gores and stuff.
Note how, in the picture above, no holes have been cut in the facing or the torso panel. This is not a mistake. Why aren’t you cutting the holes, you might ask? Well, fabric cut along curves stretches. Badly. This is bad news if you’re trying to match the hole you cut in your tunic to the hole you cut in your facing. Getting them to match requires a ton of pinning and fussying and delicate handling. I hate pinning and fussing, so I sew my facing to my tunic before I cut any holes. This way, everything is stabilized nothing can stretch out. Cool? Cool.
Now, my torso panel is one long rectangle, which makes up the main front and back of my tunic– there’s no shoulder seam. Fold your tunic in half both ways and use your iron to crease these folds. These creases now mark your shoulder line and center lines. You’ll use them to line up your facing.
Lay your facing onto your tunic, right sides (ie, outsides) together. Make sure to match facing to the tunic’s center front, back, and shoulder seams. Remember how 2/3rds of your neckline will be on the front of your tunic? Check that, now. When your facing lays straight and flat and properly positioned on your tunic, pin it in place.
You’ll now slowly stitch through both layers along the line you marked. The slash is a little different, though, so see the picture below for an explanation of how to stitch around it.
The stitching travels around the slash, with about 1/4″ to 1/8″ between the lines. The bottom of the slash should be crossed by just 1 stitch. If you use more stitches, this point will pucker when you try to flip it to the inside.

Once you’ve stitched along the entire stitching line, you’ll finally cut the neckline open.
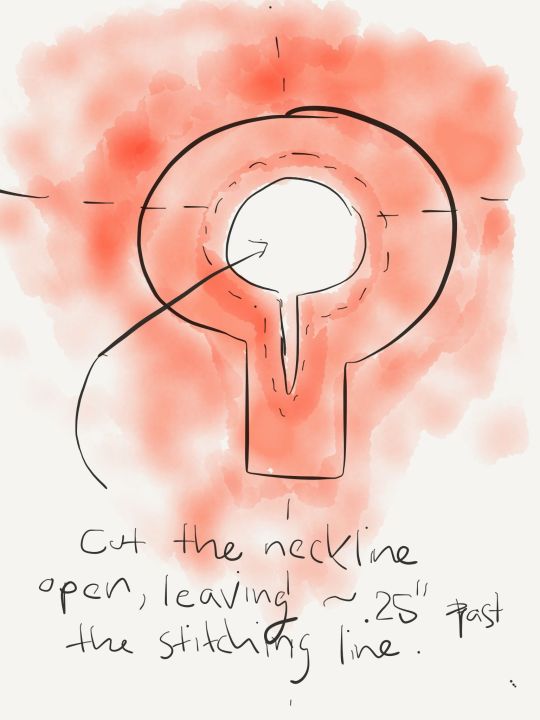
Be extra careful cutting the slash open. You’ll cut through the gap between the two rows of stitching, stopping just shy of the stitch at the very bottom of the slash.

Okay. So, you’ve got your facing sewn to your tunic, but all the raw/cut edges are still exposed. To fix that, you’ll now fold the facing to the wrong side (ie, the inside), so the raw edge will be hidden inside the fold. This can be a little tricky, so be patient and use plenty of steam with your iron. To turn the points out, use something pointy but blunt, like a big bamboo knitting needle, to poke them right-side-out.
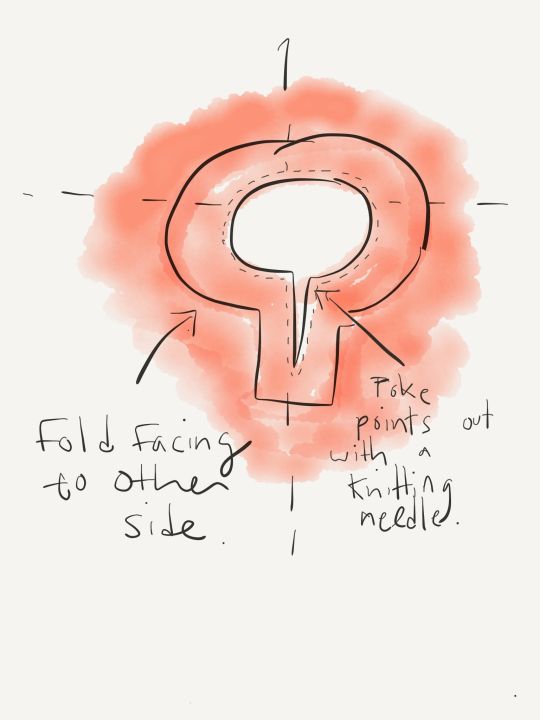
Once you’ve got your facing turned to the inside of your tunic, iron it well so the edge of the neckline is flat and crisp.
Hooray! All that’s left, now, is topstitching through the tunic and the facing in matching thread so your facing won’t creep back out to the right side. I like to use two lines of topstitching– one 1/8″ from the edge of the neckline, and another 1″ from the edge of the neckline. Make sure you’re catching the edge of your facing!

Hooray, you did it! That wasn’t so bad, was it? And look how sturdy and clean your tunic’s neckline now looks. That keyhole is never going to rip, I tell you that.
Huge thanks to Stellaria for writing the original tutorial that taught me how to do facings, and for putting up with my hare-brained innovations on her methods. Stell is the best.
1K notes
·
View notes
Text
man there’s something bout narnia that just burrows it’s way into your soul and never leaves
631 notes
·
View notes
Text
I hate waiting for things to stop being popular so i can enjoy them
27K notes
·
View notes
Text
There's a huge difference between redemption and humanization. I feel like a lot of "redemption arcs" aren't actually redemption at all, they're just attempts to humanize the villain so that they seem multi-faceted, but people read them as "redemption arcs" and think that that is meant to justify all the evil they've done before and negate whatever made them a villain in the first place. I think true "redemption arcs" are actually kind of rare because true redemption would take making the villain acknowledge their crimes, reevaluate their actions, actively choose to do better, and then proceed to make amends and become a better person, and that would this take more time than most stories are allowed to give their characters.
I've also seen people argue that a character has to be poised for redemption from the jump for it to work because once a character does something "too bad", they can't be redeemed. I completely disagree because redemption isn't justification or forgiveness, so no matter how horrible a character's actions, they could choose to become better, but because a lot of people (including writers) think redemption means "erasing the character's flaws and making it so they did nothing wrong ever", a lot of attempted "redemption arcs" just end up erasing a character's entire history or justifying every evil thing they've ever done. And yeah, in these cases, the only way to make a character go from a villain to a perfect cinnamon roll with no flaws *is* to have been planning it from the beginning and make sure they never do anything that can't be explained away later.
TLDR: real redemption arcs require a lot of self-awareness, patience, and growth, which are things that are rarely actually allocated to villains, and that's why real redemption arcs almost never get executed. The reason people think redemption arcs are overdone is because there are so many attempts to either humanize a villain that get misconstrued as redemption or attempts to blatantly erase who a character was in the name of "redemption", which is really just poor character development.
5K notes
·
View notes