
hoffyshomesteading
Hoffy’s Homesteading
Farm Goods, Country Decor, Reclaimed Furniture, Off-Grid Lodging
19 posts
Don't wanna be here? Send us removal request.
Last Seen Blogs

pantasss
CEO_TUDUNG

femmeconomics
get off your phone

traveltype-blog-blog
Travel Type

edwardcao
SURVIVE / RECOVER

child-five-direction
Untitled
Text

Questions to Ask Yourself Before Starting a Homestead
Have you ever said, ‘I’m moving to the country?’ Has the stress of city life got to you? Are you envious of people living a more ‘simpler’ lifestyle? Well, Homesteading may not be for everyone, but it may be for YOU!
Here are a few questions to ask yourself before you make the big switch.
Finances
It is not cheap to start a Homestead. Whether you are purchasing farming equipment or seeds for your garden, you should start saving for your new adventure months to years prior. Yes, you can make money on your Homestead; however, this does not happen overnight. It is best to have one reliable source of income, especially at the beginning, as you build your new future.
Discipline
Do you enjoy hard work? Are you dedicated to making your dreams come true? Homesteading is a never ending job that you love (hopefully). If you cannot say you are passionate about your work then Homesteading may not be for you. When you hear a Homesteader say, ‘there is never a dull moment’, or ‘I never sit still,’ that is completely literal. A Homesteaders job is never complete.
What are Your Needs
I am sure you have been thinking about Homesteading for awhile now. Do you want to raise chickens, cattle, goats, pigs, produce etc.? Be realistic when you are planning out your Homesteading dream. Everything cost money, and everything takes time to establish. Be sure you gain some knowledge or experience before you go out and buy a flock of chickens without a coop (highly not recommended). This leads me to Zoning and Bi-laws....
Zoning/Bi-Laws
Before you purchase that amazing property, you may want to check with your Municipal office to find out what the zoning and bi-laws are regarding Homesteading in the neighbourhood. You may not be able to raise those chickens that you wanted or build that huge workshop that HE’S always wanted.
Community
Ask yourself, ‘Am I able to live in the middle of no-where with little to no neighbours?” Are you an intra or extravert? Being isolated with limited human contact can be a real challenge. No more quick trips to Walmart, or drop-ins from friends or family for an afternoon lunch date. The adjustment to country living is very real for some people.
Family
Do you have a family? Are there children involved? Have you sat your loved ones down and had a discussion about what life will look like down the road? New town, new careers, and new schools! Be sure to have some in-depth conversations with the people you love. Making the switch to a Homesteading life affects everyone (even for those who are not moving with you).
It takes a certain kind of person to leave city or suburban life to pursue a simpler life in the country. It is hard work, challenging, chaotic, expensive but it can be rewarding in so many ways. Learn how to become self-sufficient. Educate your children with more outdoor play instead of electronics. Become your own Boss. Be a better Environmentalist. And learn how to enjoy the pure silence at the end of the day.
3 notes
·
View notes
Text

Egg-in-a-Hole
Adult version of a Bacon Bunny.
Ingredients:
12 slices of bacon
6 slices of bread
3 tablespoons unsalted butter, at room temperature
6 large eggs
6 tablespoons freshly grated parmesan cheese
1 1/2 teaspoons fresh thyme leaves
Pinch of Salt
Pinch of black pepper
2 tablespoons chopped fresh chives
Directions:
Preheat oven to 400F degrees.
Cook bacon in a non-stick skillet over medium to low heat until it is uncooked at desired texture. When cooked, place bacon onto a paper towel to remove excess grease.
Lightly butter or oil a baking sheet.
Using a 3 inch biscuit cutter, or a drinking glass, make a hole in the centre of each bread slice.
Butter one side of the bread. Place the bread onto the prepared baking sheet, buttered side down. Place the excess circle bread slices, that were created from the cutter, onto the baking sheet butter side down as well (this will be extra bread to dip into your egg).
Add bacon slices and eggs, gently cracking the eggs into each hole and keeping the yolk intact. Sprinkle with Parmesan and thyme; season with salt and pepper to taste.
Place into oven and bake until the egg whites have set, about 12-15 minutes.
Serve immediately, garnished with chives.
*Recipe inspired by ww.damndelicious.net
0 notes
Text
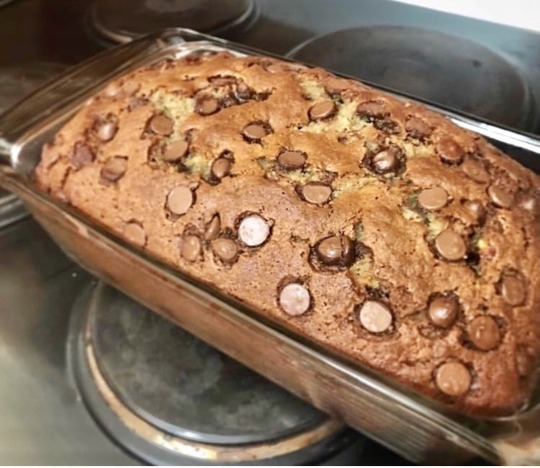
Chocolate Chip Zucchini Bread
Not just your typical chocolate chip loaf. Add grated zucchini, straight from your garden, to create a savory treat that even the kids will enjoy.
Ingredients:
2 cups all-purpose flour
1 teaspoon cinnamon
1 teaspoon baking soda
1/2 teaspoon baking powder
1/4 teaspoon salt
1/2 cup vegetable oil
1/2 cup white sugar
1/2 cup brown sugar
2 large eggs
2 teaspoons vanilla extract
1/4 cup sour cream, or Greek yogurt
1 cup finely grated zucchini
1 cup chocolate chips
Instructions:
Preheat the oven to 325F degrees. Grease and flour a 9x5 inch loaf pan.
In a medium bowl whisk together the flour, cinnamon, baking soda, baking powder and salt.
Whisk together the oil, sugars, eggs, and vanilla extract in a separate bowl.
Stir the sour cream (or yogurt) into the wet ingredients.
Gently fold the flour mixture into the wet ingredients using a spatula.
Pat the zucchini dry using a paper towel to remove any excess water.
Stir in the grated zucchini and chocolate chips.
Pour the batter into the prepared pan and bake for 50-60 minutes, or until an inserted toothpick comes out clean
*Recipe inspired by www.justsotasty.com
13 notes
·
View notes
Text

Honey Mustard Chicken Salad
Simple honey mustard chicken salad will be your new favourite Summer salad.
Dressing Ingredients:
1/3 cups of honey
3 tablespoons Dijon mustard
2 tablespoons olive oil
2 tablespoons Apple cider vinegar
1 teaspoon minced garlic
Pinch of salt
2 skinless chicken breasts
Salad Ingredients:
3 cups Romaine lettuce leaves, washed, sliced
1 cup sliced cherry tomatoes
1-2 large avocado, pitted and cubed
1/2 cucumber, cubed
1/2 ripe mango, cubed
1/4 of red onion, sliced
Directions:
Whisk dressing ingredients together to combine. Pour half the dressing into a small bowl to marinade the chicken breasts for 2 hours. Refrigerate the remaining dressing for later.
Heat a nonstick pan, or grill, over medium heat with a teaspoon of oil and sear/grill chicken breasts on each side until golden brown and cooked through.
Slice chicken into strips. Prepare salad with lettuce, tomatoes, mango, cucumber, avocados, onion strips and chicken.
Whisk 2 tablespoons of water into the remaining untouched dressing and drizzle over the salad. Sprinkle salt and pepper if desired.
*Optional to add eggs, bacon bites, cooked corn, nuts or other vegetables/fruit/protein you desire.
*Receipe inspired by www.cafedelites.com
0 notes
Text

Stuffed Zucchini Boats
Did you plant zucchini’s in your garden this year? If you harvest your zucchini’s when they are monsters like myself, here is a great recipe for you.
Ingredients:
1 large zucchini, cut in half length-wise
1/2 teaspoon of salt
1 teaspoon olive oil
1/4 teaspoon black pepper
2 tablespoon olive oil
1 medium onion, chopped
1 red pepper, chopped
3 cloves garlic, finely chopped
1 pound of ground beef (or your choice of meat)
1 teaspoon Italian seasoning
230 mls of tomato sauce
115 mls of water
1 medium tomato, chopped
1 cup cooked rice
1 cup mozzarella cheese
Instructions:
Preheat over to 400 degrees fahrenheit.
Place washed zucchini halves onto a baking tray, cut-side facing up. Drizzle 1/2 teaspoon of olive oil in each zucchini.
Using a spoon hollow out each zucchini half, placing contents into a small bowl for later.
Sprinkle each zucchini half with salt and pepper. Blake for 10 minutes and then remove from the oven. Set aside.
Heat 1 teaspoon of olive oil in a skillet over high heat.
Add onion and peppers to the pan and saute for 5 minutes.
Add garlic and saute for 1 more minute.
Add ground beef (or which ever meat you have selected) and cook until brown. Using a wooden spoon, crumble the beef into smaller bit-sized pieces.
Reduce heat to medium. Add salt, black pepper, Italian seasoning, tomato sauce, water, tomatoes, and inners of zucchini. Saute for 8 minutes.
Add cooked rice and stir to combine with zucchini mixture. Remove from heat.
Divide mixture between each zucchini boat and top with mozzarella cheese.
Bake uncovered for 15 minutes and serve immediately.
*Recipe inspired by www.thelifejolie.com
0 notes
Text

Strawberry Rhubarb Crumble
We finally harvested some of our garden growing rhubarb. Now what to do with it, is the question? Decided first up will be a yummy Strawberry Rhubarb Crumble.
Ingredients for Filling:
4 cups of chopped rhubarb
4 cups of chopped strawberries
1 cup water
1 cup sugar
4 tsp. of cornstarch
1 tsp. of salt
1 tsp. vanilla extract
Ingredients for Crumble:
2 cups flour
1 cup melted butter
1 tsp. salt
2 cups brown sugar lightly packed
1 1/2 cup quick oats
Instructions:
Preheat oven to 350 degrees fahrenheit.
Add the strawberries to a large pot and mash them into smaller chunks using a potato masher.
Add the rhubarb, water, sugar, salt, and cornstarch to the pot with the strawberries. Cook on high heat until the mixture thickens. *Make sure it is nice and thick; otherwise, the mixture will be too runny once complete.
Remove from heat and stir vanilla into the mixture.
In a large bowl mix the flour, brown sugar, salt, oats and melted butter until crumbly.
Lightly press half of the mixture into the bottom of a greased 9x13″ pan. Pour rhubarb mixture on top of the crumble and then sprinkle the remaining oatmeal mixture on top.
Bake for 45 minutes. Allow to cool for 20 minutes before serving.
*Optional, add vanilla ice cream on top of each slice served.
Recipe from www.thecreativebite.com
2 notes
·
View notes
Text

Preparing Indoor Seedlings for your Outdoor Garden
So you made the decision weeks ago to start an indoor garden. Congrats for making it this far, gardening is a labour of love. You’ve spent weeks now attending to your seedlings indoors and now its time to prepare them for their new home in your fabulous outdoor gardens.
Harden Off, is the process of gradually introducing seedlings started indoors to the much harsher conditions of the outdoors. ie. cooler weather, brighter sunlight. Usually it is recommend to transition your plants over a 7 day span, but compare each year to the previous to see what works best for you in your region.
Start off by taking your plants outside in a sunny area for several hours per day and bring them in for the remainder of the day.
Then add several additional hours per day, so that eventually your plants stay outdoors all day and night.
Be sure that there is no longer a threat of frost prior to this transitioning.
Good luck! Cannot wait to see everyone’s goodies this year.
1 note
·
View note
Text
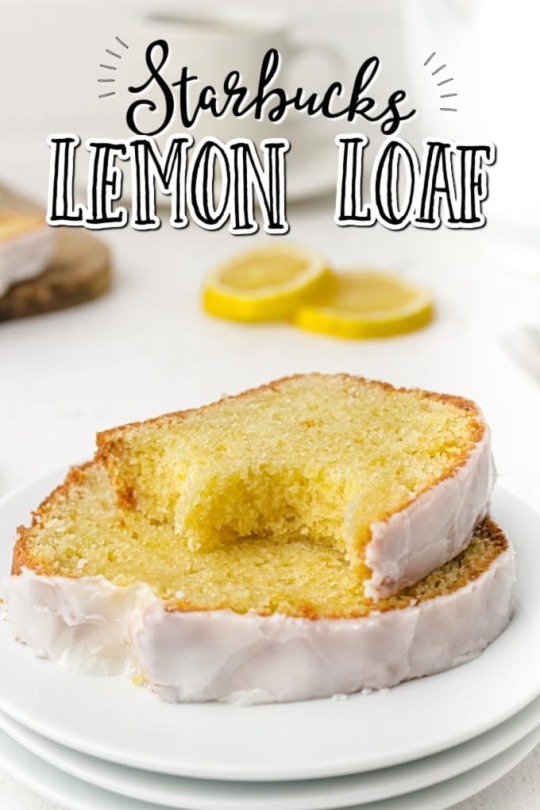
Lemon Loaf Recipe
Since moving to a small rural town, it feels like forever that I have been able to indulge in these sweet treats from Starbucks. Thanks to this copy-cat Lemon Loaf recipe from spaceshipandlaserbeams.com you can now enjoy Starbucks Lemon Loaf right from your own home.
Ingredients for the Lemon Loaf:
1 1/2 cups all-purpose flour
1 /2 teaspoons baking powder
1/4 teaspoon baking soda
1/4 cup vegetable oil
1 cup granulated sugar
3 large eggs
1/2 teaspoon vanilla extract
2 tablespoons lemon extract
Zest of 1 large lemon
1 cup sour cream
For the Lemon and Icing:
1 cup powdered sugar, add more until you reach desired consistency
1 tablespoon lemon juice
1 tablespoon milk
Substitutions and Additions:
Icing: You can leave the icing off your bread if you don’t want the added sweetness. You could also use a store-bought icing if preferred.

How to Make the Lemon Loaf:
Step One: Preheat the oven to 350 degrees F. Spray a 9 x 4 inch loaf pan with cooking spray, set aside.
Step Two: In a large mixing bowl add the eggs, sugar and sour cream. Use a hand mixer to beat together until smooth.
Step Three: With the mixer on low speed, slowly add the oil while continuing to beat together.
Step Four: Add the lemon zest, lemon extract, and vanilla extract then beat to combine.
Step Five: Add the flour, baking powder, baking soda, and salt. Stir until just combined, be careful not to overmix.
Step Six: Pour the batter into the prepared loaf pan.
Step Seven: Bake at 350 degrees F for 45 minutes, or until the top is browned and toothpick inserted in the centre comes out clean.
Pro Tip: In the last 10 to 15 minutes check the top of the bread. If it is getting too browned, tent a piece of foil over the top to prevent it from browning further.
Step Eight: Once the load if done baking, remove from the oven and allow to cool completely in the loaf pan before removing and adding the glaze.
Step Nine: To make the icing, in a medium mixing bowl add the powdered sugar and lemon juice, Whisk together until it is smoot hand well combined.
Step Ten: Evenly drizzle the glaze over the bread before slicing and serving.
Step Eleven: Slice loaf and serve.
1 note
·
View note
Text
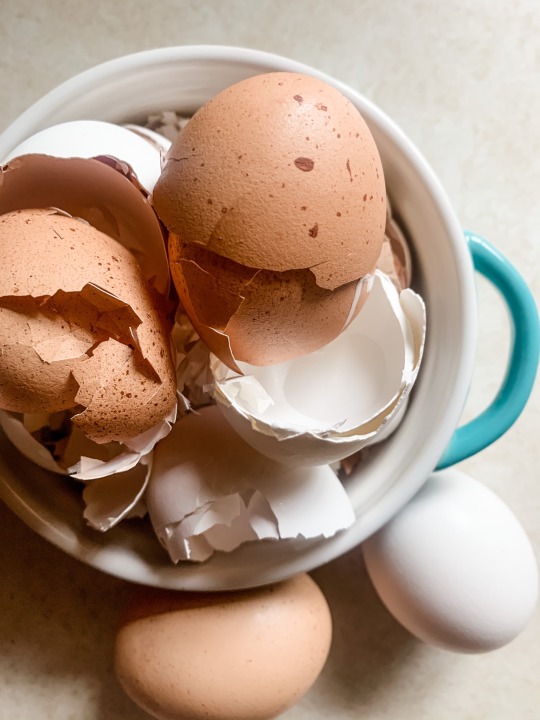
10 Useful Ways to Utilize Your Leftover Egg Shells
1. Feed for your Chickens
It may seem strange at first to feed your chickens crushed egg shells; however, the shells are full of calcium. This is a natural and inexpensive way to provide calcium supplement to your birds, which they need in order to lay healthy eggs. Be sure to crush up your shells into bite-sized pieces, mix with their regular feed, as you do not want to encourage your hens to peak at their own laid eggs.
2. Food for You
Yes, its true! Just like your chickens, you can consume egg shells as well. Create a fine powder by baking and grinding the shells. Now you can mix the fine powder into any beverage, give it a little stir, and boom you now have a great calcium supplement for yourself. If you do not want to drink it, why not put the powder into your bone broth, you'll never know it was there.
3. Plant Feed
As most of us know, crushed egg shells are an excellent source of calcium for our gardens too. Plants like tomatoes will benefit greatly from the extra boost. Crush the shells and scatter around plants that may be lacking from calcium deficiencies.
4. Compost
Speaking of gardens, egg shells are a fabulous composting agent. They will break down, helping to create an excellent soil for your gardens.
5. Laundry Whites
Most of us struggle with keeping our white clothing looking, well, white! You will want to use a Muslin Cheese Cloth bag; insert several egg shells, with a couple of sliced lemons. This will not replace bleach but you will definitely notice a difference with your whites. For those of us who do not like to use chemicals, this is a fabulous natural way to help brighten and freshen things up.
6. Pest Control
Have you noticed your gardens are under attack by certain pests like slugs? Sprinkle crushed eggshells around plants that you notice this problem with, as soft-shelled insects do not like to crawl over sharp items. Who would have thought?
7. Healthy Helpers
We have already determined that eggshells are a great nutrient supplement. So how about mixing eggshells with Apple Cider Vinegar (another amazing product that we will discuss later), to create a soothing agent for skin irritations or muscle pain. When you get a cut, place the membrane side down of the eggshell directly onto the laceration, this will help promote healing. Or completely dissolve some eggshells in the vinegar and use that mixture to rub on your aches and pains.
8. Cleaning Power
Place eggshells in a pot with warm water and soap. When the eggshells breakdown it will become abrasive and you can use that solution to clean your pots and pans. You can also use this agent to clean vases, coffee makers and even hummingbird feeders that build up residue.
9. Knife Sharpener
Freeze your eggshells so they are completely rock hard frozen. Now you can slide your knife across the shell to sharpen the edge. *Please be very careful while doing this.
10. Indoor Starters
No new to buy those plastic planting trays to start your garden indoors anymore. Place your upside down eggshells back into the egg cartons, pour your compost soil into the shells and plant away. Create a herb garden for indoors or use for your outdoor starter seedlings. When it comes time to transplant your plants, literally pickup the entire shell and insert it into the garden. An extra compost boost for your plants immediately.
25 notes
·
View notes
Text
Turning Sap to Syrup
So you have decided to make maple syrup – Awesome! Here are a few things that we have learned along the way.
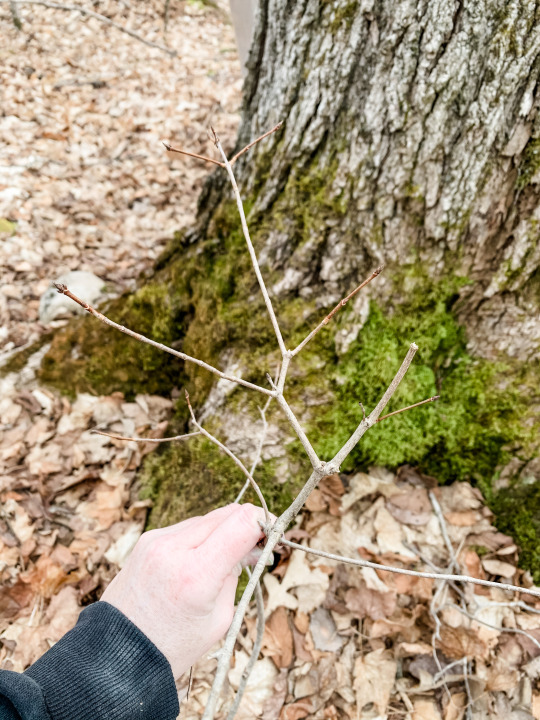
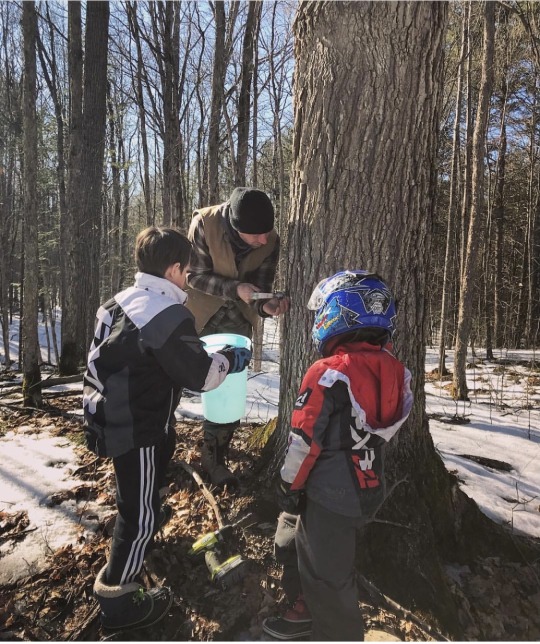
Finding Maple Trees
You might think it's easy to find a maple tree but it actually can be tricky in the Winter. We usually look at the bark but that can still cause confusion. I found this clue that could be a real game changer for you. Maple trees have opposite branches. See how each branch branches off into pairs? Maple trees are one of the only trees that grow like this.
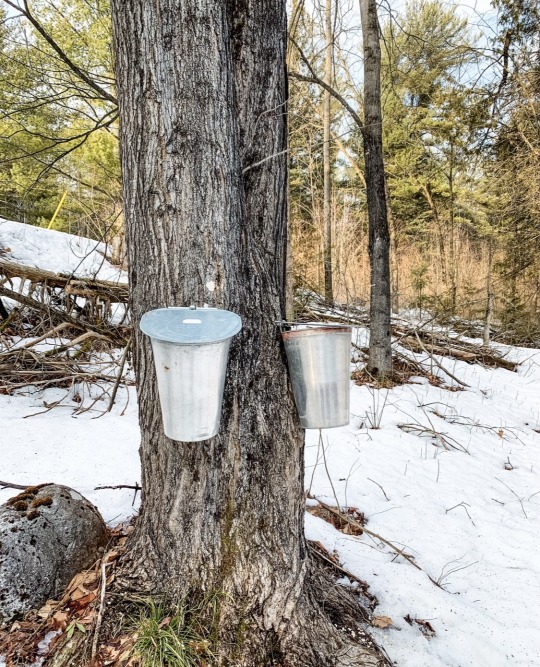
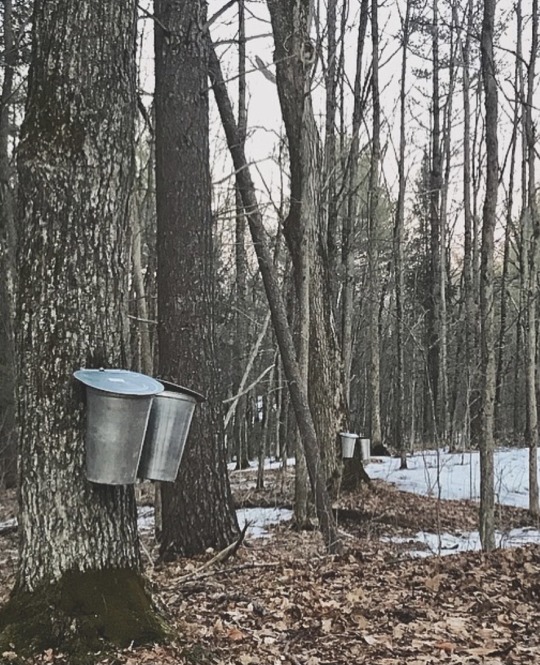
Tapping a Tree
Now that you found a tree, it's time to insert the spouts. Drill into the maple tree approximately 3 feet high from the ground. Using a 7/16 inch drill bit, drill approximately 2 inches deep on a slight angle, into the tree for standard sized spouts. Use a hammer to help insert the spout and hang the bucket onto the hanger. Make sure there is a lid for your bucket; otherwise, you will get yucky rain water or lots of bugs collecting in your sap. Be sure to follow product guidelines.
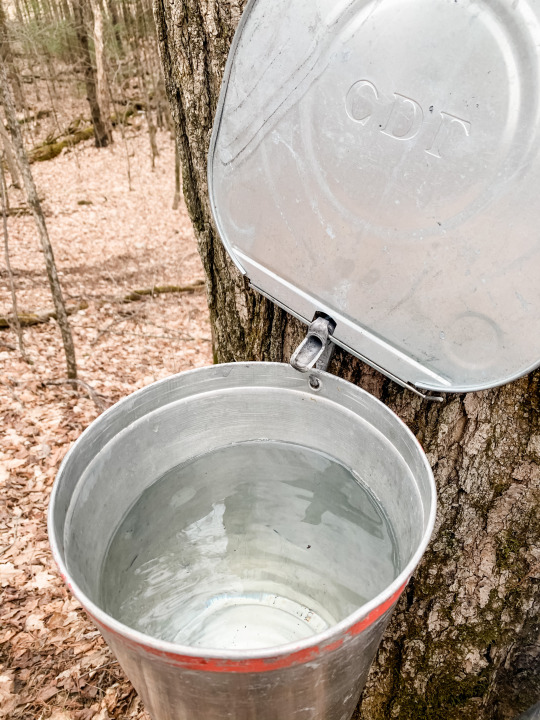
In order for the sap to run, the temperature needs to be warm during the day and freezing at night. Sometimes your bucket will be full in only a few hours and other times you will not have much at all, and it will leave you pondering. It is recommended to hang your buckets on the south side of the tree.
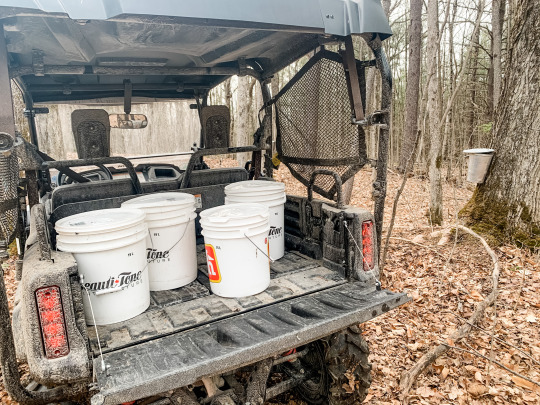
Harvesting
Now it's time to harvest your sap. We used 19 litre paint buckets, with lids, to pour the sap into while we are in the bush harvesting. Empty each bucket you have hanging, into the collecting buckets (easy to transport). Sometimes there may be bugs floating in the sap, that's fine, just pick them out. If your sap is yellow, it could have been tainted with rain water. Yellow is fine within reason. You need to start worrying when the sap is turning cloudy.
Gather all of your sap into one large container, or several smaller ones, in a cool dark place before boil. A good rule of thumb would be to not leave sap in buckets longer than 7 days.
Boiling
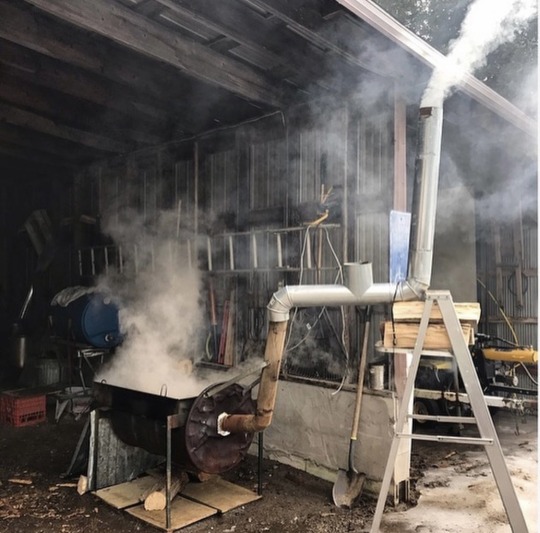
You are now ready to start boiling. There are different options available for equipment depending on how much sap you are boiling. Remember sap to maple syrup is 40:1 the process can be daunting.
You can use a pot on the stove or even on a BBQ/propane tank. In our case we have approximately 25 trees tapped so we needed a larger pan and burner. We created an oil drum fire pit with a smoke stack and surrounded it with cinder blocks to retain the heat. Pour the sap in the pan and start your fire. This process can be extremely time consuming. If you keep adding sap to the pan it can take several hours if not days to completely boil down to syrup.

Now the waiting begins...and waiting...and waiting! Never leave your fire unattended. Your fire could burnout, or burnout of control or your sap could burn.
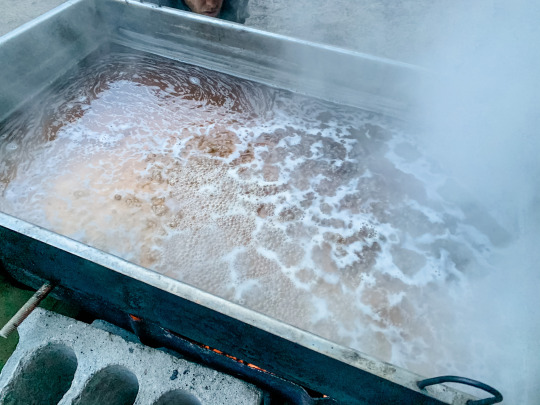
As you come closer to the end you need to keep track of the temperature. We use a BBQ reader but lots of other options are available like a candy thermometer. A good rule of thumb is to reach a temperature of 217-221 degrees fahrenheit. However a hydrometer would be recommended to control the density (we do not have one). Once you are close to the suggested temperature, in our case, we take it off of the outdoor burner so that we can finish bringing the sap to the desired temperature indoors (easier to control).

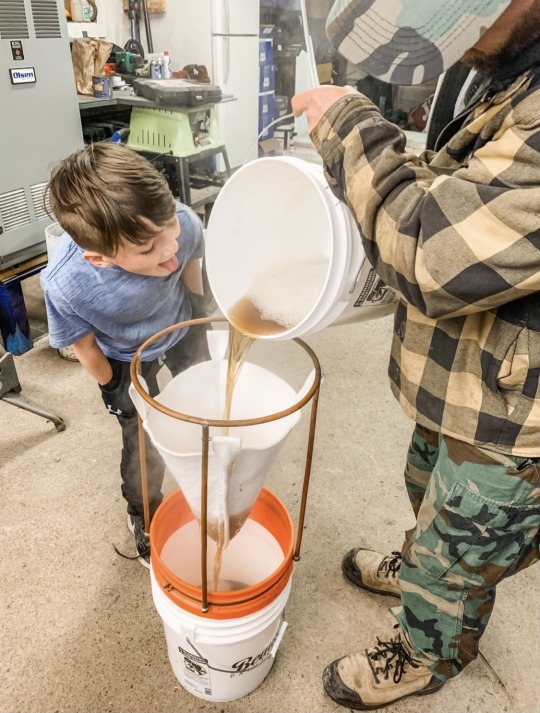
When we are ready to stop burning on the outdoor pit, we pour the sap into a bucket but filtering it at least once before we take it indoors. This is definitely a two man job! Once indoors, we start a slow boil on the stove. Bring the sap to a temperature of 221 degrees fahrenheit (that is the consistency we enjoy). Take the pot off of the stove and filter it again. We do this several times to make sure it is nice and clean. You now have Maple Syrup, but before pouring the syrup into the jars you must make sure the jars have been sterilized.
Sterilization and Canning
Soak the entire jar and lid in a boiling pot of water for 10 minutes and let air dry. Wipe residue off each jar.

Now it's time to pour syrup into jars. Let syrup cool down to 185 degrees Fahrenheit first. Then seal the jar with the lid.
Boom! Now you have canned maple syrup – congratulations! Be sure to clean all equipment thoroughly before you boil another batch or put away your equipment for the season.
21 notes
·
View notes
Text
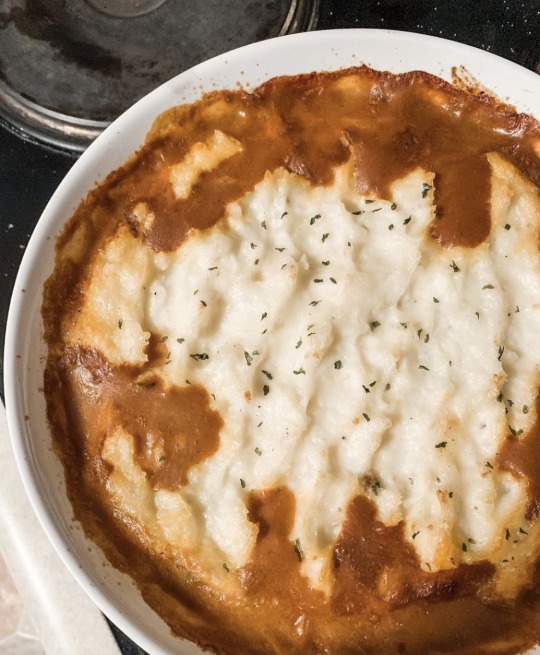
Shepard’s Pie Recipe
I have Irish/Scottish blood running through my veins, so no wonder I love a good traditional Shepard’s Pie. And even though some recipes seem a little overwhelming, it’s actually very easy to assemble.
Ingredients
Meat Filling:
2 tablespoons of oil
1 cup chopped onion
1 lbs ground beef
2 tsp dried parsley
1 tsp dried Rosemary
1 tsp dried thyme
1/2 tsp salt
1/2 tsp black pepper
1 tsp Worcestershire sauce
2 garlic cloves - minced
2 tsp flour
2 tsp tomato paste
1 cup beef broth
1 cup frozen mixed peas & carrots mixed
1/2 cup frozen corn kernels
Potato Topping:
2 lb. russet potatoes - peeled and cut into 1 inch cubes
8 tablespoons unsalted butter
1/3 cup milk
1/2 tsp garlic powder
1/4 cup parmesan cheese
Instructions
Make the Meat Filling.
Add the oil to a large pan. Add the onions. Cook 5 minutes over medium heat, stirring occasionally.
Add the ground beef to the pan breaking meat apart. Add the parsley, rosemary, thyme, salt, and and pepper. Stir well. Cook until the meat is browned, stirring occasionally.
Add the Worcestershire sauce and garlic. Stir. Cook for 1 minute.
Add the flour and tomato paste. Stir.
Add the beef broth, frozen peas and carrots, and frozen corn. Bring the liquid to a boil then reduce to simmer. Simmer for 5 minutes, stirring occasionally.
Set the meat mixture aside. Preheat oven to 400 degrees F.
Make the potato topping.
Place the potatoes in a large pot. Cover the potatoes with water. Bring the water to a boil. Reduce to a simmer. Cook until potatoes are fork tender.
Drain the potatoes. Return the potatoes to the pot.
In a small sauce pan heat the butter, milk, and garlic powder to a small boil. Mash the potatoes and pour milk mixture into the potatoes and stir until all the ingredients are mixed together.
Add the parmesan cheese to the potatoes. Stir until well combined.
Assemble the casserole.
Pour the meat mixture into a 9x9 inch baking dish. Spread it out into an even layer. Spoon the mashed potatoes on top of the meat. Carefully spread into an even layer.
Place the casserole dish on a baking sheet so that the filling doesn’t bubble over into your oven. Bake uncovered for 25-30 minutes.** Cool for 15 minutes before serving.
0 notes
Text

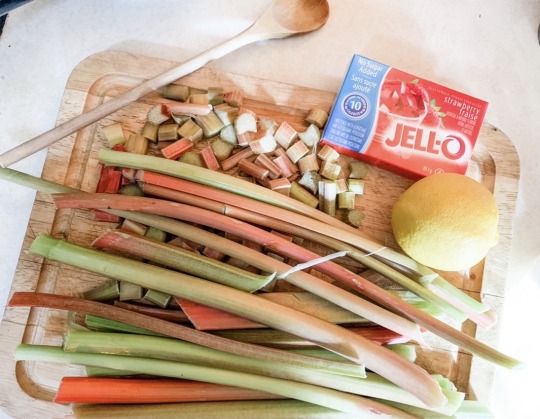
Strawberry Rhubarb Jam Recipe
Excited to share this easy recipe which allowed us to use fresh rhubarb from our garden. 2021 gardening season is right around the corner.
Ingredients:
6 cups chopped fresh rhubarb
2 cups white sugar (to taste)
1 tsp lemon juice
1 package strawberry favour gelatin
In a large stockpot stir together the rhubard and sugar. Let sit for 2 hours to absorb some of the liquid and help break down the rhubarb.
Bring the rhubard and sugar to a boil. Stirring constantly until fruit has been cooked. Use a stick blender to make the mixture into more of a smoother jam paste consistency. Some may like it more chunky where as others may want it more smooth. Now stir in the strawberry gelatin powder.
Transfer to steril canning jars. Be careful, the mixture will be hot. Allow to cool and freeze.
*If you plan on freezing, please follow proper sterilization techniques of the jars.
1 note
·
View note
Text
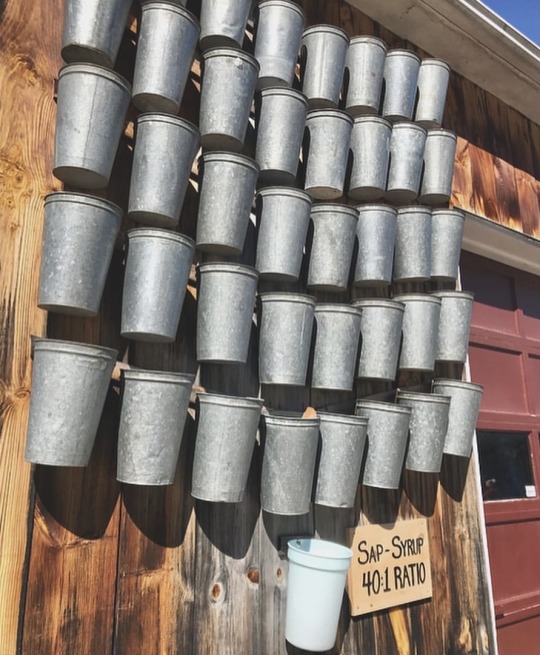
Sugar Shacks
Have you ever wondered how much sap it takes to create maple syrup? Well that ratio would be 40:1. Which means for every 40 litres of sap you collect, it boils down to 1 litre of maple syrup.
The process for us homesteaders is a long one but fairly simple. I will go more in-depth regarding the process a little later this season.
We have been very fortunate to visit two major sugar shack productions within the past couple of years. These producers manufacturer thousands of litres during a small window of time annually. It truly is an art - a science if you will. All the conditions have to be right in order to retrieve the best quantity & quality.
First was Erabliere le Chemin du Rov near Quebec City. Did you know that Quebec is the #1 producer of maple syrup in the world?

Second we visited Fulton’s Pancake House & Sugar Bush near Ottawa.

Both of these facilities are unbelievable! They tap thousands of trees and have made their family run productions into a successful business for every family to enjoy each year.
So this brings me back to our setup. The first year we started production was a small and slow one.

The second year we decided to upgrade our boiling system. Now we can manufacture triple the amount or more in the same timeframe.
If the sap is running fast, you often have to harvest it multiple times per day. You can not leave the sap to sit for too long, before the boiling process, as it will spoil. Again, I will get into the actual process a little later.
Making maple syrup is a huge task. You need to be committed for several weeks. But the end result is that you walk away with great memories and a very sweet treat.
*For the 2022 season we would love to offer a day program for families to join us in our production. Also, you could rent one of our off-grid cabins and stay for a weekend to witness from start to finish and take home your very own jar of maple syrup.
8 notes
·
View notes
Text

How to Paint Furniture
For all of my projects I use Fusion paint. Fusion is durable, quick drying and even includes a top coat.
Here is a basic step-by-step guideline on how to prep and finish your pieces. I hope these simple steps will help you along your journey.

First you need to select your paint colour. Fusion has a great selection of colours. For this project I used Ash which is a lighter grey.
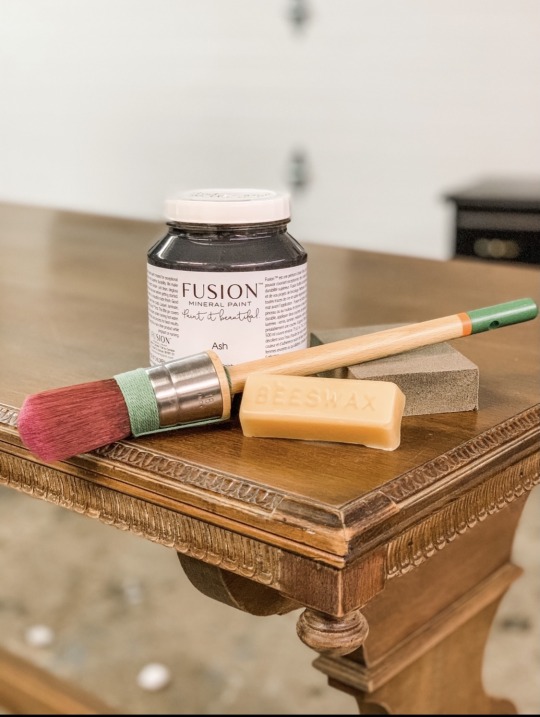
Gather all of the items that you will need for the project. Using an excellent quality brush can make a huge difference. Some projects may require more then a sanding block so be prepared for some elbow grease. You can also apply beeswax on the edges etc. which will create a weathered appearance as the paint will not stick to the wax.

This is the piece that I selected. It’s an elegant side table that is extremely versatile. I was not too fussy about the stain colour, that’s why it required a revamp. The table has beauty character and great bones.
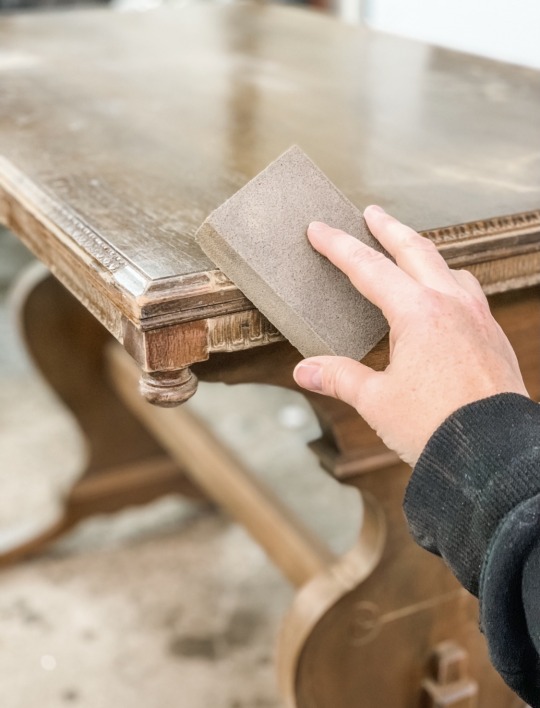
I lightly sanded the entire table. Be sure to wipe off the dust. You definitely do not want to paint over the dust. It will leave imperfections.
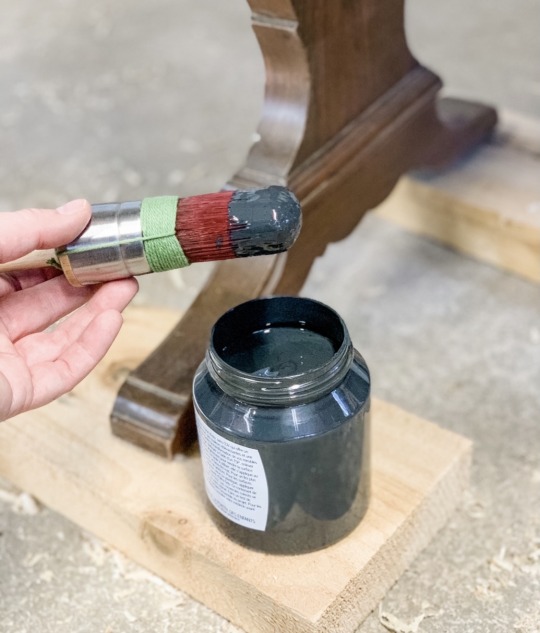
Ready to go...dip your brush into the paint can. I did a lot of research online trying to figure out what the best way was to apply the paint. Some articles said to load up your brush with paint but I found it left thick brush strokes. Now I use less paint and apply multiple coats as required.
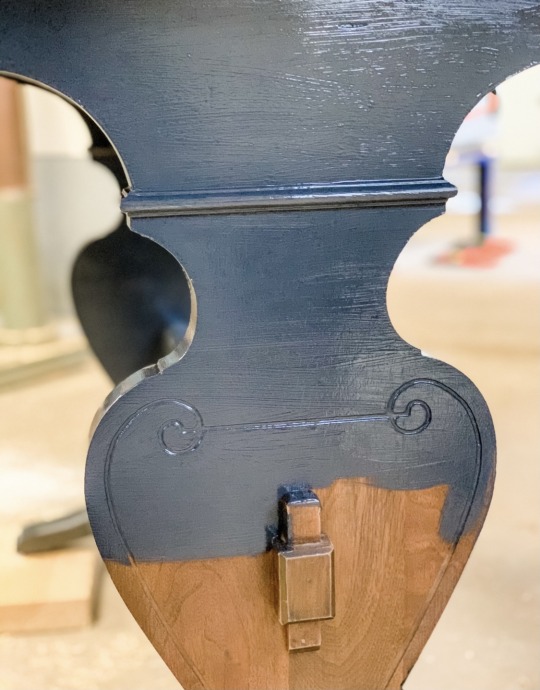
As you can see, there are brush strokes in this photo. Once dried I did a little sanding and applied another coat of paint using a foam roller brush. I would highly recommended using a roller brush when you can. Otherwise use long brush strokes from one side to the other. Try not to overlap too much with your paint strokes while applying.

Now that the table is completely painted, which only took an hour or less, I allow it to dry for 3 hours. I then inspected it for areas that I missed or check to see if I should use the foam roller brush.

And there you have it! What was once old is now new again. Good luck and have fun with your projects.
0 notes
Text
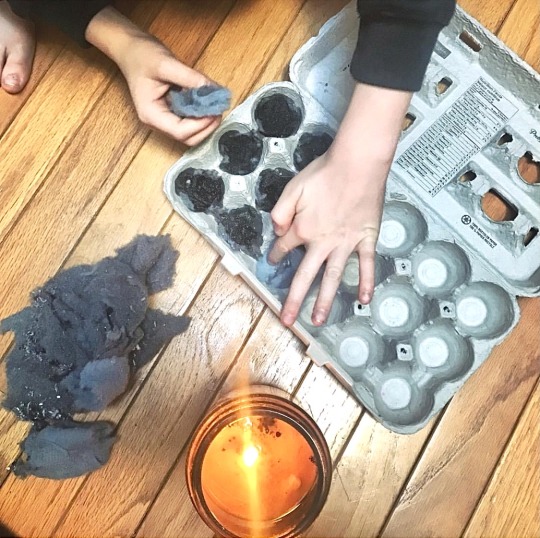
Making Fire Starters
Have you ever tried making your own fire starters? This is a fun and simple craft that you can do with your children or get super creative on your own.
We started this task with only 3 items: empty egg cartons, wax (from old candles) and dryer lint. We pulled apart bits of lint and placed them into each carton. Once the wax was melted, pour it slowly into each carton being careful not to overfill each slot and set aside to harden.
Use these starters for bonfires or keep on hand for emergency situations.
Get creative by adding scents, or other natural products like; pine cones, pine needles, cinnamon sticks etc.
Have fun!
9 notes
·
View notes
Text

Creamy Potato Soup
Let’s warm up with a yummy bowl of potato soup. Add any additional ingredients that have been excluded from this recipe ie. ham or chives that you feel would benefit you and your family.
Ingredients:
6-8 slices of cooked chopped bacon
1 diced yellow onion
3 cloves of garlic minced
3 tablespoons of all-purpose flour
4 cups chicken broth
1 cup cream
1 cup milk
3 lbs peeled potatoes cut into chunks
1 1/2 teaspoon of salt
1/4 teaspoon ground black pepper
1/3 cup sour cream
1 cup shredded cheese
Directions:
Cook bacon in a large pot until crispy. Remove from pot. Let bacon cool off on a paper towel. Leave grease in the pan.
Add onions and garlic to the pot. Cook until onions are soften.
Stir in flour. The mixture will start to thicken up. Cook until it turns light brown in colour.
Stir in chicken broth, milk and cream. Add the potatoes, salt and pepper. Stir.
Bring pot to a simmer. Let cook until potatoes are softened. Stir occasionally.
Turn off heat. Using a potato masher or hand blender, slowly begin mashing the potatoes until the consistency becomes creamy.
Cut up the cooled bacon into bite sized chunks
Stir in the sour cream and shredder cheese. Return bacon to the soup. Stir.
Serve warm with additional toppings of your choice.
*This recipe is extremely filling and we ended up freezing several containers of leftover soup.
*The potatoes and garlic that we used in this recipe were all added ingredients from our homestead.
4 notes
·
View notes
Text
Sneak Peak!
Hoffy’s Homesteading will soon be offering off-grid lodging in either our Bunk House or Hunt Camp. Both provide fantastic but very different overnight lodging options.
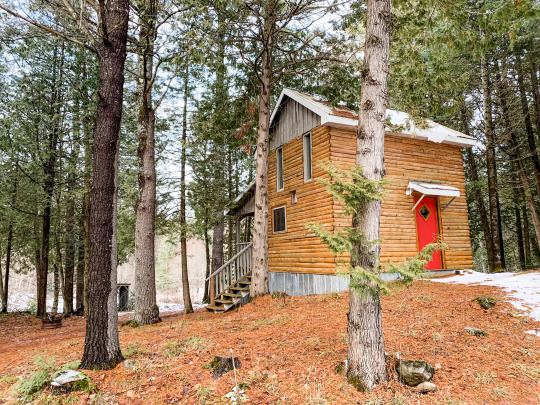
Bunk House
Our log constructed bunkie is perfect for a couple to get cozy or roomy for a small family of 5. Currently there is a double pull-out sofa on the main level and 1 queen and 1 single bed in the loft.

Hunt Camp
This two bedroom cabin includes a living room, kitchen and basic bathroom necessities. Literally a home away from home off-grid experience suitable for 7 people in single bunks.
Details to follow. If you are interested in finding out more information please contact [email protected].
0 notes