
crystallisedentertainment
Crystallised Entertainment
Hi, my name is Matthew! This where I'll post Behind the Scenes stuff for my stupid 3D Animations I do for fun... Also I'll post random pictures to! ;)
YouTube DeviantART
629 posts
Don't wanna be here? Send us removal request.
Last Seen Blogs
daniel-antoinette
Prada Or Nada
daydream4life
Day Dream Forever...
BECAUSE DREAMING IS LIFE!
catherinerosey
♡♡♡
catherinerosey
♡♡♡
spoider
the wisest incision
Text
Back from Holiday and 2023 Goals Retrospective!
Happy New Year, everyone! With 2024 finally being here, we can take a look back and see how much of my goals I have achieved from 2023:
Finishing this overall long-term project by December obviously didn't happen... But at least I did the "prerequisite" project and I am very much in the "endgame" of it! Unfortunately I want 3 months over schedule with it, and it kinda cascaded from there... ^^"
Improving my sculpting skills throughout the year kinda fell apart after March once I started "Project Starlight"... Again - timing constraints were at play here, so it is what it is unfortunately!
So my goals were kinda a disaster last year, but I think I have set a more reasonable one for 2024:
Get the last stretch out of Pre-Production, and announce what I've spent so long working on! I've set a hard limit of May 2025: so ready or not I am going to be announcing it by then!
On a different note - today marks the end of the holiday, and I'm back on the clock! It wasn't quite a relaxing experience and I did end up dabbling with projects pre-breakfast each day... But it's good enough where I can say I've made up that 1 week from missing the 2021 and 2022 holidays.
With that in mind, the holiday period for this year is 19th December 2024 - 2nd January 2025! Let's hope this year I can finally finish the "endgame" of this 28+ month project I've been doing!
1 note
·
View note
Text
Going on Holiday!
It's that time of the year again! I'm going on a holiday for 3 weeks to try to starve off burn-out for 1 additional year. Not completely as there some daily tasks I need to do to keep the Job Center happy, but mostly taking a holiday! ^^"
This year was a little worse as I didn't really have a holiday last year due to me just starting a Microsoft IT course, and it just resulted on me feeling "done" sooner then the usual... The last stretch of this "secret project" I've been mentioning on and off for the last 28 months being the most ambitious thing to date hasn't helped matters any!
Since this is 1 of the last posts I'm gonna be making in 2023: I want to take this opportunity to wish everyone a Merry Christmas (or whatever you celebrate) and have a Happy New Year! =)
3 notes
·
View notes
Text

Hey everyone! Long time no see as always! Earlier today I discovered that the upcoming 4.1 release will have a massive revamp of the real-time renderer "EEVEE" (Codenamed "EEVEE Next"). This will result in easier implementations of features moving forward; however, the immediate benefit of this new build of EEVEE is support for Real-Time Raytracing (a long awaited feature for me)!
Even though the video shows it working, I still left wondering if EEVEE now supports light being cast from "Emission" textures... To answer this question - I downloaded the latest Alpha build of 4.1 and dragged 4 models I made back in 2021 that I know emits light into a scene with the skybox being black: and it totally works! You can see all the models are casting light onto the floor and it is bouncing as expected... It looks super sweet!
The caveat are due to the fact RTRT uses "Screen Space Reflections" to work; any emission texture not in frame/view doesn't emit light. The other Light in general also doesn't pass through textures that has "Transmission" enabled.
So because the current project I'm doing relies both work like in Cycles pretty heavily for how the scenary be lit: I won't be using EEVEE Next to render it as you can bet your boots 4.1 will be out by the time that project is ready to render... But all the following shorts will be using Next, and I cannot wait in all honesty! This experiement has spawned further questions how this performs on platforms that doesn't have real-time raytracing hardware (Pre 20-series/RDNA 2/ Apple M3), but as it stands it's a pretty exciting development for Blender! ^^
My brain has actually been inspired by what I've seen and I kinda want to try to create a "Tech Demo"-esk thing on Real Time Raytracing in Blender... So I might end up trying to start that soon... ^^"
1 note
·
View note
Text
Well here it is! This is the “prerequisite” project I’ve been referencing for the last 6 months. Overall, I’m happy on how it came out and I learnt quite a few things on sculpting, rigging and animation while doing this: which was the point of this project…
In light of this, let’s go through the development of Project Starlight step-by-step and see what I have learnt. So read on down below!
So this R&D project started way back in February 2022 when I set out to create a “next generation” style of rig for future use on my projects. Traditionally, I would try new things on “production” rigs – which hasn’t always played into my favour. This time I wanted to do it as a separate rig and address any issues before I actually make a “proper” rig with what I wanted to implement!
What I hoped to learn, or otherwise improve upon are:
Try to figure out my own cartoonish-style - the last time I tried was in 2017 with those pony rigs that got scrapped after discovering some major issues, and the look of them was a little left to be desired.
I want to further improve my skills in sculpting and retopologising the mesh for rigging.
I wanted to replace my traditionally modelled hair with something that is more dynamic and gives better feedback to me, the artist, while it is being created.
Also to give me a look more akin to big studio productions!
I wanted to figure out how to get Sub-Surface Scattering working properly in textures.
I wanted all the eye controls (even those relating to eye size via textures) to be done with bones instead of the sliders found in all my older rigs.
In a similar vein: I want facial controls in general be done with bones.
Have a fake rim light for easier lighting around the edges of the character.
Have actual jiggle physics for hair to animate them dynamically and not individually by hand, which both be faster and less tedious to do!
Even though I just said the story started February; that is technically untrue as it saw a brief glimpse before shelving it after I quickly realise I’m taking on more projects then I can handle. It really began in November of the same year with me creating a “Character Feature Document”, and the concept art inside Krita”. The feature document, as the name suggests, is a way for me to document all the features I wish a rig to have before starting… Pretty good to make sure I don’t forget anything knowing what my memory is like!
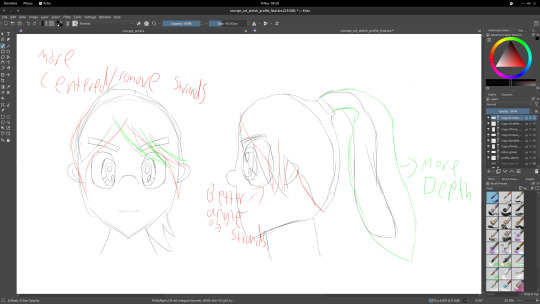
Regarding the concept art: The first revision on the hair wasn’t quite up to snuff with varying things that made it look weird. To combat this I went over the sketch in different colours to the one I did the initial sketch on and dad a sort of “editors note” thing on what needed to be improved.

Additionally, the concept art itself I originally was going to have multiple variations of skin, eye and hair colour and find what I liked most… However, I found a combination I liked immediately, so I stuck with it!
One I completed the concept art, the project was shelved again until I got my current Graphics Display Tablet; this was because the Wacom “Pen and Touch” tablet I had at the time was irritating to use without any sort of “Hand to Eye” coordination, which would make sculpting Project Starlight considerably easier.
I’m going to skip ahead 3 months to March after I did some practice on getting my sculpting skills remotely close to where they need to be… The sculpting of Project Starlight itself went very well and I feel this is the right step in the direction of finding my own artstyle I would like to pursue in the future. Additionally, I modelled the individual teeth meshes instead of using a half cylinder the last time I did this style; this in itself made the mesh feel higher quality! I had one tooth on the left side chipped, which I do like, but probably could’ve been more prominent then it was. However, I think some further practising is required with things such as the nose could have more definition, the lips isn’t quite as I hoped and obviously the chin is too big. But for a first proper attempt since 2017 for a cartoonish-style: I think she has turned out pretty well.
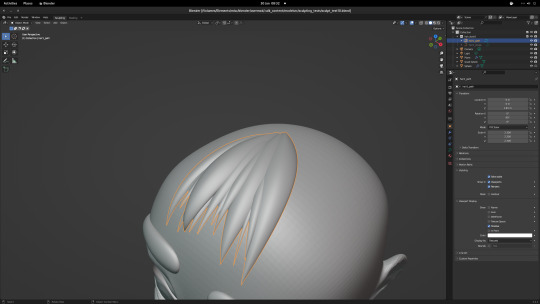
For the hair, I used NURBS to path and shape everything. I was originally going to use one style for the entire thing and overlay it over each other for a nice, cartoonish effect; however I decided instead to use 2 different styles as you see in the “Tech Demo” video to save time as I was a little behind for my original deadline of 1st June, no small thanks to the fact I can’t spend the hours that I use to. Overall I think it has turned out pretty well, however next time I think I would decrease the hair going around on the characters head as you may have noticed in the turntable portion that at around the base of the neck the hair stops going around the head towards the ponytail in a natural, circular style, and go box-y with me squeezing in the mesh so it wouldn’t look empty and even more weird then it ended up looking. Changing the size and position I imagine would solve that issue…

For texturing of the body; I moved to Substance Painter 2019. The base skin texture is actually a built-in “Smart” preset that Adobe shipped with the program… All I did was hiding a few of the detail layers as I wasn’t going for ultra-realism as an art style, then I changed the default colour to an Asian-inspired skin tone. The Sub-Surface colour is handled by a fill layer set to “Cedge”, some of it’s positioning was done as part of the Smart Texture’s work, but I also painted a few masks around the cheek and mouth area which I think gives Project Starlight more alive and dynamic in her texture which I think looks very nice! The freckles were created with a brown fill layer and I had some scattering enabled on the brush when I did the mask… I cannot remember the size and scatter values I used, but suffice to say it took a lot of trail and error to get it looking remotely close to the concept art. Mirroring really did help here!
The mouth and tongue is also part of the same texture, but there isn’t much to talk about with it – they’re mostly just base colours with some specular map applied. However the tongue did get some extra TLC with a bump map and a bit more detail added to the colour. This was actually the first time I used the “blur” effect in Substance Painter, or even was aware of it’s existence. I painted some white colouring on top of the base pink tongue colour, and lowered it’s opacity, then blurred it to blend it into the main colour. In all honestly Substance Painter misled me slightly with the intensity as it had a more seamless blended then it did when seen in Blender… So next time I would increase the intensity.
Overall though, I think the texture styling I went for is a nice blend of photorealism and cartoonish. Last time I tried to have anything like this in terms of styling was the “hand painted” style with the Ponyville houses back in 2017 with bump maps and the like – but the terrible way I UV mapped it and my reluctance to use presets as a starting base meant it looked very unappealing. Project Starlight on the other hand looks very cute and has a certain Pixar/Dreamworks vibe to it.
Also as a fun fact – Project Starlight was last thing to be textured in Substance Painter before moving to ArmorPaint a few months ago!
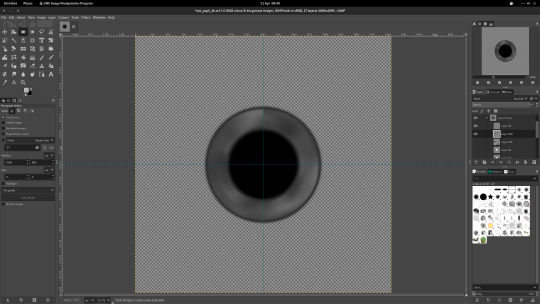
Originally I was going to create the eye texture in GIMP and import that into Blender… However I couldn’t get styling right for the inner eye with the above image being my last attempt… Since I couldn’t get what I desired through traditional means: I decided to go down the procedural texture route!

Procedural textures does have some immediate benefits such as being more resource efficient compared to image textures – I’m pretty sure the bottleneck is my 3060 for the terrible performance as the body texture was exported at 8K for fun! Anyways, using this tutorial by CGRogue as a base; I created the eye texture. There is some slight differences in my one. I’m very happy how it has turned out, and it fits the style of the main head texture surprisingly nicely! I have further modified the highlight portion of the texture and created templates for me to “drag and drop” onto future non-chibi rigs if I need them.
When rigging the nose I noticed the way I retopologised was weird and created a “w” shape when the upper lip bones moved. It turns out the way I merged vertices to the centre was causing issues, and to get around it I created an additional set of edges around the circumference of the mouth which gave me more natural results. Next time I won’t merge any vertices around the nose to avoid this issue again.
An another unexpected issue I encountered while rigging the character was getting the eyelash position line up with the eyelid. It turns out you can’t have have 2 set of edges in between a singular set, and the control bone, will not deform in the way you’d expect. Each edge needs to perfectly line-up on each respective mesh and the bone controlling that edge… Doing that got the entire area to work properly. The eyebrows also had a similar issue to the eyelash; but to avoid repetition I’ll not repeat the process I said earlier… But suffice to say what I did to fix the eyelash also worked pretty well eyebrows.
However, that was not the only issue I had with the eyelid; this one was a lot less of an issue but with this rig I wanted to have the eyes slightly influence the position of the surrounding mesh from the eyelids. Originally I went with a 50/50 ratio for the influence of the eyelid bones to the eyes, but this caused a quite large distortion which was very distracting and overall undesirable – so setting the ratio to 90/10 made it behave a lot better. I wish I could’ve had more influence from the eye, even a 80/20 split would’ve been better as I feel it’s too subtle and you don’t really pick up on it when Project Starlight is moving! Especially when compared to rigs made by other people that inspired this decision.
When it comes to the hair, since I used NURBs to create it – rigging it to animate is a little difficult… Since most people these days uses Blender’s hair system; there isn’t any tutorials for my styling – This style of hair is meant to be static for things such as figure-like sculpt. This meant I had to figure it out myself! The first thing was converting the hair into a riggable mesh: First I go to “Mesh” which can be found through “Objects > Convert”, then un-subdividing that 4-6 times. This gave me a mesh that I could easily weight to the bones. To have the hair as smooth as it was originally, I added a subdivision modifier and set that to the amount I originally decimated it by. From there rigging it is just like any other mesh in Blender.
Next up is having jiggle physics! This isn’t something I used even back in my SFM days due to never taking gravity into consideration, and it would often clip into the rest of the body when the character is moving. Now however, I wanted some automation to make my life a little easier when animating. I was hoping to not need an external plugin, but there doesn’t appear to be a built-in solution in Blender yet as of 3.5; so I used a Python plugin called “Wiggle 2.2” for the job! While it can work in real-time: I quickly found out it’s an absolute CPU hog and eats at least 70% of the processing power of my Ryzen 7-3700X based system… So instead I have Wiggle disabled in the scene when I don’t need it yet in the animation process, and bake the sequence when I’m practically done with the animation! The last 3-4 bones are effected by this script, the rest still requires animation by hand to help make sure the hair takes gravity into consideration.
The advantage of using Wiggle is that it has collision detection – so the hair bounces off the head when it comes into contact! This makes it massively more useful compared the the jiggle system in SFM! And that is nothing to say you can use certain simulation features such as “Wind” to have the hair blowing naturally. Seemed like a natural way to test the hair physics in the end showcase, honestly!
If you’re more of a visual learner: I have uploaded a tutorial on my secondary channel detailing this process for you to follow.
Overall, the Project Starlight has 62 individual controls for the face – a new PB! I didn’t really use all of them during testing, but I had them there just in case.
Since moving to Blender I kept the exact hierarchy I’ve been using during the Cinema 4D era, which itself is heavily inspired on how it is structured in Source Filmmaker! So in this rig I wanted to try to get the rig to conform with with the standards in Blender to make it easier to import into projects… This means everything should be neatly packed into the “Armature” object.
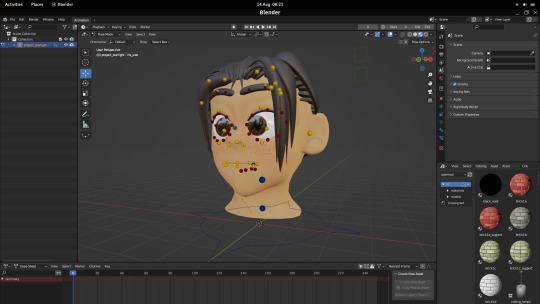
When it comes to my rigs: they are never that easy to read with everything on a single layer, and uses the default “bone” shape. This makes, say my chibi pony rigs, really difficult to see how the character’s mouth is when playing back the animation without hiding the rig. So in Project Starlight I decided to group controls for certain areas of the rig into separate layers: so layer 1 for the body controls, layer 2 for the upper face, layer 3 for eyes, etc! I think this has help de-cluttered the rig while still giving me the controls I want when they are needed… This alone really helped with the UX honestly.
Also to help with readability I wanted a somewhat unobtrusive shape for the controls. Originally I wanted to do a Pixar Presto thing where you select part of the mesh and see the results without the need of the bones being exposed – but the the test using the Gorgie head last year shows that isn’t practical in Blender. So instead I turned to Dreamworks and their Apollo software for inspiration: Apollo uses these nice, clean spheres that doesn’t take up too much space on the rigs but Dreamworks’ Animators can easily tell what that bone is for! When Apollo was introduced nearly 9 years ago, all those spheres were a singular colour, but in more recent revisions (as seen in a recent BTS video), it’s all colour coded!
Knowing that was how I wanted Project Starlight’s rig to look – I jumped into Blender! I used IcoSpheres specifically as I felt the UV variety didn’t really suit what I was after. Since not all the bones are the same size, it took a little while to getting the custom shape as close to uniform across the entire rig… Fortunately Blender has controls to modify the XYZ coordinates for position, rotation and scale for each bone’s “custom shape” – so it wasn’t that hard to do all things considering! The only NURB I used was for the “RootTransform” bone: in the past (back in the C4D days), it was a basic circle with no modification to the shape, this time I did a basic “compass” design for each direction by deleting ¾ of a circle and using a “Mirror” modifier to fill in the missing area of the shape. This proved very effective as I got the all the arrows looking identical for each direction without painstakingly trying to get all the points in the same direction – which made it a quick and easy job to do!
The colours I used for colour-coding what is what is dark blue, yellow and red depending on how far down the chain a given bone is:
Dark blue is for the main body controls (RootTransform, neck, head, etc).
Yellow is just below that and is for “general” face controls.
Dark red is the furthest down the chain and is for very minuet and specific controls such as each point in an eyebrow, or each “muscle” in the eyelid.
The exception is eyes which is a teal green to help differentiate it from everything else. Oddly enough, when I tried to add more colours to the rig to help with even more specific controls (like the hair for instance) it just made the entire thing feel more cluttered; which is the opposite on what I am trying to do… So those 3 primary is what I stuck with!
While using rigs created by other artists, I noticed that they had set up restraints for things such as how open the mouth can be or the rotation values of the eyelids. I have never tried to implement a similar thing myself, and that is evidenced that all my bones can go to infinity and beyond! Because of the benefits of having things move in a set amount, I had decided this was something else I wanted to try out in Project Starlight - luckily Blender has built in bone restraints for position, rotation, or scale; so it was really easy to implement! I had set a rotation restraint for the eyes and jaw, and positional ones for each of the 4 eyebrow bones. Overall, I think this was a success as it stopped the mouth going too wide, the eyes going “out of bounds”, and the eyebrows to act in a somewhat realistic way!
In the past when I try to “port” other people’s rigs to newer releases of Blender (like ones designed during the pre-2.8x era), I always had an issue where any object (typically NURBs) not weighted in the “Armature” object just ends up spewing out into the main hierarchy – which is less then ideal. I actually found that simply parenting the custom shapes onto the “Armature” object works exceptionally well, and when I did a test import of Project Starlight into a new project file; everything stayed inside that object! This makes it a lot easier to overall understand organise rigs into their respective collections when setting everything up before I block out my animation!
2 notes
·
View notes
Text
Switching from Substance Painter to ArmorPaint!
It’s hard to believe that it’s nearly been 4 and a half years since I upgraded Substance Painter to 2019! This was just after Adobe bought Allegorithmic and everyone (including myself) were afraid Adobe would pull the Substance suite from Steam and force you to use their CC-subscription service to gain access to it.
Obviously that hasn’t happened (yet), but I have stuck with 2019 and actually have done nearly 200 hours worth of texturing, most of that I suspect is from 2021-2022 in all honestly, and it has performed valiantly! But it is coming to that time again where I consider upgrading Substance Painter - But 2023 isn’t doing it for me as it has progressively gotten more buggy over the intervening years based on what I heard, and Adobe has increased the price on Steam for the privilege of a perpetual license.
Mainly because I dislike Adobe, I’ve turned to alternatives to fill in that gap for non-chibi related texturing... Like a common theme with the rest of the workflow: I’ve chose an open-source application called “ArmorPaint” that offers everything I wanted from SP2019, but some nice additions that I believe not even 2023 offers! It’s technically free if you’re willing to compile the program yourself; but I’m too dumb for that... So I bought it for a pre-compiled version at a very agreeable £18 - which is massively cheaper compared to Adobe’s offering, plus I get lifetime updates for free! I’m basically got my cake and I can eat it.
So yeah, this marks the end of the 7 years I’ve used Substance Painter as it is now a “legacy” program in the workflow; something I only install if I need access to those project-files, but no longer will be used actively.
(News on the “prerequisite“ project down below)
In other news: The “prerequisite“ project isn’t finished yet and I’m still working it; but that unfortunately what happens when life finally catches up with you and you can only allagate the minimal amount of time per day on hobbies... It is what it is! Wish I could say it is nearly completion, but the opposite is true and I still have a long way to go, espiecally if I want things up to my standard... I’m now aiming to get it done by September - but I’m unsure if I’ll even get it done by then. ^^”
1 note
·
View note
Photo

Happy Sunday everyone! Got a little thing that is not relating to any of my “long term projects” to show! =)
I recently created a new "Lightroom" stage map to replace the old one, with the design that dating as far back as the Cinema 4D days. This new map is less of a bowl shape and more of a smoothed edge box design. The "Point" lights have also been swapped out with "Area" lights as the point lights never worked like I hoped. The area variants hope give a nice "soft light" effect!
Did a test render of the “prerequisite” project that isn’t quite ready for prime-time yet with a WIP version of the map (lights settings weren't dailed in yet), and the render was pretty nice. This is the only map I'll probably Append instead of "Link" so I can edit the lights if I need to.
Hopefully this “prerequisite” project I mentioned back in January will be done by the middle of this year, with the actual initiative it is for done by the end of the year! ^^”
4 notes
·
View notes
Photo

Good morning everyone! I know it’s been a hot minute since I posted here - just been super busy behind-the-scenes and I’m not quite ready to talk about it yet. ^^”
This announcement is a tad late, being chalked up to not wanting people to think it was an April Fools joke and just not remembering to post it... However - I want to formally announce that my gaming streams on Twitch, like Crystallised Entertainment itself, has gone onto hiatus until further notice!
This is in part due to just a handful of technical problems that keeps plaguing me and has caused the stream to be unwatchable on several recent streams! I promise I'll return when I have time to fix these issues among some other things... ^^"
2 notes
·
View notes
Photo
So yesterday I thought I’d try creating hair as that is also a point I need to improve on in my character creation. Using a tutorial by YanSculpts - I started creating individual strands of hair. I originally all hair starts at the scalp, but since fiddling with my own hair after-the-fact - I realise this isn’t the case!
I also realised how how time consuming is (it’s going to be a multi-hour job), and since I only have 30ish minutes to practice my sculpts; I won’t be continuing with this specific thing. But It was a massively helpful learning experience! ^^”
0 notes
Text
I’m Back from Holiday!
Hello everyone! Just thought I let you know that I’m now back from my holiday and all my main (and side) projects has been fired up again whenever I’m not doing the studying.
It wasn’t as relaxing as I hoped it would be as I’ve been stressing out over other (non CE) things, so I’m not much better off on the “borderline burnout” then when I started... So the 2023 holiday is still 3 weeks opposed to 2. However, I was suppose to begin yesterday, but didn’t want to because it was a bank holiday. Since I am personally deeming that as an “unauthorised” leave, I’m deducting 1 day off for next year’s holiday as compensation.
With that in mind, my next “only planned” holiday period will be on the 13th December. Hopefully 2023 will be more productive before then! ^^”
0 notes
Text
Greetings 2023!
So 2022 has come to a close, and with that all the goals I had for the year.
So not wasting anytime, Unlike the 2021 goals, the 2022 ones didn’t exactly go according to plan.
The “secret video” didn’t get finished by June 2022, but instead 6 months later in December. Like a week or so before I went on break. So I’m more then a little disappointed about that as it has put other plans behind schedule.
I did however upload 1 animation video in form of my SFMMovie compilation... This is what I planned to upload from the get go when I announced that plan last year, but I specifically wanted it uploaded in June as I knew I wouldn’t be making anything for a while.
The aims I have for 2023 is also simple:
The secret video was part of a bigger project, and I hope I can share the fruits of my labour by November/December time of 2023. The secret video was suppose to be the easy part compared to what the following aspects of the project are. I’m hoping to do some of the prerequisites throughout the first half of the year.
An “optional aim” of mine for this year is to drastically improve my sculpting skills. As I mentioned on Friday - my current level has a lot left to be desired, and considering I want to use sculpting for a majority of my future character models; this seems a worth-while side-project to do throughout the year!
I don’t know how obtainable these goals are considering I’m studying a network course right now, in addition to the job centre, CallieMacN and secondary channel videos taking up the few hours I have when I’m not studying. To say I’m a bit squeezed for time is an understatement!
I know when I talked about this secret video in September, it looked like I’m complaining just for the sake of it, but hopefully this time next year you’ll be able to see some of the hard work I’ve been putting in behind-the-scenes of Crystallised Entertainment! So with any luck this year will be a more productive year then 2022! ^^”
0 notes
Photo
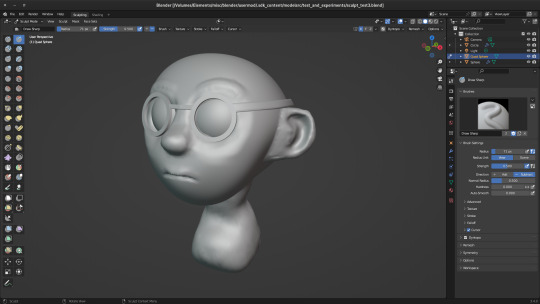
Originally I wasn’t going to publish this publicly, but a few days ago I setup a new graphics display tablet that replaced my Wacom Intuos unit. When I first tried it out, I decided to give Sculpting a go since it has been a hot minute since I did some, and even longer since it was a Humanoid. It turned out like a Gremlin/Goblin, which is not what I wanted. Today I wanted to try again.
Unlike my previous practices, I actually have some concept art to go off on... This concept is by Luigi Lucarelli over on ArtStation. I only had 40 minutes this morning before breakfast, so I didn’t get an opportunity to try things like modelling/sculpting the hair.
Overall, it’s better then my previous attempts, but there are still things that need improving on:
I tried to sculpt the eyebrows on the main mesh instead of creating a new one for the eyebrows to save time, but it hasn’t gave the desired effect... So next time I won’t be doing that.
The ears look rather flat, and doesn’t look as nicely rounded compared to the reference article.
A common problem with my sculpts is that I always make my eyes a perfect circle, but it probably be save to say that even cartoonish rigs has more oval shaped eyes - maybe using the mask instead of digging out the sockets will prove more successful...
Basically I’m saying my sculpting skills has a lot left to be desired, and it still doesn’t look visually attractive, and so I need to somehow fit time into my normally busy day to practice sculpting... ^^”
0 notes
Text
Gone on Holiday.
Hey everyone! Just want to let y’all know I’m now holiday from today until the 2nd January - so I won’t be working on anything during the intervening weeks to try to combat the constant feeling of borderline burning out.
I know it looks like I haven’t gone off last year’s holiday based on how little I posted, and the only thing I mentioned about what project I was working on, looked like I was complaining about something unrelated, or just nothing; but it’s just one of those things from treating the project with a borderline NDA. Hopefully next year I can show you what the hoopla was about! ^^”
0 notes
Text
I’ve Moved from Twitter Onto Mastodon
Good evening everyone! Been meaning to post this for over a week, but time has been an issue. Just want to let you guys know my Twitter has been abandoned and I’m now posting on Mastodon. Lately it’s been retro computer stuff (particularly Acorn), but I do the usual posts about streams there, and eventually important 3D animation news (linked from here on Tumblr).
This isn’t replacing Tumblr, so I’m still going to post here when I have something to show!
0 notes
Photo

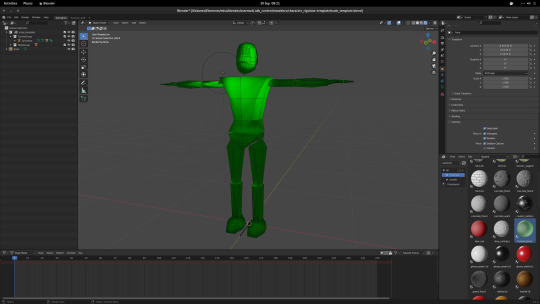
So this is something I wanted to talk about for a few days now... This came to be as I needed a model to use as a scale reference for a singular prop that’s just a generic and isn’t tied to a project, or for a “map” that is part of said project.
This quest to have such a model started by modelling a Banana last year. The “Banana for Scale” idea was good in theory, but I’d found in the digital realm it had inacquirices for scale when a prop was added to a map, or elements within the map itself. Next up I used a rig, Norman, as I wanted to animate with him and he was the right scale I normally work at in Blender anyways. But problems arose from being constructed on such an old version of Blender that I ended up not using him to animate with and religate him just as a scale template.
But the problems that ended up me not using Norman to animate things with still was persistent and it was a pain every time I imported him. So I decided I would create my own mesh dedicated for the purpose. It is inspired by “info_player_start” of Valve’s GoldSrc and Source engines, but have my own twist on his design. For the material I modified a frosted window texture I made for a different project. This gives the character the desired green look in “Material” view and a nice almost “Crystalline” look when in “Rendered” view which I find really visually appealing!
He’s low-poly and have a singular “RootTransform” bone in his rig. It’s definitely a “no frills” template, perfect for what! He’s not suitable for my Chibi-style. But for a cartoonish style: I can see this will be considerably more useful to compare scale to instead of the Banana and Norman! =)
0 notes
Text
Quick Checkup
Hey everyone!
Just want to confirm I’m not dead as I have gone radio silent for nearly 3 months! I have been working hard on this secret project that I literally have had no time to do anything else. The problem is that it feels like the Job Centre is breathing down my neck, and since I’ve gone over my deadline by 3 months (so far) I can’t afford to work on anything else.
This project is only about 27% complete, and I wanted to have 100% of it completed by June. So if Time was a budget, I have gone way over! This project needs to be done, but I admittedly would like a break from it to work on something else as a creative break as it were... But due to the importance of this project being done - it’s simply a luxury I can’t currently afford.
So I’m going to be continue chipping away at it in the background, but rest assured I’m not dead - just swamped down on things.
0 notes
Photo
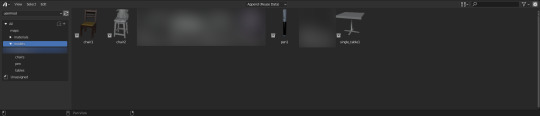
So I know I said in my last post I’d move onto the last elements before I make the artwork/timelapse I’ve been wanting to do for a few months. But literally a mere few hours later I found out Blender 3.2 dropped and it included support for collections for the asset browser. So I spent a few days making my model asset library compatible with this feature. (I have blurred out my non-generic props I’ve made and is tied to any “long-term projects” I have in the pipeline).
There is a few interesting quarks right now: The first and most prominent one is the way the asset browser is appending is different to how it works if you do it manually itself, and it doesn’t import the other collections grouped inside the one you marked as an asset... This means that the asset browser is only compatible with “static” props, with “dynamic” props and full-on character rigs not useable due to way I organise elements to a rig! ^^”
The other problem is that some props’ preview doesn’t show the textures that are assigned to them - which I haven’t figured out the cause yet why this happens to some of them while others it doesnt.
Hopefully the appending system within the asset browser will get added support to modify assets within the collection without modifying the “master” file (like if you would traditionally append an item). For now I’ll have to only use the asset browser if I need “static” models.
0 notes
Video
youtube
Good morning everyone! Here’s a little filler video while I’m working on stuff behind the scenes. This time I want to take you down a trip down memory lane between 2017-2020 where I pretty much worked exclusively on Jolly’s SFMMovie collab series thanks to the time it took to render out the C4D submissions in particular on the old Hackintosh workstation...
I hope you get a good kick out of them! ^^”
#Cinema 4D#cycles 4D#cycles#blender#eevee#eevee render#eevee renderer#blendereevee#blender eevee#Source Filmmaker#SFM#3D#My Little Pony#pony#Twilight Sparkle#sweetie bot#sweetie belle#applebloom#rarity#Scootaloo#jollyoldcinema#CrystallisedEntertainment
2 notes
·
View notes