
Last Seen Blogs

bluevaultsecure
BlueVault

dwrean
Δωρεάν

yourarifhossainblr-blog
Untitled

heeya-kkim-blog
heeya_kkim

cheeseparkour
jesus skateboarding christ
Text
How to Use Time to Walk Feature in Apple Fitness Plus?
Apple use to add several new services and apps to its health and fitness device that is Apple Watch. The company has recently introduced an interesting and new feature, “Time to Walk,” officially especially for Apple Fitness+ subscribers on its wearable device. This feature provides an inspiring audio walking experience on Apple Watch. The feature is made to encourage fitness and health-conscious persons to go for healthy walks.

“Time to Walk” enables the users to get audio content from interested and influential persons who share stories, music, photos, etc., on several topics. Each episode takes up to twenty-five to forty minutes, and you can quickly access all of them right on your Apple Watch. You can also access available episodes by navigating the Fitness+ section available in the Fitness app on your smartphone.
Here are the steps to know how you can access and use the newly introduced feature of “Time to Walk”:
Workout with Apple Fitness+
Apple Fitness+ enables the users to get their next workout and customize their in-session metrics with several features. You can get the tips of the world’s best trainer’s right on your device.
Pairing Bluetooth Headphones Right on Your Apple Watch
Before using “Time to Walk” on your device, it is necessary to have a pair of Bluetooth headphones connected to your Apple Watch. Here’s how to do the same:
At the start, tap the Digital Crown to access the home screen of your Apple Watch.
Then, press the Settings icon to launch the respective app.
Now, hit the Bluetooth option there.
Tap on the device’s name you like to pair with.
You can see the pairing status on your Apple Watch’s status bar. Once it starts showing “paired,” you will be able to view the option “Connected” right on the Bluetooth setting of your Apple Watch. Then, you can easily stream your desired music.
Getting Started with Time to Walk on Apple Watch
Before going to start the “Time to Watch” Experience, you must need a pair of Bluetooth headphones and AirPods paired and connected to your smart wearable device. Here is how:
First of all, open the Workout app on your Apple Watch.
Hit the menu tab available on the tile option “Time to Walk” situated at the upper section of the list.
Press the particular episode of “Time to Walk” you like to experience.
Controlling Time to Walk Playback
Once you have started the Time to Walk episode, an outdoor walk workout will begin automatically. You can easily manage and control the respective playback of the episode “Time to Walk,” just like any other audio.
Here is how to control Time to Walk Playback on your SmartWatch:
First of all, swipe your Watch screen leftward from the workout page.
Then, hit the playback controls option to control your episode.
Now, you can easily play or pause your Time to Walk episode. Go back fifteen seconds or skip thirty seconds ahead; you can do what you want. You may also adjust where your audio is going and see what’s next in the playlist, just as you do in your music app.
As you know how to use Time to Walk service of Apple Fitness+ right on your Apple Watch, pair your Bluetooth headphones to your wearable device first, get started with “Time to Walk,” and control your playback per your wish.
Wilder Zayn is a self-professed security expert; he has been making the people aware of the security threats. His passion is to write about Cyber security,cryptography, malware, social engineering, internet and new media. He writes norton.com/setup security products.
Source: https://secure-blogs.com/how-to-use-time-to-walk-feature-in-apple-fitness-plus/
6 notes
·
View notes
Text
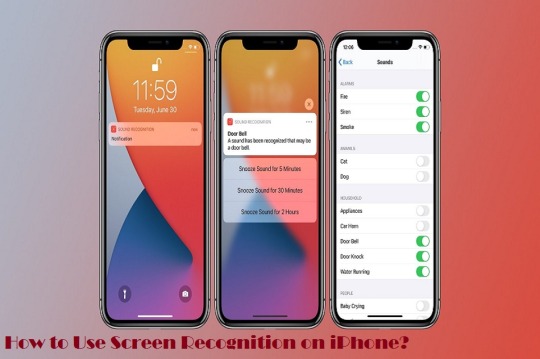
How to Use Screen Recognition on iPhone?
Apple is among the trusted smartphone brands in terms of easy accessibility and reliability. Therefore it regularly tries to improve its features and tools to make the gadget accessible for each user. One of such successful efforts is the introduction of VoiceOver. It’s the screen reader and recognition tool developed especially for low-vision and blind persons. It brings the voice feature to the next level. With this new feature provided by Apple, users can easily have their smartphone’s screen read to them, even if the user didn’t optimize the apps for VoiceOver.
If you want to activate and use the Screen Recognition feature on your device, then follow these straightforward steps:
More about Screen Recognition
Screen Recognition has provided several improvements in the already-existing VoiceOver feature. It automatically detects the entire layout of the particular element in the user interface section, especially if the user is not optimized for VoiceOver.
Previously, users need to manually handle every element of the app’s interface for using VoiceOver, especially for visually impaired persons. With this screen recognition feature, we have Machine learning functionality to automatically detect and label each tab, icon, slider, and button.
On iPhone, Screen Recognition is computer vision functionality. It has been successfully checked on thousands of images of apps. The particular algorithm detects the relevant button, tab, and icons to let the user know how several on-screen elements differ from each other. It can easily recognize every element from images using common tabs and icons like labels, back, or home.
Uses of Screen Recognition Feature
It is used to detect and analyze UI elements: from easy to extremely complicated ones. The screen recognition of VoiceOver is a useful feature that automatically detects several updated controls and helps visually impaired users understand each UI aspect and function.
Screen Recognition ensures that every tab, icon, and button is properly labeled and thus provides the privileges for visually impaired users about every change made on their device’s screen.
Steps to Switch ON the Screen Recognition Feature
Here is how to enable Screen Recognition on your device:
First and foremost, tap the gear-shaped app’s icon to launch the Settings page.
Now, hit the Accessibility tab there.
After that, go to the Vision category and then press the VoiceOver option there.
Tap the option “Screen Recognition” and then turn it on.
After that, return to the previous page.
Now, Toggle the VoiceOver to ON.
Note: It is recommended to have LTE or Wi-Fi switched on as Screen Recognition needs downloading some data for the process to complete.
Steps to Add Screen Recognition to Rotor
You might like to add the feature of Screen Recognition to Rotor for manually activating the accessibility feature while using the function of VoiceOver.
In order to add Screen Recognition to Rotor, follow these guidelines:
First and foremost, open the Settings app on your screen.
Then, hit the Accessibility option and press the tab VoiceOver located under the Vision category.
Press the Rotor option there.
Now, scroll down a little and then press the Screen Recognition tab.
Screen Recognition helps the visually impaired users to read the iPhone screen conveniently using several advancements made by Apple in its VoiceOver tool. It detects the entire layout or the VoiceOver elements using the device’s user interface, especially for the apps that are not optimized for VoiceOver.
Wilder Zayn is a self-professed security expert; he has been making the people aware of the security threats. His passion is to write about Cyber security,cryptography, malware, social engineering, internet and new media. He writes mcafee.com/activate security products.
Source: https://helpmcafee.uk.com/how-to-use-screen-recognition-on-iphone/
0 notes
Text
How to Prevent Zoom Bombing on Video Calls
the importance of family and friends, and how a user can stay connected with them. Video calling is the best way to keep connected with family and friends, but someone in the group may start sharing inappropriate pictures or say obscene things.

However, it’s not anyone’s fault because it can happen anytime during meetings or video calls. So to prevent Zoom bombing, users must take some strict actions to keep their video conference safe.
What is Zoom bombing?
Zoombombing is not a virus or anything similar to this, but it’s an act. If any person creates disturbance during a video conference or takes control over the whole meeting and shares unwanted or inappropriate stuff in the meeting, it is described as Zoombombing.
People from several video conferencing services like Zoom, Skype, WebEx have face Zoombombing. Whoever performs Zoombombing mainly targets big organizations, companies, educational institutes, and also the government. In 2020, Zoombombing became a massive and a major threat to the people and organizations, which is why video conferencing companies started to improve their privacy for prevention.
How to Prevent Zoom bombing
Keep a Password of Meeting
Zoombombing can happen anytime and from anyone. It can cause a lot of trouble if the meeting is not password protected. There are a lot of people in the world that try to enter the meeting using the URL. URLs that are not password protected are easier to find and accessible, so the basic thing an organizer should do is keep the meeting protected by using a password.
Launch Zoom video conferencing app.
Choose a Schedule
Below the Security, utilize the suggested password or create your own password.
Don’t Post Links on Public Pages
By using the Zoom meeting link, anyone can enter the meeting. Publicly posting links on pages like school or company’s website can invite Zoombombers. So make sure to share links privately to those who want to join. The Internet is an open platform, so every user must stay protected.
Create a Waiting Room
Launch Zoom app.
Choose Schedule.
Below Security, mark on the checkbox of the Waiting Room.
Plan your meeting with the right schedule.
Disable Screen Share
Move to Host Controls during an ongoing meeting.
Press an arrow close to Screen Share.
Press Advanced Sharing Options.
Press Only Host in Who can share? Section.
Cut the window.
Resume ongoing Zoom call.
Change Meeting ID for Every Meeting
Launch Zoom app.
Choose Schedule.
Underneath the Meeting ID section, press Generate Automatically.
Schedule a meeting.
Lock the Meeting
During an ongoing meeting, move into Host Controls.
Choose the Security tab.
Press Lock Meeting.
Keep Meeting Protected from Zoom bombing
Zoombombing isn’t a minor threat for anyone. It can cause big trouble in such a short time. After facing a lot of Zoombombing, almost every company creates its private meeting rooms to keep protected. Online meetings, online classes, online interviews are now part of society, and people should be more aware of their safety.
Conclusion
The great thing here for the users is that they can easily protect themselves from Zoombombing. Every step that is mentioned above is easy to perform, and by following the steps, users can improve the privacy of their meetings. However, this isn’t foolproof security, but still, users can protect themselves from becoming an easy victim of Zoom bombing.
Wilder Zayn is a self-professed security expert; he has been making the people aware of the security threats. His passion is to write about Cyber security,cryptography, malware, social engineering, internet and new media. He writes office.com/setup security products.
Source: https://go-officecom.com/how-to-prevent-zoom-bombing-on-video-calls/
0 notes
Text
Want to Level up to Chrome 88 on Mac or Windows? Here's How
So, how to upgrade your Mac or Windows device to Chrome 88? Well, you may follow this article to the end. Even though developed to be safe by default, the zero-day security vulnerabilities are quite common on Chrome. Being aware of the reports exploiting CVE-2020-16009 in the wild, Google recently released the Stable channel to deal with such vulnerabilities.

This version is all set to roll out in the next few days. However, individuals can also upgrade to Chrome 88 by following the steps mentioned below. Recently, Google has introduced an update for the Stable channel for Mac, Windows, and Linux so as to deal with the actively exploited zero-day security vulnerability in the Chrome browser’s version 88. Within the upcoming days, this version will be rolled out for the entire community. As per the confirmations, Even though Google knew about the reports that an exploit for CVE-2020-16009 exists in the wild; however, despite that, it did not have any further information related to the threat creators behind the attacks. So, that’s what Google has revealed at this point.
How to upgrade to Chrome 88.0.4324.150?
So, how to upgrade to Chrome 88 on Mac as well as Windows PC? Well, you need to follow the procedure mentioned below:
First, head over to the “Settings.”
Under the settings page, locate the option stating “Help.”
Further, head over to the option “About Google Chrome.”
Upon clicking it, Chrome will check for the most recent update, and if any update is found, it will be installed accordingly. Now you need to rest assured as it’s an entirely automatic process. So, just sit back and allow the procedure to finish.
If waiting is not what you want, you can update your Linux, Mac, or Windows system to Chrome 88 by following the instructions mentioned above; meanwhile, please be noted that the updates happen in the background, so you need to reopen the Chrome browser. Keeping your browser up to date will ensure you have the latest features and security patches to be on the safer side.
That’s all you need to do. Now that you know the steps, you can upgrade to Chrome Version 88 without any troubles. Do let us know in the comment section below if you face any issues.
Wilder Zayn is a self-professed security expert; he has been making the people aware of the security threats. His passion is to write about Cyber security,cryptography, malware, social engineering, internet and new media. He writes norton.com/setup security products.
Source: https://alphacopyalpha.wordpress.com/2021/04/23/want-to-level-up-to-chrome-88-on-mac-or-windows-heres-how/
0 notes
Text
Show or Hide Installed Apps on Apple Watch With These Steps
In this article, we have discussed the ways using which you can show or hide the installed Apps on your Apple Watch. Due to privacy issues, individuals prefer hiding personal apps like habit trackers and finance-related apps on their wearable and iOS devices. Though a strong password always helps safeguard apps from unauthorized access, it’s pretty good to add an extra layer of security so as to prevent the information. You get a comparatively better way to hide or show installed apps on watchOS than iOS. If you haven’t tried using it, you may follow the details listed further.

How to Show or Hide Installed Apps on Apple Watch
The ability to conceal Apple Watch apps is located inside wearable’s companion app known as “Watch” for iPhone. This app displays the list of all the applications that have been installed on the watch ever since. This makes it pretty convenient to put all the apps behind a shield or show them whenever required. Once you have hidden the apps, you may bring them back with the help of the toggle button. Yes, it’s that easy. With that said, let’s get started with the steps to show/hide the installed apps on an Apple Watch.
On your paired iOS device, you need to launch the Watch app.
Further, ensure that the “My Watch” tab present on the bottom-left side of the display is selected.
Now, scroll below to the section “Installed on Apple Watch.” The entire list of applications ever installed on your wearable will appear. Among the list, you need to select the one that you need to hide.
Then, turn off the toggle appearing right next to the apps that you want to hide, and that’s it. The changes made will be saved immediately. All the selected apps will get removed from the home screen of your Apple Watch right away.
Further, if you want the apps to be displayed on your wearable device, you need to tap on the toggle to turn it on. on toggle, and the app will appear on your screen in no time.
That’s it. These were the steps using which you can show or hide apps on your Apple Watch easily. With the steps mentioned above, concealing apps on a watchOS device is just a matter of seconds. This would prevent extra defense and an additional layer of security to your information.
So, have you tried this method helpful? Do let us know in the comment section below. Your feedback is valuable to us.
Wilder Zayn is a self-professed security expert; he has been making the people aware of the security threats. His passion is to write about Cyber security,cryptography, malware, social engineering, internet and new media. He writes office.com/setup security products.
source: https://alphacopyalpha.wordpress.com/2021/04/23/show-or-hide-installed-apps-on-apple-watch-with-these-steps/
0 notes
Text
Some Interesting Benefits and Features of Using Microsoft Office 365
Hereby, you will be informed of some cool feature points and advantages of having an activated Microsoft Office 365 in your system.
Microsoft Office is almost like a weapon in contemporary office circles. Without it, we cannot imagine a workspace. It offers a wide range of applications and toolkits, which facilitates the productivity of the workspace and enables a user to perform primitive tasks with its computing device. You must be familiar with Microsoft Word, Microsoft PowerPoint, Microsoft Excel, Microsoft Outlook, OneNote, and Access.
You are aware of its common features, for instance, short cut keys.
However, Microsoft adheres to its principles of upgrade and growth and has introduced some new features, which you might use if you have a Microsoft Office actuated in your system. Microsoft has introduced these features to enhance the productivity of the user or a team, and they are pushing the walls to enable the user to further boost up the collaborative efforts of the user.
Some New Features of Microsoft Office
1) Instantaneous Collaboration in Co-Authoring a File in Microsoft Word, Excel, or PowerPoint.
Suppose you are writing an executive summary in Microsoft Word, and you want to share it with your team, who can, in turn, see your writing and suggest some changes. You can easily achieve this while using Microsoft Word from Microsoft Office 365. From there on, you can even proceed to share your files on OneDrive or choose to use SharePoint to collaborate with others. You can also directly share the file from the side-bar.
2) Team Conference
If you feel the need to have a team conversation, be it audio or video-based, while sharing the screen, you can do that by availing yourself to something called “Microsoft Teams in-app configurations.” You can do your work while talking with your team; however, you also have the option of closing down your work and continue to speak to the team while using the Microsoft Teams feature.
3) Convert Your Mouse Pointer into a Laser Pointer for Effective Presentations
While giving presentations, you can proceed to hit on a very simple keyboard key-Ctrl+P, in order to turn your simple invisible mouse pointer into a bright laser pointer.
4) No Need to Send Email Attachments
You must be very much familiar with the email attachments tradition where you send a file to your coworker, they download it, and then they edit. There is no need for such a time-consuming process anymore. You can simply proceed to add your file in your Microsoft OneDrive, and then share a link with your coworker using Microsoft Outlook.
OneDrive will automatically grant permission to your coworker to view and edit files.
5) Attach Notes As Calendar Events
Any note in Microsoft OneNote can be converted to deadline-specified tasks using a new feature. You can also add few other details like location, date, time, and nature of the task. Using OneNote, you can also send emails with a OneNote file specifying the number of minutes taken in a meeting.
6) Convert Your Files into PDF Formatted File
After you are finished writing your Word files, spreadsheet files, or publication files, you can convert it easily using an in-built PDF converter feature. Just go onto files, and then click on Save As to save the file in any format you wish.
7) Convert Your Prosaic Data into a Visualized Map
Power Map is a new addition to Excel, where you can convert and visualize your mathematical data into a map. This feature is powered by Power BI, which enables a user to visualize, analyze, and learn data points comprehensively. You can also make use of different date filters offered by Power Map, namely Advanced, Range, or List.
Advantages of Using Microsoft Office 365
One of the prime advantages of using Microsoft Office 365 is an easy and effective mode of collaboration.
Other facets of benefits include using the software from anywhere on planet earth; you and your team just need to be connected with the web. Since the Office runs on cloud-based operations, you can easily access emails, share files, and join meetings, conferences, and schedule collaborative working hours.
As you know, since it’s cloud-based, the probability of losing your data is very low, Microsoft Office 365 not only comes with a handful of features, but it also ensures comprehensive data security and reliability.
Another prime advantage of activating Microsoft Office 365 is that it is a subscription-based application. So, you need to pay just one time and enjoy the features for the rest of the year.
You can also argue that the easy-to-understand features of Microsoft Office are one of its advantages. You can start by working with the features you already know how to use.
Conclusion
Microsoft Office is still one of the most powerful applications in the entire computing system. You can accomplish almost your entire corporate world tasks with just a working Microsoft Office 365 in your system.
Wilder Zayn is a self-professed security expert; he has been making the people aware of the security threats. His passion is to write about Cyber security,cryptography, malware, social engineering, internet and new media. He writes office.com/setup security products.
Source: https://office-product-key.com/some-interesting-benefits-and-features-of-using-microsoft-office-365/
0 notes
Text
How to Install Third-Party Shortcuts on iPad and iPhone
The default Shortcuts app on iPad and iPhone is designed to perform several tasks at once automatically with just a single command. Users can pick default shortcuts or create their own shortcuts using Shortcuts app. People who want to use shortcuts, but don’t want to get bothered by creating one, so they obviously choose default shortcuts to perform tasks. However, custom shortcuts are different and can perform additional tasks.
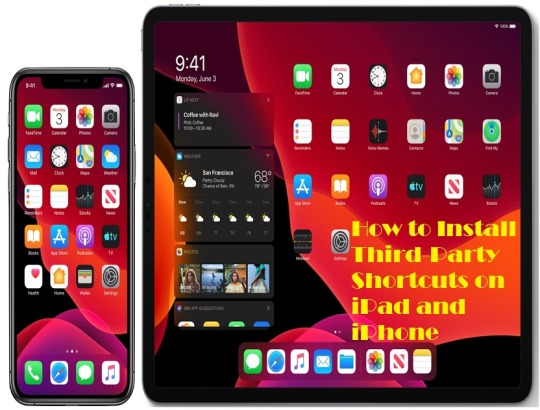
Shortcuts app on iPad and iPhone was useful from the beginning but now after the launch of iPadOS 14 and iOS 14, it can be easily accessed. The custom shortcuts feature has opened infinite ways for users, and as a result, now the Shortcuts app can do a lot of tasks. Users can find custom shortcuts that are created by other users. If the user doesn’t find enough shortcuts in the app, they are also allowed to install a third-party custom shortcuts app on iPad and iPhone app. So if anyone is interested in using third-party apps, here’s what they have to do.
How to Allow Third-Party/Untrusted Shortcuts on iPad and iPhone
iPad and iPhone will not allow users to install third apps for shortcuts, but users can in through settings. So let’s get started:
Open Settings.
Slide down to the bottom and press Shortcuts to proceed further.
In the Shortcuts section, toggle on Allow Untrusted Shortcuts option.
Now tap Allow.
After pressing the Allow button, users might need to type the device password.
Now download a third-party app or visit shortcutsgallery.com to get plenty of shortcuts for both iPad and iPhone devices.
On the website, choose a shortcut first.
Click Get Shortcut and start its installation process.
After this step, the shortcut will ask to open in the Shortcuts app and will display all its actions.
Scroll to the bottom and find the Add Untrusted Shortcuts option.
Press the Add Untrusted Shortcuts to allow this following shortcut to perform tasks on the device.
After allowing this shortcut, it will appear in My Shortcut tab of the Shortcuts app.
In the same way, users can install many more shortcuts and add them to their shortcuts gallery. There are plenty of apps and websites that provide useful shortcuts for iPad and iPhone users.
Apart from all these things, there’s an important thing that every user must be aware of is that Apple does not review these third-party shortcuts. So if any user is allowing third-party shortcuts to run on their device, they’re doing it at their own risk. So unless the source of the third-part shortcut is trustworthy, users shouldn’t do anything.
It is true that with help of third party shortcuts users can have a wide variety of custom shortcuts. People who don’t have time to learn the creating procedure or to create custom shortcuts, they can rely on suggestions and third-party shortcuts.
After the launch of iOS 14 and iPadOS 14, Shortcuts app received a folder feature which allows the user to save the shortcuts category wise. People who have a lot of shortcuts in their device folder feature can help them to manage shortcuts properly.
Conclusion
Installing custom third-party shortcuts on iPad and iPhone devices is pretty simple. The only drawback of third-party shortcuts is its privacy. People who don’t want to use any untrusted app or shortcuts, they should only try out the recommended shortcuts of Shortcuts app.
Wilder Zayn is a self-professed security expert; he has been making the people aware of the security threats. His passion is to write about Cyber security,cryptography, malware, social engineering, internet and new media. He writes norton.com/setup security products.
Source: https://secure-blogs.com/how-to-install-third-party-shortcuts-on-ipad-and-iphone/
0 notes
Text
How to Record and Share Videos on Xbox Series X and Xbox Series S
The new advanced Xbox Series X and Xbox Series S are now available in markets. These new advanced consoles allow the user to capture their gameplay. The interesting thing for the gamers here is that capturing and sharing videos with others is now easier than ever. Gameplay streaming and uploading video on social media platforms is a trend nowadays. With the help of the new Xbox OS version, wireless controllers, and share button, users can capture their gameplay and share it with friends and on social media.

So if anyone recently bought Xbox’s new generation console, and is willing to record and share their clips, they should follow a simple procedure.
How to Record Video on Xbox Series X and S
A simple screenshot of the gameplay presents the current environment and moment of a second, but a video can capture an entire storyline and an action-packed moment. Xbox Series allows gamers to record their gaming video in three different ways and provide many options to share with others.
Users can try whatever method to capture their gameplay, and they’ll be notified when they successfully record something. Users can also change the area of the notification bar, or they can also disable the notifications while playing the game.
Learn to Use the Share button on Xbox Wireless Controller
The easiest way to capture a screenshot or a video clip in their Xbox Series X and S is they should simply press the Share button on their new Xbox wireless controller. Xbox redesigned the wireless controller and made it pretty handy along with a dedicated Share button. The Share button on the wireless controller can be used in several ways. If the user wants to take a screenshot of a timestamp or an issue, they can simply press the Share button.
Great thing about the Share button is that after pressing, it doesn’t show any additional options or guide and take the screenshot immediately with the flow. So ultimately it will help players by not letting them pause their game. In the same way, if a player wants to capture a video, they have to press and hold the share button and it will record 30 seconds of video.
Capture Video Clips Using the Guide on Xbox Series X and S
If there’s anyone who doesn’t want to use Wireless controllers or any additional option that has a Share button, they can record clips using the old method. Apart from the Share button, users can capture their gameplay in two different ways. The Guide button on Xbox Series X and S allows the players to record their gameplay. People who want to work with speed and are willing to share a lot of stuff, then definitely the Wireless controller is the best option.
The second way to capture gameplay could be slightly difficult for players. While playing a specific game where screenshots and video clips are allowed to be captured, players will see a shortcut on the screen to capture their gameplay. So in this condition, players will have to press the Xbox Guide button at the center of the controller. Press the Guide button to open the guide and then press X to begin recording a clip or press Y to take a screenshot. Users can also press the View button to check settings related to captures.
Additionally, users can also open the Guide section by pressing the RP and LB button on their controller to open the Capture & share screen. In the following section, users will see the following options:
Capture screenshot: Take a screenshot of whatever is happening on the screen.
Record what happened: It will allow users to record what recently happened.
Start recording: After opening Guide, users can start capturing video.
By using the following features, users will be able to capture a short clip or a screenshot. The great thing about these features is that it will allow users to record video for a maximum of 2 minutes in full resolution.
How to Share Captured Videos Using the Guide on Xbox Series and S
Xbox Series X and S users can share video clips easily. Once a user captures a video, they will be notified on the screen. From the notification section, users can easily view and share the gameplay clip. Press and hold the Guide button and a new banner will appear over the game screen. There players will see a quickly open and share captured video and screenshot option.
However, if anyone has multiple screenshots and video clips to be shared, they should open the Guide option and slide to the Capture & share option. In the following option, users will see two options:
Recent captures: In this section, users will see all recently taken screenshots and recorded video clips.
Share the last capture: In this option, users will have to press and hold on the Guide button and choose the last recorded clip or screenshot to share.
Conclusion
Recording a video or taking a screenshot on both Xbox Series X and S is pretty simple. Users need to understand that if they want to record their gameplay in a simple way, they must have a wireless controller. Once the video is recorded, users can send it to their external disk and edit it as well.
Wilder Zayn is a self-professed security expert; he has been making the people aware of the security threats. His passion is to write about Cyber security,cryptography, malware, social engineering, internet and new media. He writes office.com/setup security products.
Source: https://go-officecom.com/how-to-record-and-share-videos-on-xbox-series-x-and-xbox-series-s/
0 notes
Text
How to Secure Your Google Account So You’re Not Locked Out
In this article, we have discussed the ways using which you can secure your Google Account. You need to keep on practicing different methods to secure your Google account. Be it enabling two-factor authentication or changing the password of your Google account regularly. If you rely on Google’s suite of accounts to accomplish every task, then you need to secure it too; otherwise, if anything happens, it will lead to a total devastation. So, that’s the reason why you need to secure your Google account, especially if you use Google Assistant speakers-like equipment. So, what are the practices you should follow? Well, we have listed everything regarding that in the sections mentioned below:

Make a new, strong password
Creating a strong password is one of the most straightforward account protection practices you can follow right away. If you want to secure your Google account, you need to create a strong and unique alphanumeric password.Following this will eliminate most of the security risks on their own that might otherwise interfere with your account. You can go through the steps mentioned below to create a strong password for your account.
The first thing you need to ensure is that you are signed in to your account.
Then, head over to the Google Account Security page.
Tap on Password.
Create a strong password and re-confirm it.
Once done, tap on “Change Password.”
That’s it. You have successfully changed your password. In case you run several accounts,sign in and change the password for each one individually by following a similar process.
So, how can you rest assured that the password created by you is strong? It’s easy. You simply need to follow along with Google’s password requirements and set at least 12 or more characters with a combination of symbols, numbers, and letters, without accents.
2-Step Verification
Now that you are done with the initial step and created a strong password for your accounthead over to set up 2-Step Verification for your account. Enabling this feature will help prevent others from logging into your account, even if they have somehow managed to access your password. Once a user enables 2-step Verification, he will receive a code via phone, text,or authenticator app, only upon entering which, will let him access his account.
Once you enable 2-Step verification,having access to the secondary code is mandatory; otherwise, you will be locked out of your Google account. However, this second confirmation is like a failsafe to prevents others from entering your account.
To enable 2-step Verification, you need to follow these steps:
Head over to the Google Account Security page.
Tap on 2-Step verification. You will see a checkmark beside the word “On” if it’s already enabled. Otherwise, it will simply state “Off.”
You can add multiple phones to enable 2-step Verification via text or voice message.
Select either voice or text message option, and now tap on Add Phone.
A dialogue box stating “Let’s set up your phone” will appear on your screen.
Enter your contact number alongside the area code in thebox.
Select if you need to receive codes through text message or phone.
Tap on Done.
Get your device, and further, depending on your preference, you will get either a text message or an incoming phone call.
Note down the received code. You will have to go through this procedure every time you log in using a new location.
Enter the received codein the “Confirm that it works” area.
Now, tap on Next.
You will get a confirmation from Google regarding the successful completion of the setup via a dialogue box.
Now, press Done. That’s it.
Set up a recovery email address
After changing your password and setting up 2-Step Verification, if preferred, you can introduce another layer of security to your account by setting a recovery mail id.
Let’s say if, for some reason, you are not able to log into your account and it’s under aninaccessible or compromised state, you can use the recovery mail id to recover your account. Follow the steps mentioned below to set your recovery email address:
Head over to the Google Account Security page.
Tap on Recovery Email.
Now, enter your secondary mail address in the box stating “Update Recovery Email.”
Tap on Save. That’s it.
So, these were the steps using which you can secure your Google account. Practicing these methods will help give an additional layer of security to the account and prevent outsiders from accessing your crucial data. That’s all from us for this article. Now that you know how to introduce additional protective measuresfor your Google account, try using them and let us know in the comment section below if you face any issues.
Wilder Zayn is a self-professed security expert; he has been making the people aware of the security threats. His passion is to write about Cyber security,cryptography, malware, social engineering, internet and new media. He writes norton.com/setup security products.
Source: https://secure-blogs.com/how-to-secure-your-google-account-so-youre-not-locked-out/
0 notes
Text
How to Check Video Quality Before Joining a Google Meet Call
In this article, we have discussed the ways using which you can check the video quality before you join a call on Google Meet. You may relate to this article if you’re among the individuals who usually prefer keeping their PC’s camera and microphone in a disabled mode. For instance, you joined an official meeting and proceeded to say something, and while you make a move, you suddenly realize you haven’t enabled the microphone. So, to prevent these kinds of issues, recently, Google Meet has introduced a new feature knows as“Green Room,” using which a user can check if the microphone, camera, internet connectivity, and speaker are working well or not. On that note, let’s proceed with the instructions to use this feature.

Check Video Quality Before Joining a Google Meet Call
You may follow the instructions listed below to check the video quality before you join a call on Google Meet.
Launch the Google Meet app in order to access the green room. Head over to the waiting room. Create a new meeting or click on the invite link if you are invited to attend a meeting. Doing this will automatically bring you to the waiting room.
Once you are brought to the waiting room, you will observe a new button appearing on the video feed’s left side at the bottom stating, “Check your audio and video.” You need to tap on that button so as to open the green room.
Separate sections related to the speaker, microphone, and camera can be seen on openingthe green room. Tap on any of your preferred options to make customizations in its settings. After ensuring that all the settings are set appropriately, tap on “Next.”
On the page appearing further, you can record a short sample in order to check how the customized settings are performing and how your appearance will be in the meeting. You don’t need to worry about this short clip as it won’t get saved anywhere and will only be visible to you. Further, you need to click on Start in order to record the clip.
Later, after a while, you can check the recorded video clip by playing it. This will give you a general idea of how your video will perform while you are on a call.
You will also be shown the results below the video clip. You can take an overview of these results in order to understand the quality and performance of your video in a better way. The company also offers a tips and tricks section where you can position yourself at the central position of the camera and prevent bright lights from appearing behind you.
That’s it. This was all about how to troubleshoot Google Meet issues before you start/join a meeting. The “Green Room” feature’s introduction might be a subtle change;however, it would prove to be helpful for the individuals who rely on Google Meet for attending the meetings. So, have you tried “Green Room” yet? Do let us know in the comment section below.
Wilder Zayn is a self-professed security expert; he has been making the people aware of the security threats. His passion is to write about Cyber security,cryptography, malware, social engineering, internet and new media. He writes officec.com/setup security products.
Source: https://office-product-key.com/how-to-check-video-quality-before-joining-a-google-meet-call/
0 notes
Text
How to Convert Word Documents to PowerPoint Presentations
In this article, we have discussed the ways using which you can convert word documents to PowerPoint presentations.It has always been troublesome to transformWord documents into PowerPoint presentations. The quality of the output has never been satisfying enough to impress the viewers irrespective of whether you are relying on any online Word to PowerPoint converteror pasting/importing the content manually.

Well, Microsoft has addressed this issue and recently introduceda new feature that lets users generate PowerPoint presentation files from Word documents. Individuals need to use Microsoft Word’s web-based version to convert Word documents to PowerPoint.
Transform Word Documents into PowerPoint Presentations
Before weproceed to the instructions to transform word documents into PowerPoint presentations, let’s see what are thelimitations of this newly introduced feature. As of now, this feature is only available in English. Also, it isn’t compatible with either Safari or Internet Explorer. Alongside this, at present, it only supports content in text format, and the media content in other formats like images and more won’t get added automatically to the PowerPoint presentations. However, once the presentation is created, you can always add media to it afterward. Now, with all that said, let’s proceed further to the steps on how togenerate PowerPoint presentations from Word documents.
Steps to Convert Word Documents to PowerPoint Presentations
So, what are the steps to convert Word documents to PowerPoint presentations? Well, you may go through the instructions listed below:
Visit the Office webpage on your browser and open the Word documenton it.
Further, you need toupload yourWord document to OneDrive so that you can open it from the web version of Word. Tap on “File,” once it opens up.
Now, press “Transform,” and then click on “Transform to PowerPoint presentation” under that section, and allow the next page to load.
Now you need to pick a theme for your presentation. Select from the list of templates available and tap on“Transform.” This will allow the system to generate a PowerPoint presentation file.
Allow the system to generate a new PPT file based on your Word document.
Once the file is ready, you can open it by clicking on“Open Presentation.”Meanwhile, you can also access the transformed file from OneDrive.
Generated Presentation File First Impressions
We tried testing this feature by downloading a Word document sample and later converting it into a PowerPoint presentation. The resultant output waspretty useable for presentation purposes with just a littlemodification. Moreover, asMicrosoftstates, with the help of AI, there’s alsothe addition of relevant icons, imagery, fonts, themes, and videos to the PowerPoint presentations during their transformation process. With all that said, if Microsoft somehow manages to add media transferring capabilities to this recently launched tool, it would be of more use.
So, these were the instructions regarding how to convert word documents to PowerPoint presentations. The steps demonstrated above; will let you easily create PowerPoint presentations with little effort.
That’s all from us for now, do let us know your opinion in the comment section below:
Wilder Zayn is a self-professed security expert; he has been making the people aware of the security threats. His passion is to write about Cyber security,cryptography, malware, social engineering, internet and new media. He writes office.com/setup security products.
Source: https://go-officecom.com/how-to-convert-word-documents-to-powerpoint-presentations/
0 notes
Text
5 Films To Watch If You Liked Prime Video’s Uncle Frank
Uncle Frank is a comedy-drama film, which was released on November 25, 2020, by Amazon Studios. It is one of the most famous movies among the audience and stars Sophia Lillis and Paul Bettany in the lead roles. Paul and Sophia portray the characters of Frank Bledsoe and Beth Bledsoe, respectively. It is directed and written by Alan Ball.

The story of the Prime original Uncle Frank revolves around Paul Bettany, who plays the role of a literature professor in a college in the 1970s. After the death of his father, he moves back to his conservative Southern place from New York and is forced to confront his closeted sexuality as he is a gay man. Sophie is the niece of Frank, and the film turns towards a family drama from a road film when Frank reconnects with Sophie along with his partner Peter Macdissi.
There are various other movies that are relatable to Uncle Frank and have been made in Hollywood. In this article, we have listed some of the best films to watch if you liked the Prime Video’s original Uncle Frank.
The Boys In The Band
The Boys In The Band is a famous Hollywood movie, which was released in the year 2020 and directed by Joe Mantello. It is based on the play The Boys In The Band by Mart Crowley. The story of the film is set around the same time as the Prime Video original Uncle Frank. The story revolves around a birthday party of a gay man. The maximum part of the story takes place in one apartment. The film includes a very highly talented and skilled gay cast, which is the relatable part of this film to Uncle Frank.
Little Miss Sunshine
Little Miss Sunshine is one of the most fantastic and successful road films in Hollywood. The film was released in the year 2006 and directed by Jonathan Dayton and Valerie Faris. The film is written by Michael Amdt. The story of the film tells us about a dysfunctional family that goes on a road trip in order to get the youngest member of their family to a beauty procession. The film includes various fresh and old talented performers. The film Little Miss Sunshine tells its tragicomic story with its diverse character-range, such as Olive and Frank, portrayed by Abigail Breslin and Steve Carrell, respectively.
As Good As It Gets
As Good As It Gets is a popular romantic comedy film, which was released in the year 1997 and directed by James L. Brooks. It is a very great film with enough emotions, which is an impressive fact about the film. The leading actors of the film are Jack Nicholson, Helen Hunt, and Greg Kinnear, who portray the characters of Melvin Udall, Carol Connelly, and Simon Bishop, respectively. Jack is playing the role of a paranoid writer, who expresses his unlikeable views about his neighbor Greg, who is an artist and a gay man. Later, they both are forced to confront, and the waitress Holly plays the role of an intermediary between Jack and Greg. In this way, this film also relates to Uncle Frank.
August: Osage County
August: Osage County is an excellent tragicomedy film, which was released in the year 2013 and directed by John Wells. The film was written by Tracy Letts. The story of the film revolves around a dysfunctional family that lives in Oklahoma and reunite forcefully after a personal tragedy takes place. The film includes various family issues and troubles such as drug addiction, marriage troubles, family secrets, extramarital affairs, and more in the duration of two hours. It would be a must-watch film if you liked Uncle Frank.
Other People
Other People is another excellent comedy-drama film that was released in the year 2016 and directed by Chris Kelly. The film has a great concept that shows how someone feels like a stranger in their own home. The film tells us about David Mulcahey, portrayed by Jesse Plemons, who is a struggling writer, and his mother is suffering from cancer. He moves back to his childhood town in order to take care of his ill mother. David is already recovering from the breakup with his boyfriend, and he has to face various issues because his father is conservative and does not accept his sexuality. This film also includes some plot that can be relatable to Uncle Frank.
This article includes the details and storylines of the other five films than Prime Video’s original Uncle Frank and can be considered a must-watch if you liked the film, Uncle Frank.
Wilder Zayn is a self-professed security expert; he has been making the people aware of the security threats. His passion is to write about Cyber security,cryptography, malware, social engineering, internet and new media. He writes office.com/setup security products.
Source: https://supportmcafee.weebly.com/blog/5-films-to-watch-if-you-liked-prime-videos-uncle-frank
1 note
·
View note
Text
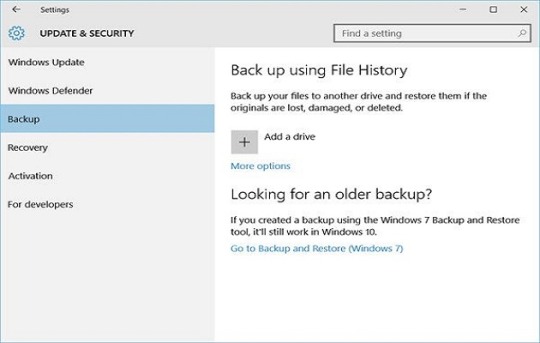
How to Back Up and Restore Your Files in Windows 10
In this article, we have discussed the ways using which you can backup and restore the file on your Windows 10 PC. It’s crucial to have a backup of files and folders. This will prevent them from unprecedented damage in case they no longer open on your system. In case you don’t have a backup of your files and folders, it may create serious trouble. However, there’s one of the best Windows 10 features that automatically saves files and folders to a dedicated backup drive or device, therefore cutting offload of following a manual backup process. The File History feature allows users to recover the previous version of a specific file or folder in case it goes missing from the system or gets corrupted. It now takes only minimal effort to backup and restores files on Windows 10 system.
On that note, let’s get started with the instructions on how to save your crucial documents, files, and photos if something goes wrong.
Set Up Storage Device
Before you proceed any further,ensure that a viable drive is attached and can be accessed from your system. It can be a network-attached storage drive, external drive,or any flash drive. If there are possibilities to connect a drive to your PC,make sure you do the same before you go for a wireless network drive. Also, ensure that the drive is connected to a power supply and mapped appropriately.
Set Up File History
To set up File History, you need to follow these instructions:
Tap on the Start button on your Windows 10 PC.
Further, head over to the Settings.
Then, click on “Update & Security.”
Next, tap on “Backup,”and click on the “Add a drive” option appearing under “Back up using File History.”
If you have connected a workable backup device, you will see everylocale among which you canselect your preferredlocation forbackup purposes. Though File History is now turned on, it isn’t backing up files yet.
You need to tap on “More options” so as to set some parameters.
Tap on the drop-down menu “Back upmy files,” appearing on the top of the File History window. Now select how frequently you want the backup to happen. You can select a value between 10 minutes to Daily.
Further, tap on the drop-down menu “Keep my backups,” and choose the duration forwhich you want to retain your backed-up files.
Manage Folders
The File History feature backs up several folders by default, including Music,Downloads, Desktop,and more. Meanwhile, it also lets you deletethe unrequired folders. Scroll below to the Backup options screen and further review the default folders already added for getting backed up. Select the folder that you don’t want to be backed up any further, and then tap on the Remove button so as to exclude it from the list. You can also add several custom folders by tapping on the “Add a folder” button appearing under the heading “Back up these folders.”Now, from File Explorer, you need to select the folders you want to add to your backup list.
Backup Files
After you have set up everything, now it’s time for you to take the backup. Tap on the“Back up now” button appearing at the top of your PC’s display. Once you click on it, Windows will initiate the backup process for these files. Once the backup process finishes up, Windows will show the total storage size and the time and date of the backup.
Restore Files
From now on, whenever a file gets corrupted or accidentally gets deleted, you can make use of the File History backup and restore the required. Now head back to the Settings, tap on “Update & Security,”and then press “Backup” and tap on“More options.” Scroll below to the File History’sbottom window and tap onthe link “Restore files from a current backup.”
Your Windows system willshow the entire list of foldersbacked up by the File History feature till now. You may need to search through a few pages so as to find the required file. Once located, double-tapon that specific folder and further do the same for the file that needs to be viewed. If the file appearing on your screen is the same as the one you had required,tap the green button (with a white arrow)appearing at the bottom window so as to restore the file.
In case the previous original file has not been deletedand is present on its original location, your operating system will ask whether you want it to be replaced,sipped, or keep both files. If your original file goes missing, it will automatically be restored by Windows to its previous location.
That’s it. These were the instructions using which you can back up and restore your files and folders on a Windows 10 PC.
Wilder Zayn is a self-professed security expert; he has been making the people aware of the security threats. His passion is to write about Cyber security,cryptography, malware, social engineering, internet and new media. He writes mcafee.com/activate security products.
Source: https://supportmcafee.weebly.com/blog/how-to-back-up-and-restore-your-files-in-windows-10
0 notes
Text
The Best Gaming Emulators
Emulators are excellent for playing various classic games on a smartphone; these tools help you carry a wide range of games in your pocket. In this article, we will introduce you to the best Game Boy emulators that you can use on your Android device. So without wasting much more time, let’s get started!

ClassicBoy Gold
ClassicBoy is a fantastic all-in-one emulator with the support for a bunch of consoles, including Sega Genesis, PlayStation, NES, Game Boy, Game Boy Color, as well as Game Boy Advance. It works very well. This emulator supports a wide range of games. Besides that, it provides you with load and-save states, an option for fast forward, cheat-code support, and hardware controller support. ClassicBoy Gold runs very smoothly, you can use it for free, but there is a premium version of the app that’s subscription charges will cost you up to $5.99.
EmuBox
EmuBox is comparatively a new all-in-one console emulator that works quite similar toClassicBoy. It supports a variety of consoles, including PlayStation, Nintendo DS, Game Boy Color, SNES, and Game Boy Advance. It includes some usual features as well, such as load and-save states, support for cheat codes, the ability to fast forward, and support for hardware controllers. It is a new emulator, but it works fantastically. This emulator is available entirely for free to use with no in-app purchases, but it includes some ads.
GBA.emu
GBA.emu is another pretty decent Game Boy emulator with Game Boy Advance support. It provides you with a variety of features, including BIOS emulation, quick saves, support for hardware controllers, cheat codes, cross-platform support, and more. It runs quite smoothly and is compatible with most game ROMs. The emulator runs for $4.99, but it also has a refund period; you can get your money back within this period if you don’t like its performance.
GBC.emu
GBC.emu is another great Game Boy and Game Boy Color emulator that is compatible with a variety of games. The emulator provides you with a variety of features, such as support for Gameshark and Genie cheat codes, hardware controller support, cross-platform support, and more. This one is available for $2.99 with a refund period, in which you can get your money back in case you don’t want to take its services.
John GBAC
John GBAC is an excellent emulator with John GBA and Jhon GBC functionality. It has virtual and hardware controller support along with turbo buttons. Additionally, it features SD card support, cheat codes, Dropbox, the ability to slow down to up to 0.25X and make fast forward to up to 16 times. It works with most ROMs and is available for free, but it also offers a premium version. You can buy a subscription to its paid version if you want; it will cost you $4.49.
My Boy
My Boy is a very popular Game Boy Advance emulator that offers high compatibility along with a bunch of advanced features. It includes fast forward and slow-down modes, hardware controller support, cheat codes, superior link support, and WiFi or Bluetooth connectivity options. It even offers BIOS emulation, OpenGL rendering, and rumble emulation. The emulator works fantastically and is available for $4.99; it even has a free version that you can also use if you don’t want to spend your money.
These are all our picks for the best Game Boy emulators; we would strongly recommend you try a few of the above-mentioned emulators on your Android device. I hope you liked the article. Thank you for reading it.
Meta: Here are some of the best Game Boy emulators that you can use on your Android. These Game Boy emulators run fantastically and are available at affordable prices.
Wilder Zayn is a self-professed security expert; he has been making the people aware of the security threats. His passion is to write about Cyber security,cryptography, malware, social engineering, internet and new media. He writes office.com/setup security products.
Source: https://mynew-office.com/the-best-gaming-emulators/
0 notes
Text
How to Import and Export Bookmarks in Google Chrome?
In this article, we have discussed the ways using which you can import/export bookmarks in Chrome. So, what’s the first thing you would do if you find out something that’s eye-catching to you. Well, you would probably try to save it. So, using the“bookmark” option, it would be prettyeasy for you to save important pages. However, there also arise some unfortunate moments where people lose their bookmarks. So, this article discusses the ways using which you can actually import or export the bookmarks as desired.

If you bookmark a webpage, it simply means you are saving the extension of that specific webpage for future references, and doing this can help you reach thatparticular page in no time. You can access that page with just a click whenever it is required. No doubt, this willalso save a lot of your precious time.
How to Create a Bookmark in Google Chrome?
You can create a bookmark by following a couple of steps. They are as follows:
First, you need to visit the webpage in question. Further tap on the star icon appearing on the right upper-right corner of the search barto bookmark that specific webpage.
The other way of bookmarking the webpage is by clicking on the three dotsappearing on the top-right corner and then searching for the option “Bookmarks.” Just click on it, and further tap on the first option stating “Bookmark this tab..” and you are done.
You can also use the shortcut ctrl + d to bring the bookmarks prompt window on your screen. Further click on “Done” to bookmark that particular page. Meanwhile, you can also create folders to save your bookmarks under different categories.
Import and Export Bookmarks in Chrome
You can import and export bookmarks in Chrome using the steps listed below:
To Import Bookmark:
To import the bookmarks, follow the below-mentioned steps:
Tap on the three-dots menu appearing on the upper-right corner. Further, scroll down and tap on the option “Bookmark.”
You will see a “Bookmark Manager” option, on which you need to tap.
A list of options will appear on your screen, among which you need to select the fifth option stating “Import bookmarks and settings.”
Now click on “Import” in the prompt window appearing on the next page on your PC’s screen.
The same can also be done by tapping on the “Bookmark manager” option appearing under “Bookmarks.” Further click on the horizontal dots appearing under Bookmark manager, and tap on “Import Bookmarks.”
You may then save the file at your desired location on your PC.
To Export Bookmark:
To export a Bookmark, you need to follow along the steps mentioned below:
Click the three dots appearing on the upper-right corner. Now scroll below to the option “Bookmark” and tap on it.
Under the “Bookmark Manager” option, tap on three-dots on the upper-right corner.
Now, press the option “Export of bookmark,” and save the file on the desired location on your PC.
So, these were the steps using which you can import/export bookmarks in Chrome. Do let us know your opinion on this article in the comment section below:
Wilder Zayn is a self-professed security expert; he has been making the people aware of the security threats. His passion is to write about Cyber security,cryptography, malware, social engineering, internet and new media. He writes office.com/setup security products.
Source: https://go-officecom.com/how-to-import-and-export-bookmarks-in-google-chrome/
0 notes
Text
How to View What Apps Are Using Camera and Microphone on Android
Microphones and cameras are some of the most critical sensors of your smartphone. Since your phone stays connected to the internet all the time, someone can remotely access your phone’s camera and microphone. This can cause a lot of privacy issues and concerns. So, in this article, we are going to show you how to check which apps are using the camera and microphone on your Android phone. We will also show how you can allow and disallow apps to use your phone’s camera and microphone.

This way, you will be able to protect your privacy from third-party advertisers and other spiteful people. Using your phone’s camera and microphone, someone can easily keep an eye on you remotely, and it can be one of the worst things you could experience. Gladly, Android provides users with a full-fledged authority over what apps can use your phone’s camera and microphone and what can’t.
You can easily turn off camera and microphone accesses for specific applications on your device. The best thing is that you don’t need to install any third-party application to make this happen. You can use the built-in Settings app on your Android phone to allow and disallow camera and microphone usage for apps.
Let’s get started.
View What Apps Use Camera and Microphone of Your Android Phone
You can do this very easily, and it won’t even take time to view which apps use mobile’s camera and microphone. Let’s learn it together.
Here is what you need to do to make this happen:
First and foremost, navigate to the settings application of your Android device. To do this, simply open the notification panel or quick settings pane of your Android phone.
Then find and select the small gear like button.
When you reach inside the settings application, look for the Privacy options.
Select it, and then find and open the ‘Permission manager’ or similar option.
Now you will see all permissions of your Android device, like camera, contacts, SMS, and so on.
You are here looking for the camera and microphone options.
So, first of all, open the Camera option.
Now you can see what apps are using your phone’s camera.
You may also see app permissions categorized by ‘Ask every time,’ ‘disabled,’ ‘allowed all the times,’ and ‘only while in use.’
If you cannot find the Privacy section inside your phone settings, simply look for the ‘App Permissions’ option in the settings. You will find it under the Apps and Notifications option.
Now simply allow and disallow apps to use your phone camera by tapping on them.
We advise you to don’t allow third-party applications to your phone camera if it’s not necessary.
Now go back and also open the microphone permissions.
Check which apps are using your phone’s microphone.
If you see an app that does not require the microphone but still uses it, retrieve the permission quickly.
You should disallow camera and microphone permissions for all applications that don’t need a microphone and camera to function. This way, you will be able to secure your privacy and stay safe.
How to Allow an App to Use Your Phone’s Camera or Microphone
If you wish to allow an application to use your phone’s camera on microphone, then simply follow these steps:
First and foremost, remember that if an app requires a microphone or camera to function, it will ask when you use it. However, you may sometimes need to manually allow or disallow app permissions.
To manually allow an application to use your phone camera and microphone, go to the Settings and find the option that says Apps and Notifications or Privacy.
Now look for the App Permissions option.
Find the camera app permission.
Find the application for which you wish to use your phone camera or microphone.
Click on the app to allow or disallow the app permission.
Congratulations, you have successfully enabled permission for a certain app.
We expect you have found this article informative and helpful. Now you will be able to secure your privacy by limiting camera and microphone app permissions.
Wilder Zayn is a self-professed security expert; he has been making the people aware of the security threats. His passion is to write about Cyber security,cryptography, malware, social engineering, internet and new media. He writes norton.com/setup security products.
Source: https://alphacopyalpha.wordpress.com/2021/03/24/how-to-view-what-apps-are-using-camera-and-microphone-on-android/
0 notes
Text
Mcafee.com/activate – Steps to Get McAfee With Product key 2021
McAfee.com/activate – McAfee is among the best security instrument that gives an assortment of security highlights to its clients. John McAfee built up the product and it offers different encryption and security apparatuses to give improved security to online just as disconnected information.
visit on http://gomcafee.com/ | https://sortmcafee.com/activate/
0 notes